Download code from GitHub
Chapter 1: Getting Started with spaCy
In this chapter, we will have a comprehensive introduction to natural language processing (NLP) application development with Python and spaCy. First, we will see how NLP development goes hand in hand with Python, along with an overview of what spaCy offers as a Python library.
After the warm-up, you will quickly get started with spaCy by downloading the library and loading the models. You will then explore spaCy's popular visualizer displaCy by visualizing several features of spaCy.
By the end of this chapter, you will know what you can achieve with spaCy and how to plan your journey with spaCy code. You will be also settled with your development environment, having already installed all the necessary packages for NLP tasks in the upcoming sections.
We're going to cover the following main topics in this chapter:
- Overview of spaCy
- Installing spaCy
- Installing spaCy's statistical models
- Visualization with displaCy
Technical requirements
The chapter code can be found at the book's GitHub repository: https://github.com/PacktPublishing/Mastering-spaCy/tree/main/Chapter01
Overview of spaCy
Before getting started with the spaCy code, we will first have an overview of NLP applications in real life, NLP with Python, and NLP with spaCy. In this section, we'll find out the reasons to use Python and spaCy for developing NLP applications. We will first see how Python goes hand-in-hand with text processing, then we'll understand spaCy's place in the Python NLP libraries. Let's start our tour with the close-knit relationship between Python and NLP.
Rise of NLP
Over the past few years, most of the branches of AI created a lot of buzz, including NLP, computer vision, and predictive analytics, among others. But just what is NLP? How can a machine or code solve human language?
NLP is a subfield of AI that analyzes text, speech, and other forms of human-generated language data. Human language is complicated – even a short paragraph contains references to the previous words, pointers to real-world objects, cultural references, and the writer's or speaker's personal experiences. Figure 1.1 shows such an example sentence, which includes a reference to a relative date (recently), phrases that can be resolved only by another person who knows the speaker (regarding the city that the speaker's parents live in) and who has general knowledge about the world (a city is a place where human beings live together):
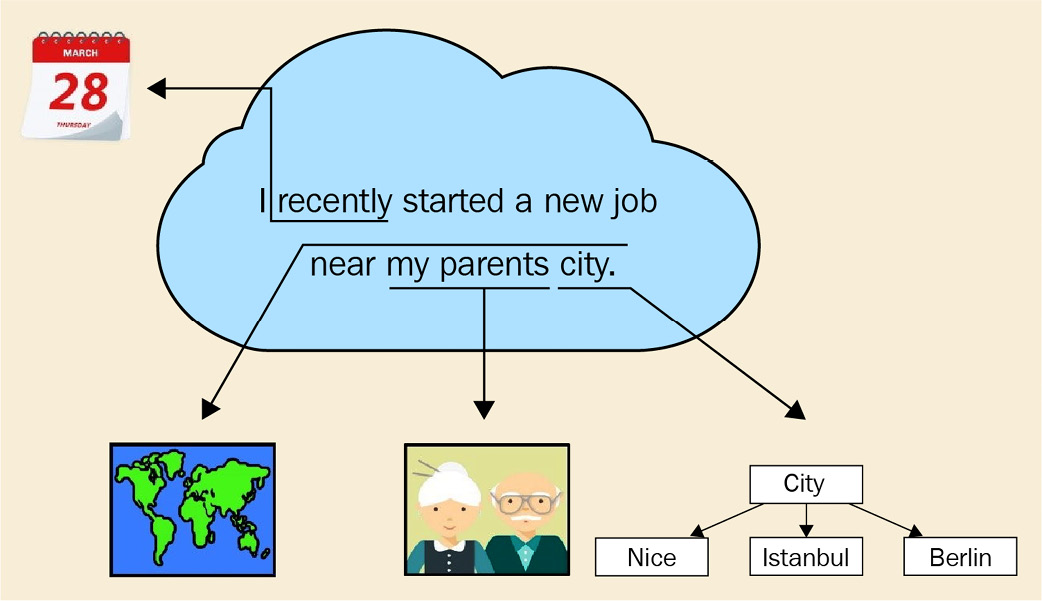
Figure 1.1 – An example of human language, containing many cognitive and cultural aspects
How do we process such a complicated structure then? We have our weapons too; we model natural language with statistical models, and we process linguistic features to turn the text into a well-structured representation. This book provides all the necessary background and tools for you to extract the meaning out of text. By the end of this book, you will possess statistical and linguistic knowledge to process text by using a great tool – the spaCy library.
Though NLP gained popularity recently, processing human language has been present in our lives via many real-world applications, including search engines, translation services, and recommendation engines.
Search engines such as Google Search, Yahoo Search, and Microsoft Bing are an integral part of our daily lives. We look for homework help, cooking recipes, information about celebrities, the latest episodes of our favorite TV series; all sorts of information that we use in our daily lives. There is even a verb in English (also in many other languages), to google, meaning to look up some information on the Google search engine.
Search engines use advanced NLP techniques including mapping queries into a semantic space, where similar queries are represented by similar vectors. A quick trick is called autocomplete, where query suggestions appear on the search bar when we type the first few letters. Autocomplete looks tricky but indeed the algorithm is a combination of a search tree walk and character-level distance calculation. A past query is represented by a sequence of its characters, where each character corresponds to a node in the search tree. The arcs between the characters are assigned weights according to the popularity of this past query.
Then, when a new query comes, we compare the current query string to past queries by walking on the tree. A fundamental Computer Science (CS) data structure, the tree, is used to represent a list of queries, who would have thought that? Figure 1.2 shows a walk on the character tree:
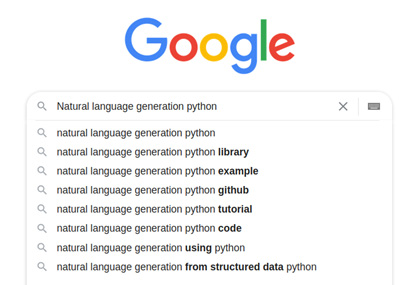
Figure 1.2 – An autocomplete example
This is a simplified explanation; the real algorithms blend several techniques usually. If you want to learn more about this subject, you can read the great articles about the data structures: http://blog.notdot.net/2010/07/Damn-Cool-Algorithms-Levenshtein-Automata and http://blog.notdot.net/2007/4/Damn-Cool-Algorithms-Part-1-BK-Trees.
Continuing with search engines, search engines also know how to transform unstructured data to structured and linked data. When we type Diana Spencer into the search bar, this is what comes up:
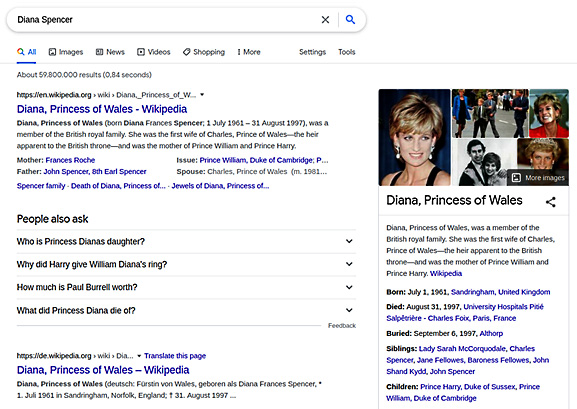
Figure 1.3 – Search results for the query "Diana Spencer"
How did the search engine link Diana Spencer to her well-known name Princess Diana? This is called entity linking. We link entities that mention the same real-world entity. Entity-linking algorithms concern representing semantic relations and knowledge in general. This area of NLP is called the Semantic Web. You can learn more about this at https://www.cambridgesemantics.com/blog/semantic-university/intro-semantic-web/. I worked as a knowledge engineer at a search engine company at the beginning of my career and really enjoyed it. This is a fascinating subject in NLP.
There is really no limit to what you can develop: search engine algorithms, chatbots, speech recognition applications, and user sentiment recognition applications. NLP problems are challenging yet fascinating. This book's mission is to provide you a toolbox with all the necessary tools. The first step of NLP development is choosing the programming language we will use wisely. In the next section, we will explain why Python is the weapon of choice. Let's move on to the next section to see the string bond of NLP and Python.
NLP with Python
As we remarked before, NLP is a subfield of AI that analyzes text, speech, and other forms of human-generated language data. As an industry professional, my first choice for manipulating text data is Python. In general, there are many benefits to using Python:
- It is easy to read and looks very similar to pseudocode.
- It is easy to produce and test code with.
- It has a high level of abstraction.
Python is a great choice for developing NLP systems because of the following:
- Simplicity: Python is easy to learn. You can focus on NLP rather than the programming language details.
- Efficiency: It allows for easier development of quick NLP application prototypes.
- Popularity: Python is one of the most popular languages. It has huge community support, and installing new libraries with pip is effortless.
- AI ecosystem presence: A significant number of open source NLP libraries are available in Python. Many machine learning (ML) libraries such as PyTorch, TensorFlow, and Apache Spark also provide Python APIs.
- Text methods: String and file operations with Python are effortless and straightforward. For example, splitting a sentence at the whitespaces requires only a one-liner,
sentenc.split(), which can be quite painful in other languages, such as C++, where you have to deal with stream objects for this task.
When we put all the preceding points together, the following image appears – Python intersects with string processing, the AI ecosystem, and ML libraries to provide us the best NLP development experience:
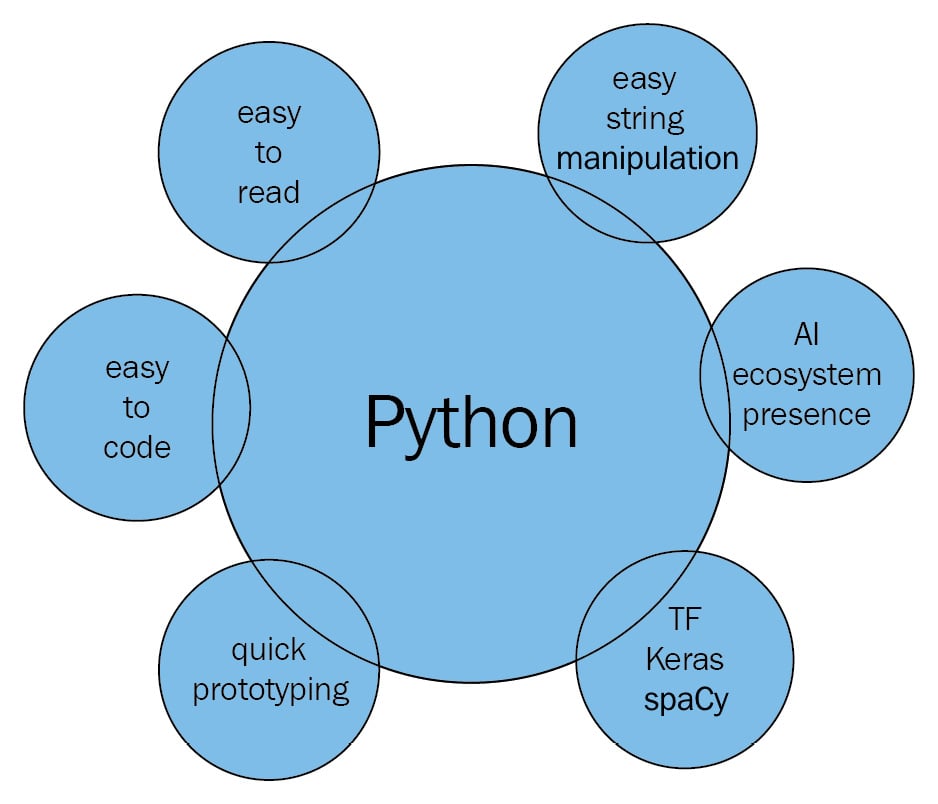
Figure 1.4 – NLP with Python overview
We will use Python 3.5+ throughout this book. Users who do not already have Python installed can follow the instructions at https://realpython.com/installing-python/. We recommend downloading and using the latest version of Python 3.
In Python 3.x, the default encoding is Unicode, which means that we can use Unicode text without worrying much about the encoding. We won't go into details of encodings here, but you can think of Unicode as an extended set of ASCII, including more characters such as German-alphabet umlauts and the accented characters of the French alphabet. This way we can process German, French, and many more languages other than English.
Reviewing some useful string operations
In Python, the text is represented by strings, objects of the str class. Strings are immutable sequences of characters. Creating a string object is easy – we enclose the text in quotation marks:
word = 'Hello World'
Now the word variable contains the string Hello World. As we mentioned, strings are sequences of characters, so we can ask for the first item of the sequence:
 print (word [0])
H
Always remember to use parentheses with print, since we are coding in Python 3.x. We can similarly access other indices, as long as the index doesn't go out of bounds:
 word [4]
'o'
How about string length? We can use the len method, just like with list and other sequence types:
 len(word)
11
We can also iterate over the characters of a string with sequence methods:
 for ch in word:
               print(ch)
H
e
l
l
o
W
o
r
l
d
Pro tip
Please mind the indentation throughout the book. Indentation in Python is the way we determine the control blocks and function definitions in general, and we will apply this convention in this book.
Now let's go over the more string methods such as counting characters, finding a substring, and changing letter case.
count counts the number of occurrences of a character in the string, so the output is 3 here:
 word.count('l')
3
Often, you need to find the index of a character for a number of substring operations such as cutting and slicing the string:
 word.index(e)
1
Similarly, we can search for substrings in a string with the find method:
 word.find('World')
6
find returns –1 if the substring is not in the string:
 word.find('Bonjour')
-1
Searching for the last occurrence of a substring is also easy:
 word.rfind('l')
9
We can change letter case by the upper and lower methods:
 word.upper()
'HELLO WORLD'
The upper method changes all characters to uppercase. Similarly, the lower method changes all characters to lowercase:
 word.lower()
'hello world'
The capitalize method capitalizes the first character of the string:
 'hello madam'.capitalize()
'Hello madam'
The title method makes the string title case. Title case literally means to make a title, so each word of the string is capitalized:
 'hello madam'.title()
'Hello Madam'
Forming new strings from other strings can be done in several ways. We can concatenate two strings by adding them:
 'Hello Madam!' + 'Have a nice day.'
'Hello Madam!Have a nice day.'
We can also multiply a string with an integer. The output will be the string concatenated to itself by the number of times specified by the integer:
 'sweet ' * 5
'sweet sweet sweet sweet '
join is a frequently used method; it takes a list of strings and joins them into one string:
 ' '.join (['hello', 'madam'])
'hello madam'
There is a variety of substring methods. Replacing a substring means changing all of its occurrences with another string:
 'hello madam'.replace('hello', 'good morning')
'good morning madam'
Getting a substring by index is called slicing. You can slice a string by specifying the start index and end index. If we want only the second word, we can do the following:
 word = 'Hello Madam Flower'
 word [6:11]
'Madam'
Getting the first word is similar. Leaving the first index blank means the index starts from zero:
 word [:5]
'Hello'
Leaving the second index blank has a special meaning as well – it means the rest of the string:
 word [12:]
'Flower'
We now know some of the Pythonic NLP operations. Now we can dive into more of spaCy.
Getting a high-level overview of the spaCy library
spaCy is an open source Python library for modern NLP. The creators of spaCy describe their work as industrial-strength NLP, and as a contributor I can assure you it is true. spaCy is shipped with pretrained language models and word vectors for 60+ languages.
spaCy is focused on production and shipping code, unlike its more academic predecessors. The most famous and frequently used Python predecessor is NLTK. NLTK's main focus was providing students and researchers an idea of language processing. It never put any claims on efficiency, model accuracy, or being an industrial-strength library. spaCy focused on providing production-ready code from the first day. You can expect models to perform on real-world data, the code to be efficient, and the ability to process a huge amount of text data in a reasonable time. The following table is an efficiency comparison from the spaCy documentation (https://spacy.io/usage/facts-figures#speed-comparison):
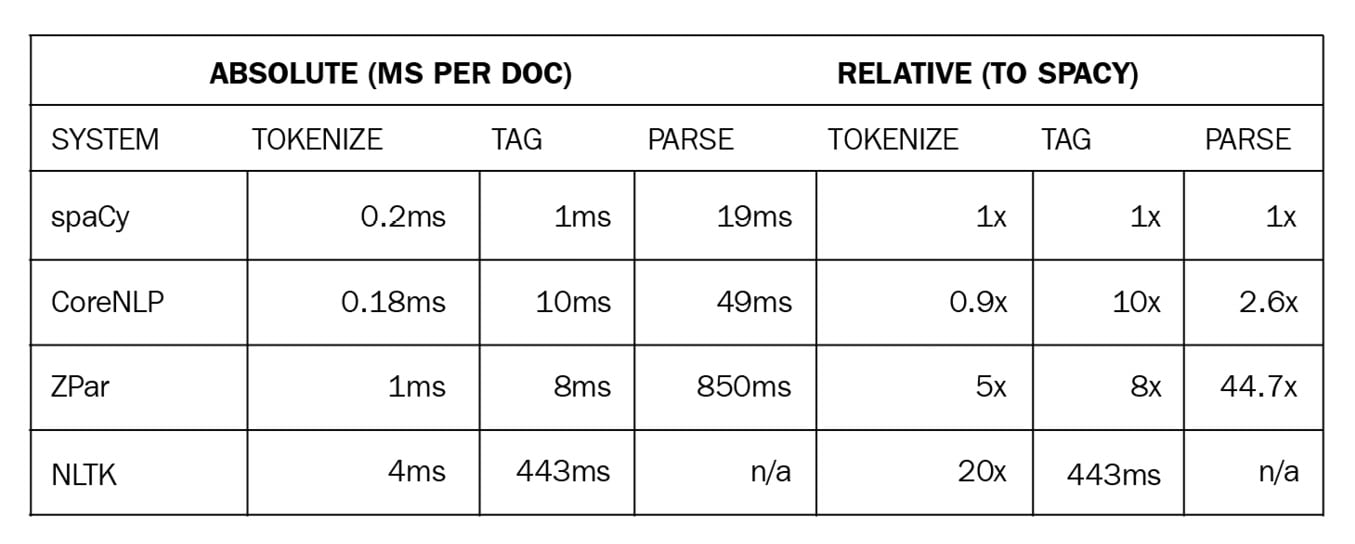
Figure 1.5 – A speed comparison of spaCy and other popular NLP frameworks
The spaCy code is also maintained in a professional way, with issues sorted by labels and new releases covering as many fixes as possible. You can always raise an issue on the spaCy GitHub repo at https://github.com/explosion/spaCy, report a bug, or ask for help from the community.
Another predecessor is CoreNLP (also known as StanfordNLP). CoreNLP is implemented in Java. Though CoreNLP competes in terms of efficiency, Python won by easy prototyping and spaCy is much more professional as a software package. The code is well maintained, issues are tracked on GitHub, and every issue is marked with some labels (such as bug, feature, new project). Also, the installation of the library code and the models is easy. Together with providing backward compatibility, this makes spaCy a professional software project. Here is a detailed comparison from the spaCy documentation at https://spacy.io/usage/facts-figures#comparison:
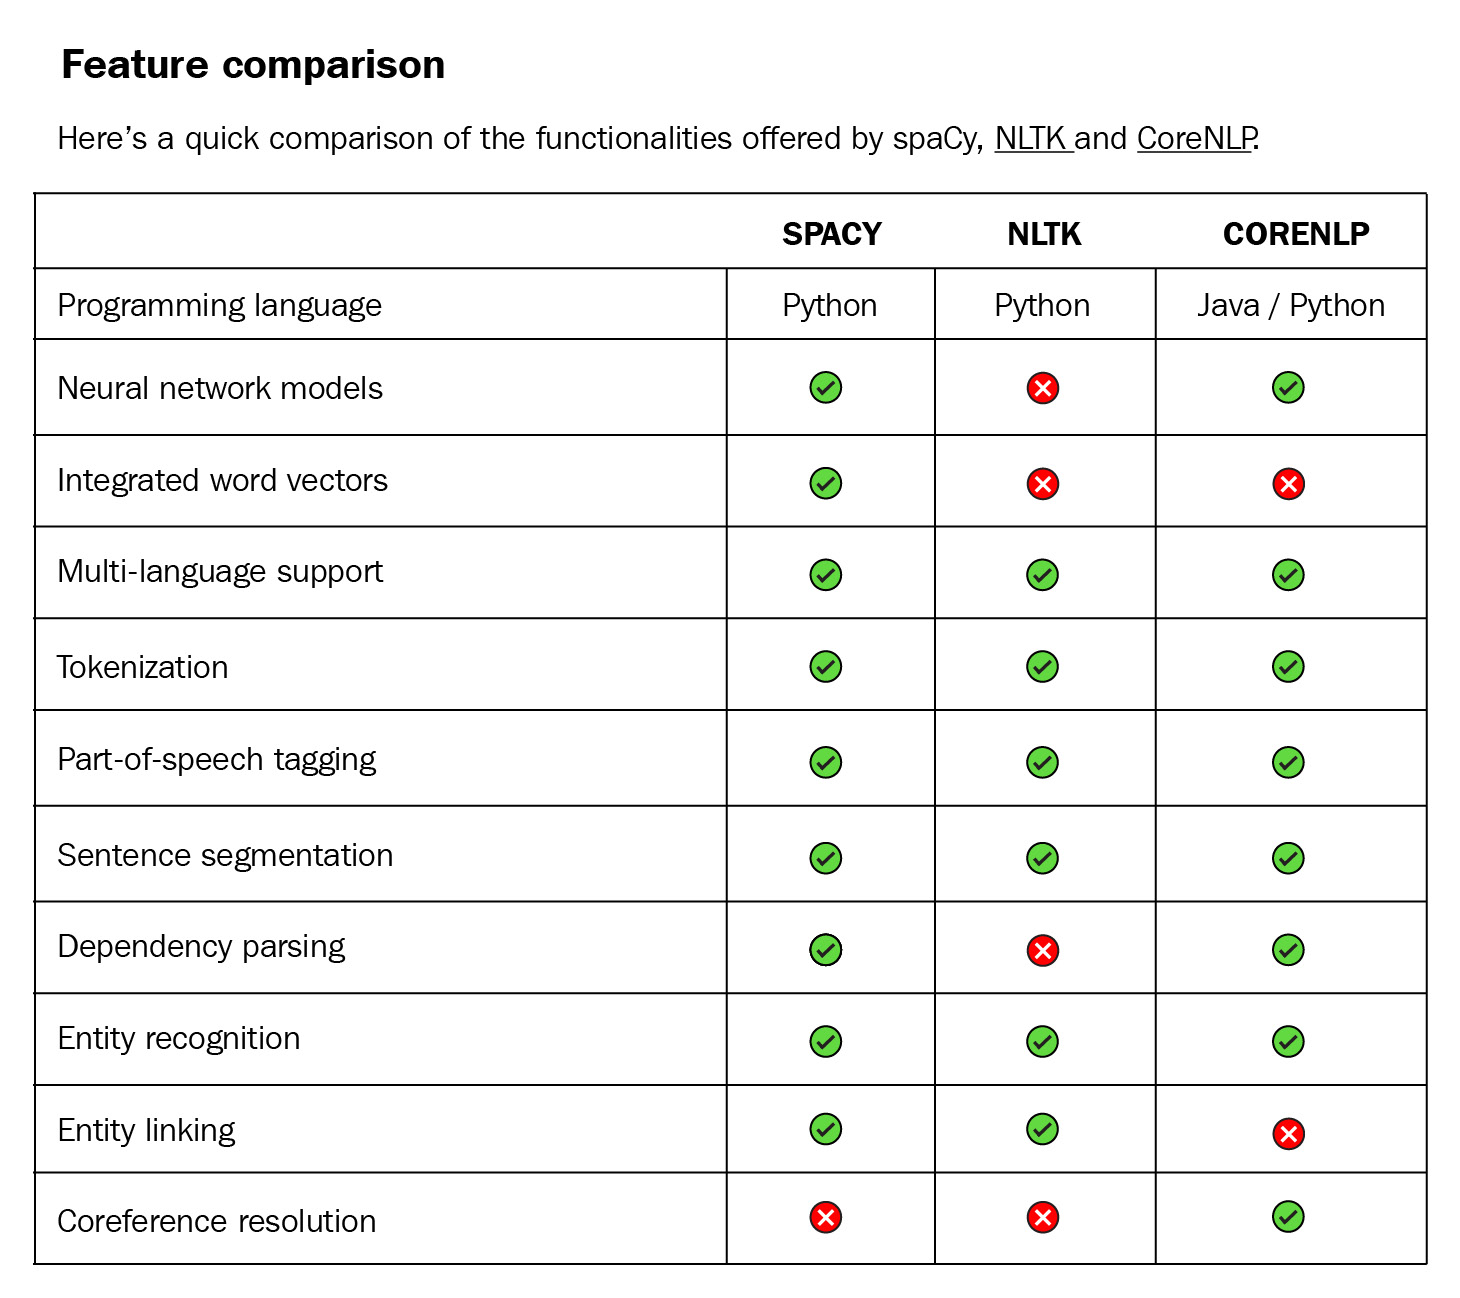
Figure 1.6 – A feature comparison of spaCy, NLTK, and CoreNLP
Throughout this book, we will be using spaCy's latest release v3.1 (the version used at the time of writing this book) for all our computational linguistics and ML purposes. The following are the features in the latest release:
- Original data preserving tokenization.
- Statistical sentence segmentation.
- Named entity recognition.
- Part-of-Speech (POS) tagging.
- Dependency parsing.
- Pretrained word vectors.
- Easy integration with popular deep learning libraries. spaCy's ML library
Thincprovides thin wrappers around PyTorch, TensorFlow, and MXNet. spaCy also provides wrappers forHuggingFaceTransformers byspacy-transformerslibrary. We'll see more of theTransformersin Chapter 9, spaCy and Transformers. - Industrial-level speed.
- A built-in visualizer, displaCy.
- Support for 60+ languages.
- 46 state-of-the-art statistical models for 16 languages.
- Space-efficient string data structures.
- Efficient serialization.
- Easy model packaging and usage.
- Large community support.
We had a quick glance around spaCy as an NLP library and as a software package. We will see what spaCy offers in detail throughout the book.
Tips for the reader
This book is a practical guide. In order to get the most out of the book, I recommend readers replicate the code in their own Python shell. Without following and performing the code, it is not possible to get a proper understanding of NLP concepts and spaCy methods, which is why we have arranged the upcoming chapters in the following way:
- Explanation of the language/ML concept
- Application code with spaCy
- Evaluation of the outcome
- Challenges of the methodology
- Pro tips and tricks to overcome the challenges
Installing spaCy
Let's get started by installing and setting up spaCy. spaCy is compatible with 64-bit Python 2.7 and 3.5+, and can run on Unix/Linux, macOS/OS X, and Windows. CPython is a reference implementation of Python in C. If you already have Python running on your system, most probably your CPython modules are fine too – hence you don't need to worry about this detail. The newest spaCy releases are always downloadable via pip (https://pypi.org/) and conda (https://conda.io/en/latest/). pip and conda are two of the most popular distribution packages.
pip is the most painless choice as it installs all the dependencies, so let's start with it.
Installing spaCy with pip
You can install spaCy with the following command:
$ pip install spacy
If you have more than one Python version installed in your system (such as Python 2.8, Python 3.5, Python 3.8, and so on), then select the pip associated with Python you want to use. For instance, if you want to use spaCy with Python 3.5, you can do the following:
$ pip3.5 install spacy
If you already have spaCy installed on your system, you may want to upgrade to the latest version of spaCy. We're using spaCy 3.1 in this book; you can check which version you have with the following command:
$ python –m spacy info
This is how a version info output looks like. This has been generated with the help of my Ubuntu machine:

Figure 1.7 – An example spaCy version output
Suppose you want to upgrade your spaCy version. You can upgrade your spaCy version to the latest available version with the following command:
$ pip install –U spacy
Installing spaCy with conda
conda support is provided by the conda community. The command for installing spaCy with conda is as follows:
$ conda install -c conda-forge spacy
Installing spaCy on macOS/OS X
macOS and OS X already ship with Python. You only need to install a recent version of the Xcode IDE. After installing Xcode, please run the following:
$ xcode-select –install
This installs the command-line development tools. Then you will be able to follow the preceding pip commands.
Installing spaCy on Windows
If you have a Windows system, you need to install a version of Visual C++ Build Tools or Visual Studio Express that matches your Python distribution. Here are the official distributions and their matching versions, taken from the spaCy installation guide (https://spacy.io/usage#source-windows):
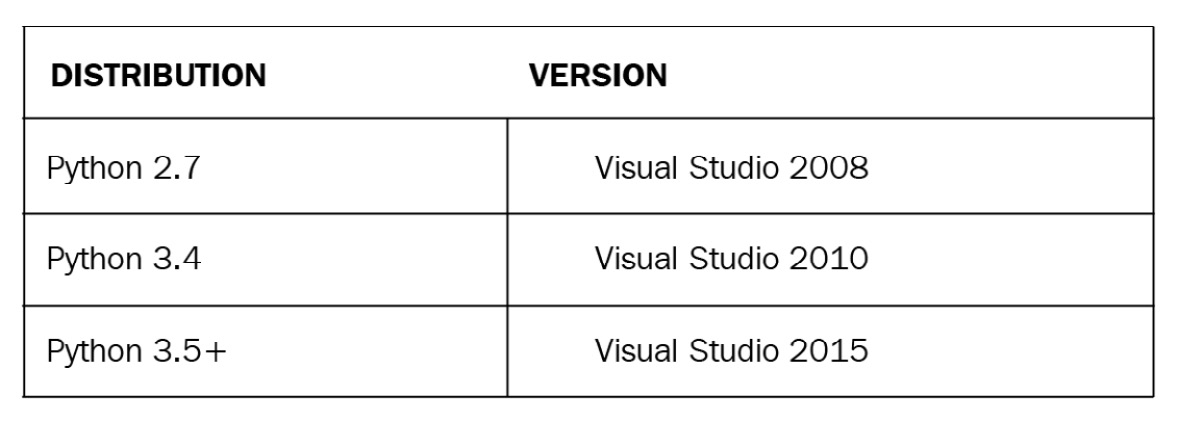
Figure 1.8 – Visual Studio and Python distribution compatibility table
If you didn't encounter any problems so far, then that means spaCy is installed and running on your system. You should be able to import spaCy into your Python shell:
import spacy
Now you successfully installed spaCy – congrats and welcome to the spaCy universe! If you have installation problems please continue to the next section, otherwise you can move on to language model installation.
Troubleshooting while installing spaCy
There might be cases where you get issues popping up during the installation process. The good news is, we're using a very popular library so most probably other developers have already encountered the same issues. Most of the issues are listed on Stack Overflow (https://stackoverflow.com/questions/tagged/spacy) and the spaCy GitHub Issues section (https://github.com/explosion/spaCy/issues) already. However, in this section, we'll go over the most common issues and their solutions.
Some of the most common issues are as follows:
- The Python distribution is incompatible: In this case please upgrade your Python version accordingly and then do a fresh installation.
- The upgrade broke spaCy: Most probably there are some leftover packages in your installation directories. The best solution is to first remove the spaCy package completely by doing the following:
pip uninstall spacy
Then do a fresh installation by following the installation instructions mentioned.
- You're unable to install spaCy on a Mac: On a Mac, please make sure that you don't skip the following to make sure you correctly installed the Mac command-line tools and enabled pip:
$ xcode-select –install
In general, if you have the correct Python dependencies, the installation process will go smoothly.
We're all set up and ready for our first usage of spaCy, so let's go ahead and start using spaCy's language models.
Installing spaCy's statistical models
The spaCy installation doesn't come with the statistical language models needed for the spaCy pipeline tasks. spaCy language models contain knowledge about a specific language collected from a set of resources. Language models let us perform a variety of NLP tasks, including POS tagging and named-entity recognition (NER).
Different languages have different models and are language specific. There are also different models available for the same language. We'll see the differences between those models in detail in the Pro tip at the end of this section, but basically the training data is different. The underlying statistical algorithm is the same. Some of the currently supported languages are as follows:
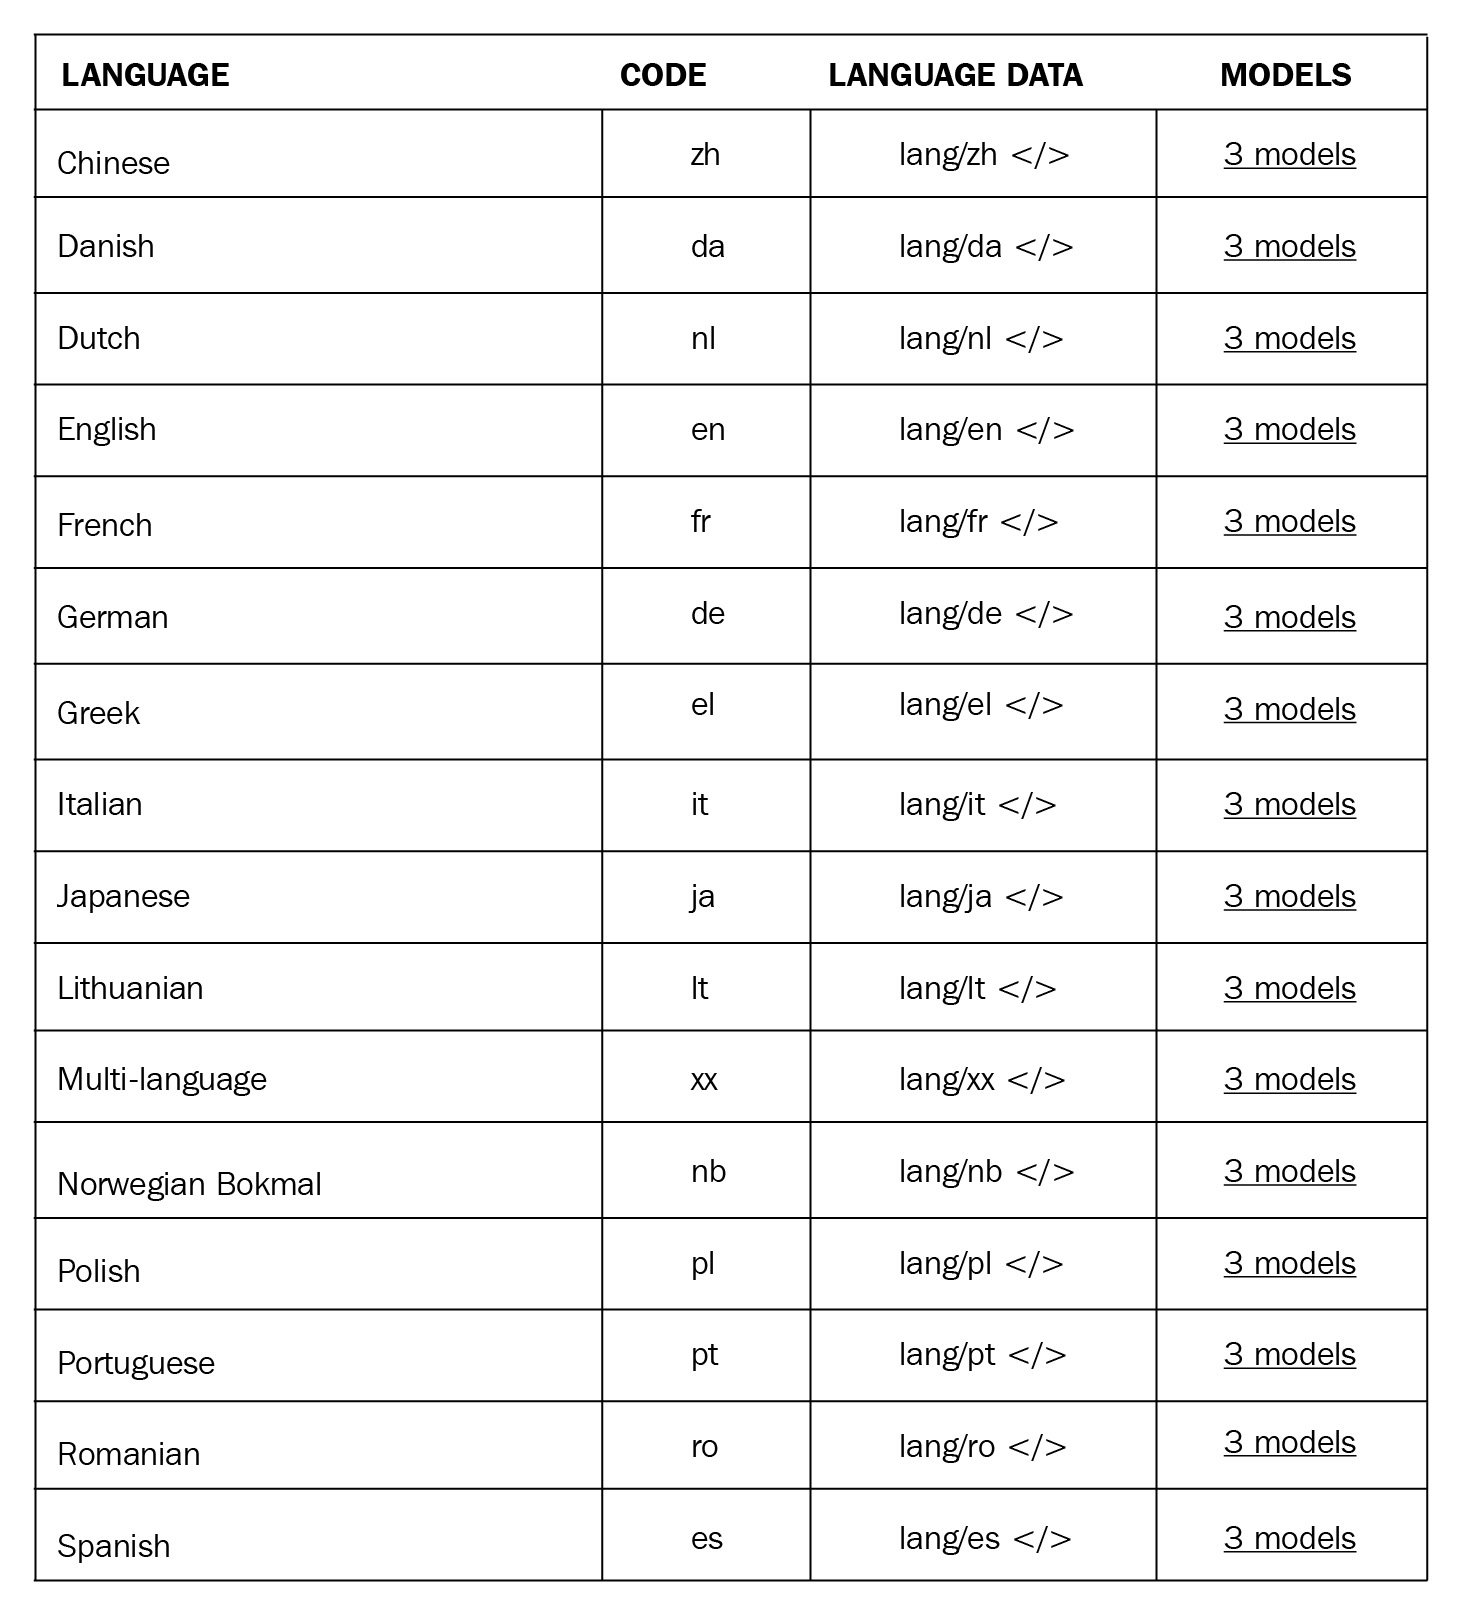
Figure 1.9 – spaCy models overview
The number of supported languages grows rapidly. You can follow the list of supported languages on the spaCy Models and Languages page (https://spacy.io/usage/models#languages).
Several pretrained models are available for different languages. For English, the following models are available for download: en_core_web_sm, en_core_web_md, and en_core_web_lg. These models use the following naming convention:
- Language: Indicates the language code:
enfor English,defor German, and so on. - Type: Indicates the model capability. For instance,
coremeans a general-purpose model for the vocabulary, syntax, entities, and vectors. - Genre: The type of text the model recognizes. The genre can be
web(Wikipedia),news(news, media)Twitter, and so on. - Size: Indicates the model size:
lgfor large,mdfor medium, andsmfor small.
Here is what a typical language model looks like:

Figure 1.10 – The small-sized spaCy English web model
Large models can require a lot of disk space, for example en_core_web_lg takes up 746 MB, while en_core_web_md needs 48MB and en_core_web_sm takes only 11MB. Medium-sized models work well for many development purposes, so we'll use the English md model throughout the book.
Pro tip
It is a good practice to match model genre to your text type. We recommend picking the genre as close as possible to your text. For example, the vocabulary in the social media genre will be very different from that in the Wikipedia genre. You can pick the web genre if you have social media posts, newspaper articles, financial news – that is, more language from daily life. The Wikipedia genre is suitable for rather formal articles, long documents, and technical documents. In case you are not sure which genre is the most suitable, you can download several models and test some example sentences from your own corpus and see how each model performs.
Now that we're well-informed about how to choose a model, let's download our first model.
Installing language models
Since v1.7.0, spaCy offers a great benefit: installing the models as Python packages. You can install spaCy models just like any other Python module and make them a part of your Python application. They're properly versioned, so they can go into your requirements.txt file as a dependency. You can install the models from a download URL or a local director manually, or via pip. You can put the model data anywhere on your local filesystem.
You can download a model via spaCy's download command. download looks for the most compatible model for your spaCy version, and then downloads and installs it. This way you don't need to bother about any potential mismatch between the model and your spaCy version. This is the easiest way to install a model:
$ python -m spacy download en_core_web_md
The preceding command selects and downloads the most compatible version of this specific model for your local spaCy version.
To download the exact model version, the following is what needs to be done (though you often don't need it):
$ python -m spacy download en_core_web_lg-2.0.0 --direct
The download command deploys pip behind the scenes. When you make a download, pip installs the package and places it in your site-packages directory just as any other installed Python package.
After the download, we can load the packages via spaCy's load () method.
This is what we did so far:
$ pip install spacy
$ python -m spacy download en_core_web_md
 import spacy
 nlp = spacy.load('en_core_web_md')
 doc = nlp('I have a ginger cat.')
We can also download models via pip:
- First, we need the link to the model we want to download.
- We navigate to the model releases (https://github.com/explosion/spacy-models/releases), find the model, and copy the archive file link.
- Then, we do a
pip installwith the model link.
Here is an example command for downloading with a custom URL:
$ pip install https://github.com/explosion/spacy-models/releases/download/en_core_web_lg-2.0.0/en_core_web_lg-2.0.0.tar.gz
You can install a local file as follows:
$ pip install /Users/yourself/en_core_web_lg-2.0.0.tar.gz
This installs the model into your site-packages directory. Then we run spacy.load() to load the model via its package name, create a shortcut link to give it a custom name (usually a shorter name), or import it as a module.
Importing the language model as a module is also possible:
 import en_core_web_md
 nlp = en_core_web_md.load()
 doc = nlp('I have a ginger cat.')
Pro tip
In professional software development, we usually download models as part of an automated pipeline. In this case, it's not feasible to use spaCy's download command; rather, we use pip with the model URL. You can add the model into your requirements.txt file as a package as well.
How you like to load your models is your choice and also depends on the project requirements you're working on.
At this point, we're ready to explore the spaCy world. Let's now learn about spaCy's powerful visualization tool, displaCy.
Visualization with displaCy
Visualization is an important tool that should be in every data scientist's toolbox. Visualization is the easiest way to explain some concepts to your colleagues, your boss, and any technical or non-technical audience. Visualization of language data is specifically useful and allows you to identify patterns in your data at a glance.
There are many Python libraries and plugins such as Matplotlib, seaborn, TensorBoard, and so on. Being an industrial library, spaCy comes with its own visualizer – displaCy. In this subsection, you'll learn how to spin up a displaCy server on your machine, in a Jupyter notebook, and in a web application. You'll also learn how to export the graphics you created as an image file, customize your visualizations, and make manual annotations without creating a Doc object. We'll start by exploring the easiest way – using displaCy's interactive demo.
Getting started with displaCy
Go ahead and navigate to https://explosion.ai/demos/displacy to use the interactive demo. Enter your text in the Text to parse box and then click the search icon on the right to generate the visualization. The result might look like the following:
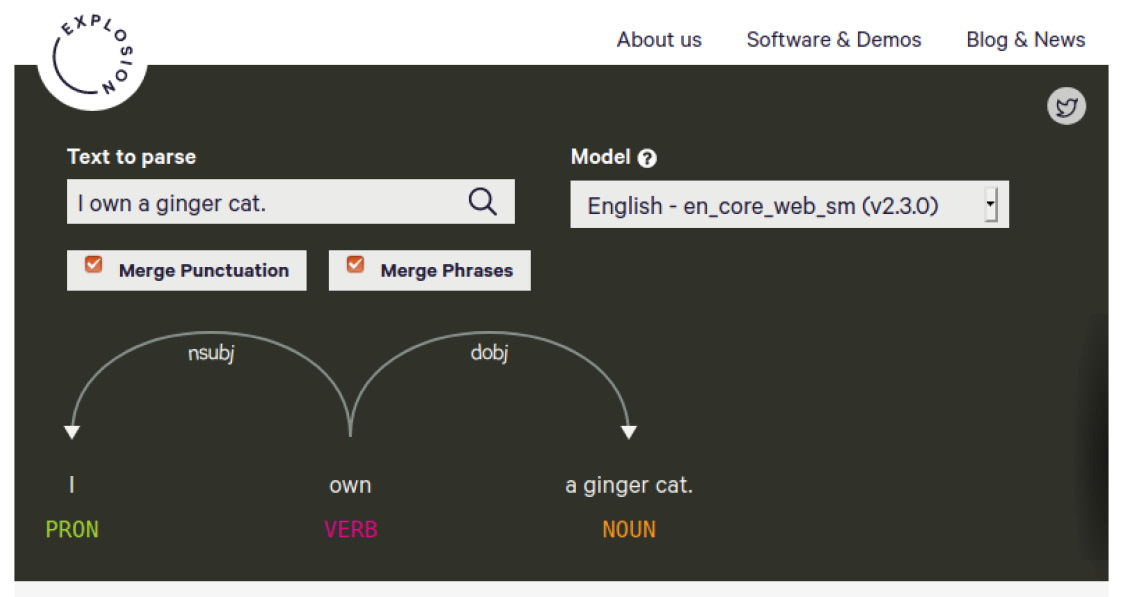
Figure 1.11 – displaCy's online demo
The visualizer performs two syntactic parses, POS tagging, and a dependency parse, on the submitted text to visualize the sentence's syntactic structure. Don't worry about how POS tagging and dependency parsing work, as we'll explore them in the upcoming chapters. For now, just think of the result as a sentence structure.
You'll notice two tick boxes, Merge Punctuation and Merge Phrases. Merging punctuation merges the punctuation tokens into the previous token and serves a more compact visualization (it works like a charm on long documents).
The second option, Merge Phrases, again gives more compact dependency trees. This option merges adjectives and nouns into one phrase; if you don't merge, then adjectives and nouns will be displayed individually. This feature is useful for visualizing long sentences with many noun phrases. Let's see the difference with an example sentence: They were beautiful and healthy kids with strong appetites. It contains two noun phrases, beautiful and healthy kids and strong appetite. If we merge them, the result is as follows:
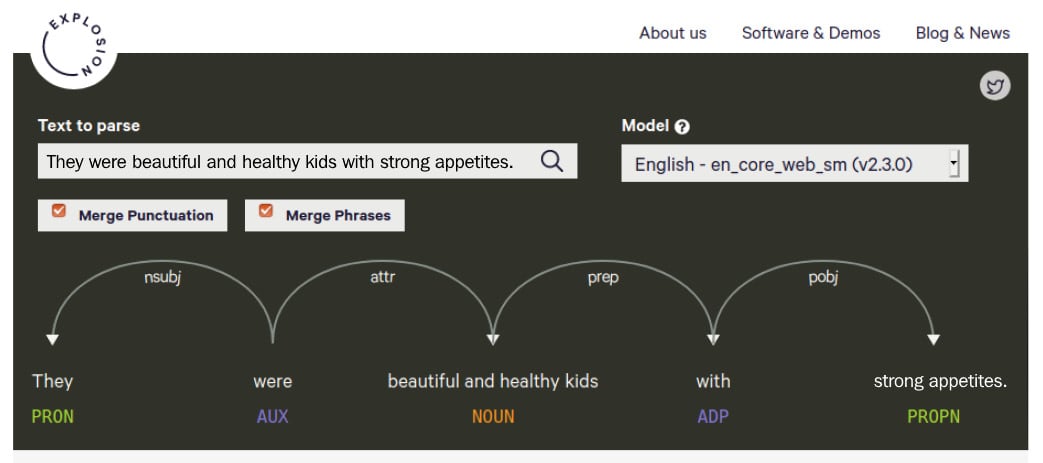
Figure 1.12 – An example parse with noun phrases merged
Without merging, every adjective and noun are shown individually:
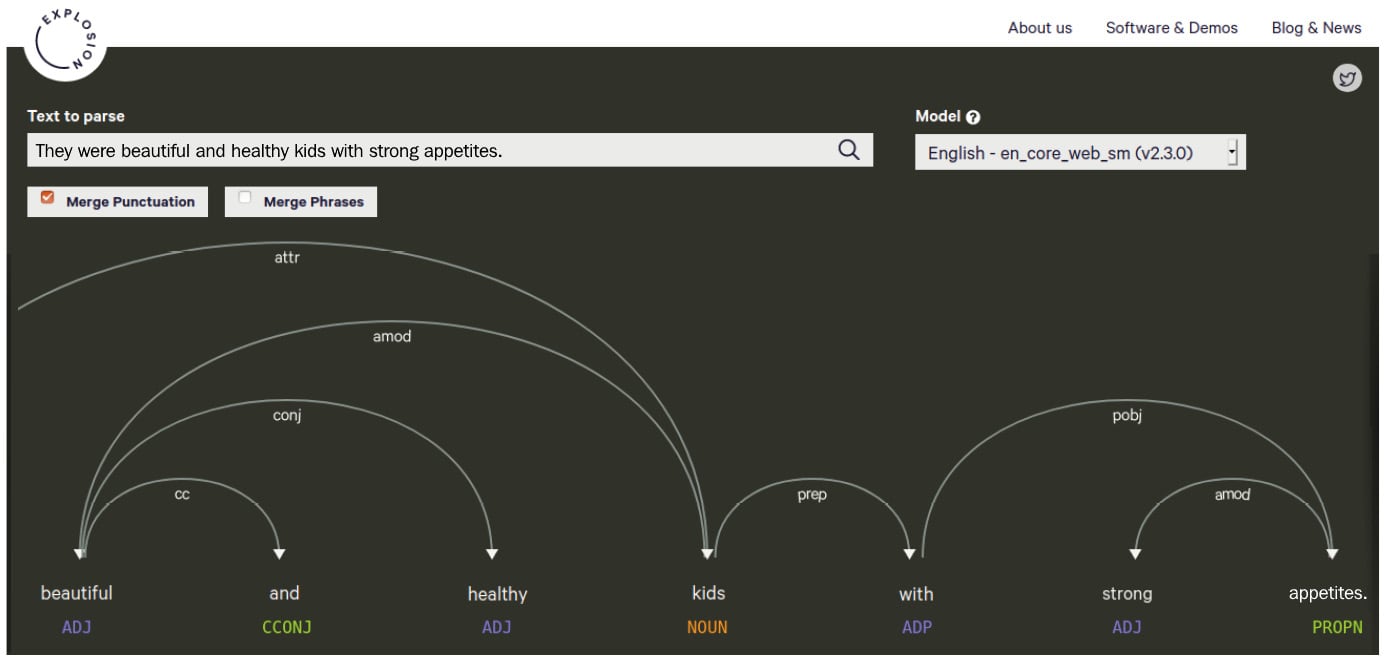
Figure 1.13 – A parse of the same sentence, unmerged
The second parse is a bit too cumbersome and difficult to read. If you work on a text with long sentences such as law articles or Wikipedia entries, we definitely recommend merging.
You can choose a statistical model from the Model box on the right for the currently supported languages. This option allows you to play around with the language models without having to download and install them on your local machine.
Entity visualizer
displaCy's entity visualizer highlights the named entities in your text. The online demo lives at https://explosion.ai/demos/displacy-ent/. We didn't go through named entities yet, but you can think of them as proper nouns for important entities such as people's names, company names, dates, city and country names, and so on. Extracting entities will be covered in Chapter 3, Linguistic Features, and Chapter 4, Rule-Based Matching, in detail.
The online demo works similar to the syntactic parser demo. Enter your text into the textbox and hit the search button. Here is an example:
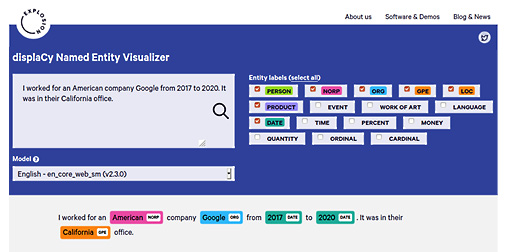
Figure 1.14 – An example entity visualization
The right side contains tick boxes for entity types. You can tick the boxes that match your text type such as, for instance, MONEY and QUANTITY for a financial text. Again, just like in the syntactic parser demo, you can choose from the available models.
Visualizing within Python
With the introduction of the latest version of spaCy, the displaCy visualizers are integrated into the core library. This means that you can start using displaCy immediately after installing spaCy on your machine! Let's go through some examples.
The following code segment is the easiest way to spin up displaCy on your local machine:
 import spacy
 from spacy import displacy
 nlp = spacy.load('en_core_web_md')
 doc= nlp('I own a ginger cat.')
 displacy.serve(doc, style='dep')
As you can see from the preceding snippet, the following is what we did:
- We import
spaCy. - Following that, we import
displaCyfrom the core library. - We load the English model that we downloaded in the Installing spaCy's statistical models section.
- Once it is loaded, we create a
Docobject to pass todisplaCy. - We then started the
displaCyweb server via callingserve(). - We also passed
depto thestyleparameter to see the dependency parsing result.
After firing up this code, you should see a response from displaCy as follows:

Figure 1.15 – Firing up displaCy locally
The response is added along with a link, http://0.0.0.0:5000, this is the local address where displaCy renders your graphics. Please click the link and navigate to the web page. You should see the following:
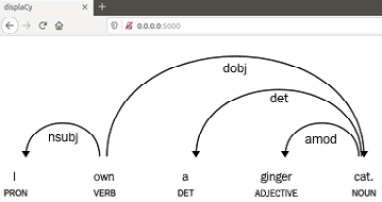
Figure 1.16 – View the result visualization in your browser
This means that displaCy generated a dependency parse result visualization and rendered it on your localhost. After you're finished with displaying the visual and you want to shut down the server, you can press Ctrl +C to shut down the displaCy server and go back to the Python shell:
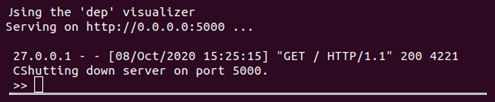
Figure 1.17 – Shutting down the displaCy server
After shutting down, you won't be able to visualize more examples, but you'll continue seeing the results you already generated.
If you wish to use another port or you get an error because the port 5000 is already in use, you can use the port parameter of displaCy with another port number. Replacing the last line of the preceding code block with the following line will suffice:
displacy.serve(doc, style='dep', port= '5001')
Here, we provide the port number 5001 explicitly. In this case, displaCy will render the graphics on http://0.0.0.0:5001.
Generating an entity recognizer is done similarly. We pass ent to the style parameter instead of dep:
 import spacy
 from spacy import displacy
 nlp = spacy.load('en_core_web_md')
 doc= nlp('Bill Gates is the CEO of Microsoft.')
 displacy.serve(doc, style='ent')
The result should look like the following:
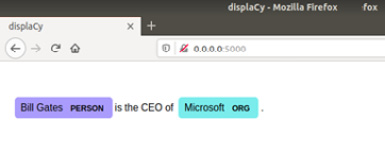
Figure 1.18 – The entity visualization is displayed on your browser
Let's move on to other platforms we can use for displaying the results.
Using displaCy in Jupyter notebooks
Jupyter notebook is an important part of daily data science work. Fortunately, displaCy can spot whether you're currently coding in a Jupyter notebook environment and returns markup that can be directly displayed in a cell.
If you don't have Jupyter notebook installed on your system but wish to use it, you can follow the instructions at https://test-jupyter.readthedocs.io/en/latest/install.html.
This time we'll call render() instead of serve(). The rest of the code is the same. You can type/paste the following code into your Jupyter notebook:
import spacy
from spacy import displacy
nlp = spacy.load('en_core_web_md')
doc= nlp('Bill Gates is the CEO of Microsoft.')
displacy.render(doc, style='dep')
The result should look like the following:
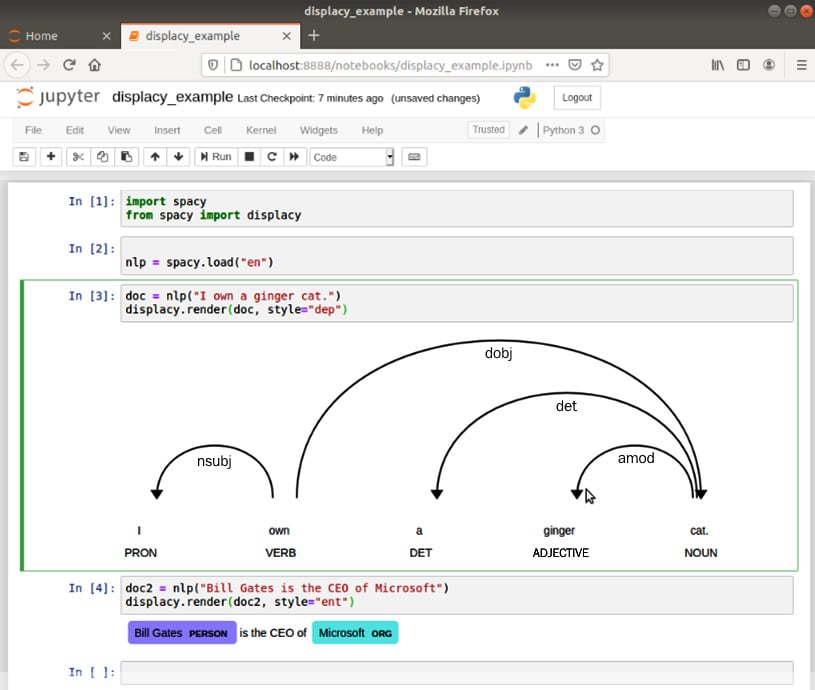
Figure 1.19 – displaCy rendering results in a Jupyter notebook
Exporting displaCy graphics as an image file
Often, we need to export the graphics that we generated with displaCy as image files to place them into presentations, articles, or papers. We can call displaCy in this case as well:
 import spacy
 from spacy import displacy
 from pathlib import Path
 nlp = spacy.load('en_core_web_md')
 doc = nlp('I'm a butterfly.')
 svg = displacy.render(doc, style='dep', jupyter=False)
 filename = 'butterfly.svg'
  output_path = Path ('/images/' + file_name)
 output_path.open('w', encoding='utf-8').write(svg)
We import spaCy and displaCy. We load the English language model, then create a Doc object as usual. Then we call displacy.render() and capture the output to the svg variable. The rest is writing the svg variable to a file called butterfly.svg.
We have reached the end of the visualization chapter here. We created good-looking visuals and learned the details of creating visuals with displaCy. If you wish to find out how to use different background images, background colors, and fonts, you can visit the displaCy documentation at http://spacy.io/usage/visualizers.
Often, we need to create visuals with different colors and styling, and the displaCy documentation contains detailed information about styling. The documentation also includes how to embed displaCy into your web applications. spaCy is well documented as a project and the documentation contains everything we need!
Summary
This chapter gave you an introduction to NLP with Python and spaCy. You now have a brief idea about why to use Python for language processing and the reasons to prefer spaCy for creating your NLP applications. We also got started on our spaCy journey by installing spaCy and downloading language models. This chapter also introduced us to the visualization tool – displaCy.
In the next chapter, we will continue our exciting spaCy journey with spaCy core operations such as tokenization and lemmatization. It'll be our first encounter with spaCy features in detail. Let's go ahead and explore more together!