


Introduction to PowerShell
PowerShell is a cross-platform (Windows, Linux, and macOS) task automation framework for IT professionals. PowerShell contains an interactive shell and a scripting language. The interactive shell is on par with the best Linux shells, including Bash. The scripting language is based on .NET and has the power of Perl, Ruby, and many other popular languages. PowerShell allows you to manage all aspects of Windows 11.
In this chapter, we cover the following:
- What is PowerShell?
- Installing Windows PowerShell and PowerShell 7 in Windows 11
- What are cmdlets, objects, and the pipeline?
- PowerShell’s scripting language
- Modules and commands
- Hardening PowerShell
- Configuring PowerShell
It is not possible to describe PowerShell fully in a single chapter. This chapter aims to introduce the key concepts and terms, show examples, and give you resources to discover more about specific features.
What is PowerShell?
As mentioned, PowerShell is a task automation platform for IT professionals and comes to you in two forms: Windows PowerShell and open source PowerShell (aka PowerShell 7).
In this chapter, any material specific to either version of PowerShell is noted as Windows PowerShell or PowerShell 7. But for the most part, almost everything you know about Windows PowerShell is useful in PowerShell 7. However, there are some differences and improvements.
Windows PowerShell versus PowerShell 7
PowerShell comes to you in two broad forms: Windows PowerShell and open source PowerShell (aka PowerShell 7). Microsoft first shipped Windows PowerShell as an add-on to Windows XP and developed the product significantly in later releases. The concept of Windows PowerShell began with the Monad Manifesto (https://packt.link/ZZHnW). This document provides a fascinating insight into the development of Windows PowerShell.
After the release of Windows 8.1 and Windows PowerShell 5.1, Microsoft transitioned the product into the open source PowerShell 7. Microsoft also transitioned .NET Framework to open source (aka .NET), which underpins PowerShell 7. Windows PowerShell is feature-complete, and it is highly unlikely that new features will be developed. PowerShell 7, on the other hand, is under active development.
Windows 11 comes with Windows PowerShell 5.1 fully installed. You have to install PowerShell 7 if you wish to use it.
Microsoft developed Windows PowerShell on top of the Microsoft .NET Framework. In many cases, Windows PowerShell is just a thin wrapper around .NET. PowerShell cmdlets leverage .NET.
Microsoft moved .NET Framework and Windows PowerShell into open source (with Microsoft funding while running the development teams). .NET Framework became simply .NET and Windows PowerShell became PowerShell 7. If you read old documentation, you may find that the first versions of open source PowerShell were known as PowerShell Core and version 6.x. For the most part, these were proof-of-concept implementations and are no longer supported.
Why does this matter, you may ask? There are a few reasons. First, by moving to .NET, the development team did not port every component of .NET Framework. If you manage your system today using Windows PowerShell, some of your scripts may not work. One example is the WSUS module, which you would normally use to manage Windows system update services. The cmdlets in this module use some APIs that Microsoft did not make available in .NET, so the cmdlets do not work and there is no direct workaround. The WSUS product team need to re-engineer their module to make the cmdlets function with PowerShell 7. Fortunately, the number of modules that do not work is very low. The Windows compatibility feature, described in the next section, resolves most of these compatibility issues.
If you are familiar with Windows PowerShell, you should be able to use it immediately. All the language constructs in Windows PowerShell carry over into PowerShell 7. All the core PowerShell cmdlets (that is, those that come with Windows PowerShell) are available in PowerShell 7. This means that almost all your scripts should work fine. From the console, all the commands you use in Windows PowerShell work fine too. In most cases, if you can use Windows PowerShell, you know how to use PowerShell 7.
There are also some key differences between Windows PowerShell and PowerShell 7, most of which are improvements.
The main differences lie in the new and updated features contained in PowerShell. Each version of PowerShell 7 has incorporated large numbers of changes and improvements. To find the specific changes that each new version incorporates, see https://packt.link/yPEPK.
Windows PowerShell compatibility solution
A challenge for PowerShell 7 is that most of the Windows PowerShell modules, which Microsoft has published, do not work natively In PowerShell 7. To enable you to use these commands within PowerShell 7, the PowerShell team has developed the WindowsPowerShell compatibility solution.
This solution involves creating a PowerShell remoting session for the local machine (using a Windows PowerShell 5.1 endpoint), loading the module into the remoting session, and then using implicit remoting to create local functions that call the remote cmdlets.
This solution works very well – all but three Microsoft Windows Server modules work fine using the compatibility solution. One small issue is that the display XML that Windows PowerShell uses to format the cmdlet output is not imported with this solution by default. You can, however, manually load this XML.
Although the compatibility solution does not provide 100% fidelity, it gets close. And even for those modules that you cannot use directly in PowerShell 7, you can use PowerShell remoting as a workaround. The scripts at https://packt.link/6w3FC show how you can install, configure, and manage WSUS using PowerShell 7.
Installing PowerShell 7
Windows PowerShell comes built into every edition of Windows 11 (and the related versions of Windows Server). Microsoft also uses Microsoft Update to keep Windows PowerShell fully up to date.
Microsoft does not currently ship PowerShell 7 inside any version of Windows, although it is easy for you to install the product.
There are several ways you can install PowerShell 7 in Windows 11.
The first method is via the Microsoft Store. From Windows 11, you can use Microsoft Store and search for PowerShell 7 like this:
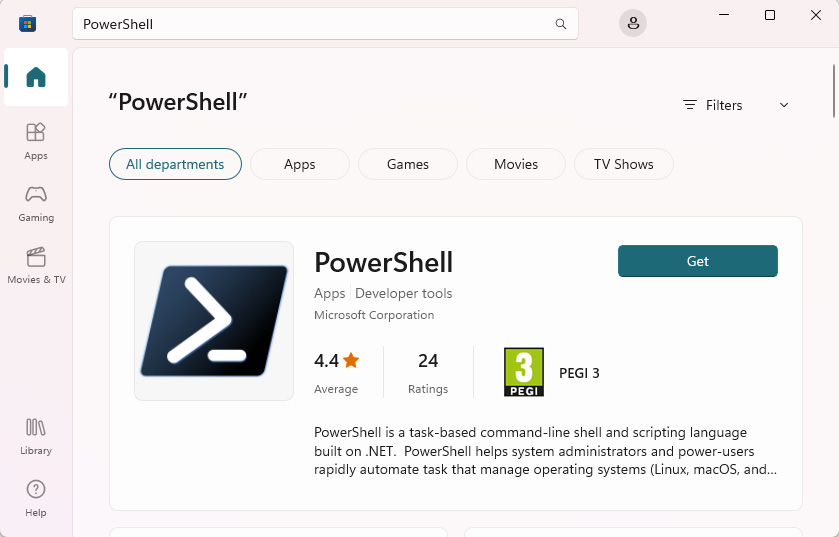
Figure 2.1 – Installing PowerShell 7 via the Microsoft Store
You click the Get button and follow the prompts to install PowerShell 7 via the Store.
The second method, and possibly the more IT-pro-friendly method, involves using the Install-PowerShell.ps1 script, which you download directly from the PowerShell team’s GitHub repository at https://packt.link/C54Up. This PowerShell script, created and maintained by the PowerShell team at Microsoft, allows you to install the latest released version using an MSI installer package that was created by the PowerShell team. You run this script, and it downloads and runs the MSI package (which also updates the Windows Path variable to enable Windows to find PowerShell post-installation).
Here is a simple script that downloads the latest released version of PowerShell 7 and installs it using an MSI file:
# 1. Download PowerShell 7 installation scriptSet-Location C:\Foo
$URI = 'https://aka.ms/install-powershell.ps1'
Invoke-RestMethod -Uri $URI |
  Out-File -FilePath C:\Foo\Install-PowerShell.ps1
# 2. Install PowerShell 7
$EXTHT = @{
  UseMSI                 = $true
  Quiet                  = $true
  AddExplorerContextMenu = $true
  EnablePSRemoting       = $true
}
C:\Foo\Install-PowerShell.ps1 @EXTHT | Out-Null
# 3. For the Adventurous - install the preview and daily builds as well
C:\Foo\Install-PowerShell.ps1 -Preview -Destination C:\PSPreview |
   Out-Null
C:\Foo\Install-PowerShell.ps1 -Daily   -Destination C:\PSDailyBuild |
   Out-Null
The output from running this snippet is as follows:
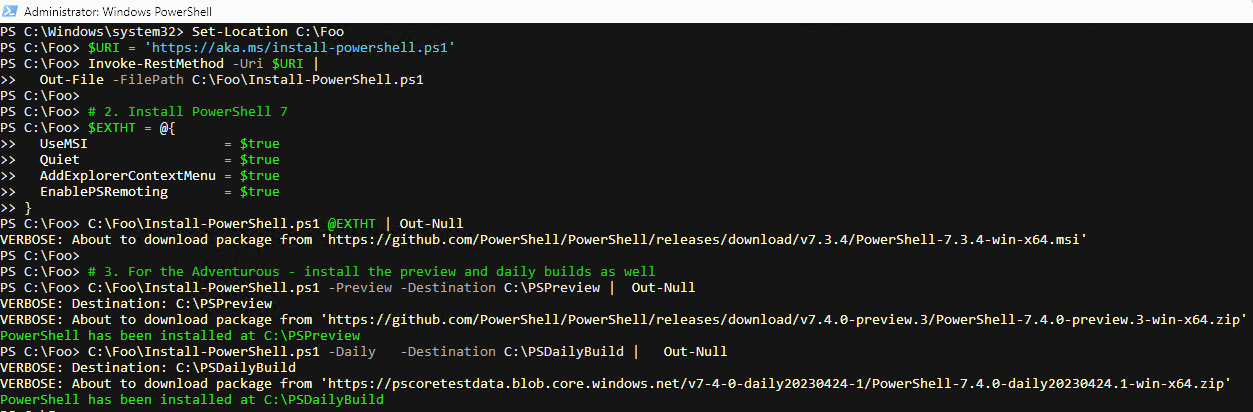
Figure 2.2 – Installing PowerShell
As seen in Figure 2.2, you can also use the Install-PowerShell.ps1 script to download different versions of PowerShell to specific folders, enabling you to have multiple versions of PowerShell 7 installed, possibly for testing. For the brave, this script also allows you to install a preview build for the next version of PowerShell. For the ultra-brave, you can also use the latest build of PowerShell 7 (the build of the day), enabling you to evaluate some of the new features coming in the next release of PowerShell or added to the latest build.
Since PowerShell 7 is an open source project with a GitHub repository, you can download versions of PowerShell 7 directly from GitHub:
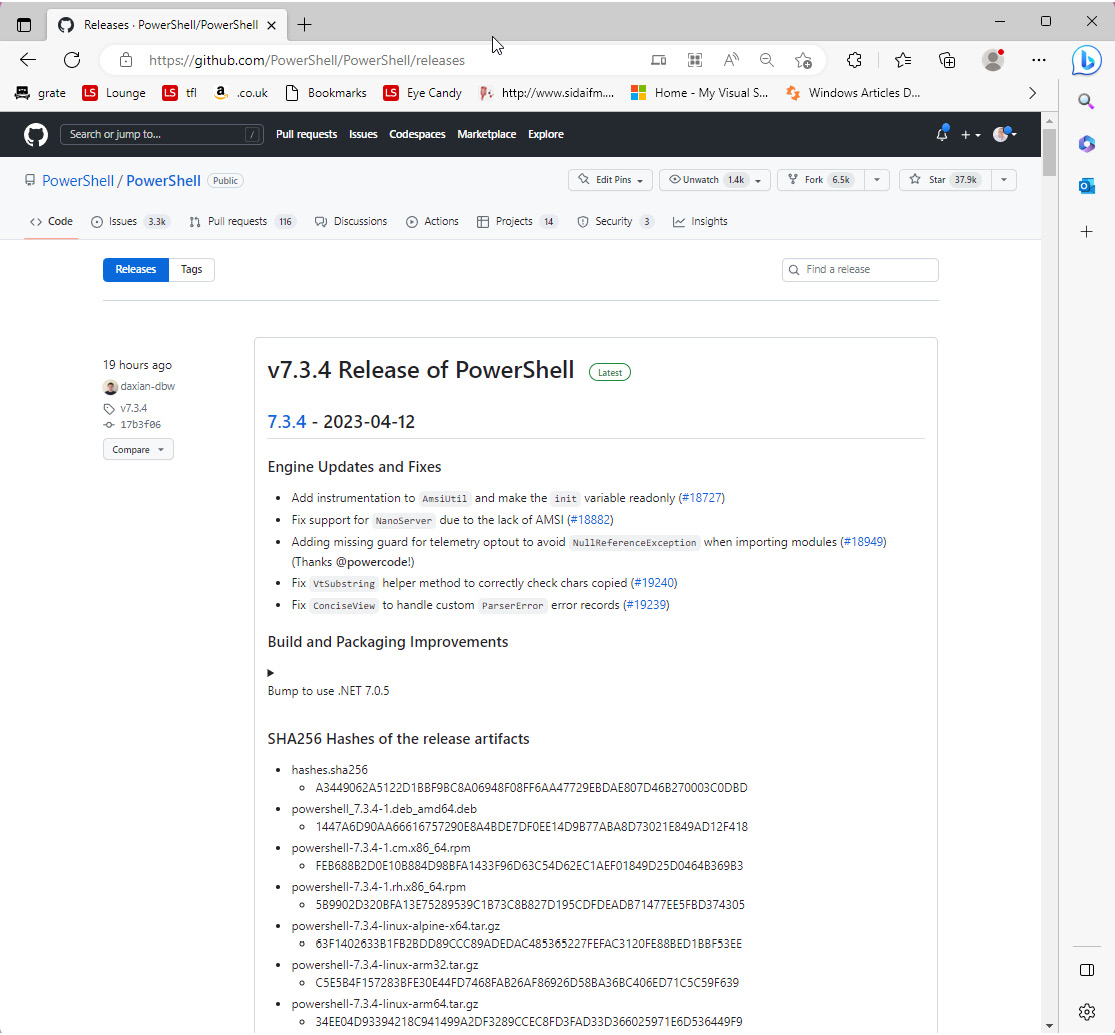
Figure 2.3 – PowerShell release page on GitHub
You can also use third-party package management tools, such as Chocolatey.
Keeping PowerShell up to date
Like almost every application, updates to PowerShell are a fact of life. With Windows PowerShell, Microsoft delivers updates via Microsoft Update.
Updating PowerShell 7 is a bit more complex, owing to the product’s nature and the different installation methods available to you. Like so many things with PowerShell, you have options.
Whenever the PowerShell team releases a new version of PowerShell 7, they update metadata held on GitHub to indicate the latest version(s) available. You can see the metadata using the following snippet:
Function Get-PWSH7ReleaseInformation {# Get details of overall PowerShell 7 information
  $FR = 'https://raw.githubusercontent.com/' +
  'PowerShell/PowerShell/master/tools/metadata.json'
  $MetaFullRelease = Invoke-RestMethod $FR
# Get Details of latest preview
  $MetaPreview = Invoke-RestMethod 'https://aka.ms/pwsh-buildinfo-Preview'
# Get Details of the latest daily build
  $MetadataDaily = Invoke-RestMethod 'https://aka.ms/pwsh-buildinfo-daily'
# Display this information
  'PowerShell 7 Status:'
  $MetaFullRelease
  'Preview information:'
  $MetaPreview
  'Daily Build information'
  $MetadataDaily
}
Get-PWSH7ReleaseInformation
When you run this code, you see something like this:
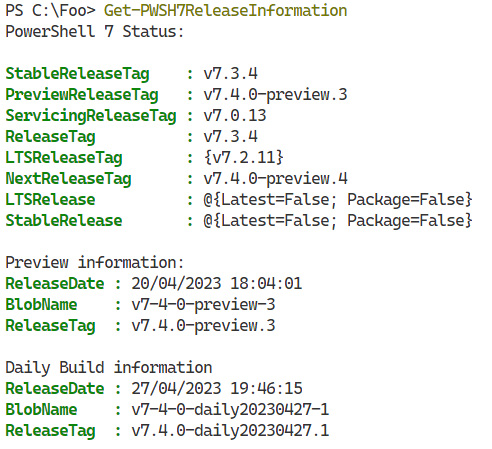
Figure 2.4 – Viewing release metadata
When PowerShell 7 starts, it checks the metadata, and if a new version is available (from GitHub), you will see a message something like this:
Figure 2.5 – Checking metadata at startup
Microsoft Update (MU) can also update PowerShell 7 when a new version is available. At the time of writing, MU can service your version of PowerShell within two weeks of it being available on GitHub. Likewise, if your installation is via the Microsoft Store, the Store should automatically download and apply updates.
These automatic methods of updating PowerShell 7 do take time, so if up-to-dateness is a key issue, consider just using the Install-PowerShell.ps1 script when and where you need to update the version of PowerShell on your system immediately.
If you use other tools, such as Chocolatey, you have to use these tools when PowerShell notifies you that an updated version is available.
The three key pillars of PowerShell
PowerShell has three key pillars:
- Cmdlets: Small programs that do useful things, such as retrieve a set of files in a folder. Some cmdlets come with PowerShell, some come with applications and services, and you can leverage a huge library of third-party tools.
- Objects: Data structures representing entities within your computer and containing properties and methods. Cmdlets can consume and produce objects.
- The pipeline: The pipeline enables you to chain two cmdlets – the output of one cmdlet is sent, or piped, to a second cmdlet.
Cmdlets
Cmdlets are small programs that do useful things, such as getting the details of all the running processes. Cmdlets developers write these cmdlets as .NET classes, typically using C#.
Cmdlets come either with PowerShell itself or as part of an application such as VMware or the various Windows Server features. In Chapter 5, you can read more about the tools you can use to manage Windows, including the Remote Server Administration Tools (RSAT).
Cmdlets are named using a strict noun-verb syntax, based on a restricted and well-known set of verbs. For example, you use the Get-Process command to get details of the processes. Likewise, you would use the Get-Service command to get details of all the services on a system. The strict naming of cmdlets is a great feature that helps you to discover other cmdlets.
Cmdlets take parameters that affect how the cmdlet operates. You specify a parameter with a parameter name (which always begins with a - character) and usually some value. For example, if you wanted to get details on the DHCP client service running in Windows 11, you would type as follows:
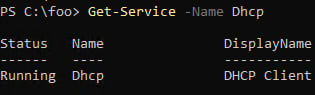
Figure 2.6 – Using Get-Service to view a Windows service
For more details on Powershell cmdlets, see https://packt.link/f9ZTD.
Objects
In PowerShell, an object is a data structure that contains properties and methods about some entity, such as a file or a Windows process. The properties of an object are specific attributes of that object, such as the file’s full name or the process’s current CPU usage. You can create objects using cmdlets (for example, the Get-Process command returns objects of the system.process.diagnostics type).
You use objects in PowerShell when you manage Windows and write scripts to automate some activity, such as deleting all the files in temporary folders. Objects are fundamental to PowerShell and are great at simplifying scripting.
A benefit of objects is that the details of the object are easy to view. Just pipe the output of a cmdlet to Get-Member, and you can discover precisely what is inside each object. There is no prayer-based text parsing, as is more usual in Linux environments. See https://packt.link/KULU6 for an explanation of prayer-based parsing.
For example, you can get details of the optional features available In Windows 11 using the Get-WindowsOptionalFeature cmdlet. When you use this cmdlet, PowerShell returns an array of objects, each representing one of the optional features. You can then pipe the output of that command to Get-Member to show what is inside each object occurrence like this:
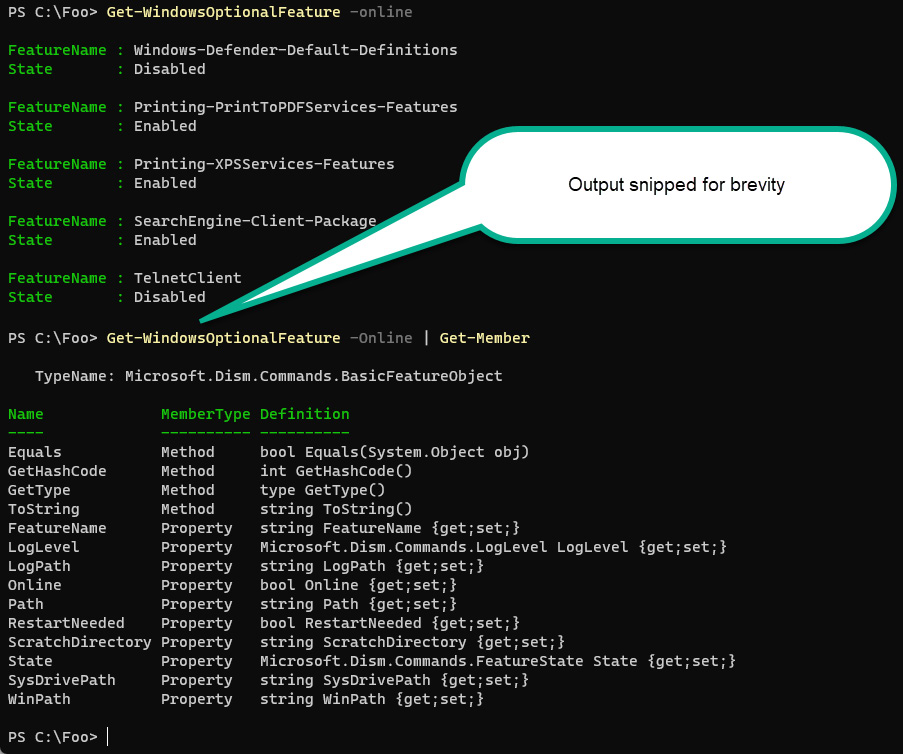
Figure 2.7 – Using Get-Member
When you automate Windows optional feature management, you easily discover that the property’s name, holding the feature’s current status is state. As you use PowerShell, this behavior becomes more and more useful.
For more details about objects inside PowerShell, see https://packt.link/QKxyh.
The pipeline
The pipeline is a feature of PowerShell that takes the objects a command creates and uses them as input for another PowerShell command. You use the | character to indicate the pipe operation, which you saw previously when you piped the output of the Get-WindowsOptionalFeature to the Get-Member command. The first cmdlet produced several objects (one for each Windows optional feature). By sending those objects to the next cmdlet, Get-Member can tell you what those objects look like.
The incredibly powerful pipeline enables you to create simple scripts to accomplish complex tasks. For example, suppose you wish to know which company made the software that uses the most virtual memory on your system. On Windows 11, each running application uses one or more (or a lot more) Windows processes. So, we can do this:

Figure 2.8 – Using the pipeline
In this example, you use Get-Process to get all the processes on your system. Powershell returns a process object for each Windows process. You then pipe it to Sort-Object to sort the objects based on VM usage (with the greatest VM usage sorted to the top). Then you take the top 150 of those processes (that is, the 150 processes using the most VM) and group them by the company attribute of the process object, which should be the application manufacturer. However, some apps do not populate that property!
PowerShell rests on top of .NET, so each PowerShell object, each service, each process, and so on is a .NET object. .NET provides a rich set of objects that enable you to interact with all the key Windows services and applications. In many cases, PowerShell is merely a wrapper around the functionality provided within .NET.
For more information on the pipeline, see https://packt.link/QVl4S.
Understanding these three pillars is fundamental to learning and mastering PowerShell.
PowerShell’s scripting language
PowerShell has a powerful scripting language that you can utilize to script key administrative tasks. The language is simple, with the syntax largely coming from C#.
The scripting language contains a variety of constructs that enable you to create powerful scripts. There are several features of the language:
- Variables: You use these to store data values in your scripts or console session. For more details on variables in PowerShell, see https://packt.link/qD2rO.
PowerShell comes with several built-in variables, some of which control preferences within PowerShell. For details, see https://packt.link/iuvBC.
- Operators: PowerShell provides a rich set of arithmetic, comparison, and string operators. PowerShell 7 has implemented many additional operators unavailable in Windows PowerShell. For more details on PowerShell operators, see https://packt.link/o0RPF.
- Loops: There are various ways to loop, iterating over a collection of objects to perform some action on a set of objects, such as changing the office name for a certain group of AD users. For details on loops in Powershell, see https://packt.link/d36fF and https://packt.link/zNi8F.
- Flow of control: Like all programming languages, PowerShell implements several different flows of control mechanisms. These allow you to alter the flow of control should some condition exist. For more details, see https://packt.link/9ghy2.
This chapter does not explore all aspects of the PowerShell scripting language fully. Microsoft has produced a good online training module entitled Introduction to scripting in PowerShell, which you can find at https://packt.link/8hhgt.
PowerShell’s formatting features
PowerShell provides a wealth of formatting features, which are very useful in automation scenarios. You can format a string to include, for example, a user name, date/time, or some other value. You have complete control over how PowerShell should format the string.
PowerShell also formats objects for easy console output. When you send objects to the console, PowerShell uses built-in defaults, describing how to output any given .NET/PowerShell object. You can change those defaults, should you need to.
Like most programming languages, PowerShell supports a range of mechanisms to format a string. You can concatenate strings or insert the value of a variable into a string. For example, you can do this:

Figure 2.9 – String formatting in PowerShell
.NET Framework and .NET provide rich string formatting features, which are useful when you need precise control over the formatting. You can read more about PowerShell and string formatting at https://packt.link/fJroH.
Getting help
One feature that stood out when Microsoft first unveiled Windows PowerShell was the built-in help system. PowerShell comes with a Get-Help cmdlet. If you run it with no parameters, you can see a description of how to use the Get-Help cmdlet. But if you use Get-Help with the name of a cmdlet, you get help with that cmdlet. The built-in help system is invaluable, as it tells you what the cmdlet does, which inputs it takes, and what it outputs. With thousands of cmdlets to choose from, using Get-Help is much simpler than trying to remember them all, as shown in the following screenshot:

Figure 2.10 – Using Get-Help
The help information quickly references what the cmdlet does and its calling syntax. You can also get examples and more detailed information, as shown in Figure 2.10.
You can also add help information to your scripts, which enables a script’s user to use Get-Help and get details about the script. You achieve this by adding a special block of help text at the start of the script.
Another great feature of PowerShell’s help system is that you can update the help text. The PowerShell help system enables the authors of the various scripts and commands you use to update help text and place it online. Then you use the Update-Help cmdlet to download the updates onto your system.
You may also note that there is very little help text the first time you use PowerShell. The reason for this is that PowerShell, by default, ships with minimal help text, which reduces the size of the PowerShell installation package. Once you first use any version of PowerShell on a system, you can download the most up-to-date help information, but only where you need it.
For more information on PowerShell’s help system, see https://packt.link/xL902.
Modules and commands
In PowerShell, you use commands to have PowerShell carry out some operation, whether it be displaying a file, adding a user to Active Directory, or setting the IP address of a computer.
Commands
In PowerShell, a command is something you can run from a script file or at the console that performs some operation. There are several types of PowerShell commands:
- Cmdlets: These are small programs (technically written as a .NET class).
- Functions: These are, in effect, script cmdlets, which are small scripts that emulate the behavior of a cmdlet. You can think of them as script cmdlets.
- Scripts: These are sets of PowerShell commands, which you save with the extension
.ps1.
In addition, the term command also applies to the many Win32 console applications, shipped with Windows 11 (over 300). Many of these are familiar to IT professionals, such as ipconfig.exe and ping.exe).
All PowerShell commands can accept and produce objects. The Win32 console applications, on the other hand, only take parameters (which tend to be unique to each console application) and output a string.
Console applications are very useful, although they can be harder to use in an automation scenario. If you need to, you can capture the output of a console application and use string manipulation to pull out the specific information you need. This approach, often called prayer-based parsing, is common in the Unix/Linux world. PowerShell objects make this process easier, and in most cases, there are PowerShell commands that can replace old console applications.
Modules
In PowerShell, a module contains a set of PowerShell commands, module metadata, and other information (such as help or formatting information). Before using any PowerShell command, PowerShell first loads the module containing that command.
By default, if you use a command in a module stored in one of a set of well-known folders, PowerShell automatically loads the module and then executes the command. Powershell has several default locations from which to load modules. The Windows PSModulePath environment variable defines PowerShell’s paths to discover and load modules (by default). Every time PowerShell starts up, it examines the current value of the module path variable and determines all the commands available (in those locations). This process creates a cache of all commands and which module to use.
For example, to use the Get-Process command to view all the running processes, PowerShell needs to load the Microsoft.PowerShell.Management module. This is the module that contains this command. Once PowerShell loads the module, it can execute the command.
Each time PowerShell starts up, it caches the location of every command in every module (for those modules located in one of those well-known places). This means that, in most cases, you only need to type a command, and the rest of the magic happens behind the scenes. You can put a module into any location on the disk and manually load it using Import-Module.
You can get modules from a variety of places:
- Built-in modules: These are modules that come with Windows PowerShell and PowerShell 7. They provide the basic PowerShell functionality.
- With applications or features: Some applications or Windows optional features come with PowerShell management tools. These enable you to manage the feature or the application. See Chapter 5 for more details on the RSAT.
- From the PowerShell Gallery: This is a Microsoft-maintained repository of community-authored modules. There are thousands of modules to choose from, as you can see at https://packt.link/ghY17.
- Commercial software offerings: Some software firms provide commercial modules. For example, /n software offers a suite of cmdlets with great communication capabilities. For more information about the cmdlets, see https://packt.link/FLF11.
- DIY: You are free to develop and use modules you have written or that your organization has developed. DIY modules exist (in the PowerShell Gallery) for a huge range of uses. For example, a Grateful Dead enthusiast created a module of scripts (https://packt.link/gq1Lb). These scripts may not help you manage Windows 11, but they indicate the breadth of available modules. Seek, and ye shall find, as the saying goes.
No matter where you get them from, modules are a critical component of PowerShell that help the authors of PowerShell package and ship their PowerShell modules.
If you want to learn more about building your own PowerShell 7 module, see https://packt.link/wvznY.
Discovery
In PowerShell, the term discovery means using built-in commands to find information on how to use PowerShell and PowerShell commands. The more you can discover, the less you need to memorize. Discovery is an extremely useful feature that the PowerShell team designed in the first versions and refined later. Without discovery, using thousands of commands and hundreds of potential modules would be much more difficult.
There are four key aspects of discovery within PowerShell:
- Discovering modules: Since modules contain commands, finding likely modules is useful. You can use the
Get-Module -ListAvailablecmdlet to see all the modules that PowerShell can discover on your host. You can also useFind-Moduleto find the modules contained in the PowerShell Gallery that may be interesting. - Discovering commands: Once you have a module, you can find the commands within the module by using
Get-Commandand specifying the module name like this:
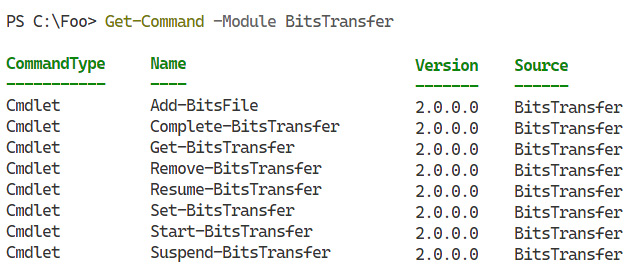
Figure 2.11 – Discovering commands in a module
- Discovering cmdlet details: Once you know the commands, you can learn how a given command works – what parameters you can specify, what it outputs, and most importantly, what this command does. Using
Get-Help, as noted earlier, helps you to work out what a cmdlet, function, or script does. For example, you can determine more details of theStart-BitsTransfercommand like this:
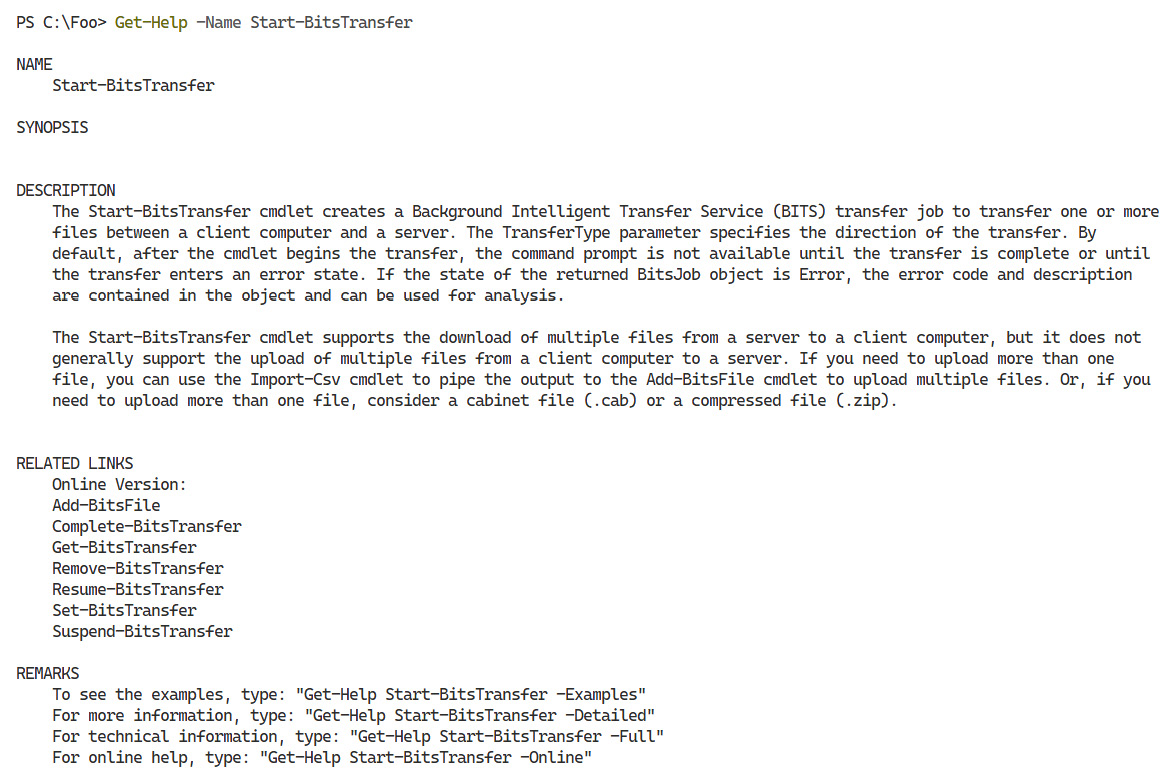
Figure 2.12 – Getting help on a cmdlet
The help text gives you more details about what a command does.
- Discovering what a cmdlet returns (that is, the objects emitted by the command): If you have a cmdlet that returns a value, remember that what you see in the console represents the objects returned from the cmdlet. The actual objects may contain more information that PowerShell does not display by default. To discover the details of the objects returned, you can do this: if you are using Windows 11’s Hyper-V function, you can use
Get-VMto determine the VMs on your host.
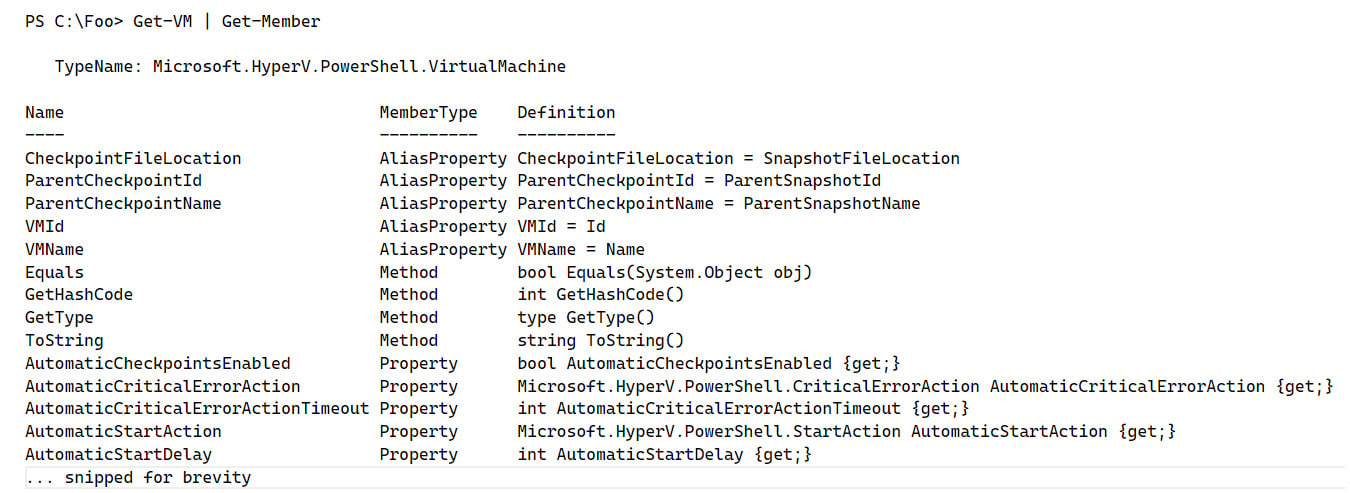
Figure 2.13 – Getting the members of a class
These four discovery approaches help you use PowerShell – to find modules and commands, determine what a PowerShell command does, and establish which outputs, if any, result.
PowerShell and security
PowerShell security is an issue for most IT professionals. PowerShell comes with various security features that can help you both harden PowerShell and improve your environment’s security.
Security by default
The PowerShell team designed PowerShell to be secure by default. But it provides IT professionals with great power at the same time. And with great power comes great responsibility.
Windows has a wealth of access control mechanisms, such as the Access Control List (ACL) with Windows NT File System. As an administrator, setting the ACL on files and objects in Active Directory is an important line of defense. If you set an ACL that denies some user access, that user cannot use PowerShell to bypass the ACL. Likewise, numerous commands require that you run PowerShell as an administrator.
But anyone possessing administrator credentials can do almost anything on a system.
PowerShell logging
PowerShell records a variety of actions in Windows event logs automatically. These include the PowerShell engine starting up, shutting down, and more. Windows PowerShell and PowerShell 7 log the same events but use different Windows event logs.
Windows PowerShell sends event details to the event log, Windows PowerShell (underneath Applications and Services Logs in Event Viewer). PowerShell 7 writes event log entries to the PowerShellCore event log (also underneath Applications and Services Logs in Event Viewer).
From a forensic point of view, these event log entries may be useful to discover when someone uses PowerShell on a given host. To learn more about PowerShell and logging, see https://packt.link/CpBO7.
PowerShell script block logging
In addition to logging basic PowerShell engine events, PowerShell can also log any script block executed on a given host. This form of logging captures a script’s complete activity and content, providing a full audit trail of a PowerShell session.
Powershell does not enable logging by default since a performance overhead is associated with event logging, particularly script block logging. You can change this manually on a given host or via Group Policy.
The about_Logging page, noted previously, contains more information about script block logging. You can also refer to the following blog post: https://packt.link/hq0tE.
Module logging
You can turn on logging for specified PowerShell modules. If you turn on module logging for a given module, PowerShell logs pipeline execution events into the event log.
Execution policy
PowerShell has an execution policy that controls a user’s ability to run any PowerShell script directly. You can use the Set-ExecutionPolicy to change the policy and Get-ExecutionPolicy to view the current policy.
You can set the execution policy to different values:
AllSigned: All scripts or configuration files must be signed by a trusted publisher.RemoteSigned: Scripts and configuration files downloaded by the internet must be signed by a trusted publisher, while you can execute scripts authored locally.Restricted: PowerShell does not load configuration files or run any scripts. Note: This is the default for Windows 11 hosts!Unrestricted: PowerShell runs any script and loads all configuration files.Bypass: PowerShell blocks nothing and issues no warning messages.Default: Sets the execution policy to Restricted on Windows 11 hosts (and sets the policy to RemoteSigned on Windows Server systems).
Note that the execution policy is not a security barrier, but more of a minor speed bump. While a restrictive policy may stop you from running a script, you can open the file in a text editor such as Notepad, copy all the text, paste it into PowerShell, and PowerShell runs the script. For a more detailed look at execution policies, see the help file at https://packt.link/JLOd6.
Many (and possibly most) administrators use Set-ExecutionPolicy to set the policy on the local machine to Unrestricted and perform the administrative task. Sometimes, they may even remember to set it back to the default. As noted in the help document, you can also use the -Scope parameter to limit the change of the execution policy in line with the current process.
In large production environments, signing the scripts you use in the enterprise, using your firm’s private key infrastructure is a best practice. You, or your security team, would need to create an X.509 certificate that enables code signing. Then you can use the Set-AuthenticodeSignature to sign scripts.
If you plan to employ code-signing PowerShell scripts, you must clearly define the process of script signing, including detailed testing and vetting. You must ensure a good script signing process, including who can access the signing key (and how). If the certificate is put on a local file server for anyone to use, code signing achieves nothing.
Transcription
You can use the Start-Transcript cmdlet to create a detailed plain text record of all or part of a PowerShell session. You can either set this in a script (to memorialize the execution of a script) or within a PowerShell session to record the details of the session. You use Stop-Transcript to stop the recording.
You can also enforce transcripts of all PowerShell sessions via Group Policy. If you do a lot of transcription, remember to implement a process to review the transcripts and clear or archive older files.
Configuring PowerShell
PowerShell comes with a default configuration. To further configure your environment and override that default configuration, you can add modules, use PowerShell profile scripts, and deploy PowerShell settings via Group Policy.
Adding modules
PowerShell and Windows applications come with numerous modules (each containing PowerShell commands). To extend PowerShell’s capabilities, you can find and download additional modules. The PowerShell Gallery is home to thousands of community (and Microsoft) authored modules that could be helpful, as noted in the Modules section earlier.
You can use your browser to view the contents of the gallery at https://packt.link/ghY17. The gallery also includes newer versions of modules shipped with Windows (and Windows PowerShell). For example, the authors of both the PackageManagement and PowerShellGet modules have created updated versions that you can download.
The NTFSSecurity module, for example, makes it much easier to automate the ACLs within Windows NTFS. The commands in this module greatly simplify the management of ACLs on files and folders and the configuration of permission inheritance.
To use PowerShell with the PowerShell Gallery, you need the latest version of the PowerShellGet module. You can also get this update from the PowerShell Gallery.
Profiles
Profiles are PowerShell scripts that PowerShell runs automatically each time you run either Windows PowerShell or PowerShell 7. The profile files are in a well-known location and have a well-known name (well known to PowerShell, that is).
To cater to a wide variety of usage scenarios, PowerShell defines four separate profile files:
AllUsersAllHosts: PowerShell runs this profile file for every user using any PowerShell host (including Windows Terminal, VS Code, etc.).AllUsersCurrentHost: Powershell runs this script for all users using this specific PowerShell host.CurrentUserAllHosts: PowerShell runs this solely for the currently logged-on user for all hosts.CurrentUserCurrentHost: PowerShell runs this solely for the current logged-on user and only this host. The built-in$Profilevariable holds the name of this profile file.
You can discover the location of each of these four files (including the full path name) by piping $Profile to Format-List, as follows:

Figure 2.14 – Profile file locations
For more details on the PowerShell profile, see https://packt.link/3q3ek.
Group Policy
Group Policy is a feature of Windows Active Directory. Group Policy enables the administrator to dictate specific settings and policies on individual systems. Windows automatically applies these policies each time you restart the system or log on and refresh the policies regularly. Group Policy is a great way to leverage Active Directory to create customized, desktop environments.
The PowerShell-related policies you can set using Group Policy are as follows:
- Execution Policy: Specifies a value different from PowerShell’s default execution policy
- Module Logging: Whether to perform module logging and for which modules
- Script Block Logging: Whether to log script block execution
- Transcription: Whether to create transcripts for all PowerShell sessions
- The default source path for Update-Help: Allows you to create a local repository for help information and to have
Update-Helpuse that location to obtain the updates
See https://packt.link/x4M1W for more information about these Group Policy settings.
Using PowerShell
Traditionally, with Windows PowerShell, you have two main ways of accessing PowerShell: the PowerShell console and the Windows PowerShell ISE. The ISE was popular and was designed to be extendable.
Developers could also host and access the PowerShell engine. This architecture allows an application to leverage PowerShell. For more details on hosting PowerShell, see https://packt.link/CQAVf.
The ISE, however, does not support PowerShell 7 and Microsoft has developed an outstanding replacement, the Microsoft Terminal. You can use this as a high-fidelity way to access Windows PowerShell and PowerShell 7.
The PowerShell console
In the early versions of PowerShell, the Windows PowerShell console was the only way to access it. Strictly speaking, the console is an application (conhost.exe) that exposes the Windows PowerShell engine to the end user and looks like this:
Figure 2.15 – PowerShell console
The Windows PowerShell Integrated Scripting Environment (ISE)
Microsoft first introduced the ISE with Windows PowerShell V2 but made substantial improvements with Windows PowerShell V3. The ISE combines a good script editor with a console window. In Windows, this application is at C:\WINDOWS\System32\WindowsPowerShell\v1.0\powershell_ise.exe.
It’s worth noting that while you can continue to use the ISE, Microsoft has ceased active development of the product. The replacement is Visual Studio Code.
The ISE is a good tool that enables you to create, test, and use PowerShell scripts. The ISE looks like this:

Figure 2.16 – The ISE
Windows Terminal
The original console application did not allow Microsoft to extend the console. As a replacement, Microsoft developed Windows Terminal. The goal was to create a great terminal, capable of hosting cmd.exe, Windows PowerShell, and PowerShell 7 (and more). The terminal also supports a tabbed interface.
The terminal looks like this:
Figure 2.17 – Windows Terminal
Windows 11 also allows you to use the console or Windows Terminal. You access this by using the Windows 11 Settings apps and navigating to the For developers page, like this:
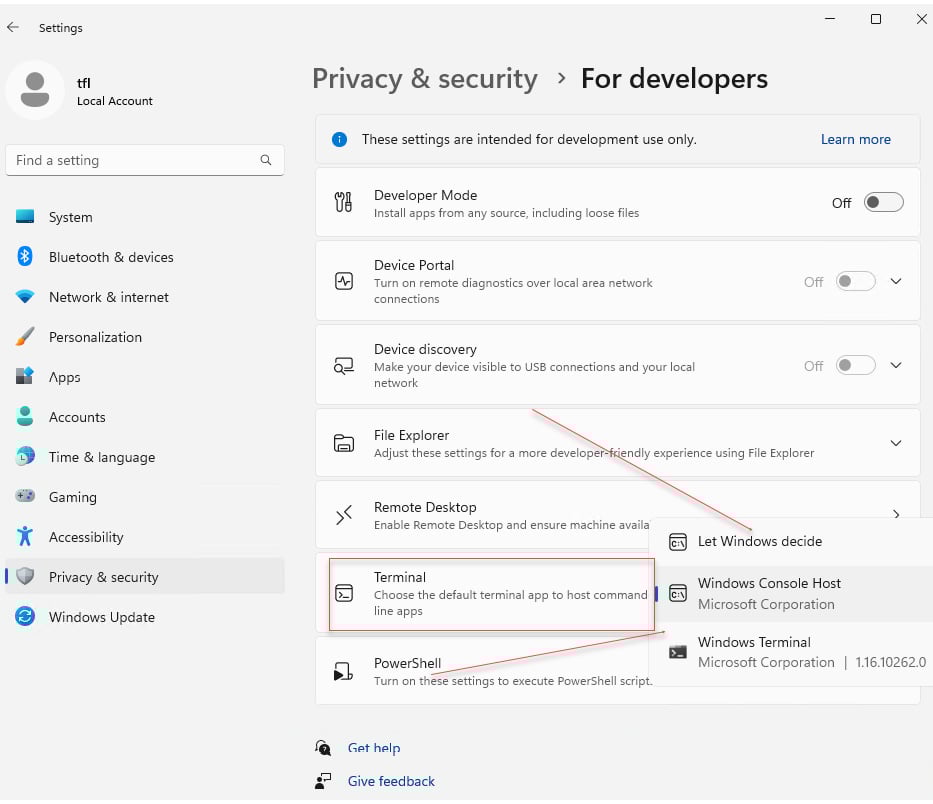
Figure 2.18 – Terminal settings
For a more detailed overview of Windows Terminal, see https://packt.link/BQi45.
Microsoft Visual Studio Code
As part of the move away from the Windows PowerShell ISE, Microsoft launched a new tool, Visual Studio Code. Visual Studio Code looks a bit like the ISE, with a three-pane layout (folders and files on the left, an editor pane in the top right, and the terminal in the bottom-right pane).
Visual Studio Code looks like this:
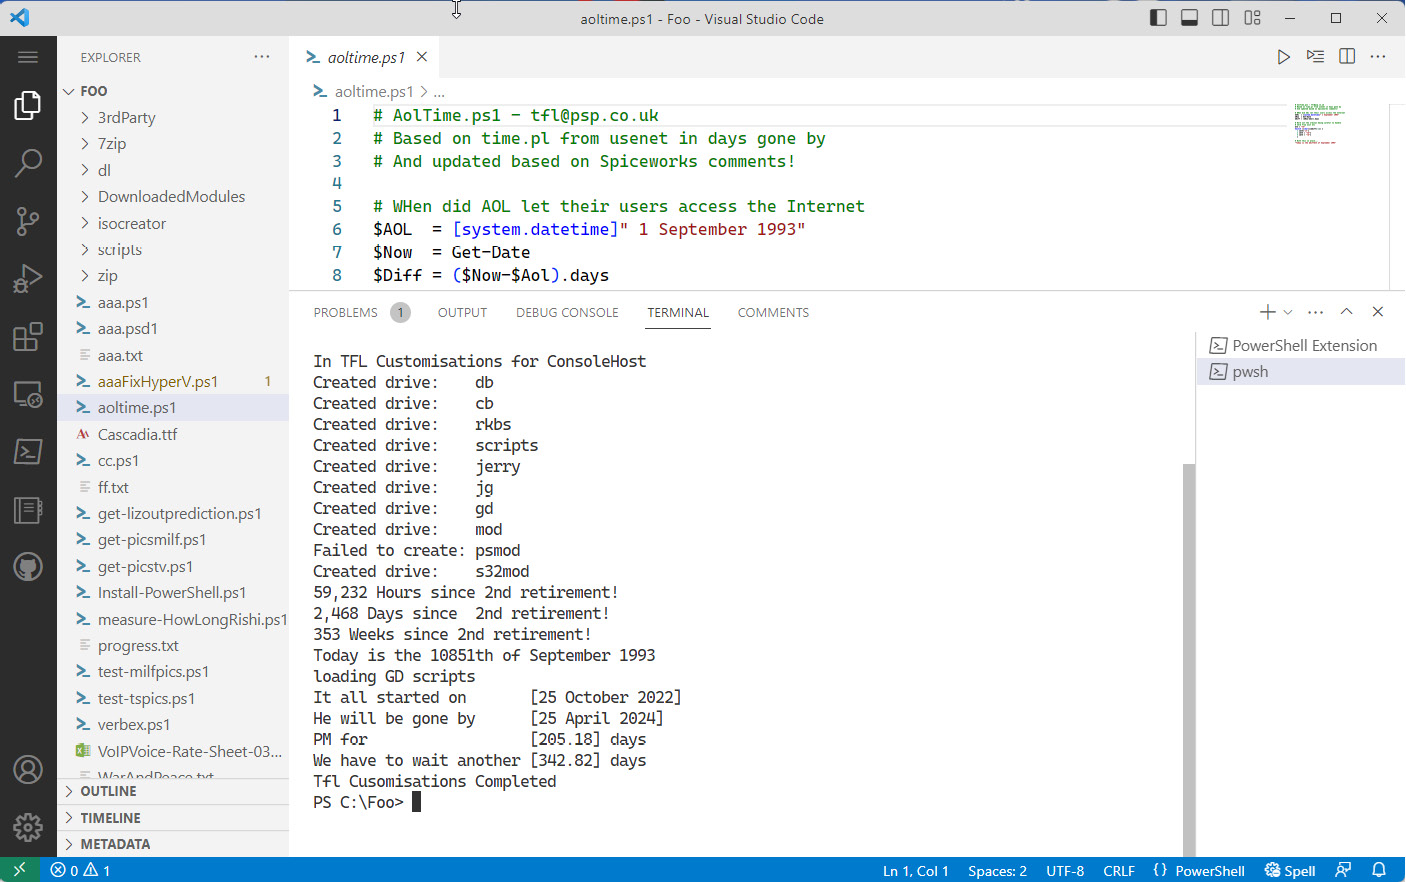
Figure 2.19 – Visual Studio Code
Visual Studio Code is not loaded into Windows 11 by default, but you can use the Windows Store to install the product. You can also download the latest versions directly from GitHub at https://packt.link/Y5CEr. Or you can use your favorite package manager to install Visual Studio Code.
For more information on Visual Studio Code or to download the product, see https://packt.link/QfvFZ. Once installed, Visual Studio Code detects available updates and prompts you to install them.
One great feature of Visual Studio Code is the extension architecture. This allows you to add a huge range of extensions, greatly enhancing your usage. For example, you can add a spell-checker, a great drawing package, Git Integration, and support for Markdown. For more details on the available extensions and how to manage Visual Studio Code extensions, see https://packt.link/K13Jv.
Desired State Configuration
Desired State Configuration (DSC) is a management framework in Windows PowerShell that provides a standardized way of defining a system’s DSC. This enables the complete automation of device configuration using a declarative model: you create a configuration that states how a device should be configured, publish that configuration, and then wait for the devices to update themselves to match the configuration. DSC, as described here, is only available using Windows PowerShell.
A single configuration can be used across multiple devices, ensuring all hosts have identical and standardized settings. DSC prevents configuration drift when numerous changes occur over time.
DSC supports two deployment methods:
- Push mode: In this mode, the administrator makes the configurations and manually pushes them to the target devices. Push mode is one-way communication and can only work if the devices are available on the network during the push. This option best suits small environments where all devices are always connected. It also assumes that the appropriate PowerShell modules are available on all devices.
- Pull mode: In this mode, the administrator creates a pull server that hosts the configuration information. You then configure each device to contact this server at regular intervals (such as every 15 minutes) to look for any configuration changes. The device can pull the DSC data and any required modules if found. Using pull mode allows you to automate the deployment of configurations to a high frequency and doesn’t require further interaction from the administrator.
DSC, in Windows PowerShell, has both a configuration and a resource side, and a configuration manager runs the show between the two:
- Configurations: These are PowerShell scripts that define and configure the resources. The DSC engine will examine the configuration to ensure the system adopts the desired state.
- Resources: A resource is a code that keeps the target of a configuration in a specific state. By default, DSC has several resources, which you can see by running the
Get-DSCResourcecmdlet. These are typically in Windows PowerShell modules:
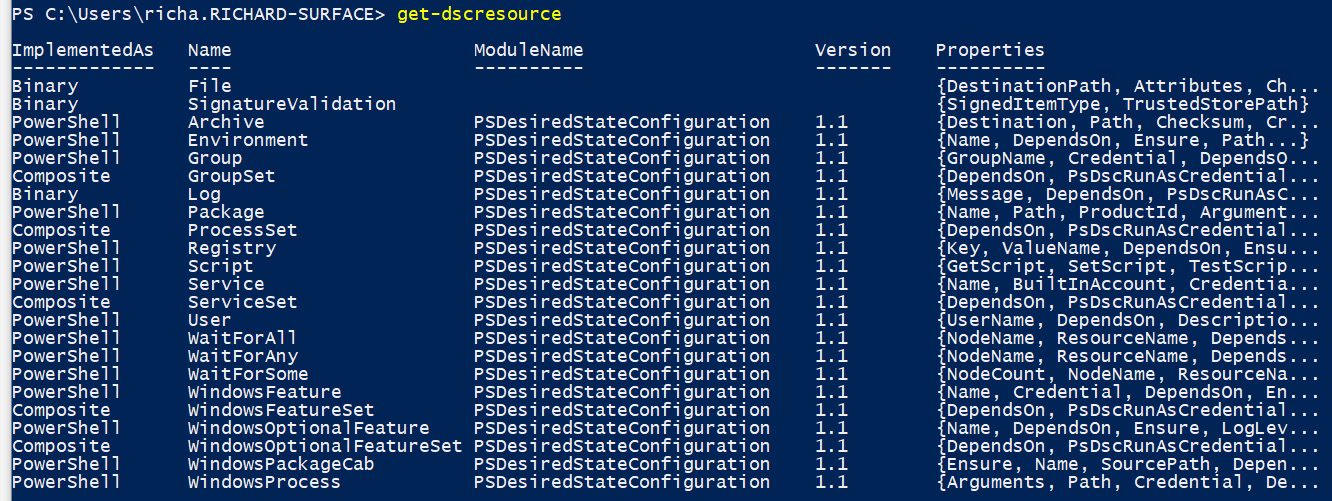
Figure 2.20 – Getting DSC resources
- Local Configuration Manager (LCM) runs on the local device to ensure the configuration is applied correctly. The LCM polls the system to ensure that the state defined by the configuration is maintained, and corrects any errors.
An example of how you would use DSC configurations would be to prevent a specific process from running or having a registry key or security policy set in a particular way to meet your security requirements.
Use the official Microsoft DSC resource kit for more advanced configuration: https://packt.link/ZpjZw.
At the time of writing, DSC does not provide the rich features available with Windows PowerShell. Beginning with PowerShell V 7.2, PowerShell no longer ships with the PSDesiredStateConfiguration module as part of the PowerShell 7 download. This has allowed a separate DSC team to invest in and develop DSC independently of PowerShell (and has the benefit of reducing the size of the overall PowerShell download package).
While you can do some DSC-based configuration, DSC for PowerShell 7 does not currently include the richness available in Windows PowerShell. For more details on DSC and Powershell, see https://packt.link/CBsp0.
Summary
To summarize this chapter, we have learned about Windows PowerShell and PowerShell. We examined the components of PowerShell, the PowerShell scripting language, and modules and commands. We then learned how to manage security with PowerShell. We also looked at configuring and using PowerShell. Finally, the chapter ended with a brief look at DSC. There is a lot more to PowerShell, such as classes, error handling, debugging, and more. For a more detailed look at PowerShell, see https://packt.link/SNGDk.
In the next chapter, you will learn about Windows image configuration and customization.
