Download code from GitHub
Modules and Snap-Ins
Modules are packaged collections of commands that may be loaded inside PowerShell, allowing PowerShell to interact with new systems and services. Modules come from a wide variety of different sources.
PowerShell itself is installed with a small number of modules, including ThreadJob and PSReadline.
You can install modules by adding Windows features or enabling capabilities, for example, the ActiveDirectory and GroupPolicy modules.
Some applications include modules; for example, Microsoft Local Administrator Password Solution (LAPS) includes a PowerShell module in the installer that you can use to manage some of the features of the application.
The Windows platform itself includes many modules, most of these having been included since Windows 8 was released.
Finally, you can install modules from the PowerShell Gallery or another registered repository. The PowerShell Gallery can include updated versions of PowerShell installed modules.
The PowerShell Gallery is therefore a valuable source of modules published by Microsoft, VMware, Amazon Web Services, and many others.
Snap-ins were included in PowerShell 1 and largely replaced with modules with the release of PowerShell 2. PowerShell 7 does not support snap-ins; snap-ins are limited to Windows PowerShell.
The chapter covers the following topics:
- Introducing modules
- Using Windows PowerShell modules in PowerShell 7
- PowerShellGet 3.0
- PowerShell repositories
- About snap-ins
Introducing modules
Modules were introduced with the release of PowerShell version 2.0. A module is a packaged set of commands that includes any required supporting content; modules often include help content.
Modules tend to target a specific system or focus on a small set of related operations. For example, the Microsoft.PowerShell.Archive module contains a small number of commands for interacting with ZIP files.
The modules available on a system can be discovered using the Get-Module command.
The Get-Module command
Get-Module is used to find the modules either in the current PowerShell session, or available on the current system.
PowerShell itself comes with several built-in modules, including PowerShellGet, ThreadJob, PSReadLine, and the commands in the Microsoft.PowerShell.* modules.
The Windows platform, especially the most recent versions, comes with a wide variety of modules installed. These, as well as any other available modules, can be viewed using the Get-Module -ListAvailable command.
By default, Get-Module returns information about each module that has been imported (either automatically or by using Import-Module). For example, if the command is run from PowerShell 7, it shows that the ISE module has been loaded:
PS> Get-Module
ModuleType    Version    Name                            ExportedCommands
----------    -------    ----                            ----------------
Script        1.0.0.0    ISE                             {Get-IseSnippe...}
Manifest      3.1.0.0    Microsoft.PowerShell.Management {Add-Computer...}
The ListAvailable parameter shows the list of modules that are available on the system instead of just those that have been imported:
Get-Module -ListAvailable
Modules are discovered using the paths in the PSModulePath environment variable, which contains a delimited list of paths for PowerShell to search.
Get-Module will show all instances of a module regardless of the path and version when using the All parameter:
Get-Module <ModuleName> -All -ListAvailable
Modules that are available on a system can be imported either by running Import-Module or by running a command from the module.
The Import-Module command
PowerShell 3 and later attempts to automatically load modules if a command from that module is used and the module is under one of the paths in the $env:PSModulePath environment variable. Explicit use of the Import-Module command is less important than it was before Windows PowerShell 3.
For example, if PowerShell is started and the CimCmdlets module is not imported, running the Get-CimInstance command will cause the module to be automatically imported. This is shown in the following example:
PS> Get-Module CimCmdlets
PS> Get-CimInstance Win32_OperatingSystem | Out-Null
PS> Get-Module CimCmdlets
ModuleType Version    PreRelease Name         ExportedCommands
---------- -------    ---------- ----         ----------------
Binary     7.0.0.0               CimCmdlets   {Get-CimAssociatedInstance,...
The autoloader may be disabled using the $PSModuleAutoLoadingPreference variable as shown here:
$PSModuleAutoLoadingPreference = 'None'
You can explicitly import modules in PowerShell using the Import-Module command. Modules may be imported using a name or with a full path, as shown in the following example:
Import-Module -Name ThreadJob
Import-Module -Name $PSHome\Modules\ThreadJob\ThreadJob.psd1
Importing a module using a path is only required if the module is not in a discoverable path.
Once a module has been imported, the commands within the module may be listed using Get-Command as follows:
Get-Command -Module ThreadJob
Modules, Get-Command, and auto-loading
As the commands exported by a module are only identified by PowerShell importing the module, the previous command will also trigger an automatic import.
Modules installed in Windows PowerShell 5 and later are placed in a folder named after the module version, for example, Modules\ModuleName\1.0.0\<ModuleContent>. This allows multiple versions of the same module to coexist, as shown in the following example:
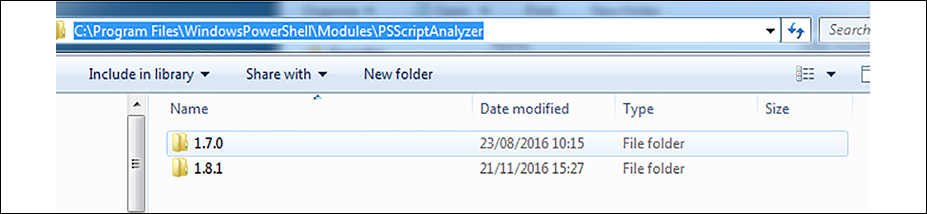
Figure 2.1: Side-by-side versioning
Version 1.8.1 of PSScriptAnalyzer will be imported by default, as it is the highest version number. It is possible to import a specific version of a module using the MinimumVersion and MaximumVersion parameters:
Import-Module PSScriptAnalyzer -MaxmimumVersion 1.7.0
Modules that have been imported can be removed from a PowerShell session using the Remove-Module command.
The Remove-Module command
The Remove-Module command removes a previously imported module from the current session.
For binary modules or manifest modules that incorporate a Dynamic Link Library (DLL), commands are removed from PowerShell but DLLs are not unloaded. DLL files used in a PowerShell session cannot be unloaded without restarting the PowerShell process.
Remove-Module does not remove or delete the files that make up a module from a computer.
Each of the preceding commands, by default, interacts with modules saved in the PSModulePath environment variable.
PSModulePath in PowerShell
PSModulePath is a delimited list of paths that can be used to store modules. You can import modules in these paths by name and they will be automatically loaded when a command from the module is used.
PowerShell allows the value of $env:PSModulePath to be set using user- and machine-scoped environment variables. By default, the machine-scoped variable should include the following paths, which are used by Windows PowerShell and by PowerShell 7 for compatibility:
C:\Program Files\WindowsPowerShell\Modules
C:\Windows\System32\WindowsPowerShell\v1.0\Modules
If the environment variables do not exist, PowerShell 7 uses the default values:
PS> $Env:PSModulePath -split ';'
C:\Users\whoami\Documents\PowerShell\Modules
C:\Program Files\PowerShell\Modules
c:\program files\powershell\7\Modules
The default values in the preceding list are included regardless of the value of the environment variable.
When using module paths, it is important to note that PowerShell does not search all paths for the latest version of a module. PowerShell searches the list of paths in the order they appear in the PSModulePath environment variable. If a module is listed in more than one path, the most recent version from the first discovered path is used.
For example, if the current user path contains a module with version 1.0.0, and the program files path contains the same module but with version 2.0.0, PowerShell will prefer to load version 1.0.0 because the current user path is searched first. The Version or MinimumVersion parameter must be used with Import-Module to avoid this.
If both Windows PowerShell and PowerShell 7 are in use in an environment, care must be taken when updating the PSModulePath environment variable. The behavior described previously differs from Windows PowerShell. In Windows PowerShell:
- If the user environment variable is set, it completely replaces the user value, which defaults to
C:\Users\whoami\Documents\WindowsPowerShell\Modules - If the machine environment variable is set, it replaces the
system32path:C:\windows\system32\windowspowershell\v1.0\Modules - In all cases, the
C:\Program Files\WindowsPowerShell\Modulespath remains
The C:\windows\system32\windowspowershell\v1.0\Modules path should be included in the machine environment variable to allow PowerShell 7 to load modules, either directly or using a Windows PowerShell compatibility session.
The value of $env:PSModulePath may be safely modified within on all PowerShell versions and all platforms, for example, by using a profile script. Changes made to $env:PSModulePath are scoped to the process and only affect the current PowerShell session and any child processes; the changes do not persist.
PowerShell 7 can use modules intended for Windows PowerShell either directly or by using a Windows PowerShell compatibility session.
Using Windows PowerShell modules in PowerShell 7
Many modules available to Windows PowerShell are compatible with PowerShell 7 without requiring any changes.
If a module is not compatible with PowerShell 7, an attempt can be made to load the module in a Windows compatibility session.
In PowerShell 6, the following functionality discussed is part of the WindowsCompatibility module available in the PowerShell Gallery. This module is not required in PowerShell 7. In PowerShell 7, the ability to load a module in a compatibility session is built into the Import-Module command.
The TLS module, for example, will not load PowerShell 7 by default because it does not state that it supports the Core edition of PowerShell, as shown by Get-Module:
PS> Get-Module TLS -ListAvailable -SkipEditionCheck
    Directory: C:\Windows\System32\WindowsPowerShell\v1.0\Modules
ModuleType Version    PreRelease Name       PSEdition ExportedCommands
---------- -------    ---------- ----       --------- ----------------
Manifest   2.0.0.0               TLS        Desk      {New-TlsSessionTic...
The module can be loaded in two ways:
The edition check can be skipped (the module may work, it may just lack testing, and therefore careful testing may be required before using the module in a production scenario):
Import-Module TLS -SkipEditionCheck
Alternatively, if the previous command fails, the module may load in a compatibility session:
PS> Import-Module TLS -UseWindowsPowerShell
WARNING: Module TLS is loaded in Windows PowerShell using WinPSCompatSession remoting session; please note that all input and output of commands from this module will be deserialized objects. If you want to load this module into PowerShell Core please use 'Import-Module -SkipEditionCheck' syntax.
The compatibility session can be seen using the Get-PSSession command after the module has been imported:
Get-PSSession -Name WinPSCompatSession
When importing the preceding TLS module, a warning message is displayed that notes the input and output is deserialized. The impact of this depends on the complexity of the objects returned by the command; typically, it will mean that methods of specialized types will not work from PowerShell 7.
The effect of this can be demonstrated by invoking Get-WmiObject in the compatibility session. Get-WmiObject is not available in PowerShell 7 and cannot be directly used:
$session = Get-PSSession -Name WinPSCompatSession
$process = Invoke-Command -Session $session -ScriptBlock {
    Get-WmiObject Win32_Process -Filter "ProcessID=$PID"
}
If the Get-WmiObject command is run in Windows PowerShell without using Invoke-Command, it will have several methods available. One of these methods is GetRelated, which is typically used as follows when used in Windows PowerShell:
$process = Get-WmiObject Win32_Process -Filter "ProcessID=$PID"
$process.GetRelated('Win32_Session')
Because PowerShell 7 has a copy of the properties only, the method does not exist and an error will be displayed:
PS> $session = Get-PSSession -Name WinPSCompatSession
PS> $process = Invoke-Command -Session $session -ScriptBlock {
>>     Get-WmiObject Win32_Process -Filter "ProcessID=$PID"
>> }
PS> $process.GetRelated('Win32_Session')
InvalidOperation: Method invocation failed because [Deserialized.System.Management.ManagementObject#root\cimv2\Win32_Process] does not contain a method named 'GetRelated'.
The compatibility feature is incredibly useful but does not replace native compatibility with modern versions of PowerShell.
PowerShell on the Windows platform has a wide variety of modules available, or available through installable applications and features to interact with other systems. New modules can also be installed from resources such as the PowerShell Gallery.
Finding and installing modules
PowerShell includes a module named PowerShellGet, which can be used to register repositories and search for and install modules.
By default, PowerShellGet searches the PowerShell Gallery.
What is the PowerShell Gallery?
The PowerShell Gallery is a Microsoft-run repository and distribution platform for PowerShell scripts and modules written by Microsoft or other users.
The PowerShell Gallery has parallels in other scripting languages, as shown in the following examples:
- Perl has cpan.org
- Python has PyPI
- Ruby has RubyGems
Support for the gallery is included by default in PowerShell 5 and above. For Windows PowerShell 3 and 4, PowerShellGet must be installed as described in Microsoft Docs: https://docs.microsoft.com/powershell/scripting/gallery/installing-psget.
The PowerShell Gallery may be searched using https://www.powershellgallery.com as shown in the following screenshot:
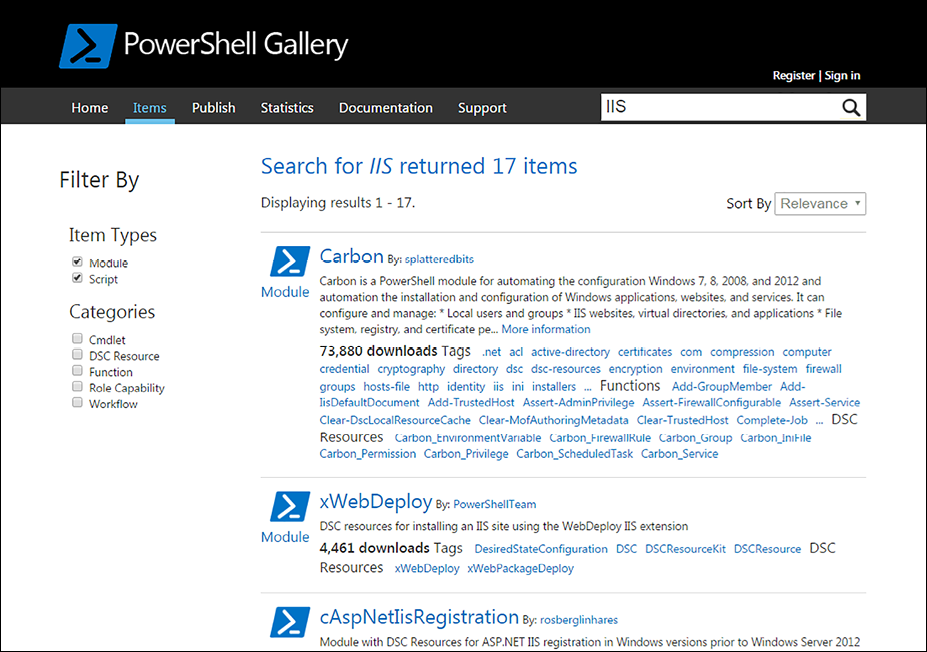
Figure 2.2: Searching the PowerShell Gallery
You can use the Find-Module command to search the PowerShell Gallery, or any registered repository, instead of using the web page.
The Find-Module command
Find-Module is used to search registered PowerShell repositories. Modules are identified by name, as shown in the following example:
Find-Module Carbon
Find-Module -Name Carbon
Find-Module -Name Azure*
You can use the Filter parameter when the name alone is not sufficient to find an appropriate module. Supplying a value for the Filter parameter is equivalent to using the search field in the PowerShell Gallery, it expands the search to include tags:
Find-Module -Filter IIS
The Find-Module command cannot filter based on PowerShell edition, and the result of the search does not state which version the module might work with.
Once found, a module can be installed using the Install-Module command.
The Install-Module command
The Install-Module command installs modules from the PowerShell Gallery or any other configured repository. By default, Install-Module adds modules to the path for AllUsers, at C:\Program Files\PowerShell\Modules on Windows and at /usr/local/share/powershell/Modules on Ubuntu.
Access rights
Installing a module under the AllUsers scope requires administrative access.
For example, the posh-git module may be installed using either of the following two commands:
Find-Module -Name posh-git | Install-Module
Install-Module posh-git
Modules may be installed under a user-specific path ($home\Documents\WindowsPowerShell\Modules) using the Scope parameter:
Install-Module carbon -Scope CurrentUser
If the most recent version of a module is already installed, the command ends without providing feedback. If a newer version is available, it will be automatically installed alongside the original.
The Force parameter may be used to reinstall a module:
Install-Module posh-git -Force
Force may also be used to install a newer version of a module when the existing version was not installed from a PS repository, or when changing the scope a module is installed in.
The Install-Module command does not provide an option to install modules under the $PSHOME directory. The $PSHOME directory is reserved for modules that are shipped with the PowerShell installer, or for Windows PowerShell, those that are shipped with the Windows operating system.
The Update-Module command
You can use the Update-Module command to update any module installed using the Install-Module command.
In both Windows PowerShell and PowerShell 7, Update-Module attempts to update the specified module to the latest or specified version.
The Save-Module command
The Save-Module command downloads the module from the PowerShell Gallery (or any other registered repository) to a path without installing it. This is useful if you save a module to an alternate module path, or if you intend to copy the module onto a system that cannot use Install-Module.
The following example command downloads the Carbon module into a Modules directory in the root of the C: drive:
Save-Module -Name Carbon -Path C:\Modules
Save-Module will download the module and overwrite any previously saved version in the specified path. The command ignores other downloaded versions of the module.
Each of the preceding commands is part of PowerShellGet 2. PowerShellGet 3 is likely to be released in the coming months and adopts a slightly different approach to the commands.
PowerShellGet 3.0
PowerShellGet 2 (for example, PowerShellGet 2.2.4.1) implements the Install-Module, Update-Module, and Save-Module module commands demonstrated at the beginning of this chapter.
PowerShellGet 3.0 is in preview at the time of writing; the following commands are based on the beta7 pre-release. One of the key features is that this new version does not depend on the PackageManagement module, allowing a simpler installation process, avoiding the need to bootstrap the NuGet provider, making upgrading the module simpler.
The preview version also uses new command names, completely divorcing it from the previous implementations of PowerShellGet. The change in command names means the new version can safely be installed alongside any existing version.
PowerShellGet 3.0 can be installed as follows:
Install-Module PowerShellGet -Force -AllowPrerelease
Once installed, you'll need to register the PowerShell Gallery or another repository:
Register-PSResourceRepository -PSGallery
In PowerShellGet 2.0, you implement separate commands to work with modules and scripts. PowerShellGet 3.0 does not differentiate between modules and scripts; all artifacts are termed PSResource, and all searches use the Find-PSResource command. For example, we can find a module by using the following command:
Find-PSResource -Name Indented.Net.IP -Type Module
The Type parameter may be omitted without affecting the search results in this case.
Most of the commands in PowerShellGet 3.0 use the same approach as those in PowerShellGet 2.2.4 and below. Over time, the differences between the commands are likely to start to appear; for example, Install-PSResource includes a Reinstall parameter, which is somewhat like the Force parameter for Install-Module in PowerShellGet 2.
Repositories
Like older versions of PowerShellGet, repositories are registered on a per-user basis. In PowerShellGet 2.2.4 and below, the repository configuration file is found in the following path:
$env:LOCALAPPDATA\Microsoft\Windows\PowerShell\PowerShellGet\PSRepositories.xml
The PSRepositories.xml file is stored in CliXml format and may be read using the Import-CliXml command. The file is normally read and updated using Get-PSRepository, Register-PSRepository, and Unregister-PSRespository.
PowerShellGet 3.0 uses a simpler format for the PSResourceRespository.xml file. The file may be found in the following path:
$env:LOCALAPPDATA\PowerShellGet\PSResourceRepository.xml
The Get-PSResourceRepository, Register-PSResourceRepository, and Unregister-PSResourceRepository commands are the expected way of interacting with this file.
As with older versions of PowerShellGet, storing credentials for a repository is not currently supported. If a repository requires authentication, the Credential parameter must be used explicitly with each operation.
Version ranges
Find-PSResource allows wildcards to be used for the Version parameter; using * will return all available versions except pre-release. The Prerelease parameter may be added to include those:
Find-PSResource -Name PowerShellGet -Version *
A range of versions may be defined using the range syntax used by NuGet, which is described in the following document:
https://docs.microsoft.com/nuget/concepts/package-versioning#version-ranges-and-wildcards
For example, the highest version of PowerShellGet available between 1.0 (inclusive) and 2.0 (exclusive) may be found using this:
Find-PSResource -Name PowerShellGet -Version '[1.0,2.0)'
The search can be changed to be inclusive by changing the closing ) to ]. For example, the following command will find version 2.0.0 of PowerShellGet:
Find-PSResource -Name PowerShellGet -Version '[1.0,2.0]'
The same syntax will be available when declaring dependencies between modules.
PowerShell repositories
Each of the examples from the previous section uses the PowerShell Gallery as a source for installing modules. This is an important resource, but in a business setting, it may be desirable to restrict access to the gallery. Instead, an internal repository that holds curated or internally developed content may be implemented to share content.
Creating an SMB repository
A file share is a simple way to share content. Such a repository requires little effort to set up and maintain. A file share may be registered as a repository as follows:
$params = @{
    Name               = 'Internal'
    SourceLocation     = '\\server\share\directory'
    InstallationPolicy = 'Trusted'
}
Register-PSRepository @params
Existing modules can be published to the repository using the Publish-Module command. For example, if Pester 5.0.2 is installed, it may be published to the newly created internal repository:
$params = @{
    Name            = 'pester'
    RequiredVersion = '5.0.2'
    Repository      = 'Internal'
}
Publish-Module @params
The RequiredVersion parameter is mandatory if more than one version of the module (in this case Pester) exists on the system publishing the module. Once published, a nupkg file will appear in the file share. The Pester module is now available for installation by anyone else with the repository registered.
Users installing content from an SMB share must be authenticated and must have at least read access to the share. Guest access may be granted to avoid the authentication requirement.
NuGet repositories
NuGet is a package manager for .NET. PowerShellGet can use a NuGet repository as a source for PowerShell modules. The PowerShell Gallery is a NuGet repository.
NuGet offers greater flexibility when dealing with authentication, or package life cycles, when compared with SMB shares.
At the simple end, the Chocolatey.Server package available from chocolatey.org may be used to configure an Internet Information Services (IIS) website to act as a NuGet repository:
https://chocolatey.org/packages/chocolatey.server
About Chocolatey
Chocolatey is a package manager for Windows. See https://chocolatey.org for further information.
More advanced servers include Sonatype Nexus and ProGet. Both offer free to use servers, which may be locally deployed. These services must be configured, and once configured, packages will typically be published by using an API key to authenticate.
About snap-ins
Snap-ins, and the commands for interacting with snap-ins, are only available in Windows PowerShell; they are not present in PowerShell 7.
A snap-in is the precursor to a module. It was the mechanism available to extend the set of commands in PowerShell 1 and was deprecated with the release of PowerShell 2.
You can view the list of installed snap-ins by using the following command:
Get-PSSnapIn -Registered
If the Registered parameter is excluded, Get-PSSnapIn will show the snap-ins that have been imported into the current PowerShell session.
PowerShell does not automatically load commands from a snap-in. All snap-ins must be explicitly imported using the Add-PSSnapIn command:
Add-PSSnapIn WDeploySnapin3.0
Once a snap-in has been installed (registered) and added, you can use Get-Command to list the commands as if the snap-in was a module:
Get-Command -Module WDeploySnapin3.0
The snap-in shown will only be visible if the Web Deployment Toolkit 3.0 is installed.
Summary
Modules are a vital part of PowerShell. Modules allow users to extend the commands available within PowerShell, allowing PowerShell to work with many different systems from many different vendors.
The commands explored in this chapter have demonstrated how to discover and use locally available modules along with the commands each module contains. The PowerShell Gallery has been introduced as a public repository of modules, extending PowerShell further still.
PowerShellGet has been a feature of PowerShell since PowerShell 3. With the release of PowerShellGet 3 on the horizon, we demonstrated its new commands and filtering capabilities.
SMB- and NuGet-based repositories were briefly introduced for those looking to establish private repositories for use within an organization. This allows administrators to create private repositories with curated content, reducing exposure to the unknown modules.
Snap-ins, an artifact of PowerShell 1 that is limited to Windows PowerShell, were very briefly demonstrated for the products where snap-ins remain important.
Chapter 3, Working with Objects in PowerShell, dives into the commands available to work with objects in PowerShell, including Where-Object and ForEach-Object.