Working with Assets in Adobe Substance 3D Painter
Adobe Substance 3D Painter is owned by Adobe, and therefore, there is a strong connection between Painter and Adobe products, especially Adobe Photoshop. A lot of artists create resources inside Adobe Photoshop and import them into Painter.
In this chapter, we will first go through conceptual knowledge of the Assets panel, which is essential for creating any Adobe Substance 3D Painter project as it contains important resources. Then, we will go through methods to create our custom tabs in the Assets panel, which will help us organize our project and make our texturing and painting process agile.
When you will move to the real world, you will see for yourself that organizing a project is one of the most crucial steps because if you start working on your project without organizing it, you will be lost halfway through and miss out on important things. Once we have a comprehensive understanding of the Assets panel, we will learn how to apply these assets.
In this chapter, we will be covering the following topics:
- Familiarizing ourselves with the Assets panel
- Importing resources and creating custom tabs in the Assets panel
- Understanding the different types of assets in the Assets panel
- Applying assets to 3D meshes
Familiarizing ourselves with the Assets panel
You will find the Assets panel on the left side of the interface. The panel has a dock and undock option on the panel’s top-right side, as shown in Figure 2.1:
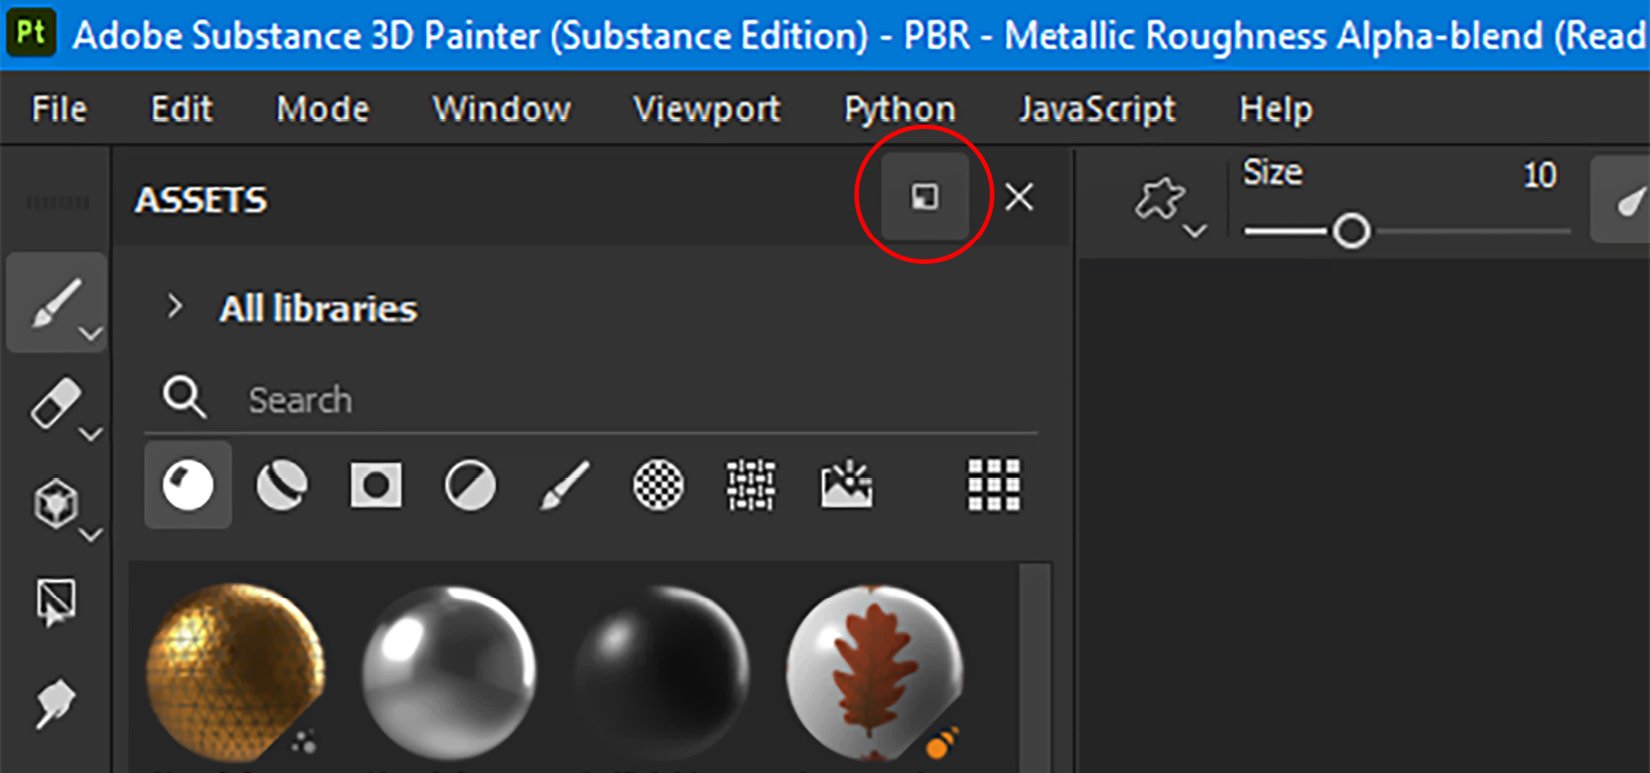
Figure 2.1 – Docking and undocking option
With the help of this option, you can undock the panel, resize it, and place it anywhere you want, as shown in Figure 2.2; you can dock the panel back to its original place by simply moving it to its original position and waiting till it docks back by itself.
In case you change your UI by mistake, you can select Window and then click on Reset UI, which will restore your interface to its default state. Whenever you try to dock back any panel, Adobe Substance 3D Painter makes space for the panel by moving other panels, as shown in Figure 2.2:
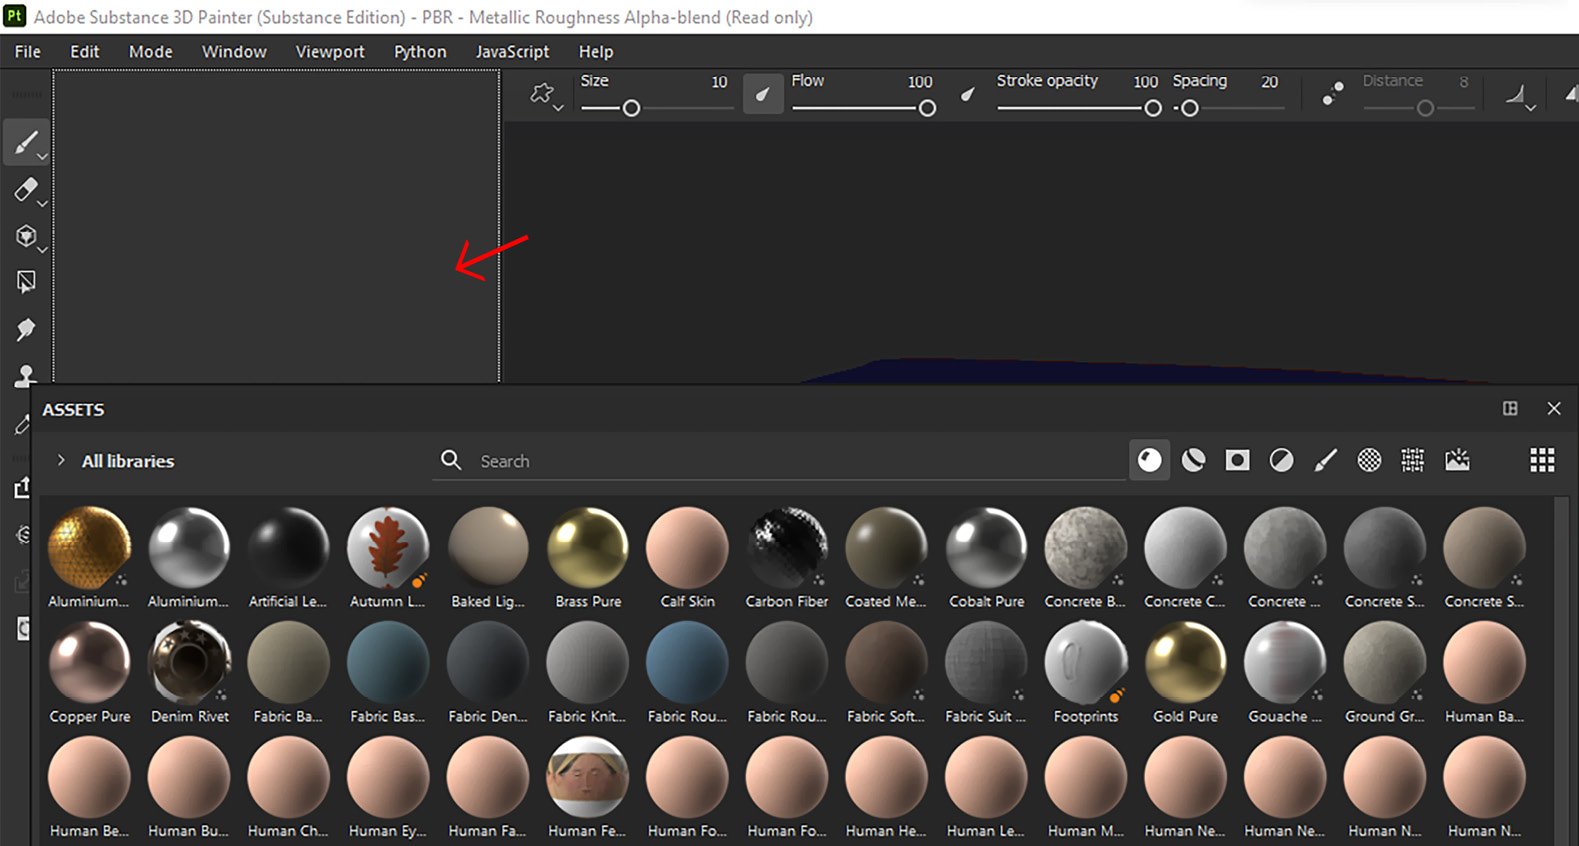
Figure 2.2 – Docking back the panel
Let us now familiarize ourselves with all the elements in the Assets panel shown in Figure 2.3:
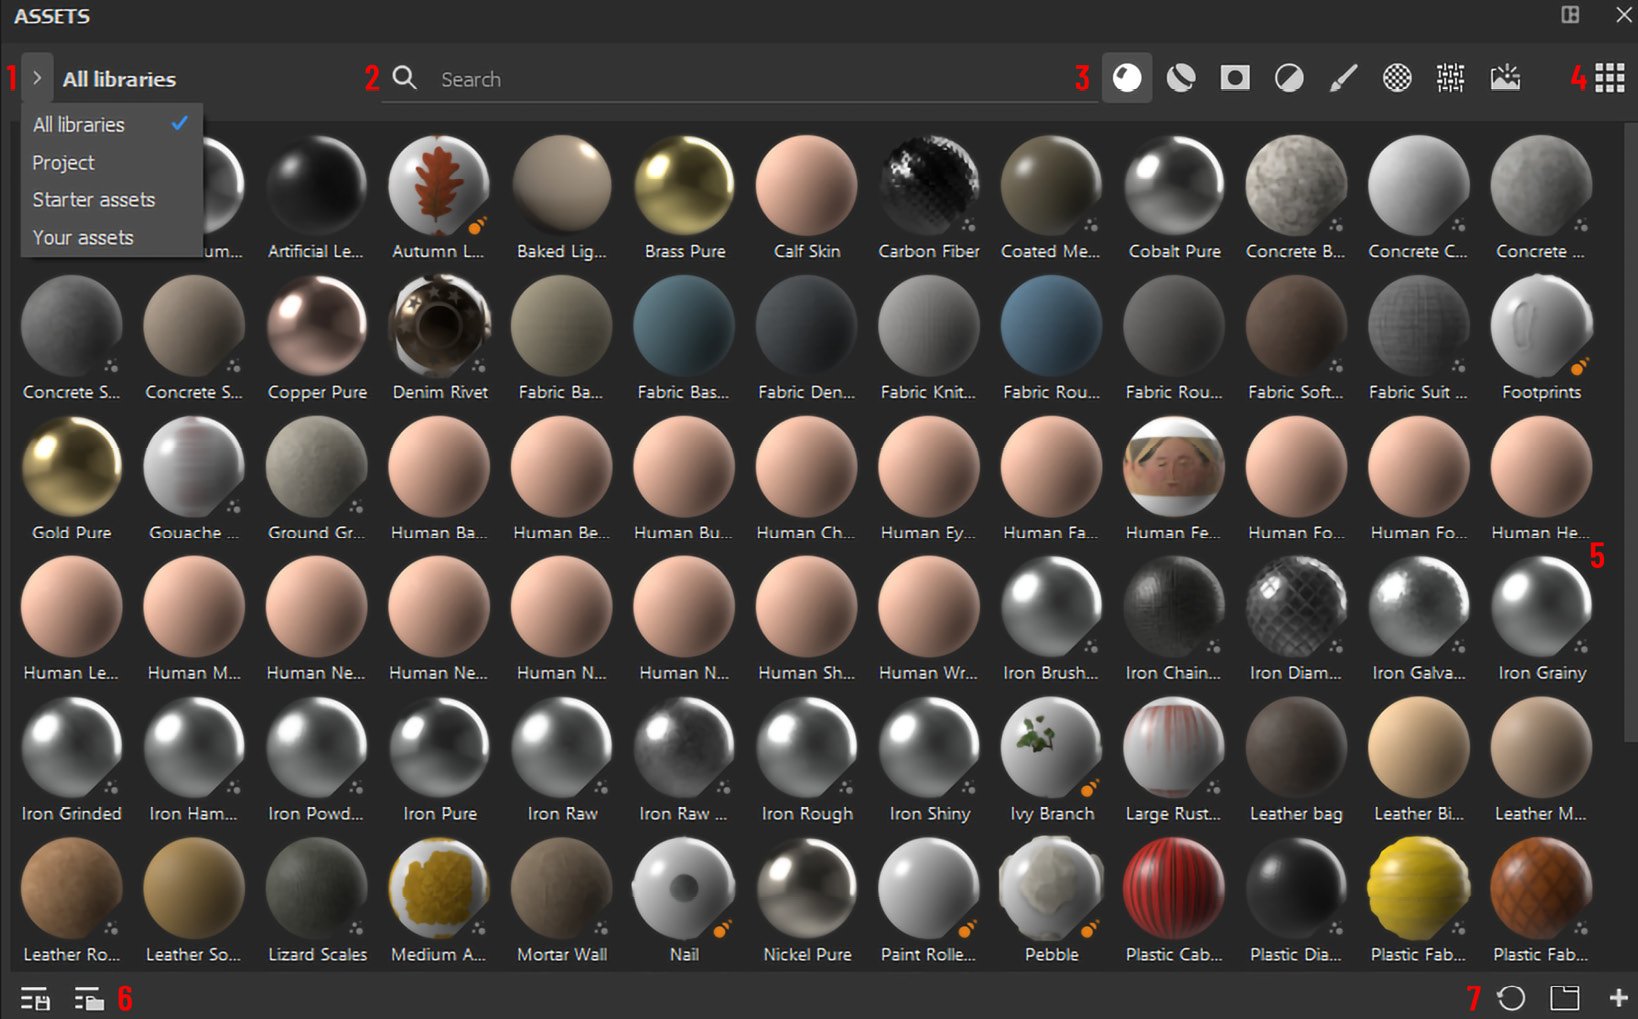
Figure 2.3 – Assets panel
Important elements in the preceding figure have been labeled with numbers, and their descriptions are as follows.
- Breadcrumbs: There are four different ways you can view libraries inside the Assets panel, which you can access through a dropdown:
- All libraries: This will show you all asset libraries.
- Projects: This will show you all assets that belong to your project mesh and the assets that are created after baking maps. However, you need to clear all the search results to view this option.
- Starter assets: This is the assets library that contains assets that are used most commonly in any project. Once you choose Starter assets, you will notice that there is an arrow next to its name, which will further filter the choice of your starter assets.
- Your assets: This is the library that shows the assets you created or imported from other files.
- Search field: The search field allows you to quickly search any material, smart, mask, imported assets, and so on.
- Assets: The icons here represent various assets (from left to right): Materials, Smart Materials, Smart Masks, Filters, Brushes, Alphas, Textures, and Environment maps. These assets are the most frequently used features in Adobe Substance 3D Painter to generate textures.
- Asset thumbnail size: This helps users to customize the way they want to see their assets.
- Assets view: This part of the interface displays all the assets based on the type you have chosen to display.
- (From left to right) Saved searches and Filter by path: The Saved searches option allows you to save your recent searches, while the filter path gives you various filters to customize your search. With these options, you can save time if you are frequently searching for your assets.
- (From left to right) Reset all queries, Open a new sub-library tab, and Import resources: Reset all queries will help you to remove all the saved searches, Open a new sub-library will allow you to open a tab in which you can show assets of your choice, and the Import resources option is a shortcut to import resources outside the Adobe Substance 3D Painter. We will learn about all of them in detail in later sections.
Now that we are familiar with the components of the Assets panel and what each can do, let us learn about importing resources into the panel to work on our project.
Importing resources and creating custom tabs in the Assets panel
Resources are the items that you import from external files; these can be created in any third-party software, such as Adobe Photoshop or Illustrator, and can comprise Smart Materials, Alpha Maps, Textures, and so on. On the other hand, tabs are used to access nested panels for quick access.
Importing resources
To import any resources in the Assets panel, use the following steps:
- Click on the File menu and select the Import resources… option:

Figure 2.4 – Import resources

Figure 2.5 – Add resources
- Select the resources (these are the same resources whose download link was given to you in Chapter 1, Getting Started with Adobe Substance 3D Painter). Select all the files from the resources folder except for any
.fbxfile and click Open.
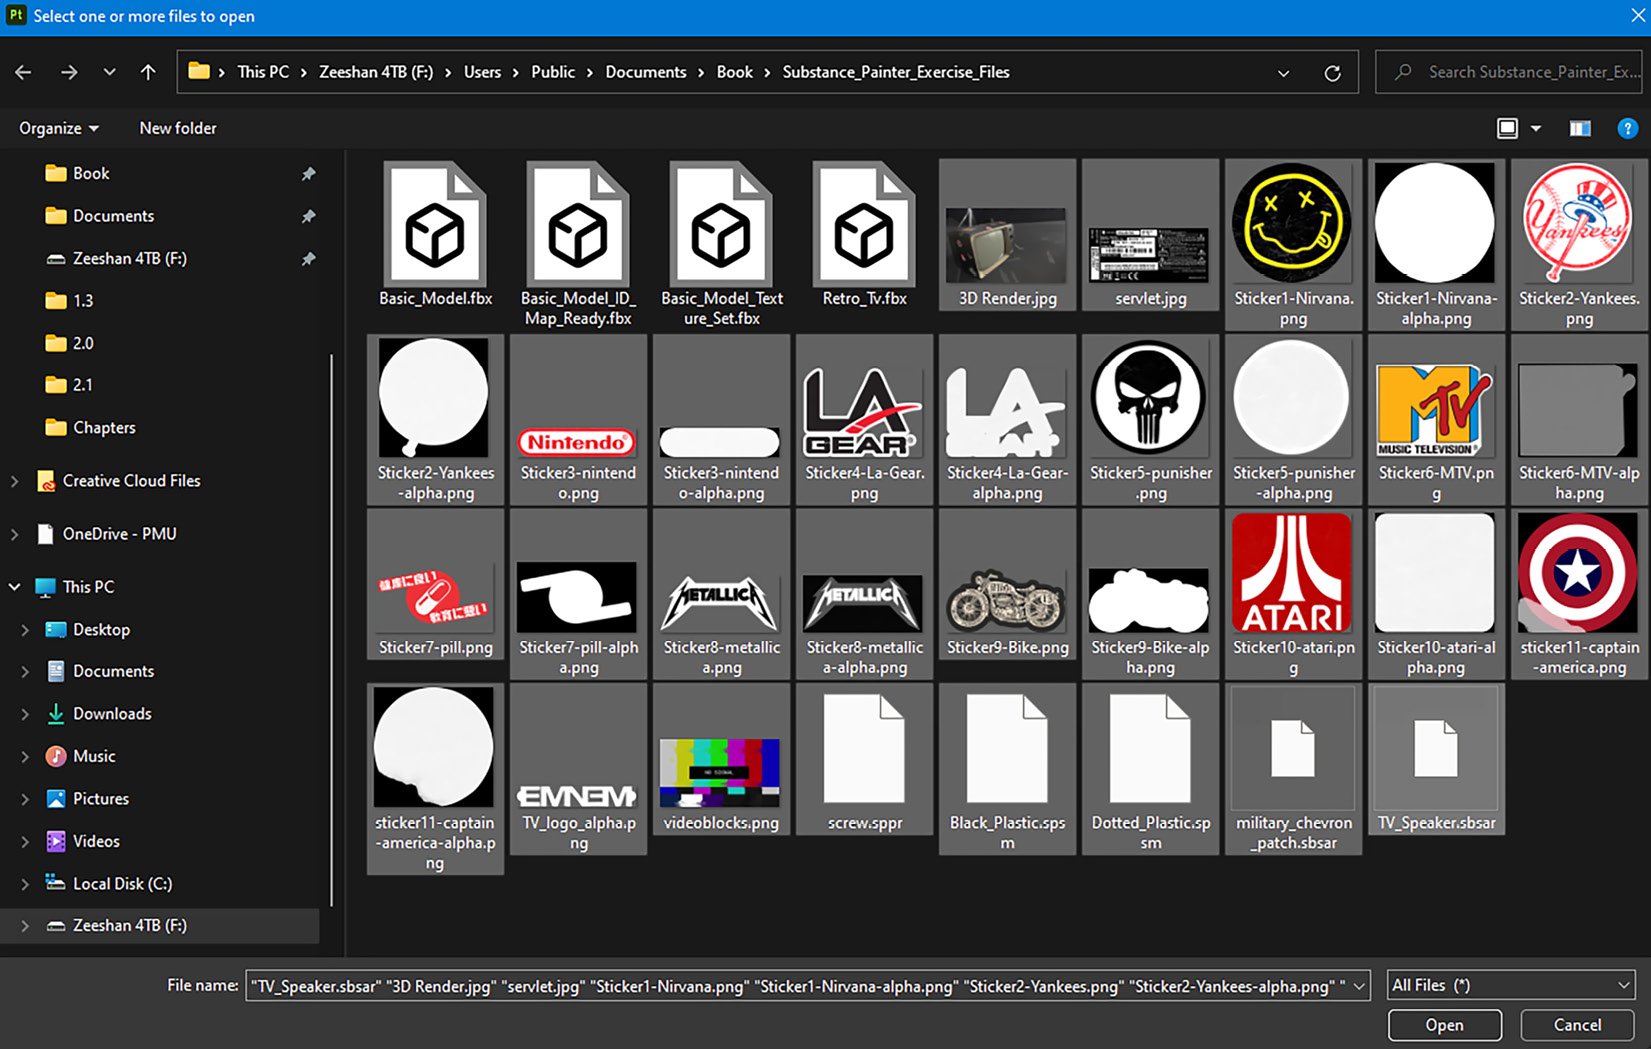
Figure 2.6 – Select resources
- Once you click Open, all your resources will be collected in the resources list; however, you will not be able to import them yet because the type of these resources must be defined first:
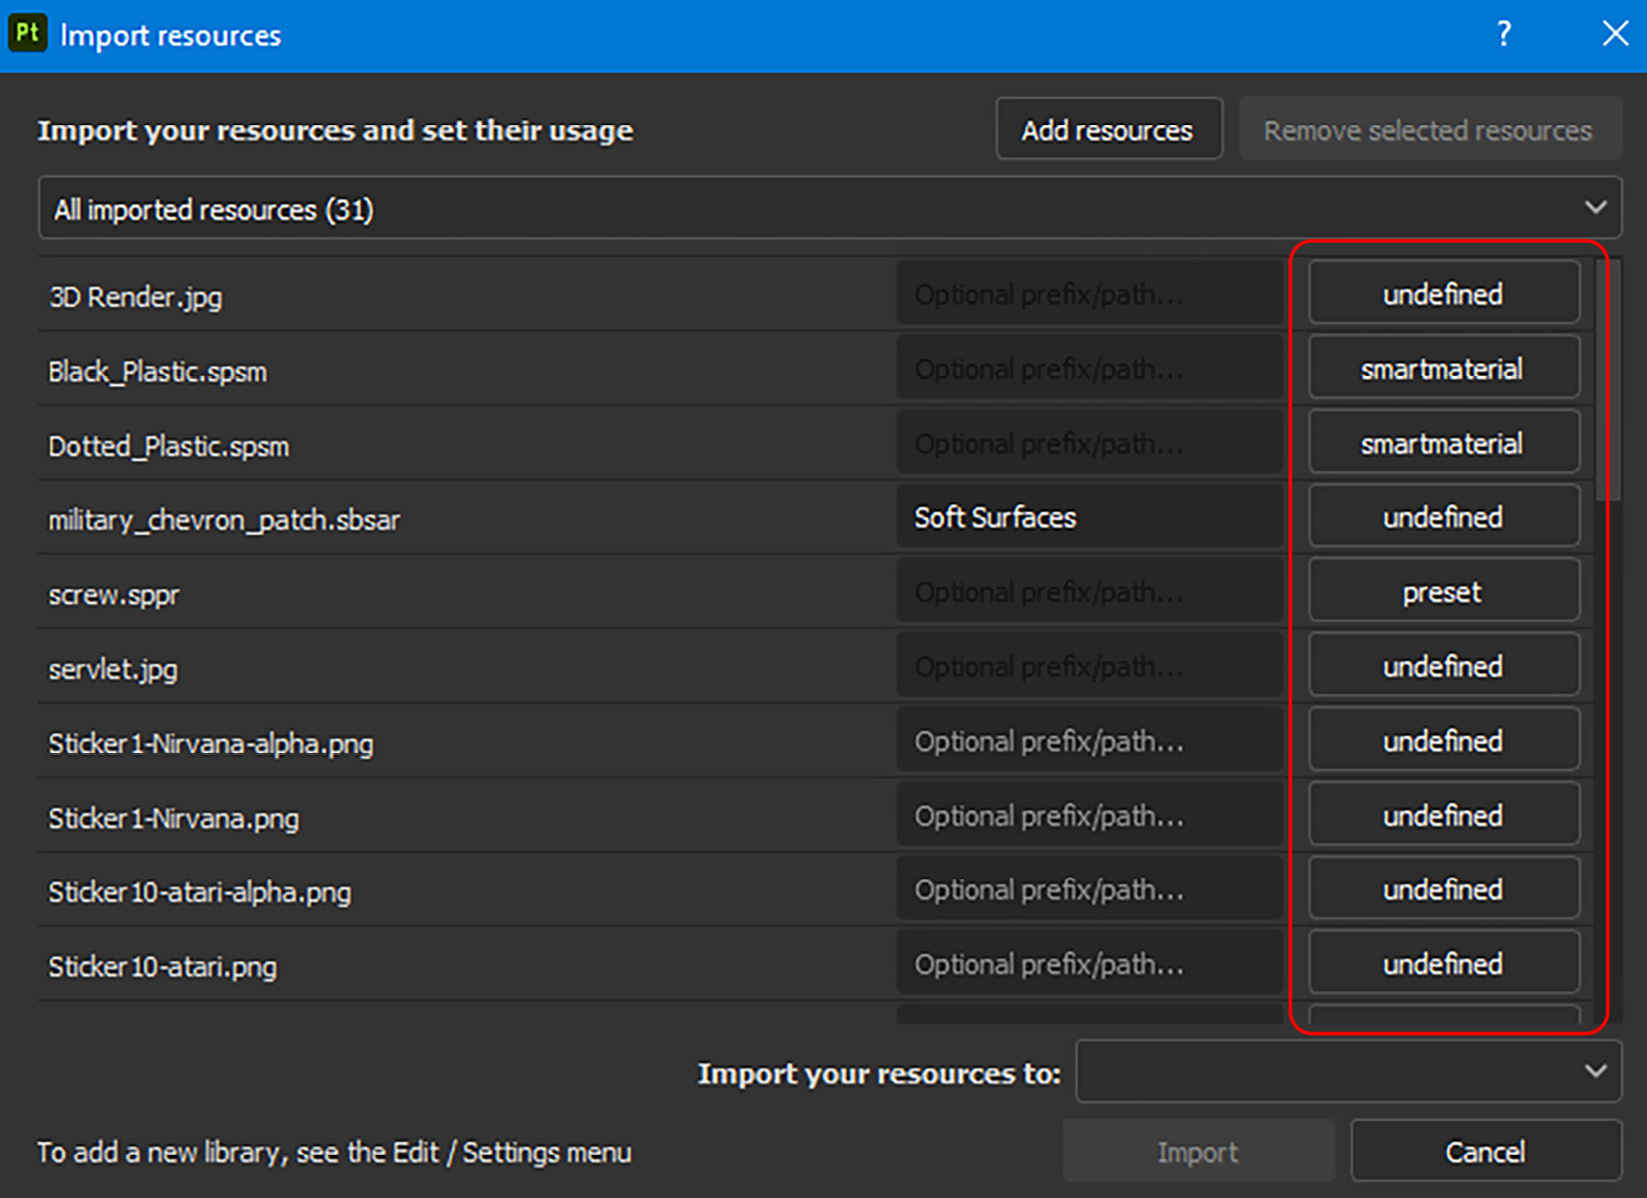
Figure 2.7 – Imported resources list
- Select the basematerial type for
military_chevron_patch.sbsarandTV_Speaker.sbsar. Define all the JPEG and PNG files without the wordalphaas texture, and define all the PNG files with the wordalphaas alpha. You will notice that Adobe Substance 3D Painter has already defined all the Substance Painter Smart Material (SPSM) files as smartmaterial because it is automatically programmed to detect files directly related to Painter.
Note
Texture
A texture is a two-dimensional picture that may be used in three dimensions. Textures might be grayscale, which means just one channel is utilized, or colorful, which means many channels are used. Materials are often made up of a variety of textures, each of which serves a distinct purpose, such as color, roughness, and metalness.
Alpha
Alpha is a mask that may be used to paint complicated shapes or details, such as a barcode, decals, stickers, or a logo.
- Next to the type of resource, you will find Prefix. This option helps you to create common prefixes in case you want to search for any asset. So, select all the resources with the Shift key and, for example, type
Retro. The result will be as follows:
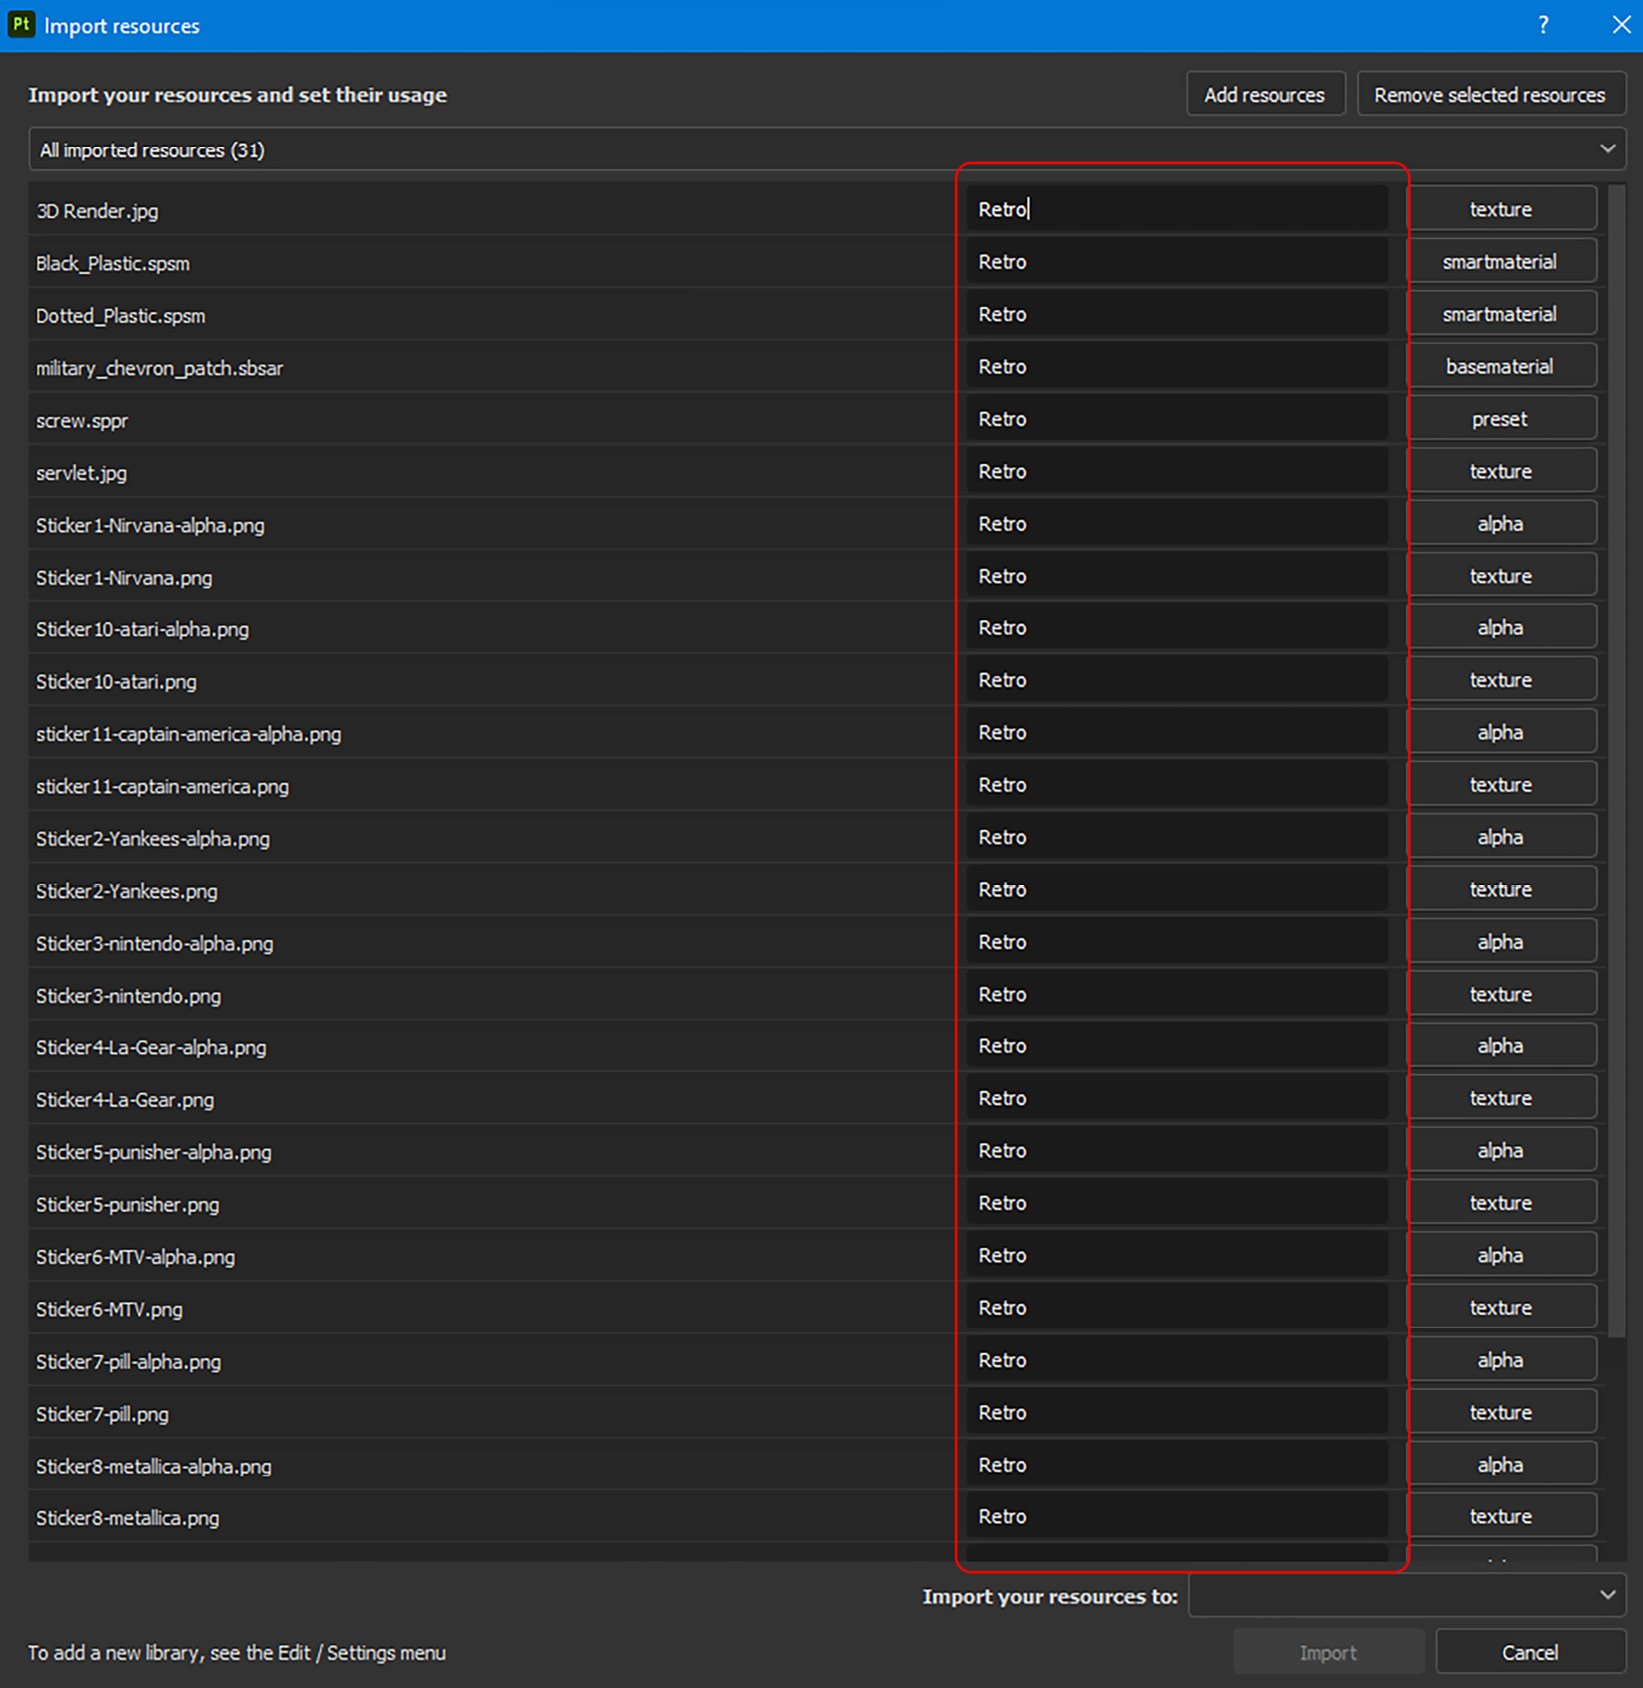
Figure 2.8 – Typing prefix
Now, whenever you search in the Assets panel with the word Retro, all these resources will show up. This will make your search more flexible, and you will be able to search for assets more quickly, especially if you have a lot of resources.
- Now you need to choose the project type from the Import your resources to: option, which is located at the bottom right of the panel:

Figure 2.9 – Project types
You will find three different options in the project type, as shown in Figure 2.9. These options can be explained as follows:
- current session: This type will import the resources to the current session of the project, and the resources will be available only for that session. Once the project is closed and then reopened, all the previously imported resources will be gone.
- project ‘PBR - Metallic Roughness Alpha-blend’: This type will import the resources to the project you are working on, and the resources will be available throughout the project. No matter how many times you close and reopen the project, the resources that you imported previously will be always available. However, you have to save the project before closing it. The
PBR - Metallic Roughnessportion is actually the name of your project until you save it, so if you are importing resources after you have already named and saved a file, it can look different than what we have here. - library ‘your_assets’: This type will import the resources to the assets library; therefore, these resources will be available for all the new and old projects, unless you remove them manually from the
your_assetsfolder.
- Select project ‘PBR - Metallic Roughness Alpha-blend’ and click Import:

Figure 2.10 – Import your resources to project ‘PBR-Metallic Roughness Alpha-blend’
- Once you will click on Import, all the resources will be imported into the Assets panel. These resources will be available under the Project library. Moreover, a search filter called Imported resources will also be generated automatically, as you can see in Figure 2.11. However, you don’t need that filter as you have already created the prefix. So, you can delete that filter by clicking on the cross next to it:
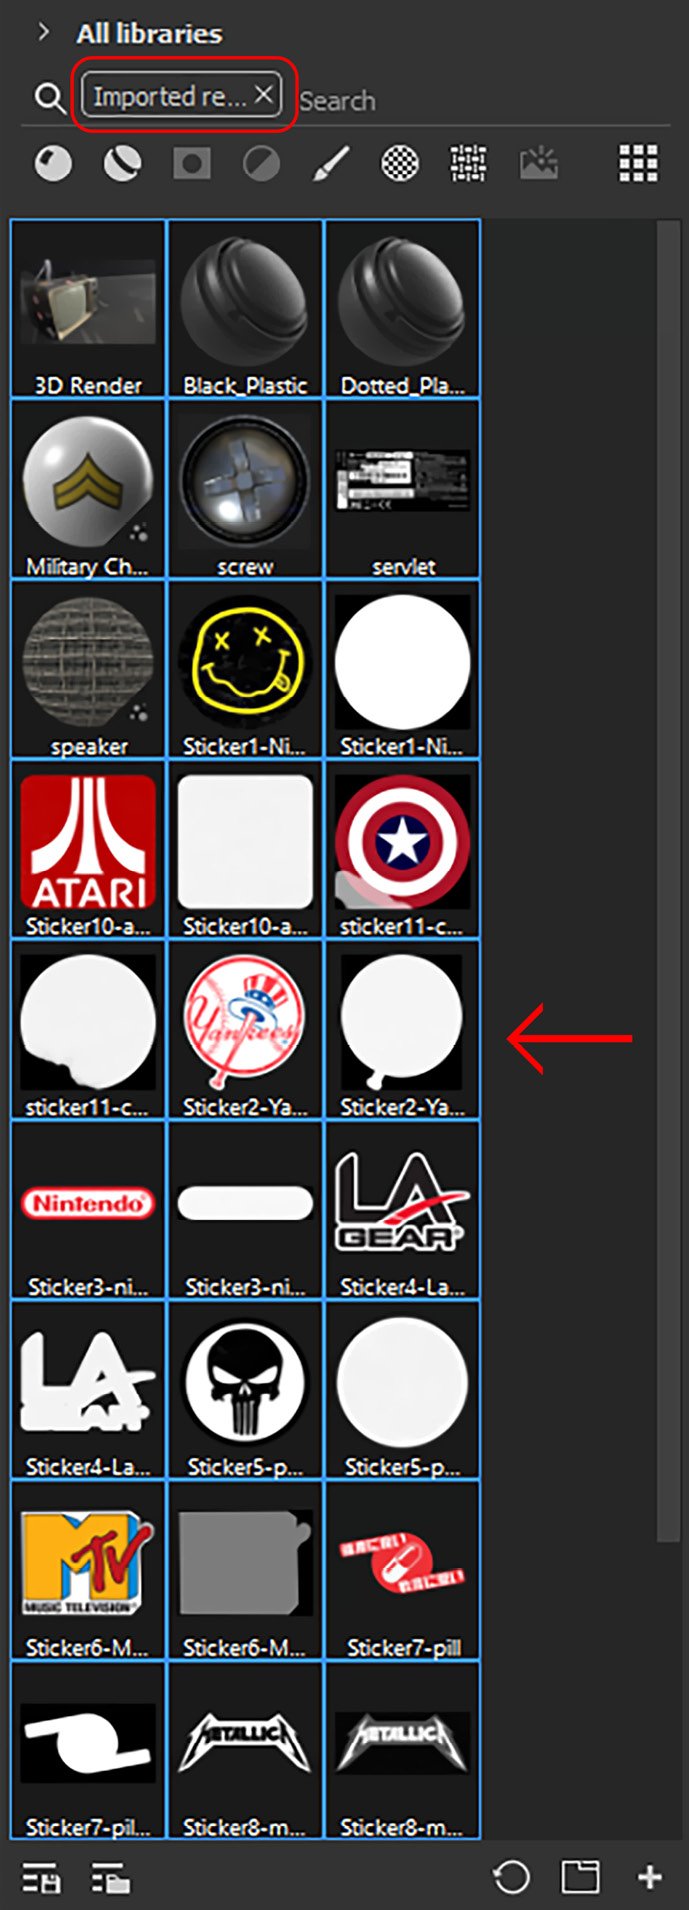
Figure 2.11 – Imported resources
Now, our resources are ready to use. Let us move on to creating custom tabs inside our Assets panel to help ourselves work faster.
Creating custom tabs inside the Assets panel
You can create custom tabs inside the Assets panel to work on your project faster and more efficiently. However, before you can create custom tabs, you must create a search keyword.
Creating a search keyword
You can create search keywords by using a filter or the Saved searches option.
Creating a search keyword using a filter
To create a search keyword using a filter, go through the following steps:
- Click on All libraries and choose Project. You will notice that your imported resources are there along with the textures that you previously baked:

Figure 2.12 – Project library
- It’s quite overwhelming sometimes when you have a lot of textures showing, especially the baked textures. So, to only see the imported resources, you can click on the small arrow next to the Project option and choose a filter. For our example, you can choose the Retro filter, which will show you all the resources assigned with the
Retroprefix:

Figure 2.13 – The Retro prefix filter
You can also perform the same operation by clicking the Filter by path option (1) at the bottom of the Assets panel, as shown in Figure 2.14:
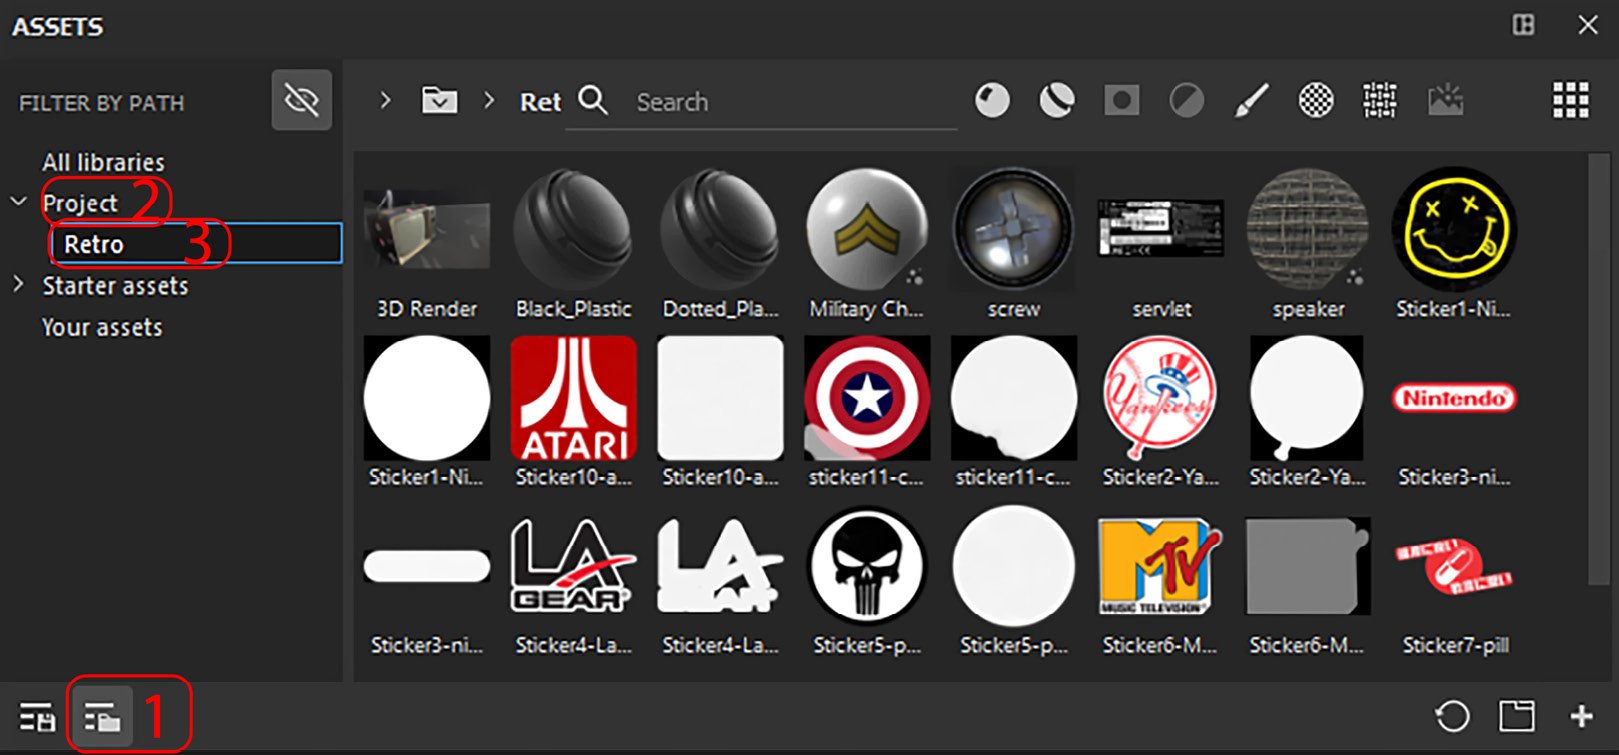
Figure 2.14 – The Filter by path option
- Then, click on Project (2) and choose the prefix you are looking for. In our case, we will select Retro (3). Now, you have successfully created a search keyword to represent a filter.
Creating a search keyword using Saved searches
You can also create a search keyword using Saved searches:
- You can also save searches in the Assets panel. Click on the Saved searches option at the bottom of the control panel (circled in Figure 2.15):

Figure 2.15 – Saved searches
- Then, type any search keyword, for example,
silver:
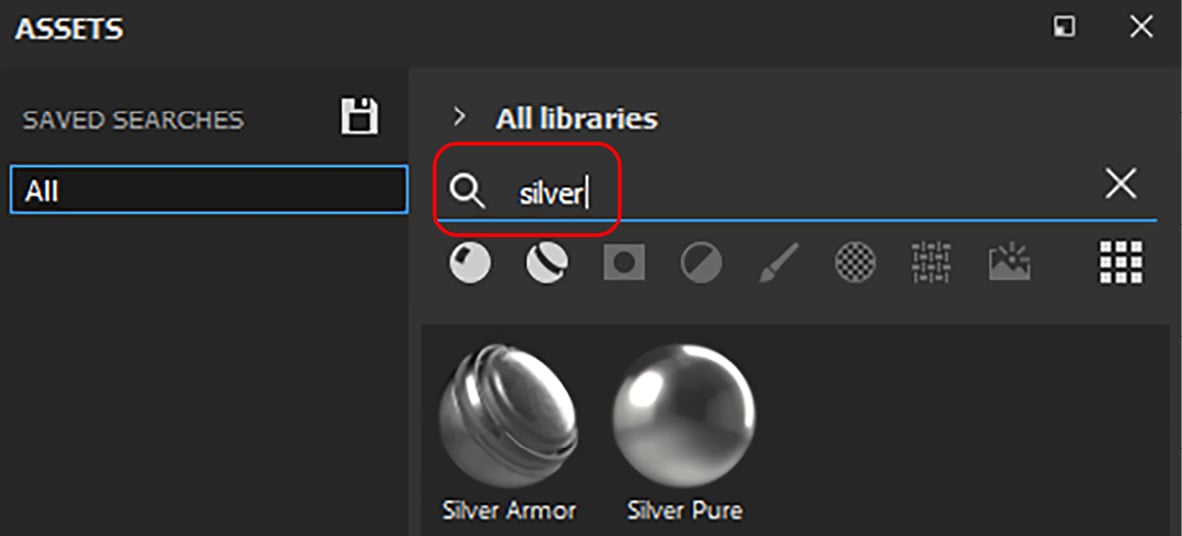
Figure 2.16 – Searching using typed keywords
- To save the keyword, click on the Save icon:
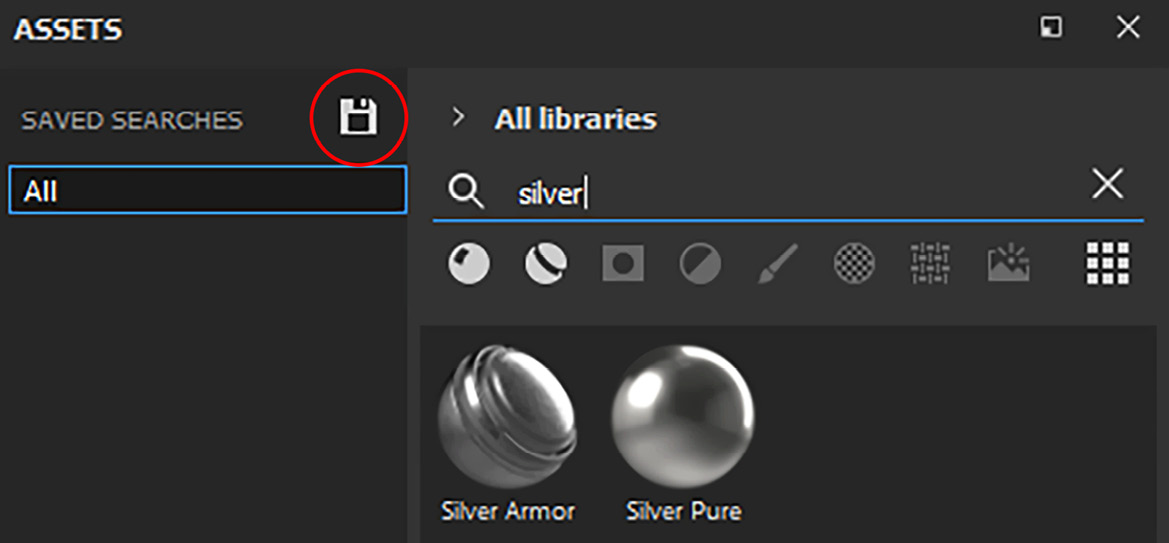
Figure 2.17 – Saving search keywords
- After saving the keyword, you will notice that the search keyword is saved in the list. Now you can come back to this option whenever you want to search for the same keyword:
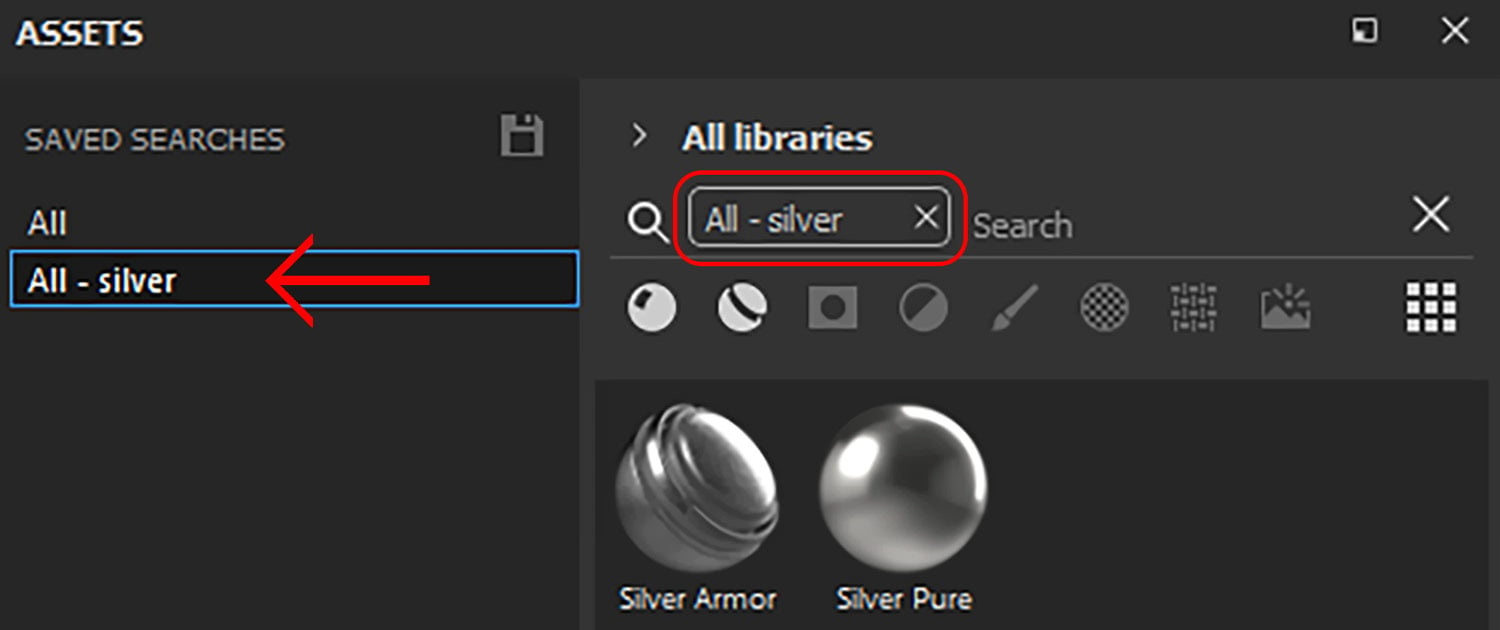
Figure 2.18 – Saved searches list
However, it’s quite time-consuming if you are going to search for filters using the Search path option, or the Saved searches option. To save time, it’s best to create a tab that will help you to switch between keywords much faster.
Creating a custom tab
Let’s see how to create custom tabs that will help you switch between keywords faster, and as a result, help you save time:
- Select the keyword silver that you saved and then click on the Open new query option at the bottom of the Assets panel, as highlighted in the following figure:
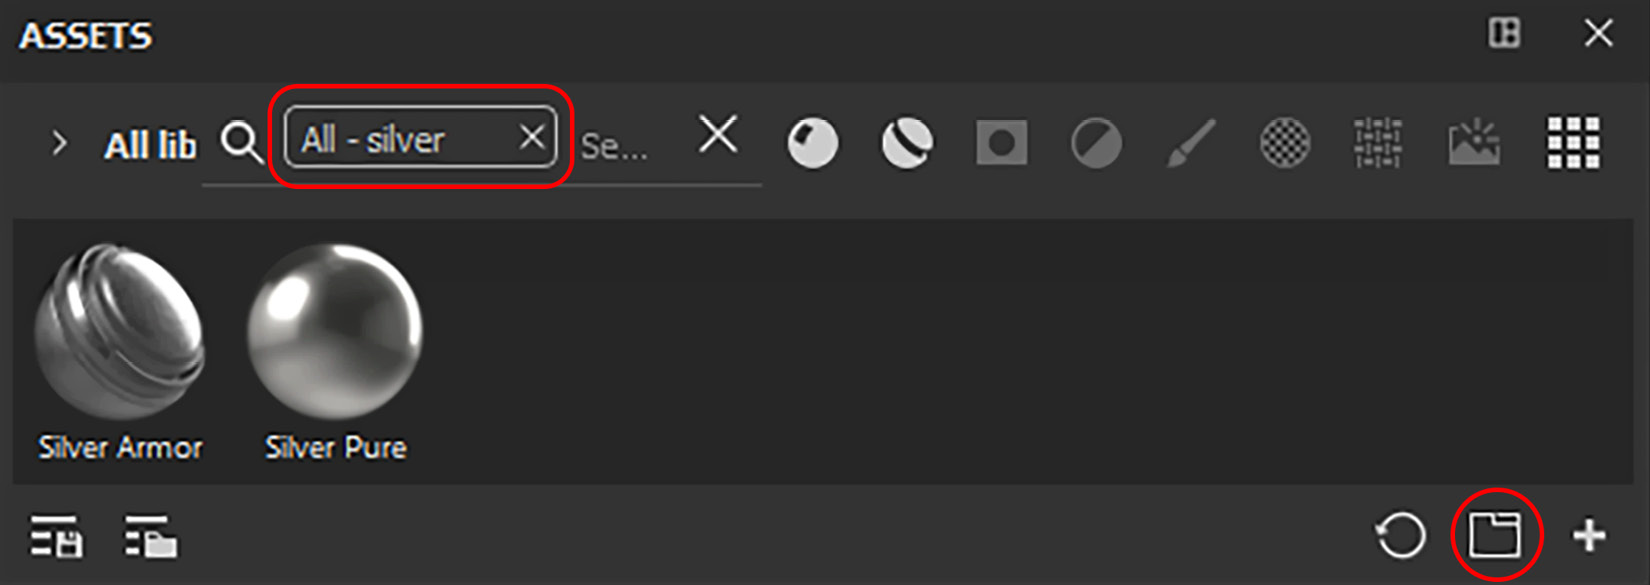
Figure 2.19 – Open new query option
- As soon you click the Open new query option, you will notice that a new tab with a ALL - SILVER keyword is created, as shown in Figure 2.20:
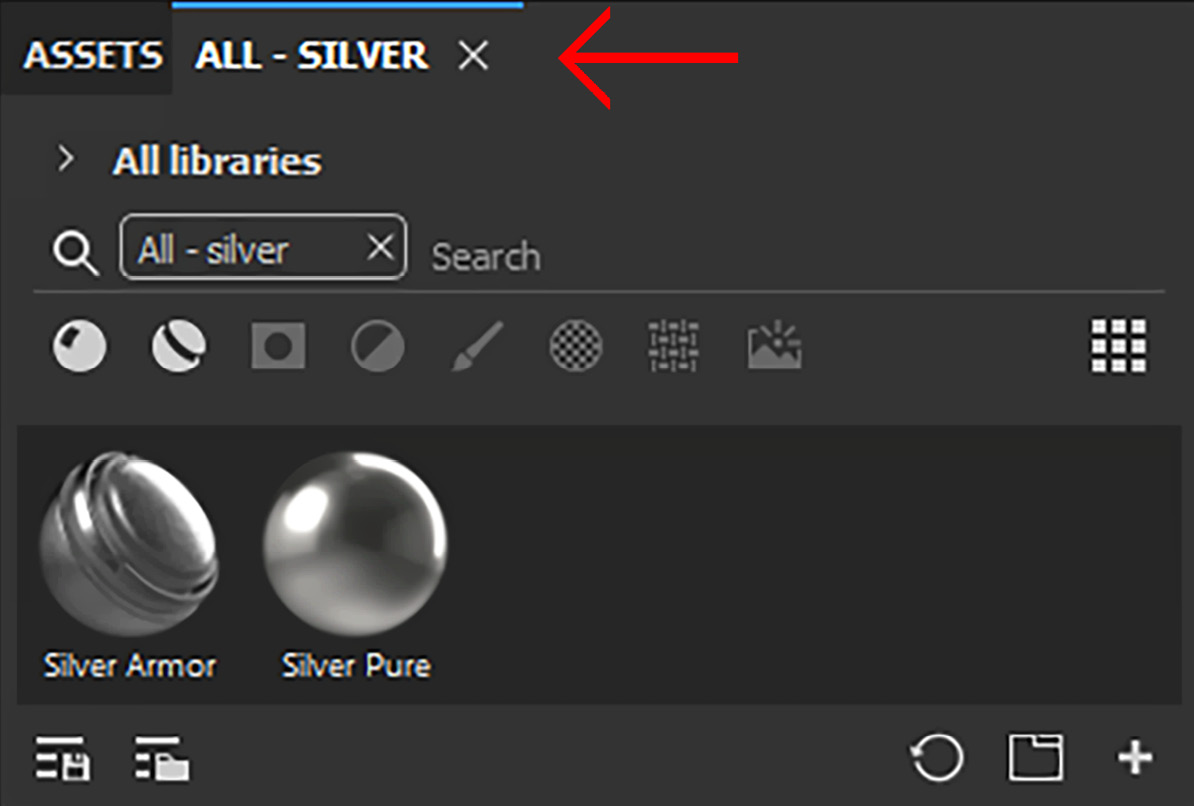
Figure 2.20 – Created SILVER tab
- Now you can go to the Assets tab and delete the filter from there, as shown in Figure 2.21, but do not delete it from the SILVER tab; otherwise, you will not be able to see the results.
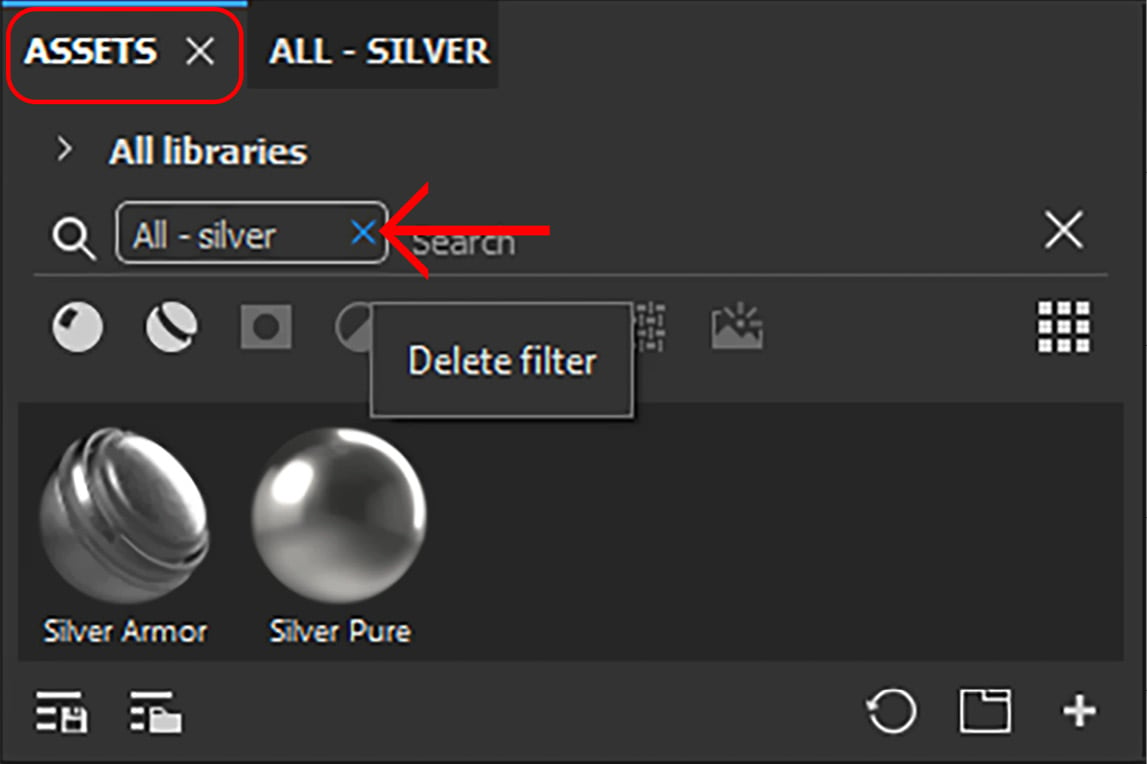
Figure 2.21 – Delete the filter from the Assets tab
- Now you can easily switch between your Assets panel and the SILVER panel. In this way, you can create as many tabs as you like, with the keywords of your choice, and easily access them:
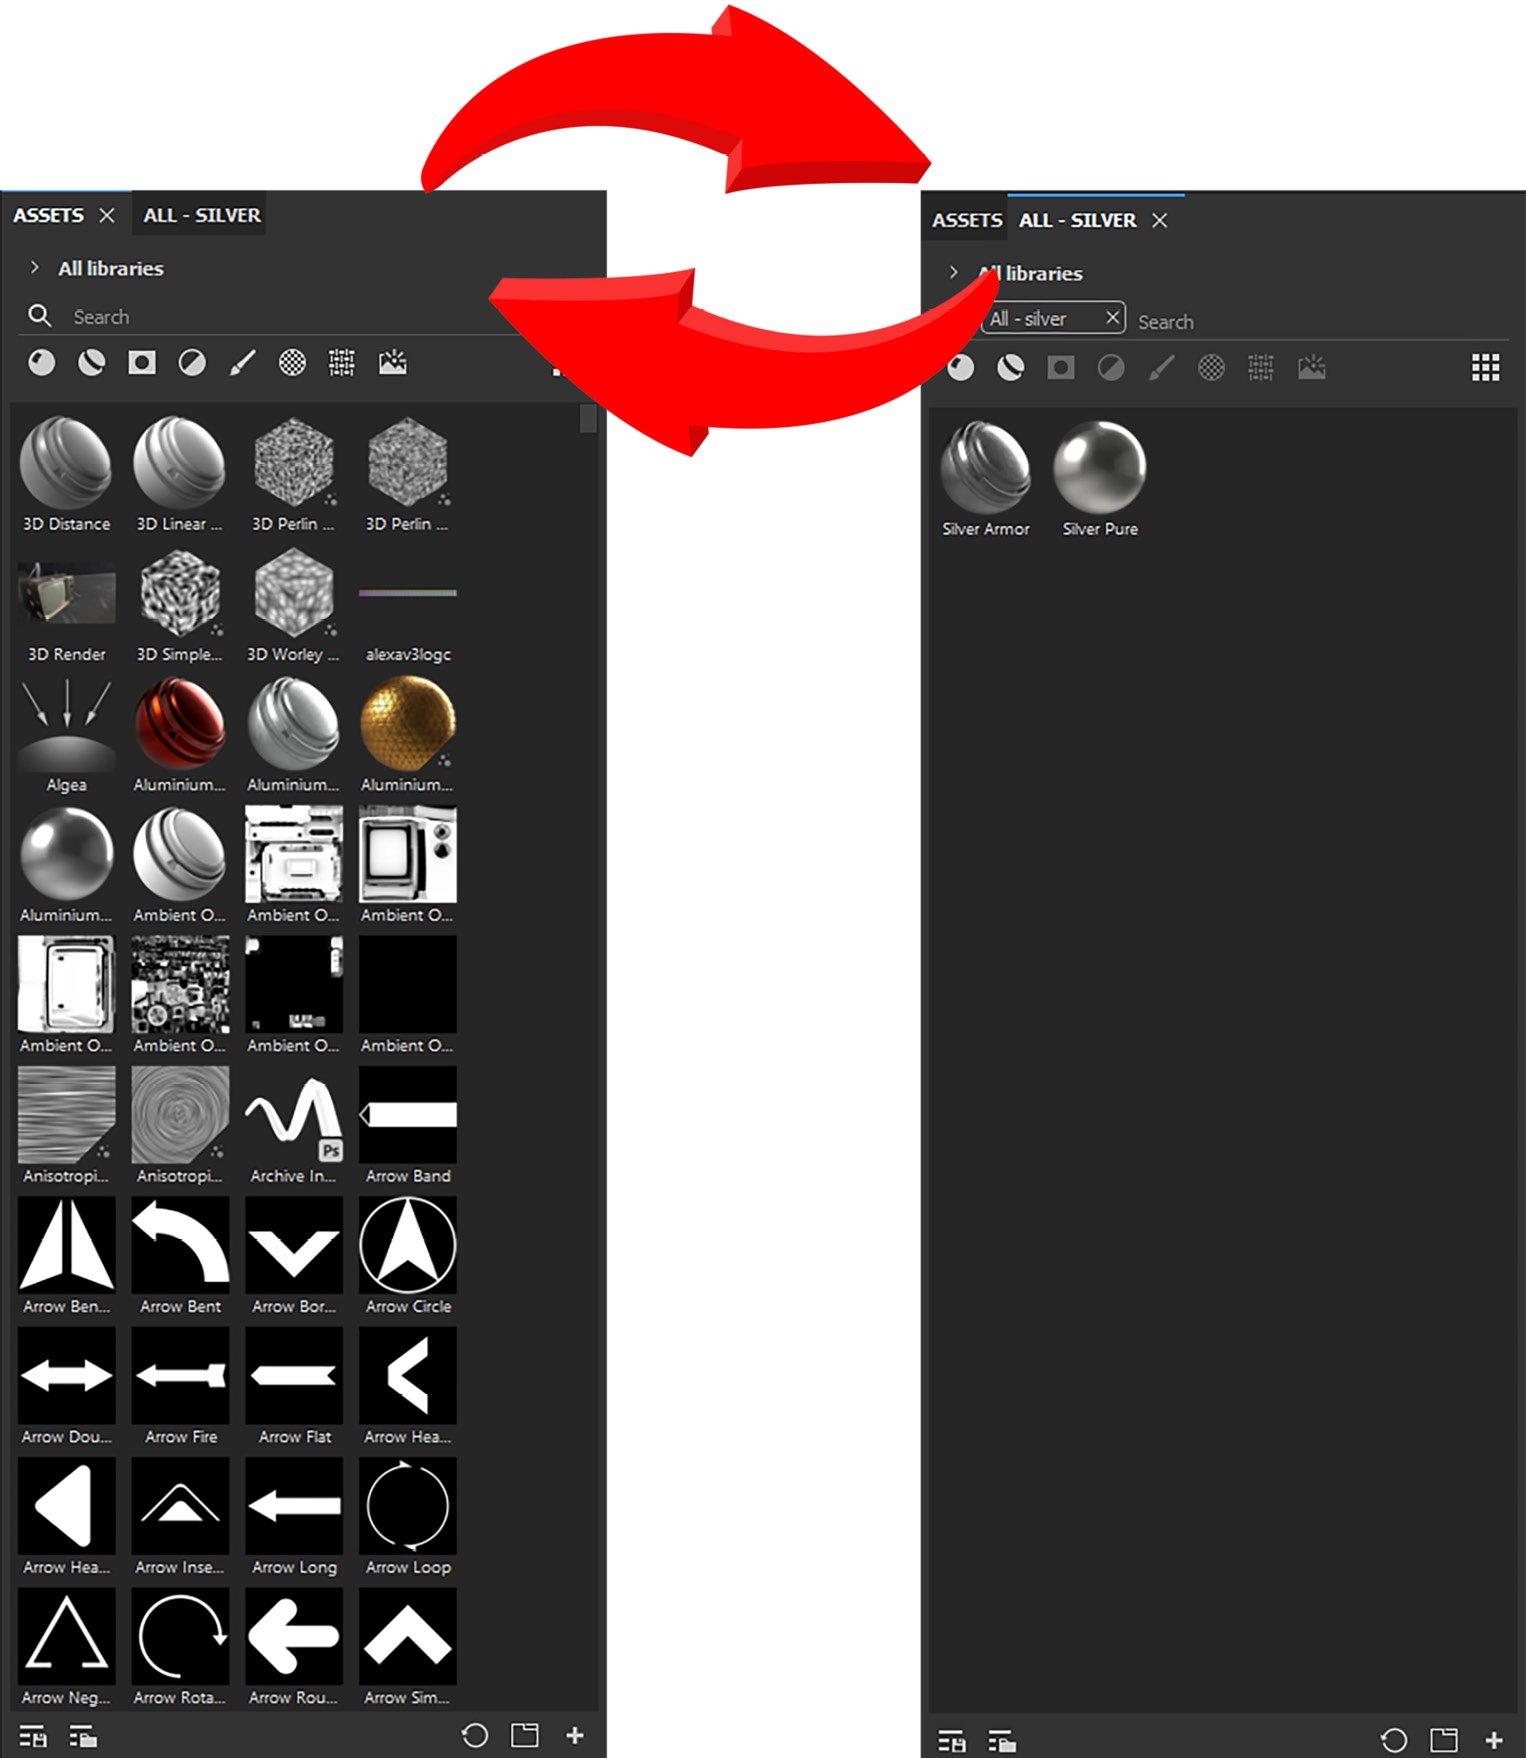
Figure 2.22 – Quick switch between tabs
- Now, go to the File menu and choose Save As and save the file in the
Substance_Painter_Exercise_Filesfolder asRetro_Television.spp. Bear in mind that yourPainterfile can be huge depending on mesh details:
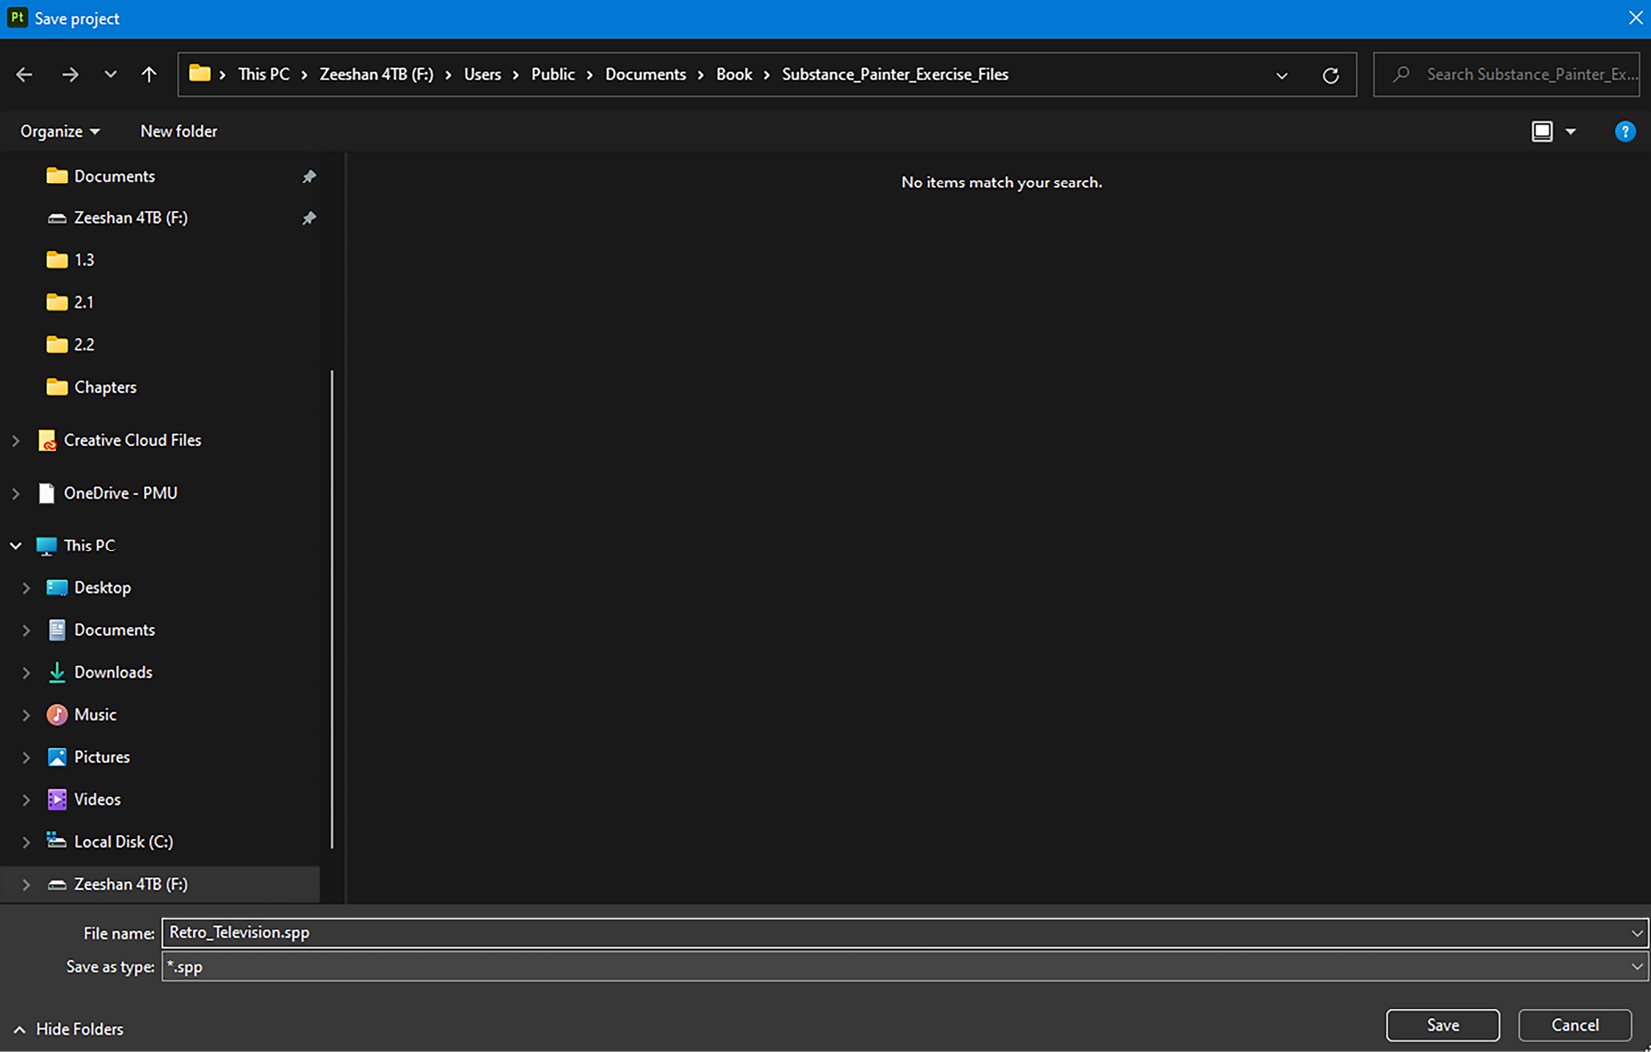
Figure 2.23 – Saving the project
As you have learned how to create your own custom tabs, we will now study different types of assets so you can comprehend their correct use. You may create more custom tabs based on your choice of assets.
Understanding the different types of assets in the Assets panel
Adobe Substance Painter has a variety of asset types that you can simply drag and drop on the model and customize according to your preferences. In this section, we will go through each one of them and learn about their usage.
In the following figure, the asset -type icons have been labeled with numbers from 1 to 8:

Figure 2.24 – Various types of assets
Let us now explore what each icon labeled with the number entails:
- Materials: Materials comprise tiling materials that are standard and consistent. They don’t require baking and don’t have any mesh-specific details. Materials can be created using a fill layer in Painter, but for additional control, use Substance 3D Designer or Substance 3D Sampler.
If you type Human Skin in the search field, you will find human skin under the materials. Human skin is widely used for humans, cartoon characters, and creatures.
- Smart materials: Painter’s Smart materials are a one-of-a-kind feature. They feature mesh-specific characteristics, in addition to tiling and uniform detail, that are automatically customized to your mesh. You must first bake your maps for this to work. Only Substance 3D Painter can create and use Smart materials.
- Smart masks: Smart materials can be applied to any layer in the stack. However, Smart masks can only be applied to the effect stack because these are effect presets (for masks specifically). We will learn about effect stacks in Chapter 4, Working with Masks in Adobe Substance 3D Painter, and Chapter 6, Working with Materials and Smart Materials in Adobe Substance 3D Painter.
- Filters: These are effects like the filters you find in Adobe Photoshop, such as blur, color correction, and emboss. However, these are specially designed for Adobe Substance 3D Painter.
- Brushes: These provide you with brush types; you can also customize available brushes:
- Particles: This falls under the brushes category and can provide you with physical effects that can act as physical particles on your meshes, for example, dripping oil, spray paint, rust, and so on.
- Alphas: Alphas are used for the shape of the brushes, text, decals, and stamps, and as a height map.
- Textures: These are generally JPEG or PNG files or other formats of colored images such as LUTs, which are lookup tables and are most commonly used in color grading. All the imported texture files can also be accessed under this category. The details of texture subtypes are given here:
- Grunges: These can be used as masks or as an effect to create some dirt, damage, or wear and tear effects.
- Procedurals: These are procedural effects that you can apply on meshes. You can customize them to get random results that will prevent a tiled or a computer-generated look and feel, and output more realistic and natural effects.
- Hard Surfaces: These contain a variety of normal maps that will allow you to create an effect with an engraved or height map (displacement) effect. These are specially used for effects such as screws, bolts, grills, and so on.
- Environment maps: The environment is a representation of the infinite space that surrounds the three-dimensional scene. These are HDRI files that give you realistic lighting results that are derived from the HDRI files themselves. There are a variety of HDRI files under this category.
Hopefully, you have understood the different types of assets and their usage, so let’s learn how we can apply them in our next section.
Applying assets to 3D meshes
There are many ways to apply assets to 3D meshes; this section will cover some of those methods and discuss them in detail.
Using normal maps to apply assets
Normal mapping is a texture mapping technique used in 3D computer graphics to simulate the lighting of bumps and dents. To apply a normal map in Adobe Substance 3D Painter, you need to do the following:
- Select the texture set from TEXTURE SET LIST; for this project, let’s choose
TV_Front_Casing:
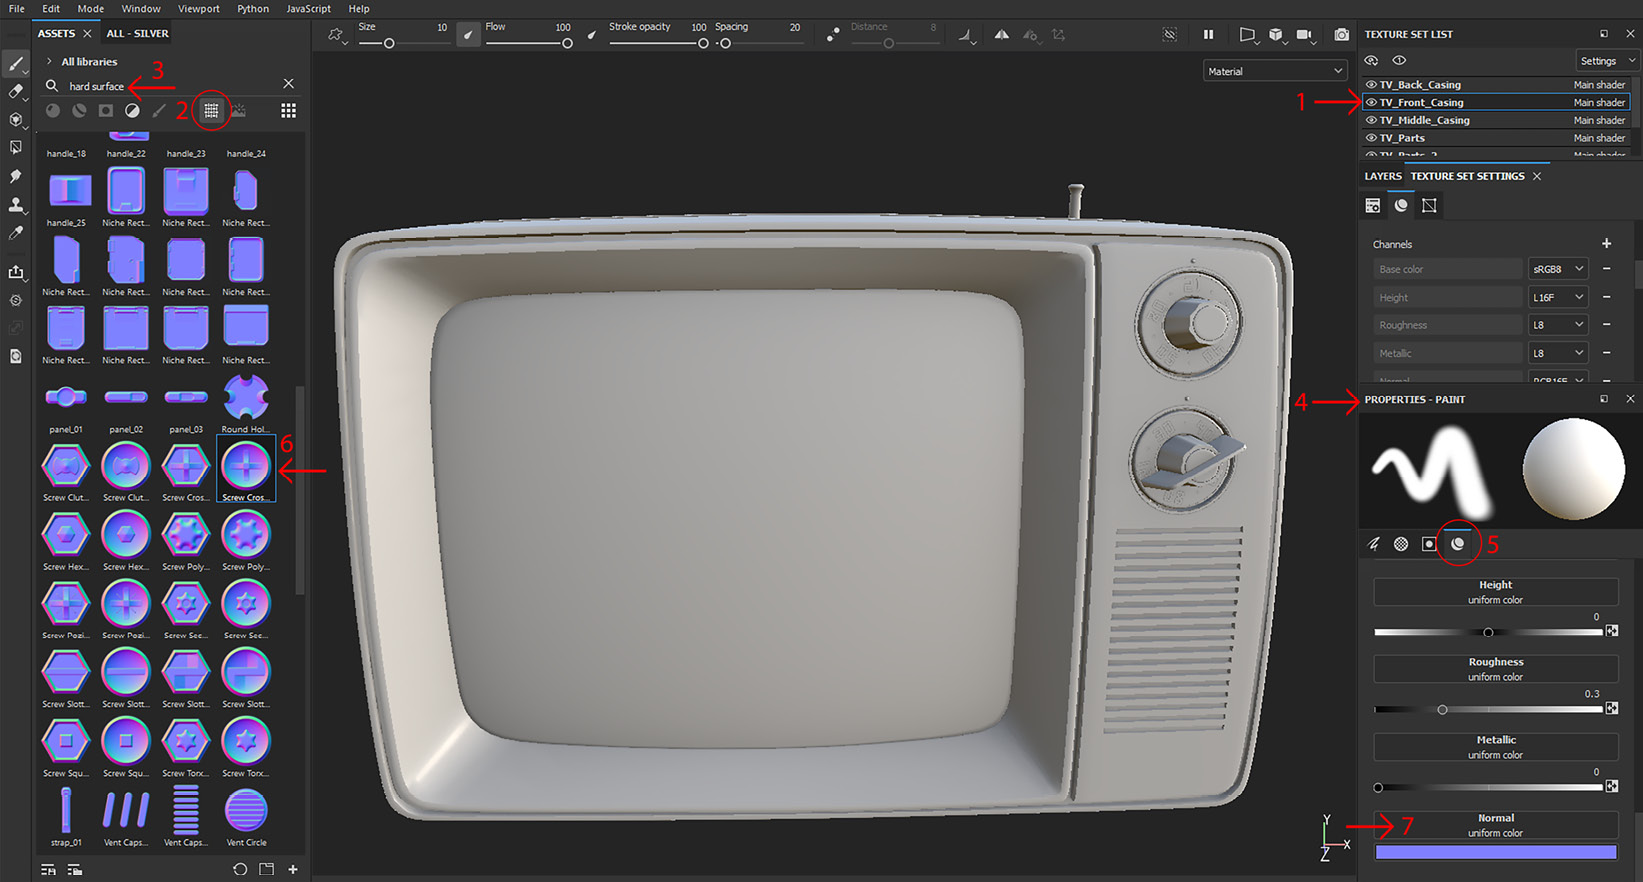
Figure 2.25 – Applying a normal map
- After selecting the texture set, click on the Textures asset in the Assets panel.
- Then type the keyword
hard surface. - Once the hard surfaces are shown, then select a basic brush from the brushes menu in the Assets panel, and go to the Paint property on the right side.
- Click the Material tab under PROPERTIES - PAINT. You should see the Normal map further down.
- Drag the Screw Cross Round normal map from the left panel to the Normal map area on the right panel.
- Screw Cross Round is loaded in your Normal map.
Now, you can take the brush and click on the front of the TV screen using the left mouse button. You need to only tap on the TV screen; do not drag over the screen; it will create unwanted results.
Changing the Brush attributes
To increase the size of the brush, you can press ], and to decrease the size, you can press [ on your keyboard; however, these shortcuts might not work if you are using a different keyboard layout such as the Swiss keyboard; therefore, you can change the shortcuts.
Also, you can press Ctrl (Windows) or Command (Mac), keep the right mouse button pressed, and drag the mouse left or right to change the size of the brush, and up or down to change the softness of the brush. You can also rotate the brush by keeping Ctrl (Windows) or Command (Mac) pressed and dragging the mouse up or down while the mouse’s left button is pressed.
Moreover, you can change the flow of the brush by keeping Ctrl (Windows) or Command (Mac) pressed and dragging the mouse left or right while the left mouse button is pressed.

Figure 2.26 – Screw stamped on the front screen of the television
However, you will notice that the screw is drawn in a white color. If you want to change the brush color, then choose the STENCIL tab in the PROPERTIES - PAINT panel and choose a different color under Base color:
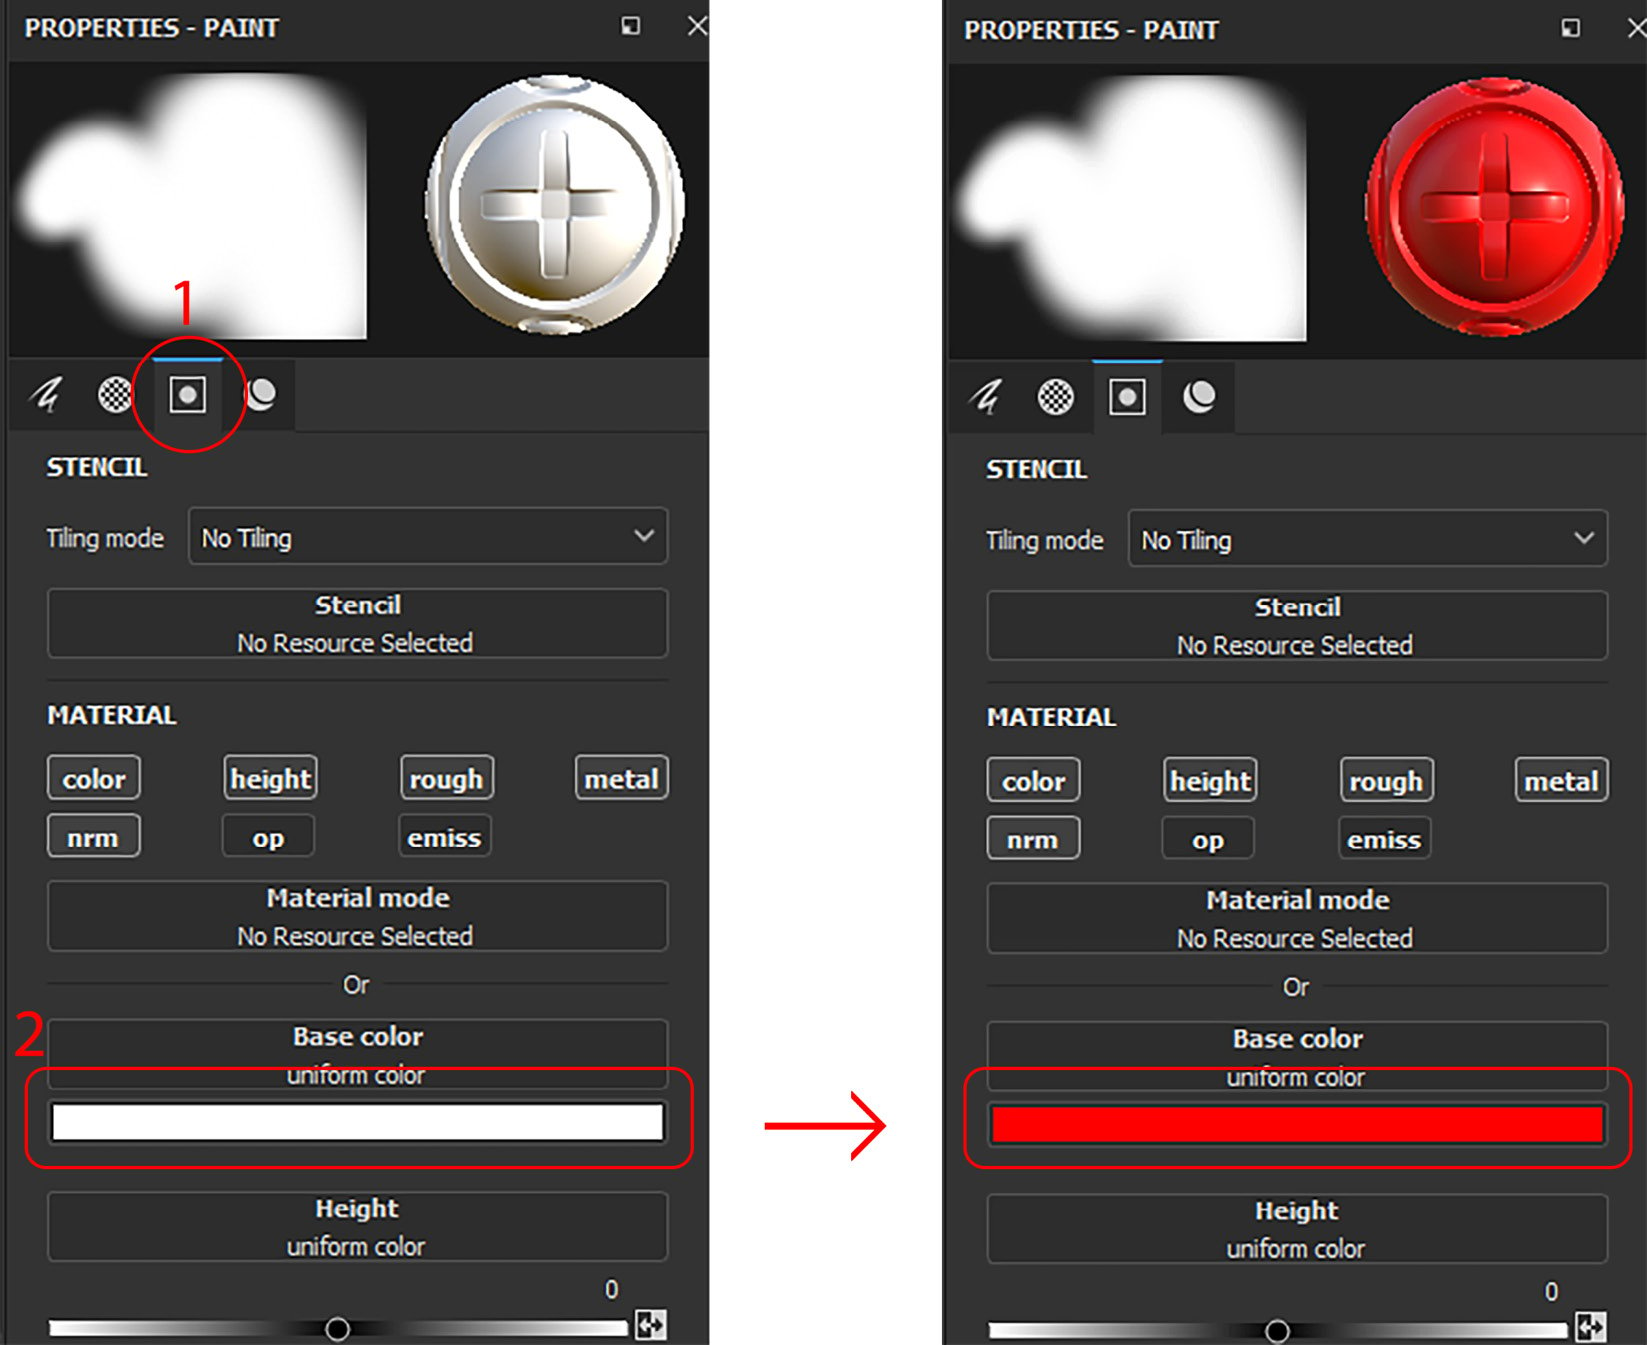
Figure 2.27 – Changing brush base color
Now, if you click with the brush using the left mouse button on the TV screen, you will get a red screw:
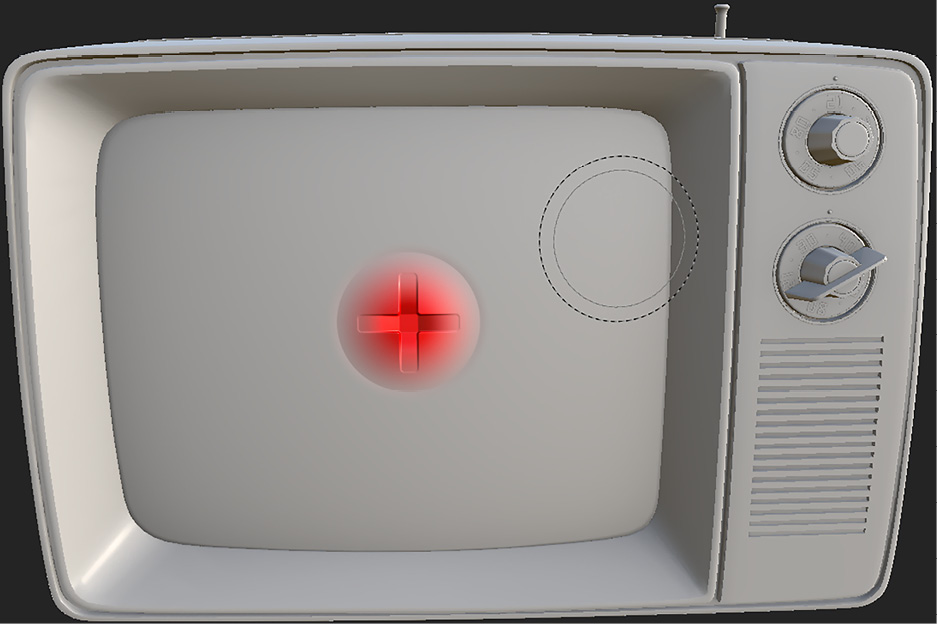
Figure 2.28 – Red screw
Suppose you do not want color at all. All you have to do is follow these steps:
- Deselect the color option under the STENCIL tab.
- Now, click on the TV screen using the left mouse button; you will not notice any color on the screw:
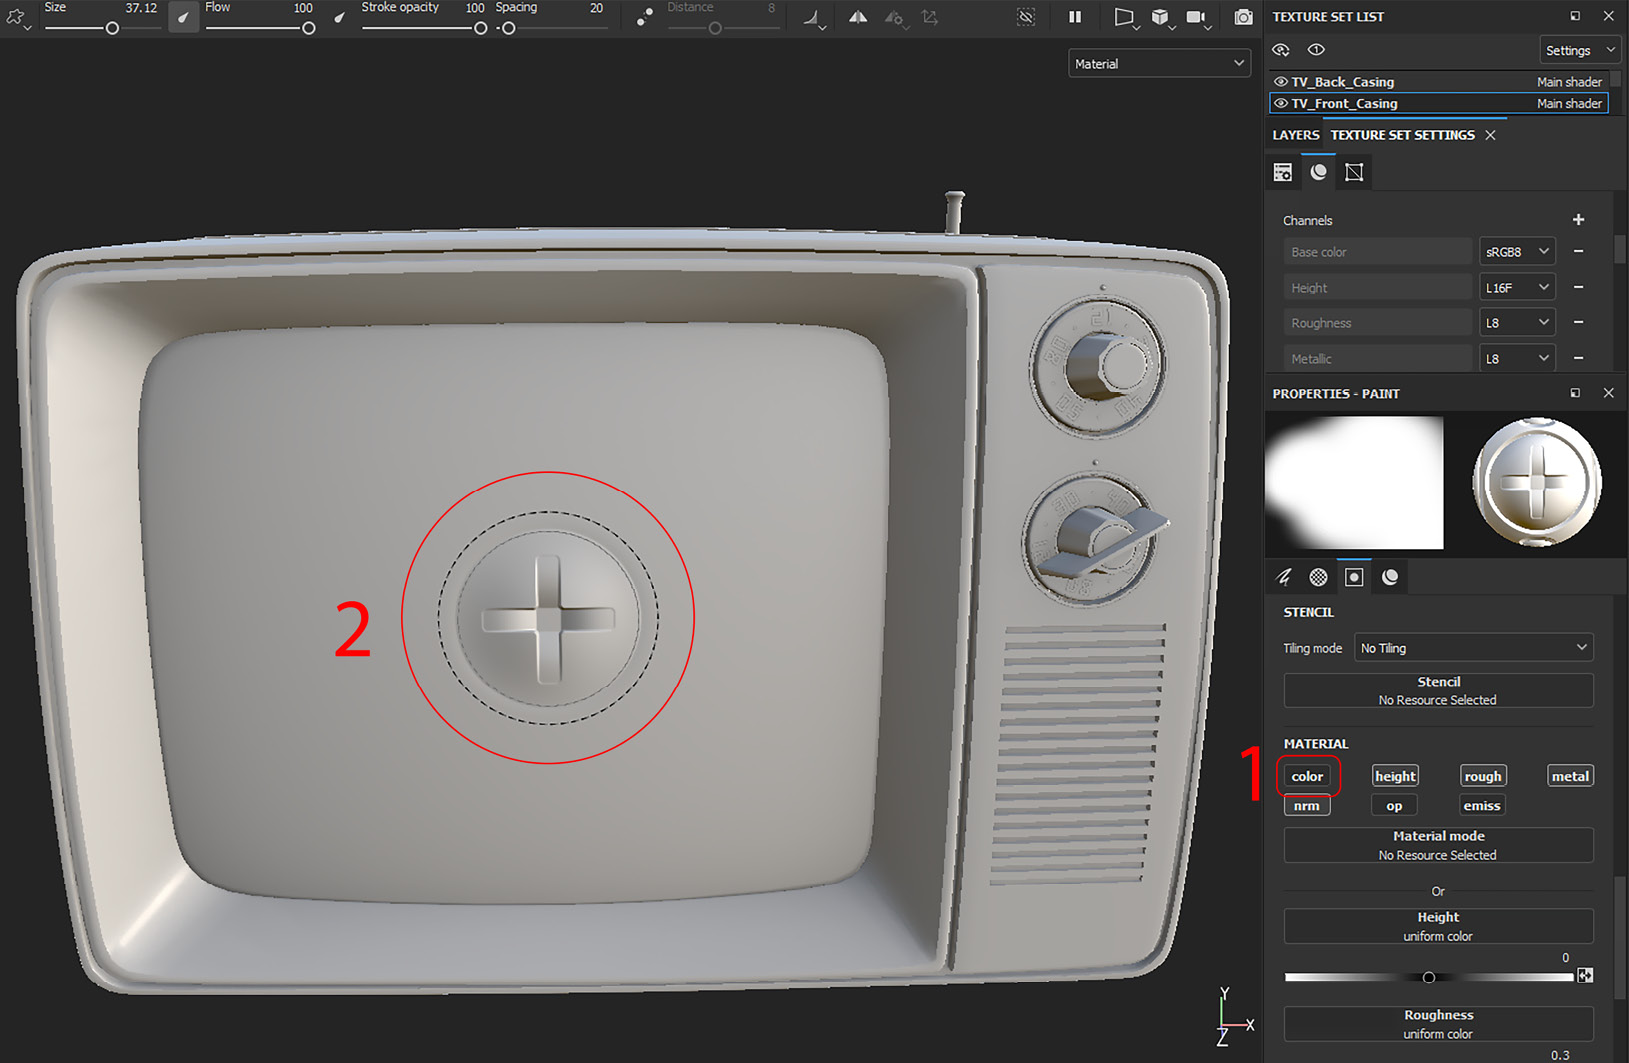
Figure 2.29 – Painting without color
Now let’s create the same Screw Shape brushstroke but with the material. Go to the previously created SILVER tab and drag Silver Pure to Material mode in the Paint properties, as shown in Figure 2.30:
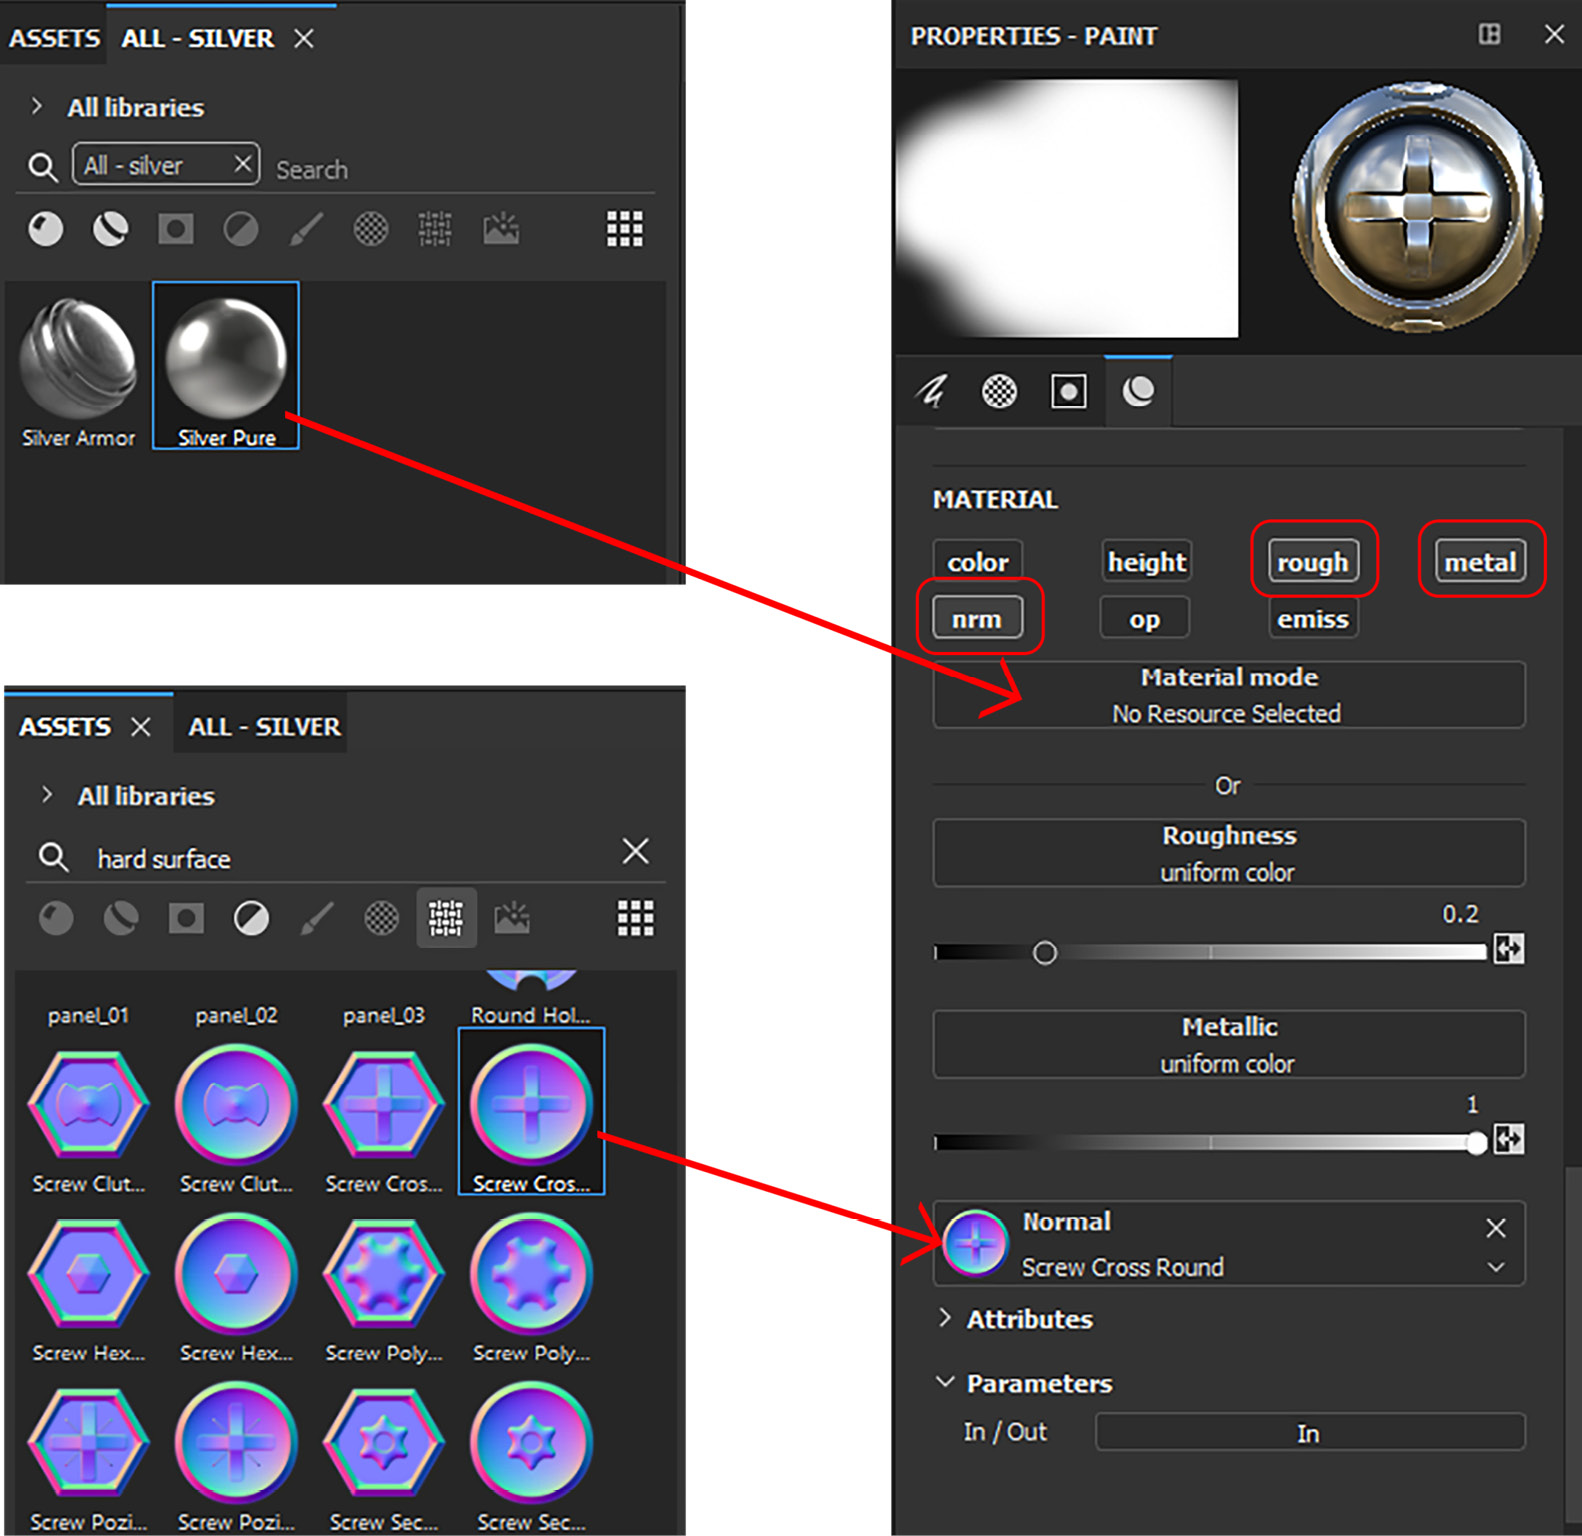
Figure 2.30 – Creating Silver Screw
Make sure your normal (nrm) option is selected under MATERIAL and drag Screw Cross Round across to the Normal map, as shown in Figure 2.30.
Using alpha maps to apply assets
Previously, you might have noticed that the edges of the painted screw were blurred or feathered; this was because the alpha that the brush was using had soft edges. To create a solid screw, go to the ALPHA tab under PROPERTIES - PAINT.
In case you don’t have any solid round alpha inside Adobe Substance 3D Painter, you can use the alpha that we imported. So, go to the Assets panel and choose Project library and then choose Retro. Then, drag any solid round alpha from the Assets panel to the ALPHA section on the right Properties panel and replace it, as shown in Figure 2.31:

Figure 2.31 – Alpha
Now, click on the front screen of the TV with the left mouse button, and you will get a solid silver screw:
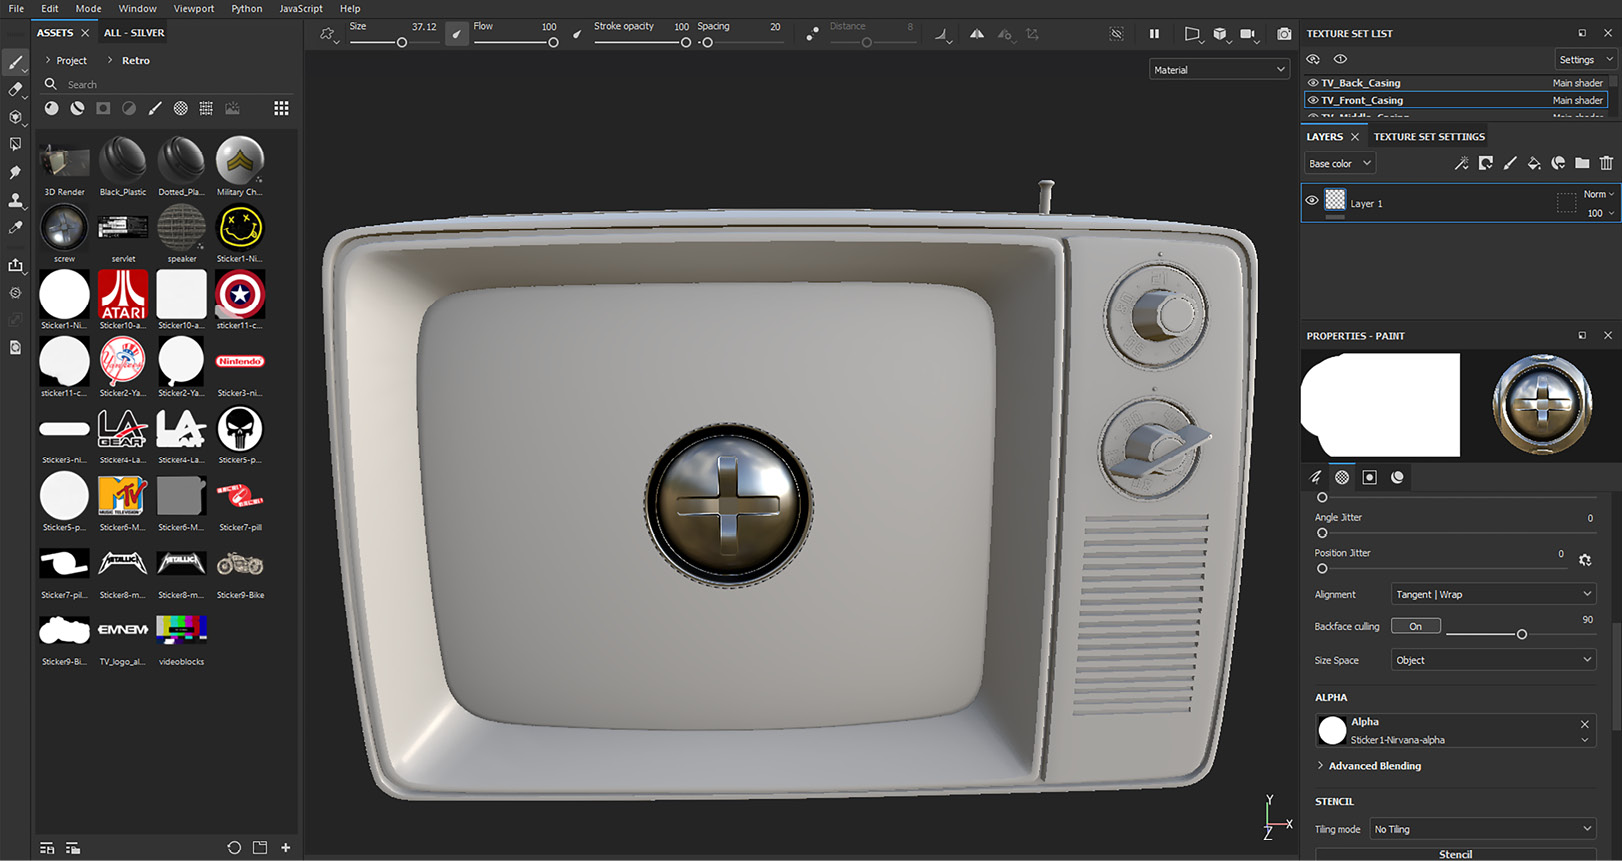
Figure 2.32 – Solid silver screw
Every material, normal map, alpha, and so on, has different parameters. For example, if you go to the Normal map in Attributes, as shown in Figure 2.33, you will find In/Out, which creates normal maps by flipping the tangents:
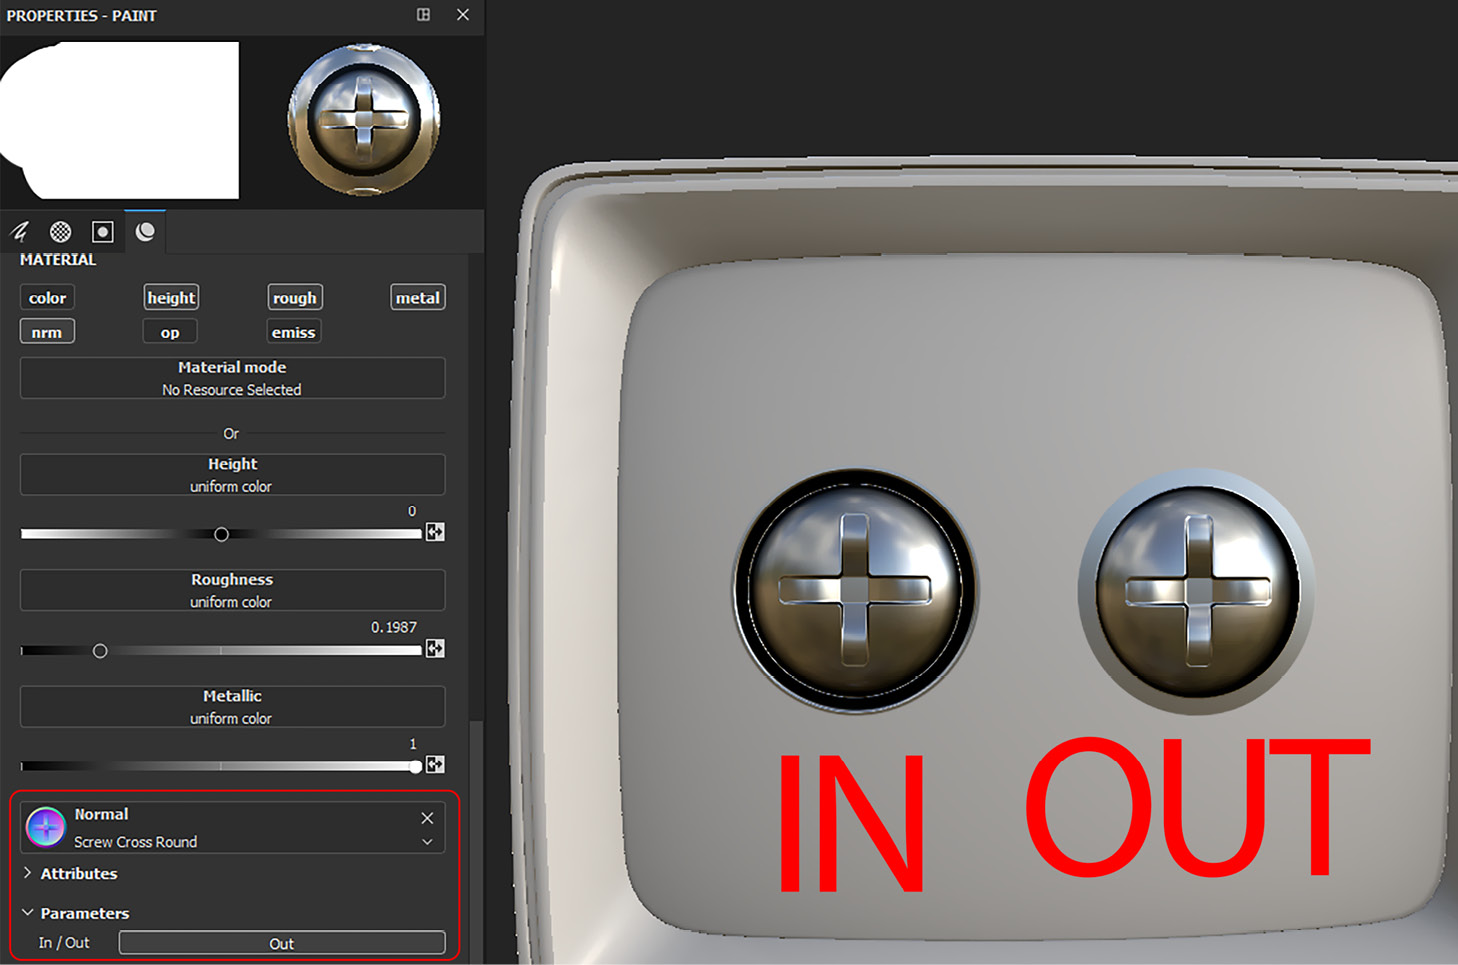
Figure 2.33 – Parameters
Undo the previous screw brush strokes, so we can perform some other experiments.
You can also increase the height of the normal map, but first, make sure the height map option is selected:
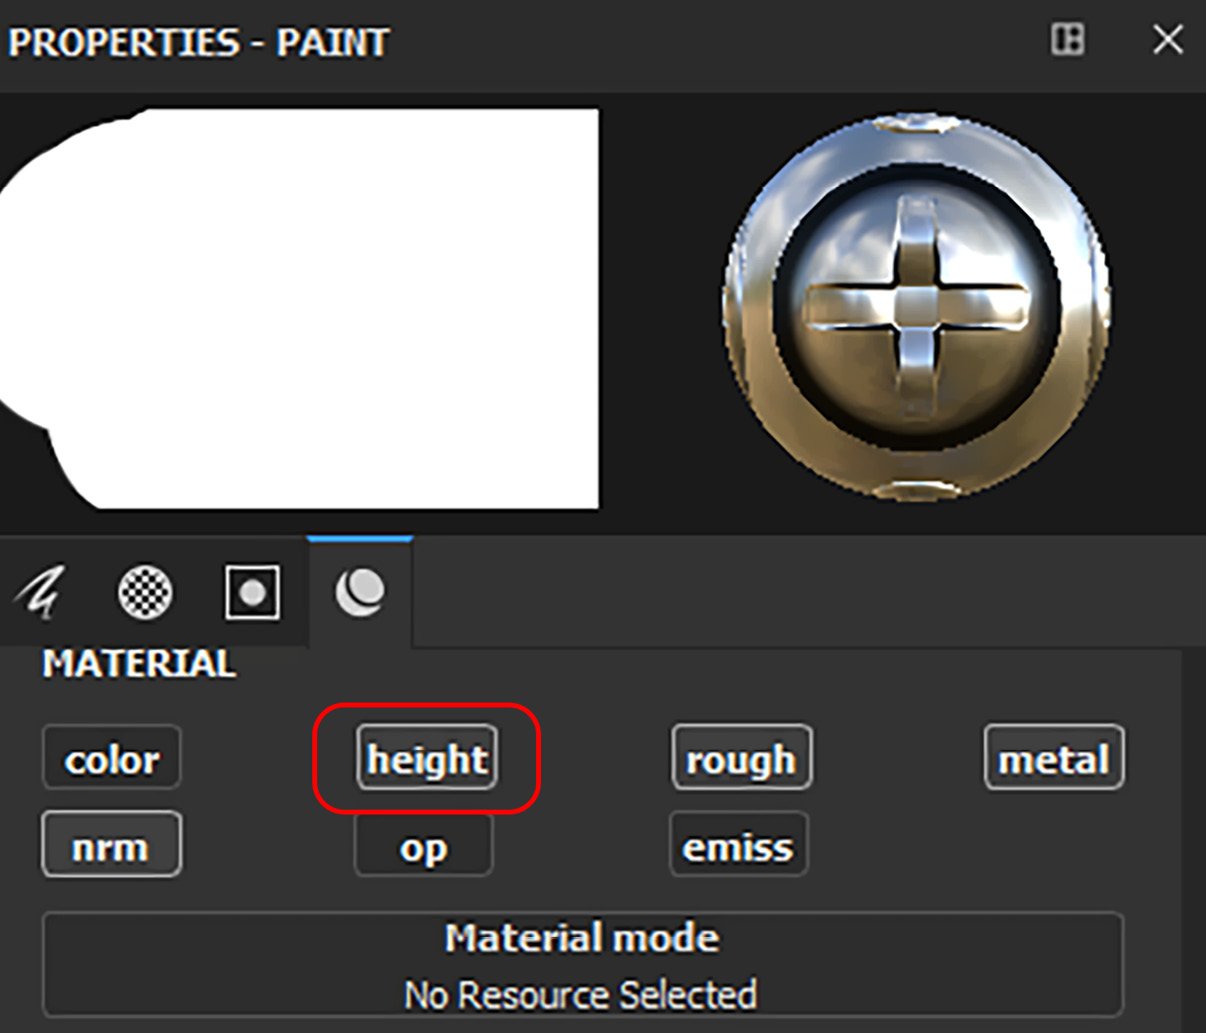
Figure 2.34 – Height map
To increase the height of the normal map, you can move the slider to the white area, and if you want to reduce it, then move the slider to the black area. White means 100% positive height, and black means 100% negative height. You can also invert the height by clicking the invert height map button:

Figure 2.35 – Positive and negative height
Now, click on the TV screen with positive and negative heights and see the results:
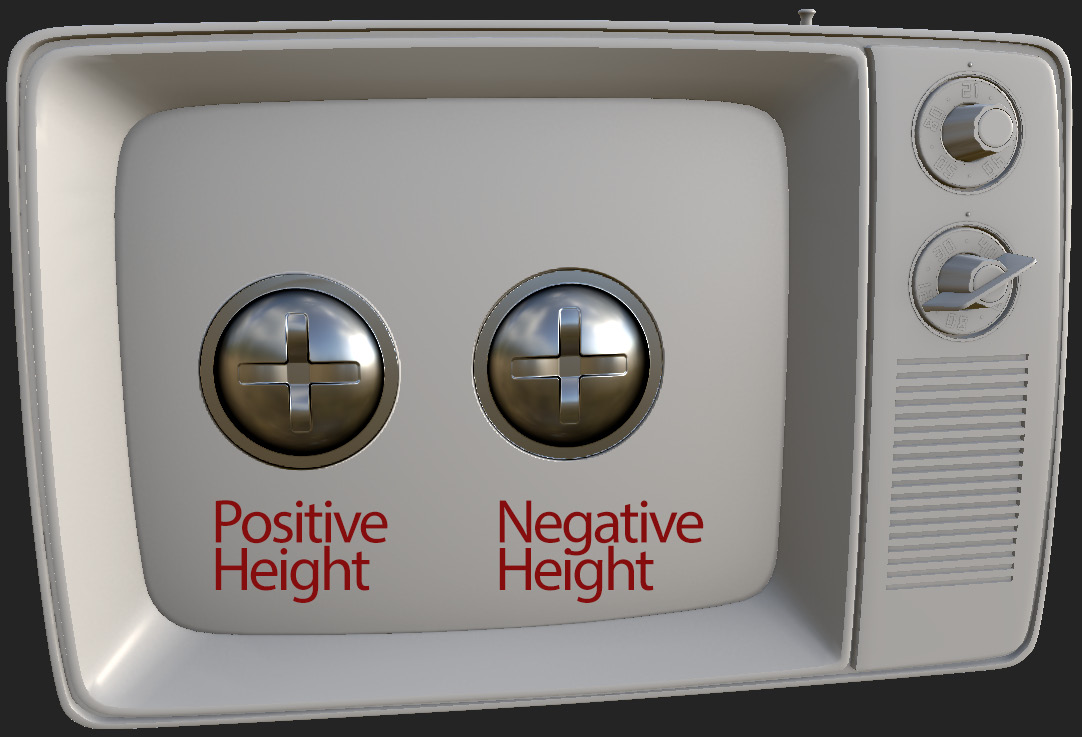
Figure 2.36 – Positive and negative heights
Now, you can undo and remove the screw or use the Eraser option from the left toolbar to erase it. And practice using the brush with different Alpha, Material, Height, Roughness, Metal, Emission, Opacity, and Color combinations.
Summary
In this chapter, we covered some vital areas of Adobe Substance 3D Painter. First, we learned about the use of the Assets panel. We studied the Assets panel’s interface and its usage. Second, we learned how to import resources from the outside of Adobe Substance 3D Painter into the Assets panel and create custom tabs inside it. Third, we learned in detail how to apply assets to 3D meshes using different methods. Last, we studied different types of assets in Adobe Substance 3D Painter and learned how to apply them.
In the next chapter, you will gain basic to advanced practical knowledge of layers in Adobe Substance 3D Painter. Layers will help you to keep your textures and materials organized in your future projects. You will also learn how to apply materials in more detail, which is a key skill in Adobe Substance 3D Painter, and in this part, you will master this technique.
Once you become a master in applying materials, you will be able to create and apply highly complex and in-demand materials and textures. You will be learning techniques showing how to apply a material through ID maps, which will quicken the workflow in Adobe Substance 3D Painter.
You will also learn how to create transparent materials in Adobe Substance 3D Painter, such as a television screen and LED lights. By learning about the aforementioned techniques and skills, you will be able to create materials for professional gaming assets, architecture models, and visual effects for movies.