


 Download code from GitHub
Designing User Interfaces
When working with UI, it is important to understand a few design basics. This chapter will cover the foundation of designing UI as well as a few key concepts to start you off in the right direction.
In this chapter, we will discuss the following topics:
- Defining UI and GUI
- Describing the four types of interfaces
- Choosing a UI layout and color scheme
- Defining interface metaphors
- Discerning and setting resolution and aspect ratio
This book is not about the art of designing UI. It is a technical text that discusses implementation of UI functionality. However, I do want to discuss some basic design principles of UI design. I don't expect you to be an amazing UI artist after reading this chapter. I do hope that you get some basic understanding of layout and design principles from this chapter, though, so that maybe your artist friends won't make too much fun of you.
UI and GUI
So what exactly do UI and GUI stand for, and what's the difference? UI stands for user interface, and GUI (pronounced "gooey") stands for graphical user interface. To interface means to interact with, so the user interface is the set of devices that let the player interact with the game. The mouse, keyboard, game controller, touch screen, and so on are all part of the user interface. Graphical user interface is the subset of the user interface that is represented by graphics. So, onscreen buttons, drop-down menus, and icons are all part of a game's GUI.
This book will focus primarily on GUI design, but it will discuss some non-graphical aspects of user interface controls, like accessing data from the mouse, screen tap, keyboard, or controller.
As GUI is a subset of UI, many people (myself included) tend to just refer to the GUI as UI. In fact, Unity also refers to all the GUI items they provide templates for as UI. "Back in the day", the days before Unity 4.6, to implement visual UI in Unity, you had to use the "legacy GUI controls". These controls used the OnGUI() method. I believe one of the reasons that Unity refers to their new graphical user interface controls as UI rather than GUI is to make a distinction between the old GUI and the new UI. This, and the fact that I feel silly saying "gooey", is also why I refer to the graphical user interface we can implement in Unity as "UI".
Anything Unity replaces with new functionality gets marked as "legacy". Legacy items are only left available within Unity for backward compatibility.
As a general rule, if you are trying to find any information about working in Unity's UI and find reference to OnGUI(), move along! This code has been deprecated for a reason, and Unity no longer supports it. In fact, Unity explicitly states that you should not use it for a new project. There are a few diehard OnGUI() fans out there who want to hold on to the past, but I couldn't tell you why. In my experience, I have not found anything to be "undoable" in the "new" (it's not that new anymore) UI. While some things you may want to do will not be explicitly provided by the "new" UI system, a little bit of your own code can go a long way.
Four game interface types
When you say "game UI", most people think of the HUD (heads-up display) that appears in front of all the in-game items. However, there are actually four different types of game interfaces: non-diegetic, diegetic, meta, and spatial.
Fagerholt and Lorentzon first described these four different interface types in the 2009 Beyond the HUD: User Interfaces for Increased Player Immersion in FPS Games: Master of Science Thesis. Since then, the terminology has been widely used throughout the field of UI game design. You can find the original publication at http://publications.lib.chalmers.se/records/fulltext/111921.pdf.
The distinction between the four is determined by a cross of the following two dimensions:
- Diegesis: Is part of the story?
- Spatiality: Is in the game's environment?
The following diagram demonstrates the cross relationship between the two questions and how they define the four types of interfaces:

Non-diegetic is the category that a game's HUD will fall in. This information exists purely for the player to view, and the characters within the game are not aware of its presence. It exists on the fourth wall of the game view and appears to be on the screen in front of everything. The examples of this type of UI are endless, as nearly every game has some non-diegetic UI elements.
Alternatively, a diegetic interface is one that exists within the game world and the characters within the game are aware of its presence. Common examples of this include characters looking at inventory or maps. The most commonly referred-to example of diegetic UI is the inventory and health display within Deadspace. The inventory displays in a holographic display window that pops up in front of the playable character, and they interact with it as you select their weaponry. His health is also indicated by a meter on his back. The inventory of Alone in the Dark (2008) is displayed in a diegetic way as well. While there are some UI elements that only the player can see, the main character views inventory within their jacket pockets and interacts with the items. Uncharted Lost Legacy and Far Cry 2 both use maps that the characters physically hold in the scene and interact with. Fallout 3 and Fallout 4 use a diegetic interface to display the inventory and map on the character's Pip-boy, which is permanently attached to their arm. Games also use this type of display when characters are in a vehicle or suit, where various displays appear on the shield, window, or cockpit.
Meta interfaces are interfaces that the characters in the game are aware of, but they are not physically displayed within the scene. Common examples of this are speed displays for racing games. Forza 7 actually uses a combination of meta and diegetic displays for the speedometer. A meta speed indicator is persistently on the lower-right corner of the screen for the player to see. Since the character is constantly aware of how fast they are driving, they would be aware of this speed indicator, therefore making it a meta interface. There is also a diegetic speedometer in the car's dash that is displayed when playing in first-person view. Another common usage of this type of display is a cell phone that appears on the screen but is implied the playable character is interacting with in. Persona 5, Catherine, and Grand Theft Auto 5 all use this interface type for cell phone interactions.
The last type of interface, spatial, exists in the scene, but the characters within the game are not aware of it. Interfaces that exist in the scene but that the characters are not aware of are incredibly common. This is commonly used to let the player know where in the scene interactable items are, what the in-game character is doing, or information about characters and items in the scene. For example, in Legend of Zelda: Breath of the Wild, arrows appear over the heads of enemies, indicating who Link will attack. Link is not actually aware of these arrows; they are there for the player to know who he is focusing on. Xenoblade Chronicles 2 uses a spatial interface to indicate where the player can dig; a shovel icon appears over the diggable areas.
Layout
When laying out the UI for your game, I strongly recommend checking other games of the same genre and seeing how they implemented their UI. Play the game and see whether it feels good to you.
If you are unsure of how to lay out your game's UI, I recommend dividing the game's screen into a guttered grid, like the one shown in the following diagram, and placing items within the non-guttered areas:
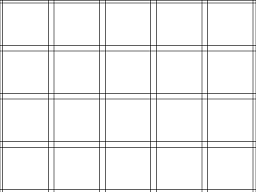
You can use as many grids as you want, but laying out the items with reference to the grid will help ensure that the UI is arranged in a balanced way.
In most cases, the HUD items should remain in the outer edges of the grid. Any UI that displays in the center grids will restrict the player view. So, this area is good for pop-up windows that pause the gameplay.
The device your game will be played on is important when determining layout. If there are a lot of buttons the player will interact with, they are generally best suited for the bottom or side portions of the screen if playing on a mobile device. This is due to the way players hold their phones and top-center part of the screen is the most difficult area to reach with their thumb. Additionally, reaching for this area will cause them to block the majority of the game view with their hand.
You'll note that when you play computer games, they tend to have much smaller and more cluttered UI than mobile and console games. This is due to visibility and interaction. Clicking on small objects with a mouse is significantly easier than tapping them with a finger or selecting them by scrolling through them with the d-pad. Also, the screen resolution is much bigger, allowing for more space to be taken up by the UI as compared to the game.
Fitts' Law is a commonly referenced principle of UI design. The gist of Fitts' law is don't make interactable UI small and far apart to increase user experience. Make the most important interactible items the largest and ensure that they are near each other.
Color schemes
The color you choose for your UI will play an important role in not just its visual appeal, but in the player's interpretation of what the UI does. The colors of the UI should stand out compared to the background, but it should also not stand out so much that it causes eye strain. There is no specific color scheme you have to use for your game, but as a general rule, split complementary color schemes are the best for reducing eye strain while also producing enough contrast to make items distinguishable.
Whenever possible, you should also avoid color combinations that will be indistinguishable to those who are color blind; if it's not possible, use other indicators to make items distinct.
The following websites offer very good information on designing accessible UI for color blindness:
http://blog.usabilla.com/how-to-design-for-color-blindness/
https://www.smashingmagazine.com/2016/06/improving-color-accessibility-for-color-blind-users/
Interface metaphors
When you design your UI, you should use metaphors when possible rather than words. Metaphors are symbols whose meanings are universally recognized. For example, most people will recognize the meaning of these buttons to be play, pause, menu, settings, close/cancel, confirm, mute, and save:

There are three main reasons for using these metaphors:
- They are quicker to recognize than text
- They don't clutter the UI as much as their words counter parts
- You don't have to translate them!
The third reason is the reason I use them the most. All the games I produce for the company I work for need to be translated into six different languages, so I avoid using words whenever possible.
Resolution and aspect ratio
The resolution of a game is the pixel dimension of the screen. For example, a game could run at 1024x768. This means that the game is 1024 pixels wide and 768 pixels tall. The aspect ratio of a game is the ratio between the width and height (expressed width:height). This aspect ratio of a game is determined by dividing the resolution width by resolution height and then simplifying the fraction. So, for example, if your game has a resolution of 1024x768, the aspect ratio would be as follows:

Here, the fraction 4/3 is the aspect ratio 4:3.
The following diagram provides a list of common aspect ratios and related resolutions:
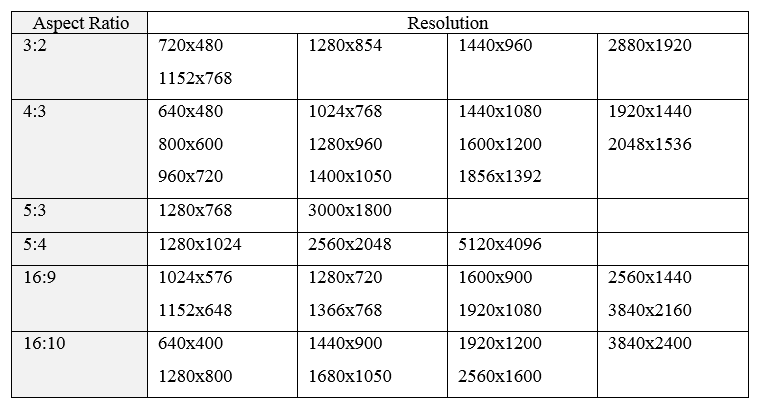
The following website provides a list of common resolutions specific to iOS devices: http://iosres.com/. Note that not all the aspect ratios are simplified fractions. For example, 16:10 is not simplified, as the simplified fraction would be 8:5.
When it comes to UI, the resolution of your game will be incredibly important. If you'll build to a single resolution/aspect ratio, the UI will be much easier to deal with. However, if you'll build a game that you want to run on multiple resolutions/aspect ratios (for example, a mobile project), you want your UI to scale appropriately, and you want to be able to easily change the resolution of your game so that you can test that it is scaling properly.
Even if you will allow your resolution and aspect ratio to vary, you should still decide on a default resolution. This default resolution represents the resolution of your ideal design. This will be the resolution that your initial design and UI layout is based on, so if the resolution or aspect ratio varies, the UI will try to maintain the same design best as it can.
Changing the aspect ratio and resolution of the game view
You can easily switch between different resolutions and aspect ratios in the Game tab. This will allow you to see how your UI scales at the different resolutions and aspect ratios:
- If you navigate to your Game tab, you will see the words Free Aspect. Clicking on Free Aspect will reveal a menu that shows various aspect ratios and a single 1024x768 resolution that is labeled Standalone:

Free Aspect means that the window will scale to whatever resolution you set by changing the size of the game window. So by moving the frame around on the game window, you will change the aspect ratio. You can see this in effect easily by setting your Editor layout to one that shows both the Screen and Game tabs open simultaneously. For example, setting the Layout to 2 by 3 will do this.
- You can change the layout by selecting the word Default that appears in the upper-right hand corner of the Unity Editor.
- Now the Game and Scene tabs will both be visible on the left-hand side of your screen. Zoom out of your scene tab very far so that the square representing the camera looks small, as shown:

- Now, reduce the size of the game tab so that it is a very small thin rectangle. You will see that the main camera is now also displaying as a very small thin rectangle, because we are in Free Aspect ratio mode:

- You can select another aspect ratio, like 5:4, and you will see that as you rescale the game window, the blue area representing the actual game will maintain a 5:4 ratio and black bars to fill in any extra spacing. The camera will also maintain that ratio:

- Standalone (1024x768) will attempt to emulate the 1024x768 resolution. It's pretty likely that the window you have set for the Game tab is not big enough to support 1024x768 pixels; if so, it will be scaled as indicated in the following screenshot:

If the resolution or aspect ratio you want to use is not available in the resolution drop-down menu, you can add your own item to this menu by selecting the plus sign. If you want to create a set resolution item, set Type to Fixed Resolution. If you want to create a set aspect ratio item, set Type to Aspect Ratio:

For example, if I wanted to have a resolution item that represented the iPhone 6, add an item with the settings displayed in the following screenshot:

Once you hit OK, the iphone 6 item will be displayed at the bottom of the list. When you select it, the camera and visible area of the Game tab will maintain the aspect ratio created by a 1334x750 resolution:

Building for a single resolution
If you are creating a game that you plan to build on the PC, Mac, & Linux Standalone target platform, you can force the resolution to always be the same. To do so, go to Edit | Project Settings | Player. Your Inspector should now display the following:

You may have more or fewer platforms displayed here; it depends on the modules you have installed with Unity.
To force a specific resolution on a PC, Mac, & Linux Standalone game, deselect Default is Native Resolution. Then, the options for inputting Default Screen Width and Default Screen Height will be made available to you, and you can enter the desired resolution values. You must also set Display Resolution Dialog to Disabled. Then, when you build your game, it will build play in a window of the size you specified.
The following screenshot shows the settings for forcing your game to display at 1024x768 in the Player Settings for PC, Mac, & Linux Standalone:

You can also force a specific resolution with a WebGL build. There are a few less options to worry about, but the general concept is the same. The following screenshot shows the settings for forcing your game to display at 1024x768 in the Player Settings for WebGL:

Resetting the resolution
Annoyingly, if you build and run a PC, Mac, & Linux Standalone game with one set of resolution settings, and then try to rebuild with a different set of resolution settings, your new settings will not update and the game will still build with the previous resolution. This may seem like a bug, but it is not. The Unity application is saving the screen settings under the PlayerPref save data.
If you find that you are unable to manually set your resolution settings, there are two methods you can attempt:
- Deleting the PlayerPrefs with PlayerPrefs.DeleteAll();
- Physically deleting the PlayerPrefs files from the computer
I will outline the two methods for you.
Method 1 – PlayerPrefs.DeleteAll()
You can create a menu item within the Unity Editor that will delete all of your PlayerPrefs for you. This is helpful for this issue as well as helping you delete saved data in other scenarios.
The following method is modified from the one found at http://answers.unity3d.com/questions/516517/why-doesnt-standalone-build-resolution-settings-af.html.
To create a menu item within the Unity Editor that will delete all of your PlayerPrefs, complete the following steps:
- Create a new folder in your Assets folder called Editor.
- Create a new C# Script and name it DeletePrefs.cs within the Editor folder. It will not work unless it is placed in a folder called Editor, so be sure to do that:

- Open the DeletePrefs.cs script and give it the following code:
using UnityEditor;
using UnityEngine;

public class DeletePrefs : EditorWindow {

     [MenuItem("Edit/Delete All PlayerPrefs")]

     public static void DeletePlayerPrefs(){
           PlayerPrefs.DeleteAll();
           Debug.Log("delete prefs");
     }
}
- Save the script.
- A new option, Delete All PlayerPrefs, will now be at the very bottom of the Edit menu. Select Delete All PlayerPrefs. If performed correctly, you should see delete prefs in the Console log.
- Rebuild the game and see whether the new resolution settings "stick".
Method 2 – Deleting PlayerPref files
I have found that Method 1 doesn't always work for me and sometimes my resolution settings are not reset. If you are unable to get Method 1 to work for you (or you just feel like doing it another way), you can find the PlayerPref files on your computer and delete them manually. To delete the files manually, complete the following steps:
- Determine Company Name and Product Name from PlayerSettings by navigating to Edit | Preferences | Player Settings:

- Now, select (Windows) Start and type regedit. Select the regedit program when it becomes available to you:

- The Registry Editor should now be open. Navigate to the folders that represent the Company Name and Product Name you found in step 1, by the following path:
- Computer
- HKEY_CURRENT_USER
- Software
- The Company Name Found In Step 1 (DefaultCompany)
- The Project Name Found In Step 1 (Mastering Unity UI Project):

- Once you select the appropriate folder, you should see the following items on the right-hand side of the Registry Editor:
- Screenmanager Is Fullscreen
- Screenmanager Resolution Height
- Screenmanager Resolution Width
- Select all three of the listed items and delete them:

- Rebuild the game, and the new resolution settings should now be displaying.
Building for a single aspect ratio
Forcing a specific aspect ratio is possible in PC, Mac, & Linux Standalone builds. To do so, enable Display Resolution Dialog and check the aspect ratio you wish to use in the Supported Aspect Ratios setting.
The following screenshot shows a game being built with a 4:3 aspect ratio:

When you build and run your game with the preceding settings, a dialog option will open and the player will be allowed to choose from multiple resolutions that fit that setting. The following screenshot shows the resolution dialog window with multiple 4:3 resolutions available:

Setting the orientation
When building for mobile devices, you can't specify resolution and aspect ratio. However, you can choose between screen orientations in mobile devices. There are two different orientations: Landscape and Portrait.
Games built so that they are wider than they are tall are said to have landscape resolution. Games build that are taller than they are wide are said to have portrait resolution. For example, a 16:9 aspect ratio would be a landscape resolution, and a 9:16 aspect ratio would be a portrait resolution, as illustrated:

So, while you can't choose the exact aspect ratio of a mobile game, you can choose the orientation, which forces the aspect ratio to be either wider or taller. You can set the orientation by navigating to Edit | Preferences | Player Settings and selecting the mobile device. If you are building for both iOS and Android, you will not have to set these properties for both. As you can see from the following screenshot, the asterisk next to the property of Default Orientation states that the settings are shared between multiple platforms:

You can set the Default Orientation to either Auto Rotation, or one of the other rotations, as shown:

Unity defines the following orientations as the following rotations:

When you select a rotation other than Auto Rotation as the Default Orientation, the game will only play at that orientation on the device. If you select Auto Rotation, you will have the option to select between multiple orientations:

In most cases, it is best to choose only the Landscape orientations or only the Portrait orientations, but not all four. Generally, allowing all four orientations will cause issues with the game's UI.
Players tend to prefer to be able to rotate their games (especially if they're like me and like to play games in bed while their phone is charging), so unless you have a good reason to stop rotation, it's best to enable both Portrait and Portrait Upside Down or Landscape Right and Landscape Left.
Summary
This chapter laid the framework necessary to begin working with UI.
In this chapter, we discussed the following topics:
- Defining UI and GUI
- Describing the four types of interfaces
- Choosing a UI layout and color scheme
- Defining interface metaphors
- Discerning and setting resolution and aspect ratio
In the next chapter, we will jump into working with the Unity UI system.