Chapter 1: Getting Started with Krita
As we have established, the goal of this book is not to be a technical manual about Krita (as Krita's official documentation is way better at that than I will ever be!). However, there are some fundamentals that we are going to cover to make sure we start our Krita journey in the best possible way. Whether you're a seasoned professional or someone who is brand new to digital art, you're certain to find something interesting here!
This chapter is going to cover some of my basic hardware recommendations so that you can get the most out of your Krita painting experience. We will look at a quick overview of Krita as a piece of software, learn how to download and install Krita, and go over Krita's default user interface (UI) once you have the software installed.
In this chapter, we will cover the following topics:
- Recommending hardware – tablets and upgrades
- What is Krita, and what makes it different?
- Installing Krita
- Breaking down the Krita UI
Technical requirements
We will be installing Krita from the official website's Download page at https://krita.org/en/download/krita-desktop/.
Recommending hardware – tablets and upgrades
Normally, in technical guides (especially in other great books from Packt Publishing), there's a Technical requirements section that lists the necessary requirements that you might need to participate in the guided practices or workshops within the book. However, this book has been set up a little bit differently, as it does not require specific hardware (other than a machine that meets Krita's system requirements, which we will cover later). There are a few items that I'd like to touch on that will make your digital painting journey much easier. They come as my personal recommendations.
The first thing I'd like to cover is the different types of tablets you could consider. If you already have a tablet, feel free to skip ahead; however, if you haven't made the plunge, I very much encourage you to take a look. Here are some of my thoughts on what to look for. Afterward, we will take a look at some recommended hardware upgrade paths to ensure your computer is giving the performance levels that you require.
The graphic drawing tablet
If you want to push your digital painting and illustration skills to the next level and have not done so already, I highly recommend investing in a graphic drawing tablet (also known as a pen tablet) or a touch monitor tablet (also known as a touchscreen tablet) set up for your computer. There is a myriad of choices you have regarding sizes, styles, and brands when it comes to your tablet purchase, but you'll notice there's no one-size-fits-all solution that will work for everyone. So, find something that fits within your budget (on Amazon, some graphic drawing tablets start at $40!), and be sure to do your research!
For instance, I used the Huion H610 Pro V2 graphics tablet (as pictured in Figure 1.1) for my first year of professional digital art, and I still have it kicking around:
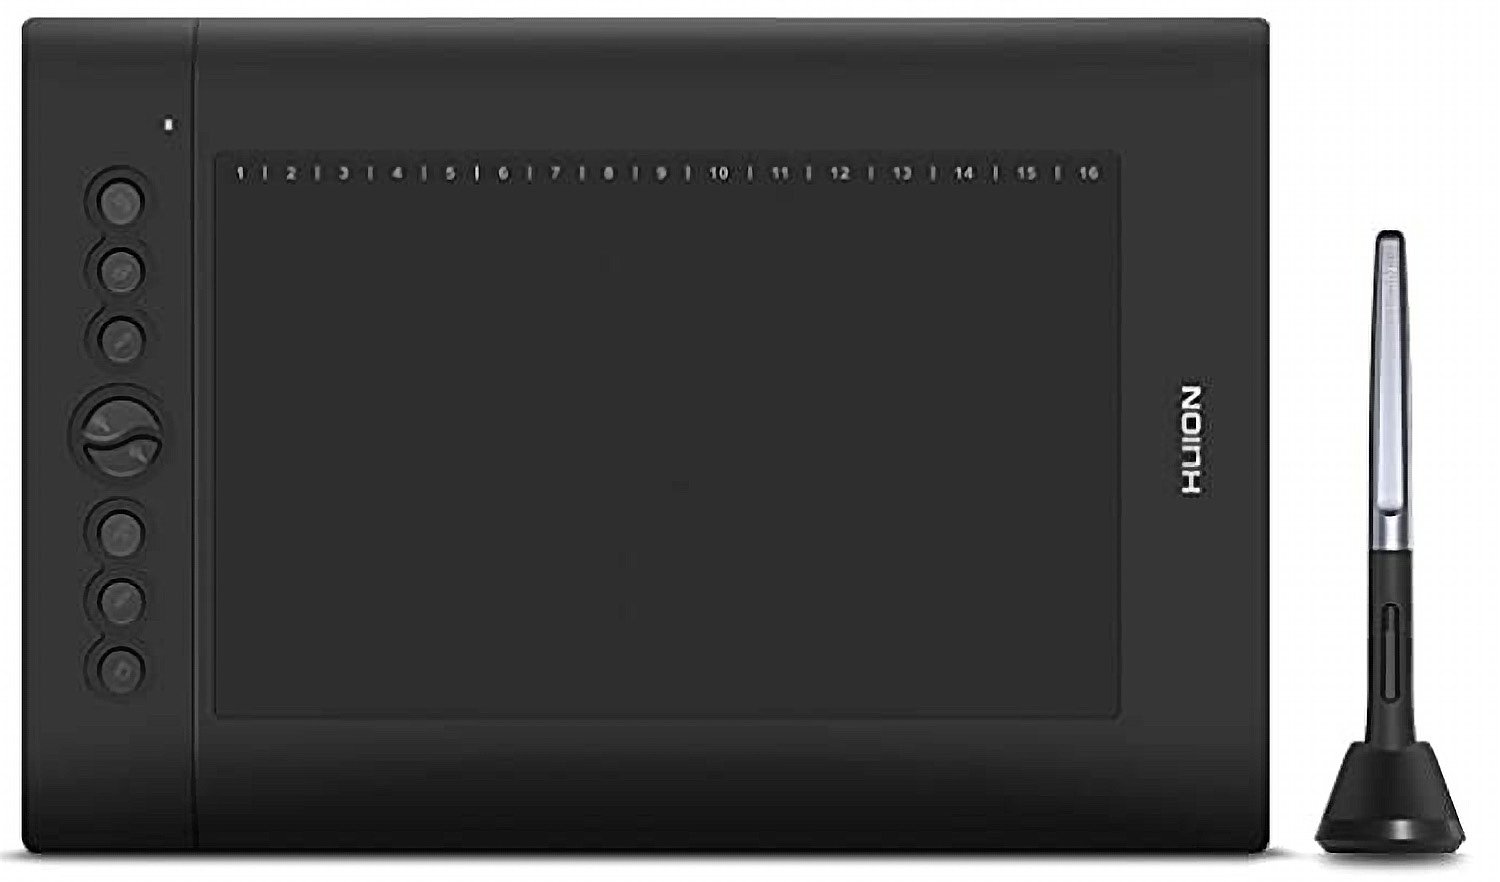
Figure 1.1 – The Huion H610 Pro V2 graphic drawing tablet
It was a fantastic starting point for me, as it came in under $80 and had all the cool features (such as pen pressure, pen tilt, and programmable buttons on the side) that I saw my digital art heroes (such as Craig Mullins, Sparth, and Barontieri) using at the time.
Graphic drawing tablets are devices that only require a single USB slot, so they can be used with a large number of computer setups (and even with some cell phones, depending on your phone's capabilities). It is a perfect way to get in the door without breaking the bank, and it comes highly recommended not only for the projects within this book but for your overall enjoyment of digital art in general.
The graphic drawing monitor/pen display
If you are looking to "level up" your digital art workspace, a drawing monitor could be the next step. Drawing monitors mimic drawing or painting in traditional media in terms of how they allow you to use a stylus to draw and paint directly on the screen itself, but they need a computer to attach to. They will come with power cables, input cables to attach to your computer, and depending on the make or model, charging stations or docks for the stylus pen. There are many companies, sizes, and styles to choose from, so shop around and find something that fits within your budget! While the higher-end Wacom drawing monitors can be a few thousand dollars a pop, entry companies such as Huion or XP-Pen start around the $300 range, maybe even cheaper during a holiday sale or a special event, so keep a lookout!
As I write this, my Huion Kamvas 20 (as pictured in Figure 1.2) is sitting right next to me, acting as my third monitor. I have had fantastic luck with driver support and features such as pen tilt and pen sensitivity within Krita:
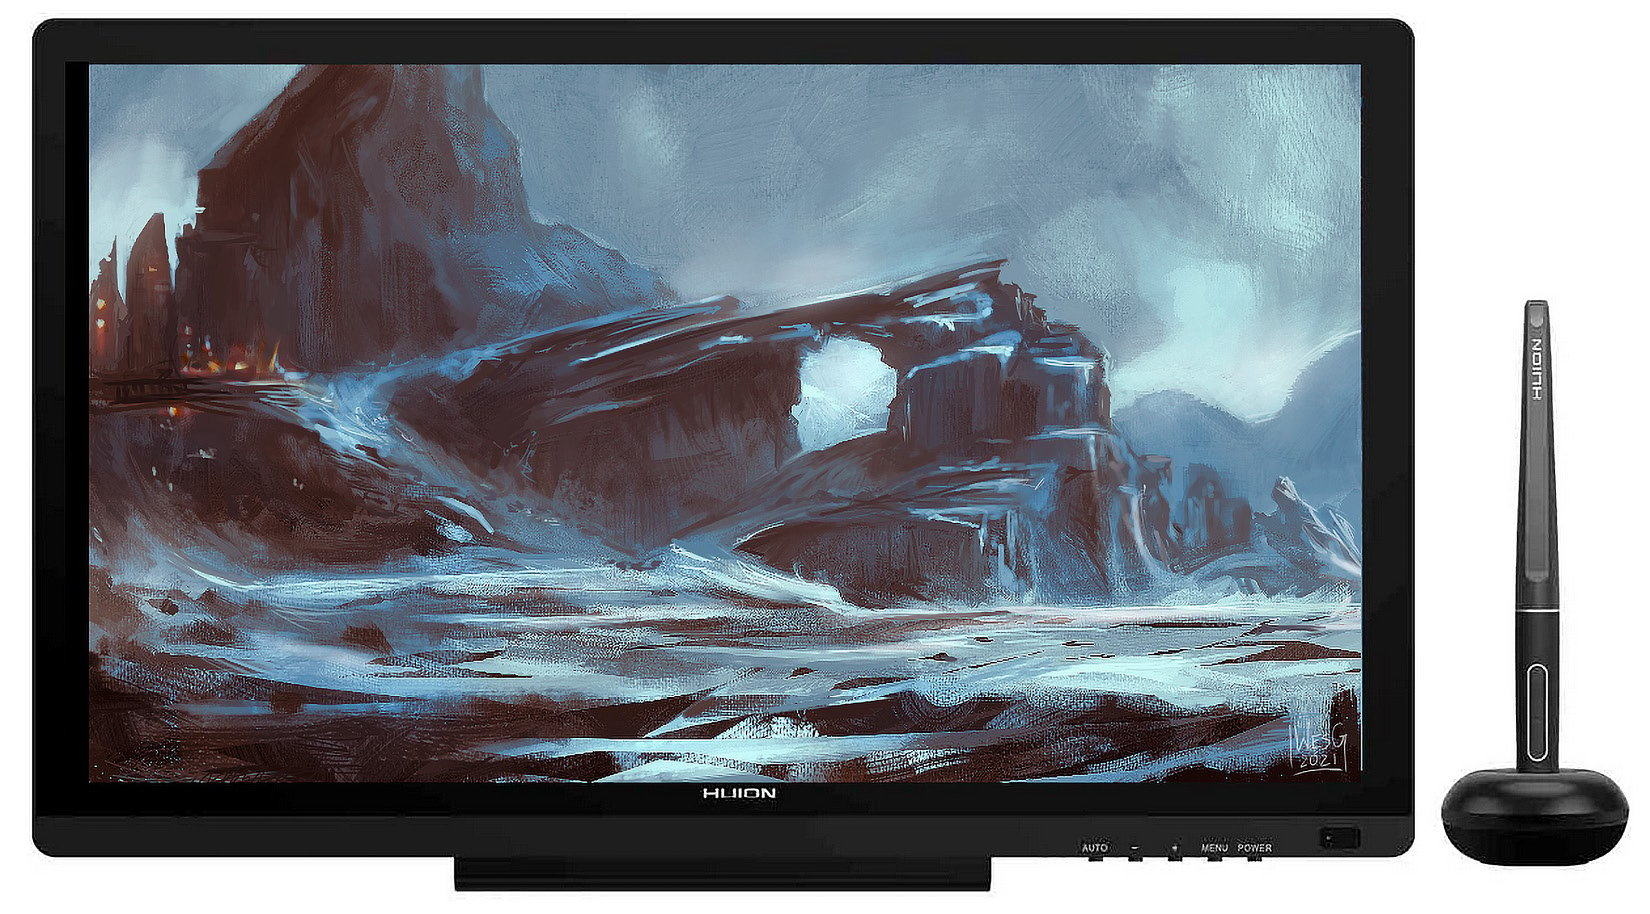
Figure 1.2 – The Huion Kamvas 20
If you want to go beyond the pure hobbyist level, I do think the touch tablet might be worth the additional cost investment for the cohesive nature of mimicking drawing or painting on a traditional sketchbook or canvas. However, both tablet options are great for hobbyists and professionals alike! Remember, impactful art is up to the artist creating it; the tools just make communicating the ideas easier!
Speaking of tools to help your craft, you might have your computer at the ready but be interested in upgrading some of the internal hardware to really get the best out of your new tablet device. Let's talk about general computer upgrades!
Upgrading your computer
If you want a quick cheat sheet on things to look for regarding upgrading your computer to get the most out of Krita, your best bet will be to look at the following items:
- Central Processing Unit (CPU): Since Krita has so many moving parts and different systems that talk to one other (regarding file management, import/export capabilities, and layer calculations), you will want to make sure your computer's processor is up to the challenge of handling multiple tasks at once. Newer Intel and AMD processors should be up to the task, but if you are noticing your machine is lagging while you paint and it is a bit older (for example, 2016 or earlier), it might benefit you to look at upgrading the CPU. The CPU is the "brain" of the computer, and as we all know, it's always good to have a sharp mind!
- Random Access Memory (RAM): Since digital art deals with displaying images on the screen, and more advanced techniques such as photobashing and matte painting will use multiple images combined to make a cohesive piece, you will want as much memory as you can afford. Krita's official documentation lists 8 GB of RAM as a system requirement, and I would say that is a fair assessment. You can get by with less; however, you might notice a slowdown in performance when making complex or larger documents. Upgrading the amount of RAM your system has will improve load times, ensure certain tools (such as transforms, warps, and blending modes) respond quicker, and display results more instantly on the screen. Think of RAM as your computer's "immediate memory," for example, having papers on your desk. They're right there at your fingertips, so they provide information quickly without having to search (as opposed to a hard drive's memory, which we will cover later). In this case, having more RAM would be the same as having a bigger desk to hold more immediately accessible items. Krita also uses a great swap feature, allowing you to allocate your RAM more heavily to specific tasks and items of your choosing, such as the canvas size, the brush engine, and the editing tools while offloading (or, in this case, "swapping") things such as extended undo history or recent file directories to a hard drive's memory. Essentially, this will free up more RAM for you to use in the moment while you create! Pretty slick stuff.
- Graphics Processing Unit (GPU) or graphics card: Many artists and tech people might tell you that a graphics card should be the first component of this list, but I disagree. Because of their limited availability and moderate-to-high asking price compared to both CPU and RAM upgrades, I put a graphics card behind those two on the list. Yes, having a graphics card will give you additional processing power and memory (as Krita can utilize the additional boost of power that a graphics card grants you). However, I would argue that you could comfortably get solid CPU and RAM upgrades for less than the price of a single graphics card in the current market. If you can get a graphics card for a fair asking price, or do not mind spending on some outright ridiculous markup, a graphics card is a good choice for getting that boost of performance you might be looking for with your Krita workflow.
- Solid-State Drive (SSD) or Hard Drive (HDD): In many ways, your computer's hard drive is its filing cabinet. The faster you're able to access information within it, the more productive you can be. In practice, getting a solid-state (meaning no moving parts) hard drive will allow files to be retrieved, loaded, and brought into RAM faster. Think of an SSD upgrade as adding a brand new six-lane highway to your computer, making sure there are no pesky traffic jams (such as program loading times, data crashes, or slow boot-ups) between when you click on a button to do a task and the conversation between your operating system, CPU, RAM, GPU, and data, to make that request a reality. Additionally, solid-state drives have the benefit of having lower power consumption and higher reliability than a standard hard-disk drive due to the lack of clunky internal moving parts. The likelihood that you will have the ill-fated "hard drive crash" and lose all your data goes down exponentially with a good SSD.
Now that we have some of the basic recommendations for technology and hardware upgrades out of the way, let's get into the main reason you're probably reading these pages: Krita!
What is Krita, and what makes it different?
Krita is an open source digital art software that is available free of charge for Windows, macOS, and Linux. It utilizes many key features that hobby-grade and professional-grade digital artists, illustrators, and animators might want or need in their workflow and is updated on a very consistent basis. We will cover the installation of the Windows version, along with notes about installing the Linux and macOS versions, later in this chapter.
Krita on Mobile?
While there is currently an Android mobile version of Krita in beta, I am not listing "mobile" as a platform, as it is not officially released. However, feel free to download the mobile beta and poke around if you have a device that is capable! You can find up-to-date information about the status of any and all mobile versions of Krita from the official Krita website (Krita.org).
Krita, as we know it, came to be in 2002. However, some interesting history traces the beginnings of the Krita project all the way back to 1998! Krita has been going strong ever since, and in 2012, the Krita Foundation was formed by the collective Krita community to ensure the longevity and success of Krita going into the future. The goal of Krita is to be the go-to software for digital artists from all walks of life, and regular donations and fundraisers aided by the Krita Foundation ensure that can be the case.
Whether you are just starting your digital art journey or are a tenured veteran in your respective art industry, you understand there is a ton of digital art software to choose from when it comes to digital painting and illustration. Krita is different in quite a few ways, but I would put one feature above all the others: it has been created by creators, for creators.
The Krita Artist Community
Krita has another fantastic feature, and that's the overall art community it has nurtured over the years. Various artists, at all levels (from absolute beginners to decades-long seasoned art professionals), are available for guidance, advice, and sharing creations! You can check out the Krita Artist community by navigating to https://krita-artists.org. See you there!
While Photoshop will always be considered an "industry standard" in the digital art realm, first and foremost, it started off as strictly a way to edit photographs. Creating digital art in Photoshop was almost a "happy accident" that resulted from features being added to Photoshop over the years, as opposed to being built from the ground up for digital painting and art. On the other hand, Krita has stayed true to its initial goal of being a heavy-hitting digital artist suite, by bringing in tools heavily used in Photoshop and adapting them to a more matter-of-fact way for visual painters and illustrators to use. These subtle changes range from filters, to the way perspective rulers work, to slight tweaks of the color wheel and natural brush engines to mimic the feel of traditional painting on a canvas. We will be covering all of these features (and many more!) throughout this book to create our projects. So, you will see the depth and breadth of possibilities that Krita can provide for yourself.
The biggest "difference" Krita provides upfront is the low barrier of entry: it is free! The only real thing Krita requires is the time to download and install it, and you are using the same software as some of your favorite professional artists at no charge. While I love the fact that Krita does not cost anything to download and use, I highly recommend donating to the Krita Foundation if and when you can, as our ongoing support as the Krita community can ensure the software stays as fresh as possible, for as many people as possible. Digital creativity should be available for everybody, and I believe we can act as ambassadors to make that a reality!
Another fantastic feature that we will cover, which makes Krita different, is its nature as an open source piece of software. So, what does open source mean in this case? Well, the full code base (programmed in Python) is available to look at, modify, create extensions for, and customize to your liking. The full-time Krita development team is less than ten people, with multiple volunteers committing changes, edits, and updates regularly, and each new release brings about fantastic changes because of this hybrid team's hard work. The UI is fully drag and drop, allowing you to set up your workflow in any way that feels comfortable for your creativity. I am friends with quite a few other Krita artists, and let me just tell you: not one of our UIs looks the same! That sort of flexibility is very hard to come by in the digital art and software industry. However, Krita's open source nature makes it one of the most inviting, customizable tools that you can use in your digital artistic journey.
Custom interfaces, life-like brushes, awesome tools, and regular updates, all for free? You bet! Let's finally get to the installation of Krita. Then, we will discuss some basic things that you will see the first time you load the program.
Installing Krita
Krita is free and available for Windows, Mac, and Linux. Because there is a myriad of different ways to install Krita on different operating systems, here, I will just cover the Windows version step by step.
Installing Krita is easy, as the official website has everything you need to get started! If you are downloading the macOS version, please bear in mind that you will need macOS 10.12.0, or later, for the most current versions of Krita.
As your first step for downloading and installing Krita onto your Windows device, you should ensure that your system meets the minimum system requirements. While you could download and use Krita with a slightly older setup than is recommended, I do believe the boost of performance you will have when using the minimum system requirements, or greater, is well worth the investment.
System requirements
As of writing, Krita's system requirements for Windows PCs use Windows 8.1, or higher, as your operating system, 4 GB of RAM, and OpenGL 3.0 (which should be standard, even on the vast majority of built-in integrated graphics cards – no standalone graphics card is required!)
Krita's .appimage file for the Linux 64-bit version is readily available from Krita's main download page. It is also included in many Linux distribution packages, but you might have to enable extra repositories. Krita's official website (Krita.org) has detailed tips and commands for more specific Linux setups, including Fedora, OpenSUSE, Debian, Arch, Flatpak, Snaps, and more.
Additionally, Krita's website recommends a graphics tablet, which we covered in-depth earlier. You can use a mouse, but trust me, painting with a graphics tablet or touch device is a game-changer!
A step-by-step example (for Windows)
Now we will begin our step-by-step installation guide for the Windows 64-bit version of Krita.
Note
As of writing, I've installed both Krita 4.4.5 (which was current at the time) and the beta version of Krita 5.0. So, some of the images you see here may differ slightly from what you see during your first installation.
Now, let's begin with the installation process:
- Navigate to Krita's official website (http://www.krita.org), and click on the Download option in the main navigation bar.
- You will see a Download Krita graphic, which defaults to Windows Installer 64-bit, as shown in Figure 1.3:
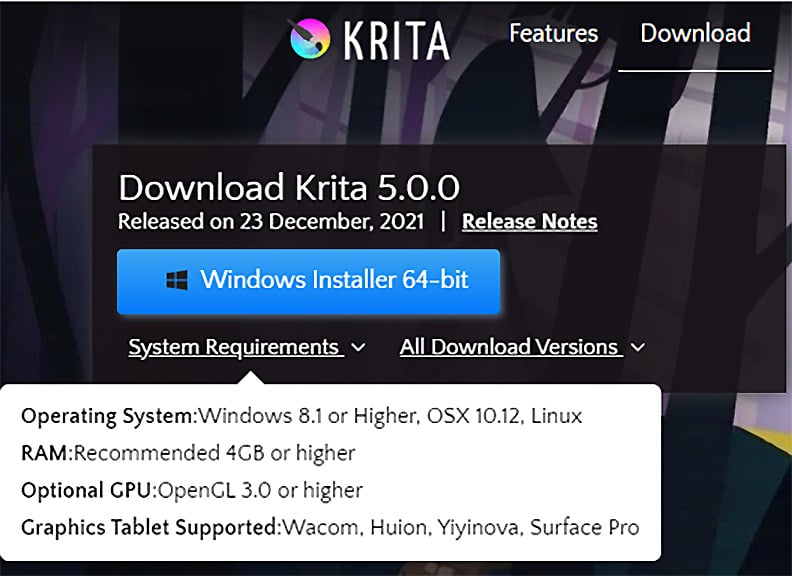
Figure 1.3 – The Download Krita page as of Krita 5.0
While this is the Windows installation tutorial, note that you can click on All Download Versions to bring up the macOS installer and Linux .appimage files if needed.
- Choose your version of Krita (for us, this will be the Windows Installer 64-bit version). You will see a prompt asking you to save the file, as shown in Figure 1.4. Click on Save File when prompted:
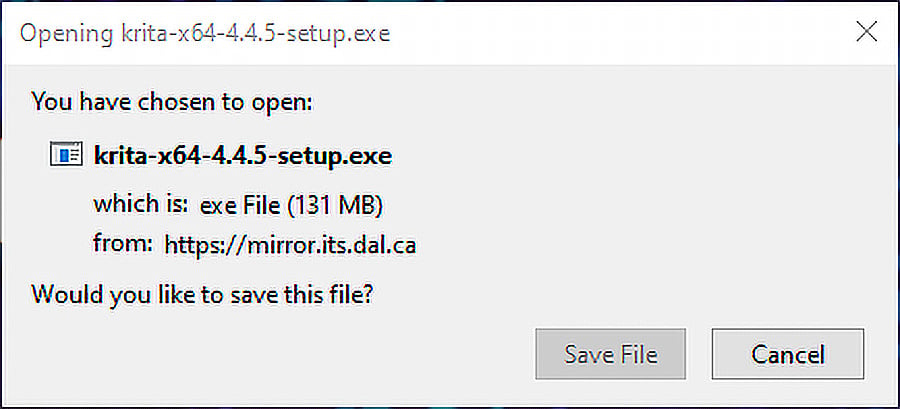
Figure 1.4 – The Save File prompt for the Krita installer version 4.4.5
- Once downloaded, locate your downloaded setup file from your download location (many browsers now default to their Download folder in the upper-right corner of your browser window). Double-click on your setup file.
- In Windows 8.1 or greater, you might see the User Account Control window pop up, which asks Do you want to allow this app to make changes to your device?. This looks very similar to Figure 1.5. Click on Yes when prompted:
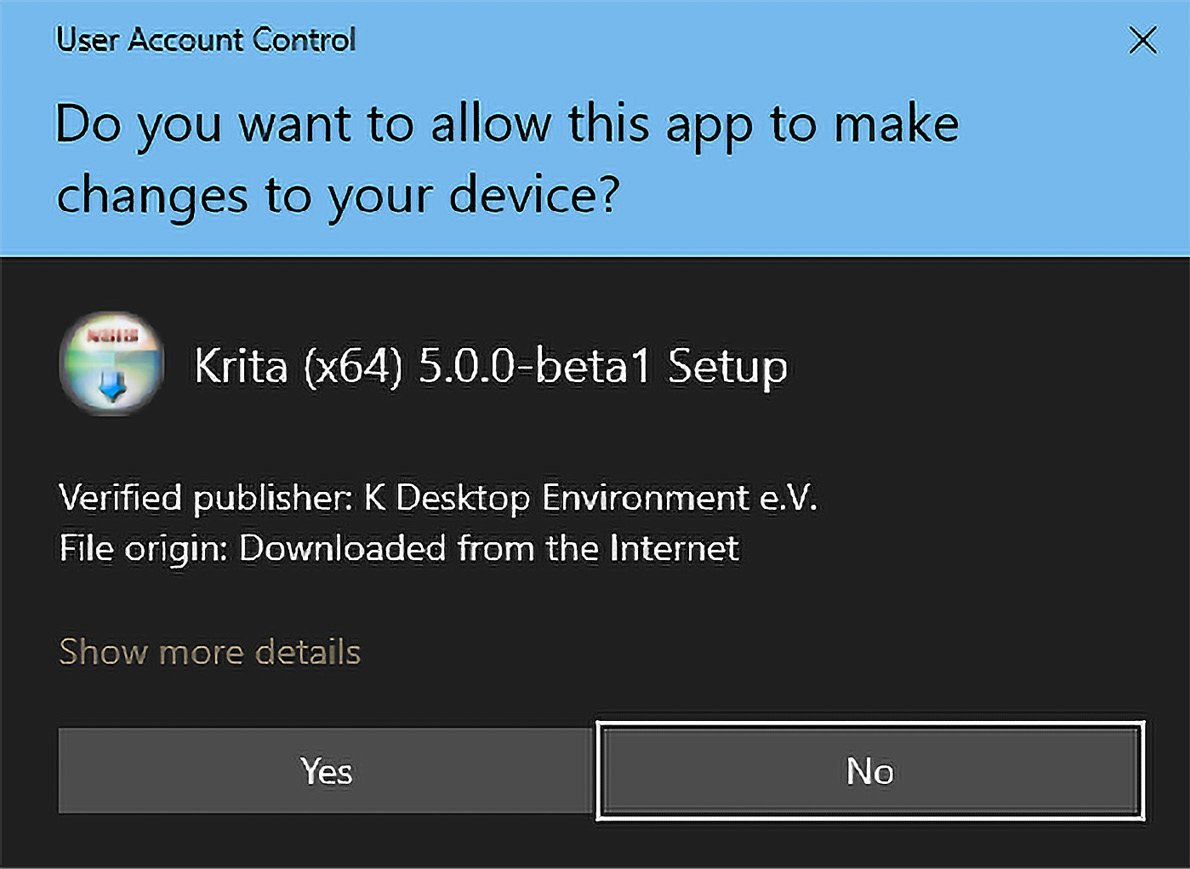
Figure 1.5 – The Windows User Account Control permission prompt for Krita 5.0 (beta)
- For the next step, you will be prompted to choose a language to use during the setup process, as shown in Figure 1.6:
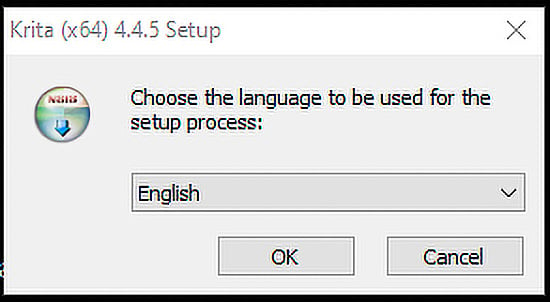
Figure 1.6 – The language selection setup prompt
Please note that you can select from over 60 languages inside Krita once it is installed, as we will cover later in the Breaking down the Krita UI section of the chapter. Krita (and this setup process) should automatically default to your system language setting within Windows.
- The next portion of the setup will be the End User License Agreement (EULA). I know these can be a bit mundane, but if you are interested in the open source nature of the Krita project and the development libraries used in development, I suggest giving it a quick read! Click on Next until the installation process starts, as shown in Figure 1.7:
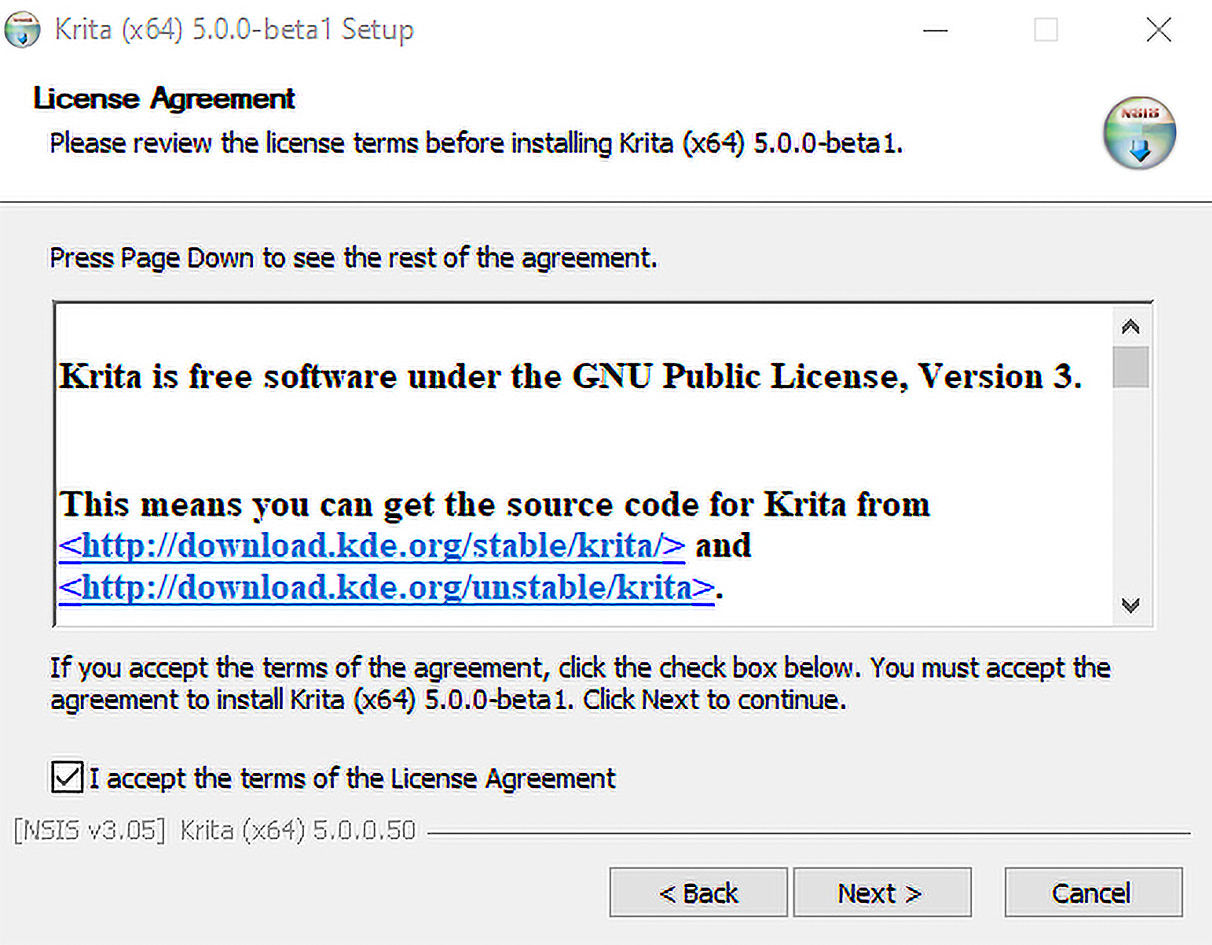
Figure 1.7 – Krita's EULA prompt
- Once you have completed these steps, you should see a screen showing a full installation log. It will give you a confirmation message of Completed, as shown in Figure 1.8:
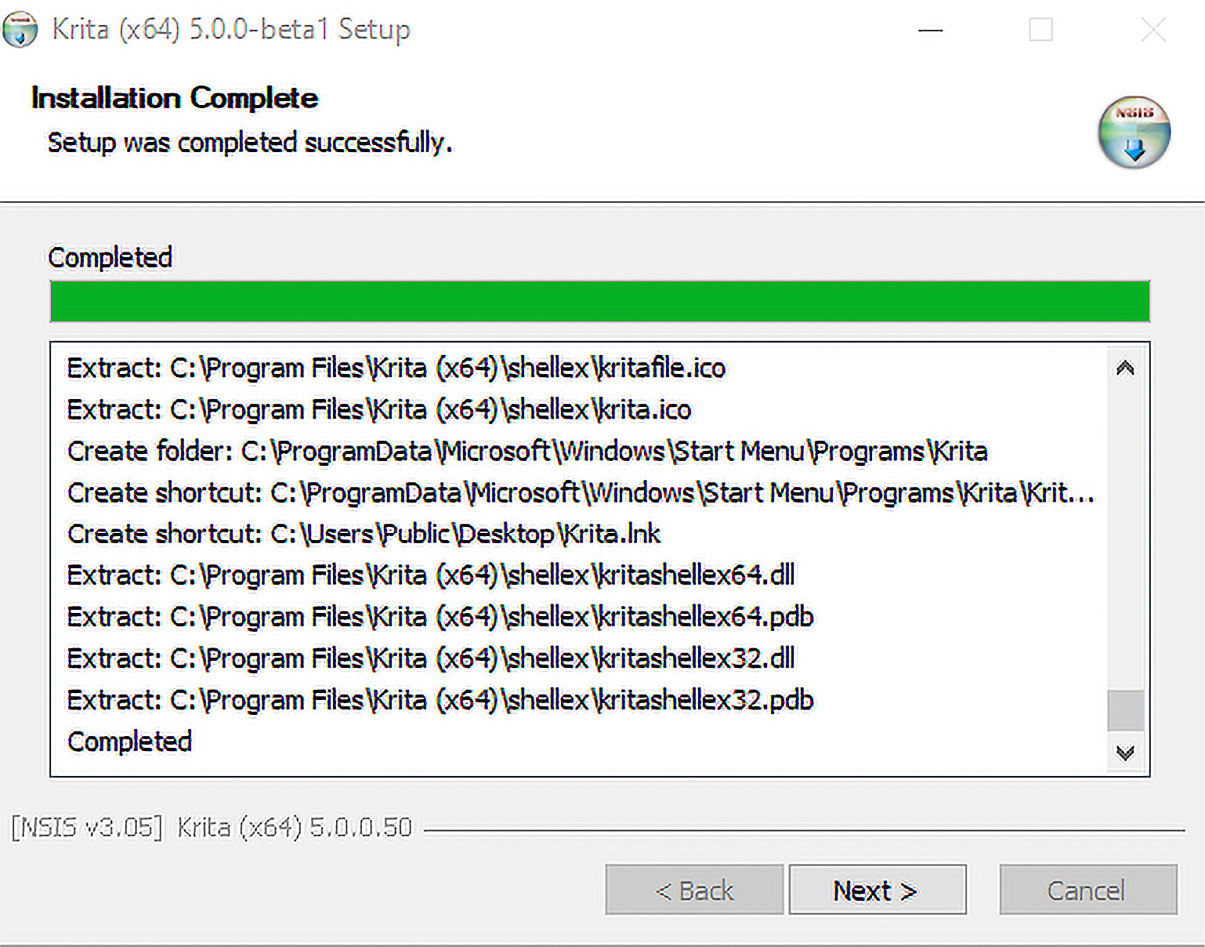
Figure 1.8 – A successful installation prompt
Click on Next, and that's a wrap!
- Once installed, you should have a prompt to either Launch Krita or exit the installer to return to the desktop. You are ready to start mastering Krita!
Now, let's take a bit of time to look at the default layout of Krita once it has been installed and start introducing customizations that you can use to make it feel a little more like home!
Breaking down the Krita UI
Now that your Krita installation is complete, it is time to open the program for the first time!
Once the installation is complete, find the Krita shortcut icon on your desktop, or locate Krita in the file location you chose during installation. Double-click on the shortcut and Krita should greet you with a loading/splash page to let you know the assets are loading (as shown in Figure 1.9):
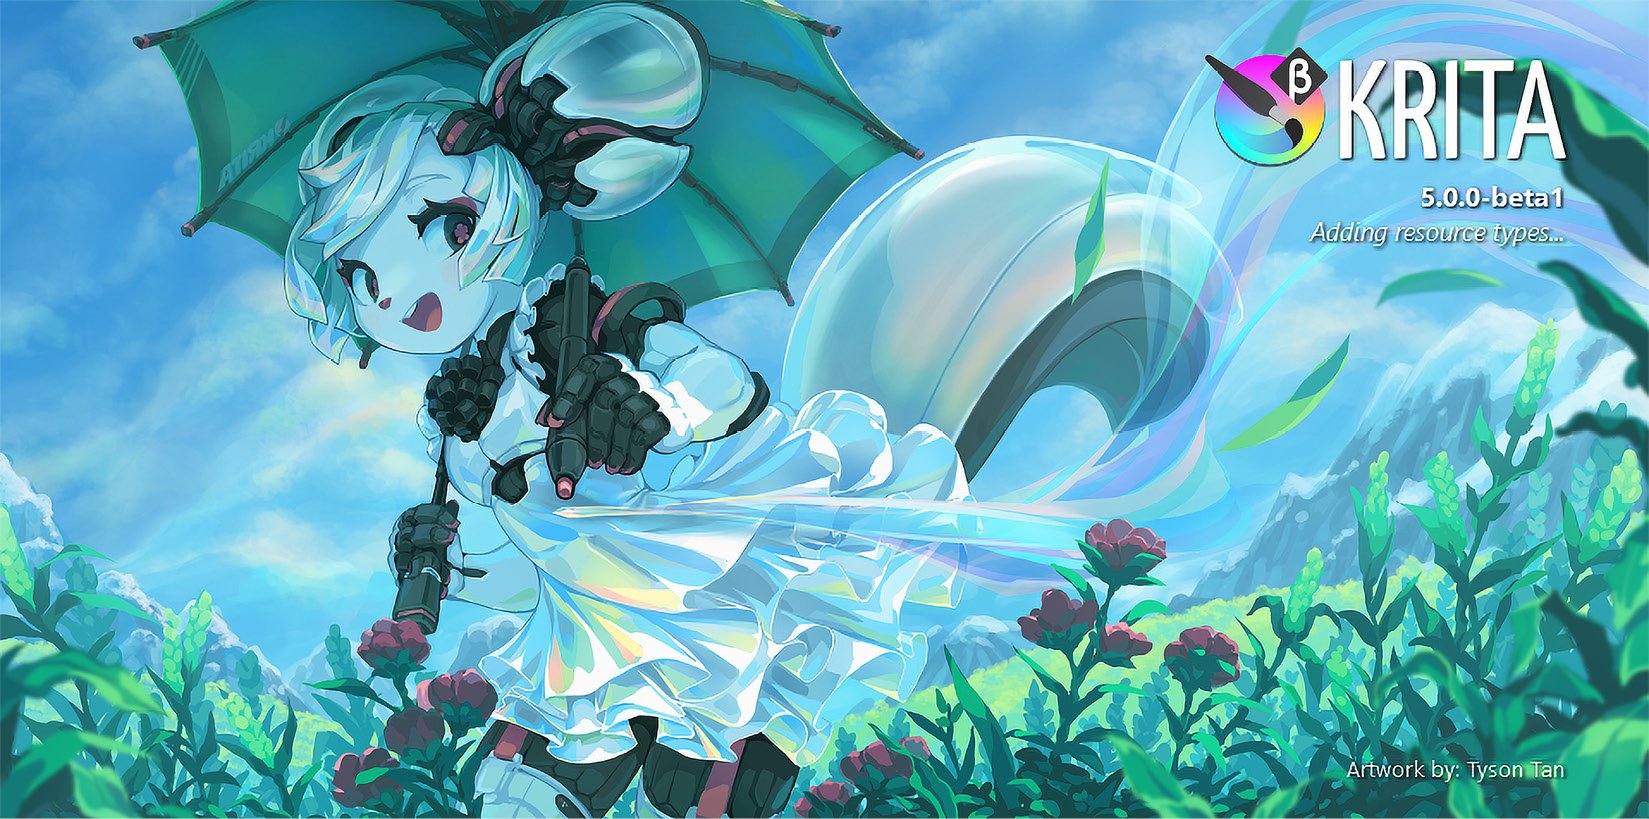
Figure 1.9 – The Krita loading or splash screen for Krita 5.0 (beta)
Your "New" Install
One thing to bear in mind is that your "splash screen" might look different from mine, and that is okay! One of the benefits of Krita being open source is that once you customize the software to your liking, a large amount of those UI changes will carry over to newer installations of the program on the same device (the tools and dockers might change slightly based upon updated features). Since I have used Krita for many years, each new version still has "my" layout, with my brushes and tools on the left-hand side, while the color wheel, sliders, and layer controls are on the right-hand side. Even if it has been years since your previous installation of Krita, you might be surprised to discover that certain tools are exactly where you left them when you load in from a fresh installation!
You will notice a fairly standard startup screen, and if you are familiar with digital art software, the layout might have some familiar features (as shown in Figure 1.10):
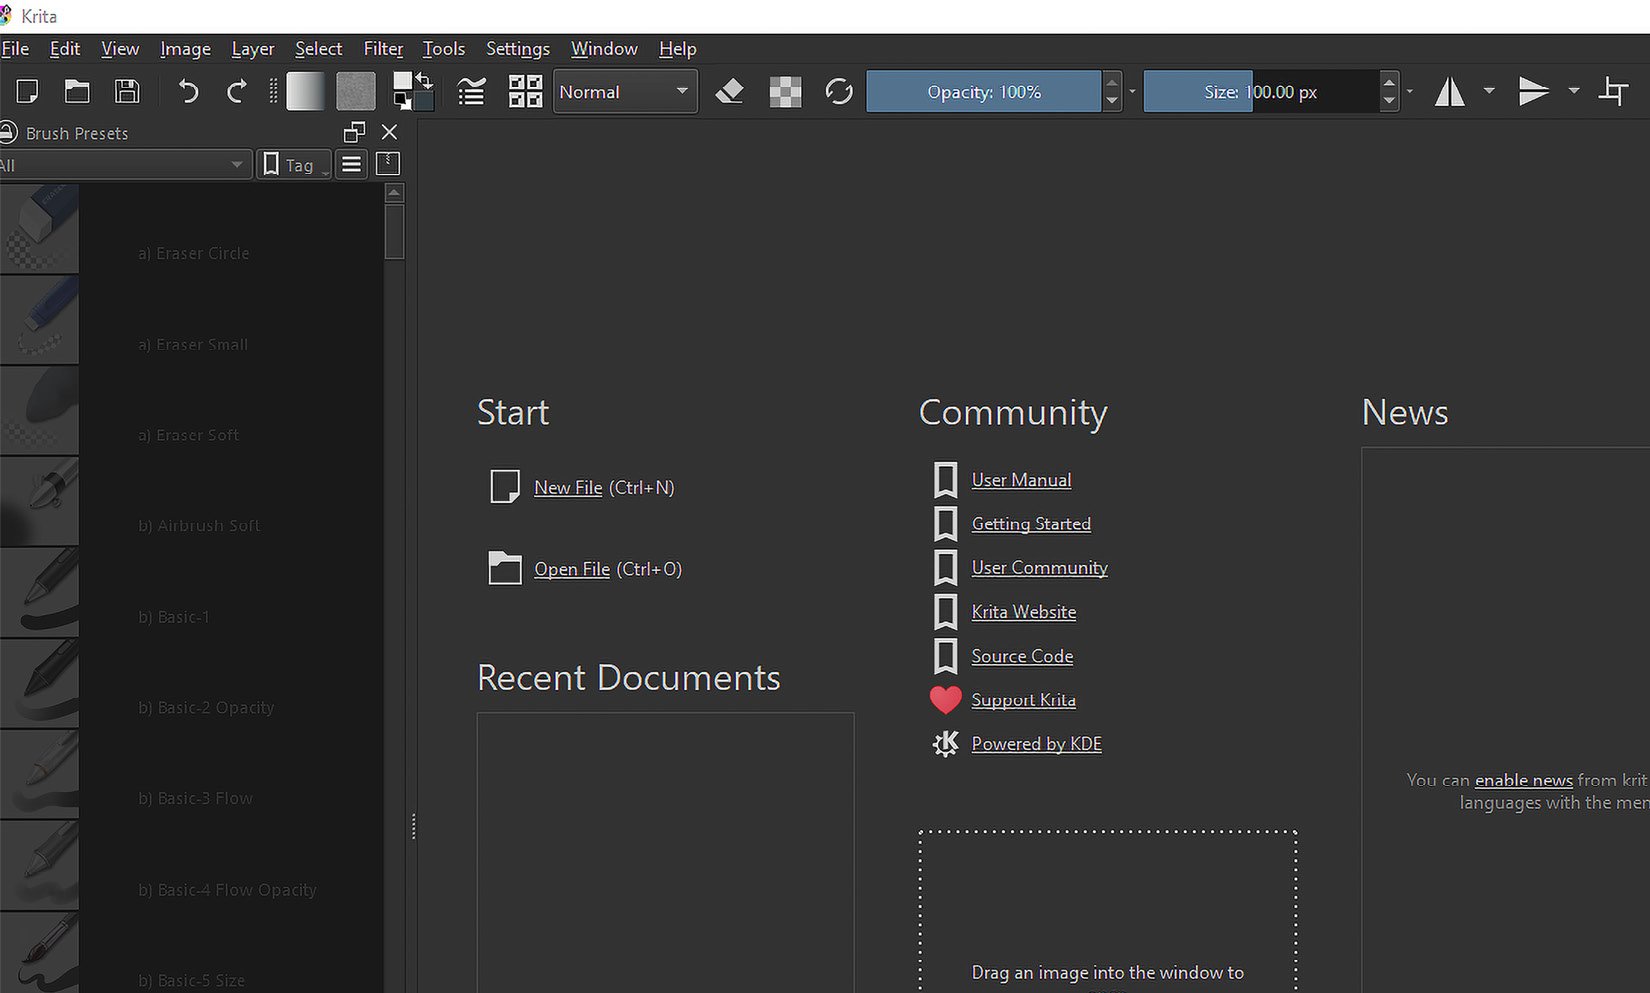
Figure 1.10 – My default Krita startup screen from a fresh installation (Krita 5.0 beta)
For the rest of the chapter, we will do a quick overview of the main components that make up Krita's basic layout and build up our comfort in terms of navigating the program. I know this part might appear basic, but as any good artist knows, the fundamentals are key to success!
While the initial startup screen might appear somewhat daunting when you first open the program, remember that everything you might need to get started on your masterpiece is at your fingertips. We are going to go line by line, in almost a "glossary" style of tour, and discuss what we are looking at.
Dockers and Tool Visibility
If something from these images is not automatically showing for you, a quick way to check the visibility of a given tool within Krita is under the Settings > Dockers menu command.
The file menu and toolbar
Starting from the upper-left corner of your screen, we will look at the traditional File menu (as shown in Figure 1.11):

Figure 1.11 – Krita's traditional File program menu
The File menu is your core functionality menu within Krita. Features such as creating new documents, loading, saving, program settings, and more can be accessed through this menu. Bear in mind that the File menu stays static (that is, it does not change) depending on the current tool you have selected or the project you have loaded into your workspace, so be sure to familiarize yourself with the functionality of each option, as they will always be available to you! We will be covering a large portion of what this entire menu has to offer throughout this book.
Next, directly under the File menu, we have the contextual Toolbar menu (as shown in Figure 1.12):

Figure 1.12 – The contextual Toolbar menu
I want to note that this Toolbar menu is contextual, as the options provided to you on this menu will change depending on the tool you have currently selected. For instance, the Toolbar menu will give different options if you have the brush tool selected, as opposed to the options it will provide when having the text tool selected. Each tool provides a myriad of options; later in the book, we will discuss how to customize your toolbar with options and sliders of your choosing!
The workspace
If we continue to use the layout, as shown in Figure 1.10, the next items we will look at will be my standard workspace (as shown in Figure 1.13):
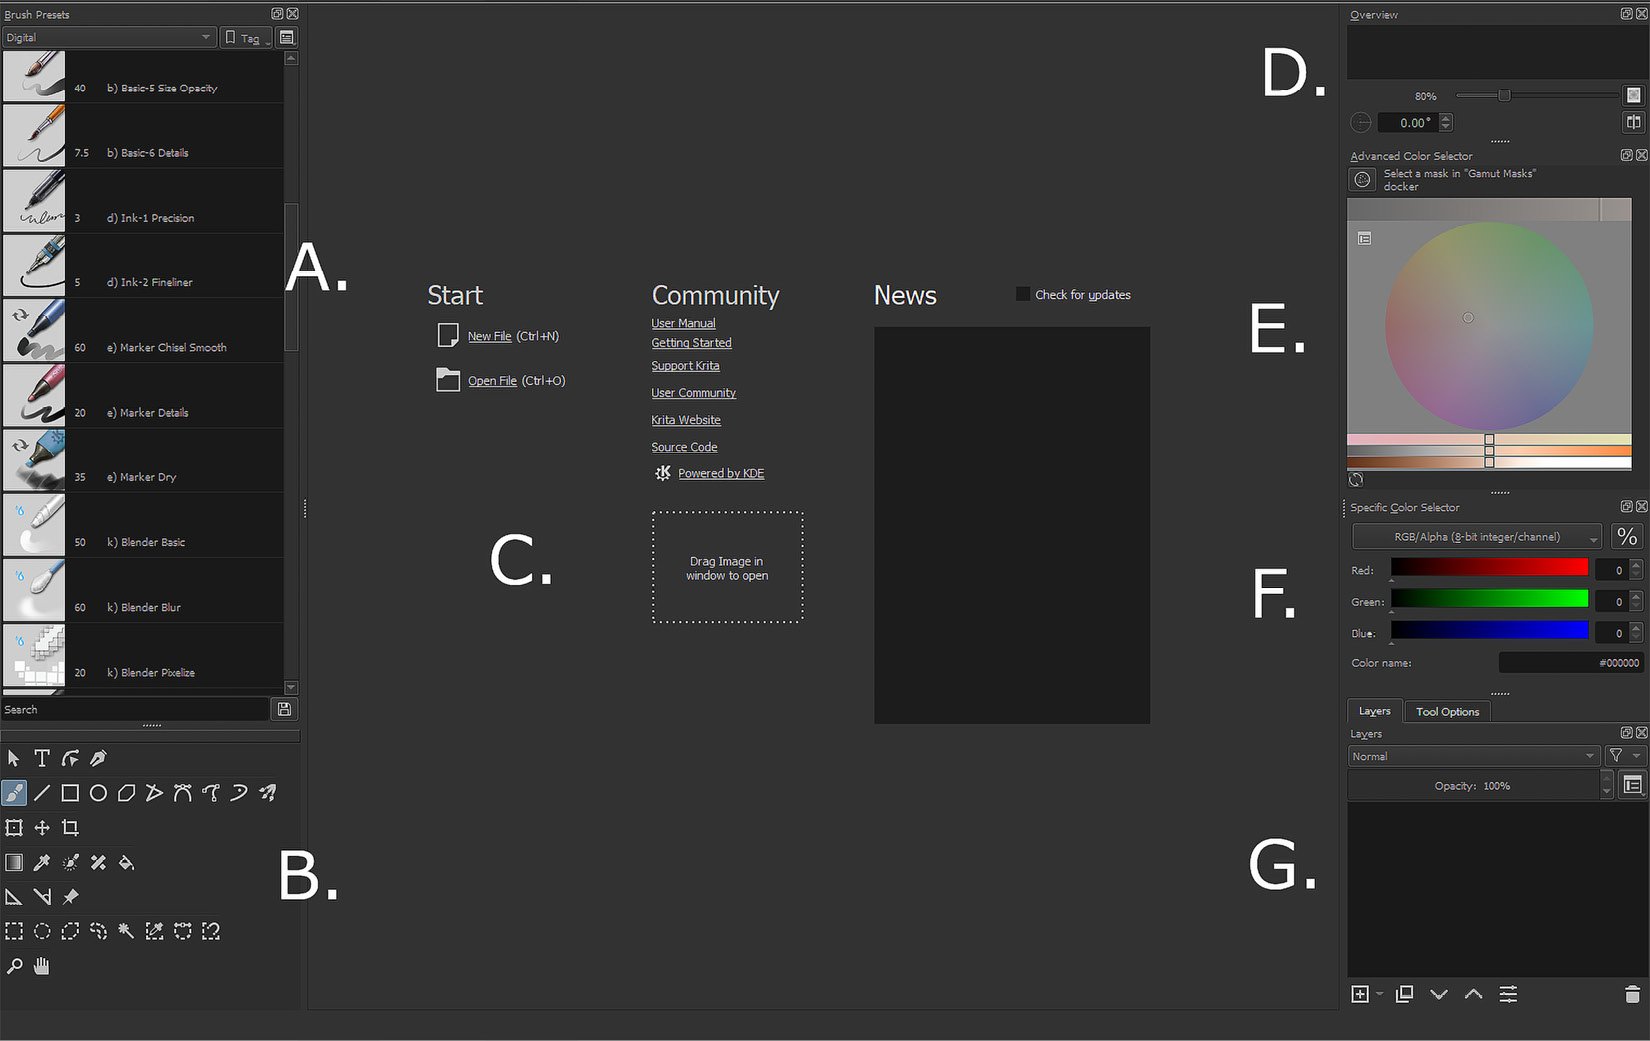
Figure 1.13 – A guided look at the main work area of Krita
Here is a quick breakdown of my standard setup within Krita, along with some notation regarding what each tool is. Remember, you can mimic this layout if you like or customize the sizes and locations of these (and other) tools based on your preferences:
- Brush Preset docker (A): This allows you to have your favorite brushes, erasers, and illustration tools quickly accessible at any time.
- Toolbox docker (B): Similar to the Brush Preset docker, the Toolbox docker allows you to quickly access a lot of important formatting, editing, selection, and warping tools so that you can manipulate your image in a variety of ways.
- Work area (C): The work area is the general area on which your canvas will be located. Within this area, you can zoom, rotate, scale, and flip your canvas with a variety of tools and keyboard shortcuts that we will review throughout the book.
- Overview (D): This is the area in which you'll see a "zoomed-out" version of your current project. This is a must-have for me, as I love to see the "readability" of my art as I work, even if I'm zoomed in and working on specific details!
- Advanced Color Selector (E): This is a tool that we will become much more familiar with in upcoming chapters. Some features of this tool include custom color wheels and various sliders for the hue, saturation, and brightness of your selected color.
- Specific Color Selector (F): This is slightly more specific than the Advanced Color Selector tool (hence its name!). It gives you more subtle customization of the tones, temperatures, and overall "mood" of your selected color. Once again, we'll do a deep dive into what this truly means throughout the rest of the book.
- Layers panel (G): Your Layers panel will definitely be a staple of your workflow. Controlling your layer organization is a very important skillset and one that we will review in great depth throughout the book. This area allows for adding layers, deleting layers, changing blending modes, grouping content, masking content, and more.
Additionally, we will be looking at a large number of these features and settings throughout this book. So, while I did a quick overview of each tool I use on a regular basis, note that we will be taking a far more comprehensive look at these tools throughout the remainder of this book. I am very much a person who likes to learn by doing, and I believe the best way to really get comfortable with using the tools of Krita is to use them in the context of creating artwork. Seeing another artist's Krita UI setup is always interesting, and I hope this quick rundown will help you to decide which dockers and settings you would like at your fingertips.
The pop-up palette
Speaking of having features at your fingertips, one very cool feature that Krita offers, which will be helpful during your art journey, is the Pop-Up Palette (as shown in Figure 1.14):
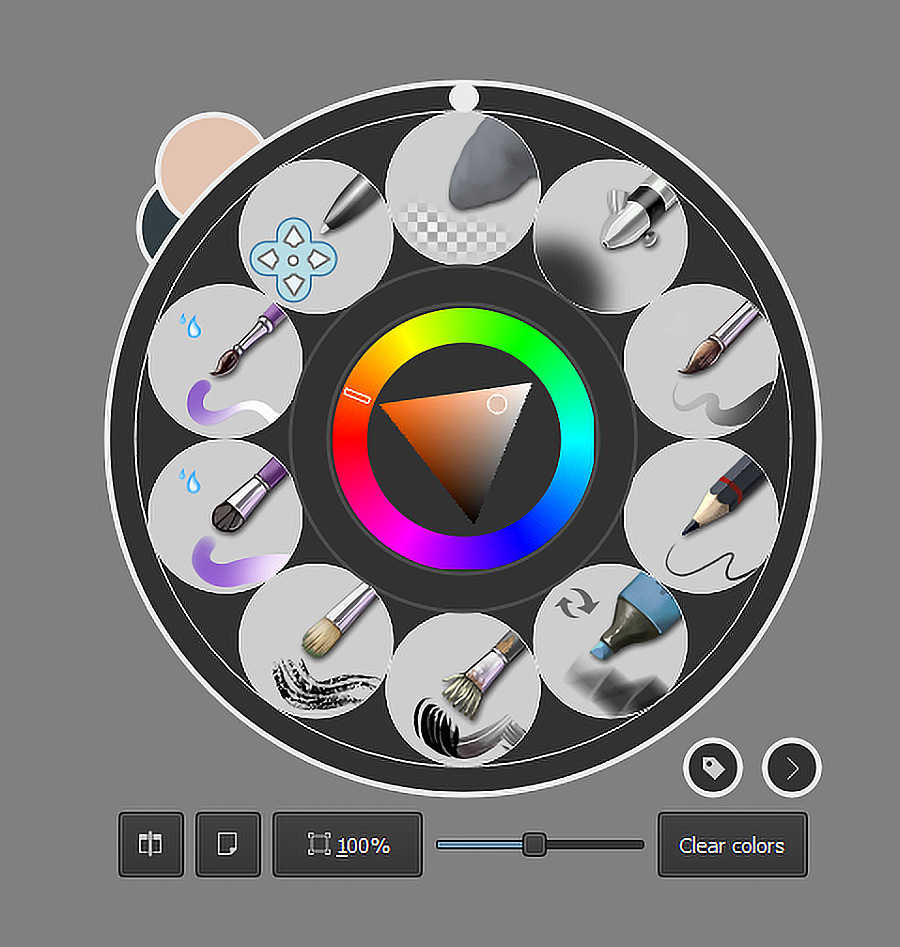
Figure 1.14 – The pop-up palette
This is a shortcut system within Krita that allows you to bring up your most used or favorite brushes within your workspace, without needing to fuss around with clicking on bulky menus or constantly changing your docker settings.
To bring up the Pop-Up Palette feature, you simply need to right-click when you are in your workspace area. The small tag in the lower-right corner of the pop-up palette will allow you to change your brush preset categories, which are displayed in the pop-up palette radial menu.
Additionally, note that there is a miniature color wheel in the middle of the radial menu, foreground and background color swatches in the upper-left corner of the radial menu, and various display options for tool customization and canvas visibility.
Customizing your workspace
Now that you are familiar with some basic terminology within Krita, the first order of business is to set up the program in a way that makes the most sense for you!
Every digital artist is going to have slightly different needs or have their own "go-to" features that they consider to be essential when creating the artwork they love. Krita uses a powerful system of Dockers (that is, windowed tools that can be locked or "docked" to each other and/or anchor points of the program itself). The full list of dockers is substantial (as shown in Figure 1.15) and allows for several options and workflows within Krita:
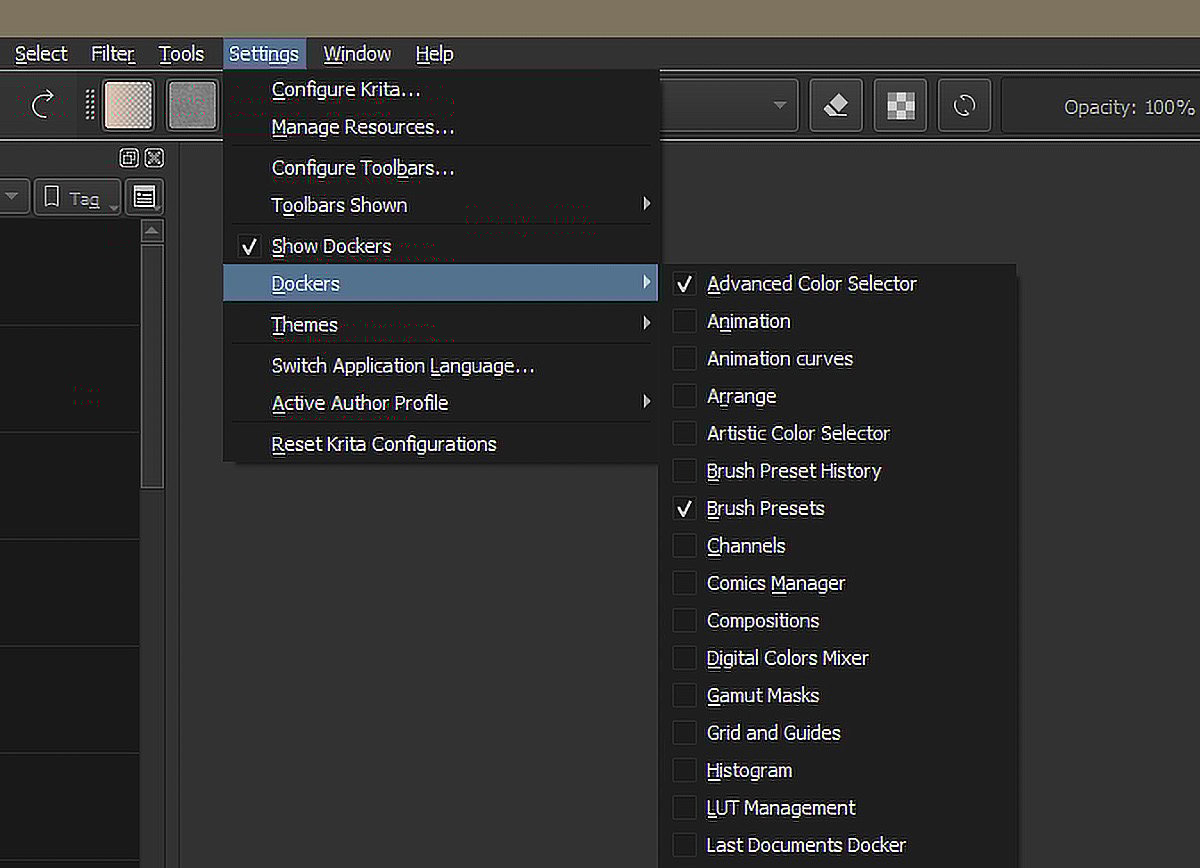
Figure 1.15 – The location of various docker options
As you can see from my setup, I only keep a small number of dockers activated at one time, as I enjoy keeping my work area free from clutter. Feel free to activate any docker that you think sounds interesting and give it a spin!
Experimenting and editing your docker locations and settings in your workspace is cool, but what if you want to have separate workspace setups depending on what type of project you are working on? Working with digital painting will require different "must-have" features as opposed to say photography, animation, or graphic design.
Krita makes having "custom loadouts" very easy, and the program already comes preloaded with some standard workspace loadouts that you can try for yourself:
- You can get to this menu by navigating to the Window > Workspace option in your File menu (as shown in Figure 1.16):
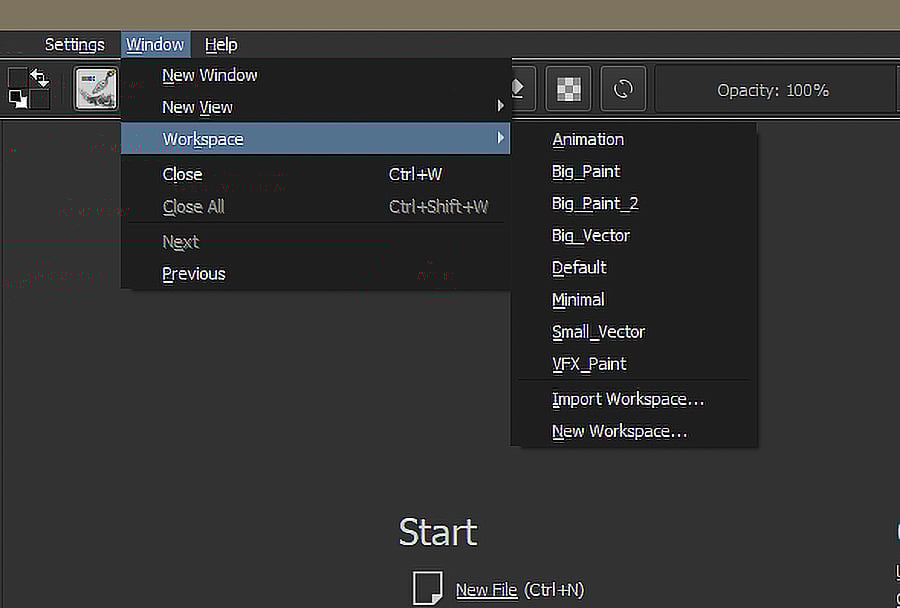
Figure 1.16 – Krita's workspace selection menu, showcasing various workspace layout options
- Once you have explored your docker windows and would like to save what you currently have, you can click on the Window > Workspace > New Workspace option.
- You will be prompted to enter a custom name for this Workspace (as shown in Figure 1.17).
- Once saved, your custom workspace will be added to the list of options found under the Window > Workspace menu in the File menu bar:
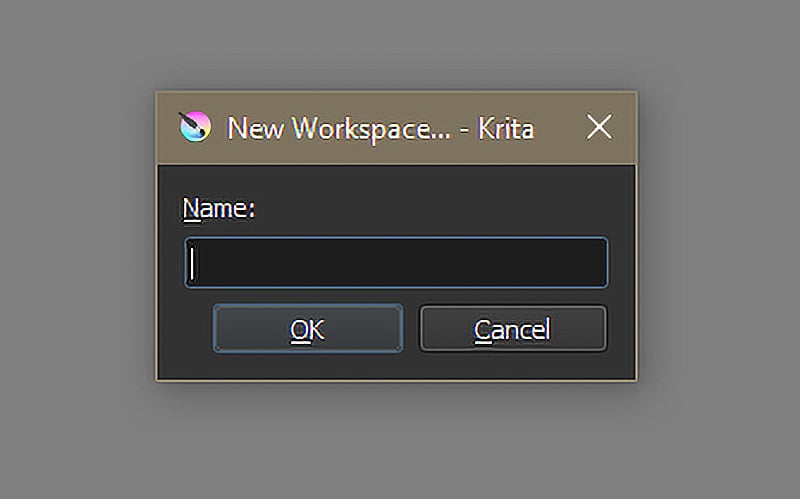
Figure 1.17 – The New Workspace prompt
Sharing Your Workspace
Krita has the ability to actually import the workspaces of other artists! Under the Window > Workspace window, you will see an option entitled Import Workspace. These are stored as Krita workspace files (.kws), and they will be located in the Krita > Share > Krita > Workspaces folder of your Krita installation directory. This is great for newer artists who are receiving training or even sharing workspaces in a studio environment to ensure everyone is using the same tools, leading to more consistent results!
Congratulations! You have now created your own custom workspace! This functionality might not seem like much at first, but it is a crucial asset that will serve you well. No matter the task at hand, you will be prepared with all of your favorite tools for the job, all at the click of a button due to your understanding of workspaces.
Configuring the toolbars
While we've touched on how to customize our workspace, note that Krita also allows you to make your own customized toolbar. The number of options available for toolbar customization is staggering, literally allowing you to browse through every single action that Krita can take and then add shortcuts to those actions. The number of options is easily in the thousands, ranging from text augmentation and canvas options to importing Python plugins and showing system information for bug reports.
However, for our needs, I will be adding the Reference Images Tool feature (as we will be using this feature in a later project!). Let's add that option to our custom toolbar next:
- Similar to getting the full list of dockers available in Figure 1.15, you will receive the Configuring Toolbars prompt by clicking on Settings > Configure Toolbars in the File menu at the top of Krita.
- Once you click on this option, the Configure Toolbars menu will be displayed (as shown in Figure 1.18):
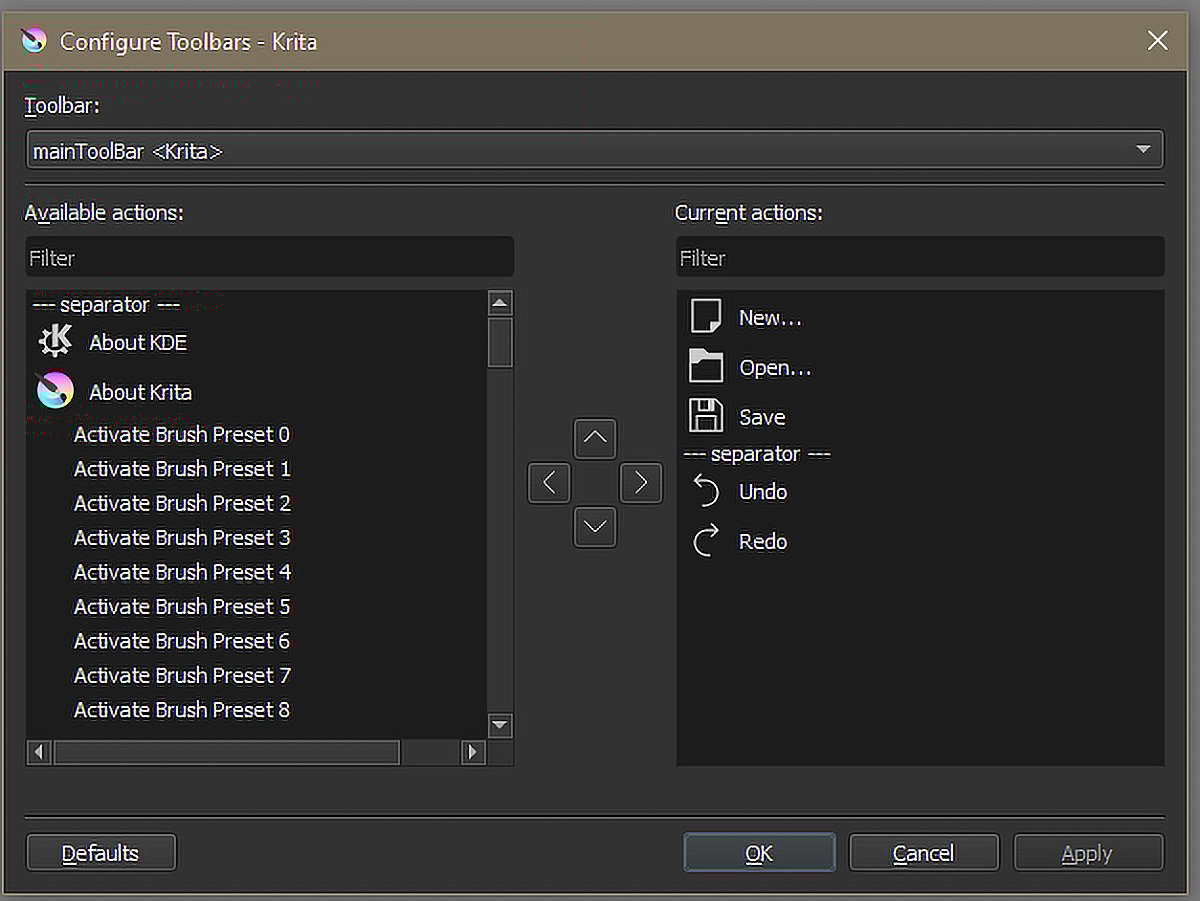
Figure 1.18 – The Configure Toolbars prompt
- Once the Configure Toolbars prompt has appeared on the screen, under the Available Actions filter, type in
Reference. You will notice a few options pop up, including one option entitled Reference Images Tool with a push-pin icon in the list. - Select the Reference Images Tool option (with the push-pin icon) and drag it to the right-hand side of the menu (as shown in Figure 1.19):
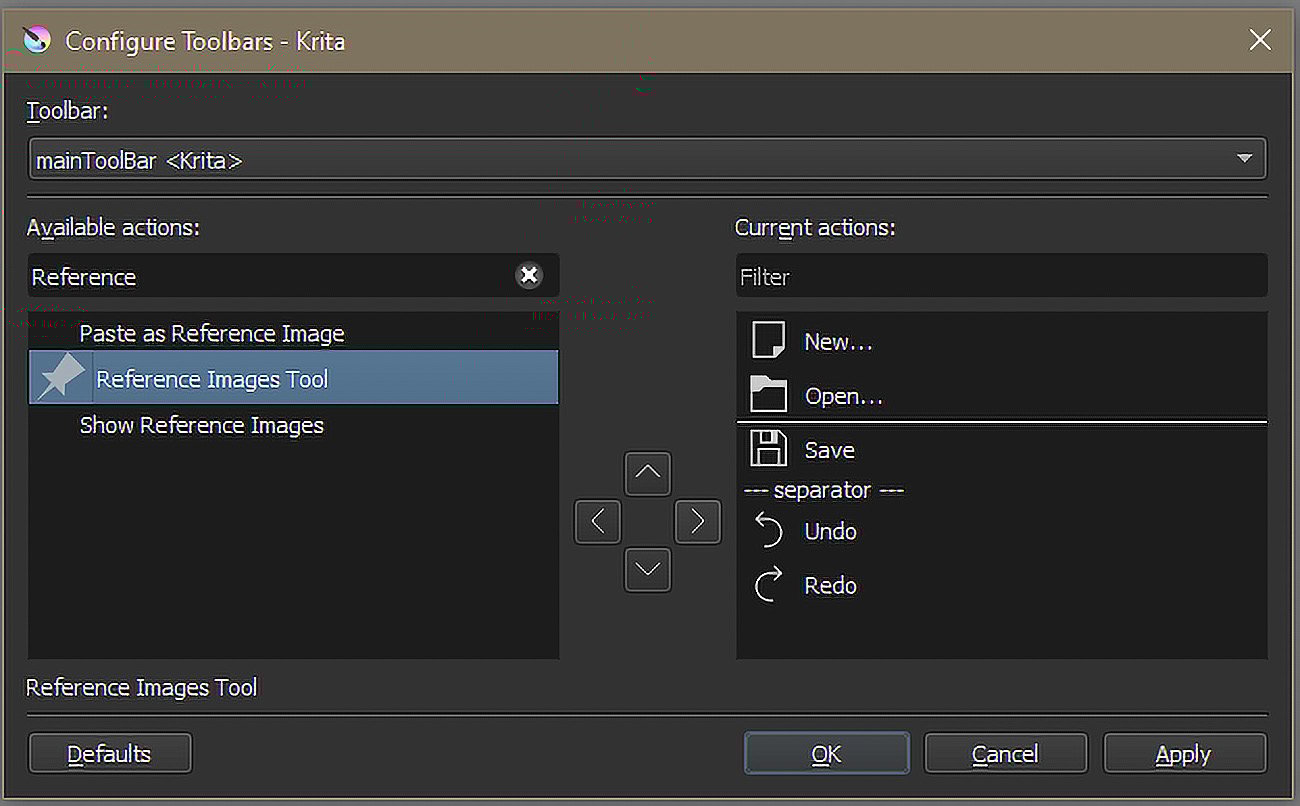
Figure 1.19 – Getting our Reference Images Tool shortcut configured in our custom toolbar
- Go ahead and select Apply once the shortcut appears in the list at the location you would like.
- Note that the change takes place immediately on your Toolbar section after selecting Apply.
- Continue adding any other shortcuts that you might find useful and apply the changes.
- Once you are done, click on OK.
There we have it! Your change has taken a global effect on Krita. That means every time you load the program, your customized toolbar should be available! Regarding your custom workspaces, Krita will usually default to the most recently used workspace. Saving your custom workspaces is highly recommended as swapping back and forth between them will be as easy as clicking on a button instead of having to memorize layouts that you liked in the past!
Returning to True Defaults
At any point, if you would like to return to either of the default toolbars or workspaces, you can use the Reset Krita Configurations option in the Settings menu.
Now that we have glanced at some docker and toolbar customizations, we can briefly discuss some interesting, advanced options in the overall configuration of Krita.
Configuring Krita (advanced)
To get to the more advanced software setup area of Krita, click on Settings > Configure Krita. You will see several options (such as Display, Canvas Inputs, Keyboard shortcuts, Tablet settings, and more). All of these can enhance your workflow within Krita tremendously. If you have specific shortcut keys that you like, custom Python scripts that you would like to run, want to set file handling options, or even change the way multiple projects being open will appear on screen, this is the area where you can tinker to your heart's content.
For this book, we will look at two main configuration areas: Author profiles and Color Selector Settings.
Setting your author information
Author information within Krita is a cool feature that allows every image you create in Krita to have metadata embedded into it! When an image you create in Krita is exported with the author information embedded, if a viewer right-clicks on your image, your information will appear in the image's description. The information allowed in the author information embed is varied and can include your name, website, email address, physical address, phone number, or fax number.
To set a customized Author Information feature within the Configure Krita prompt, perform the following steps:
- Click on the Author icon on the left-hand side of the Configure Krita prompt.
- To create a new author persona, click on the + button in the upper-right corner of the Author prompt.
- Create a new name for this author persona and begin filling out the information that you would like embedded in your Krita-exported images (an example is shown in Figure 1.20):
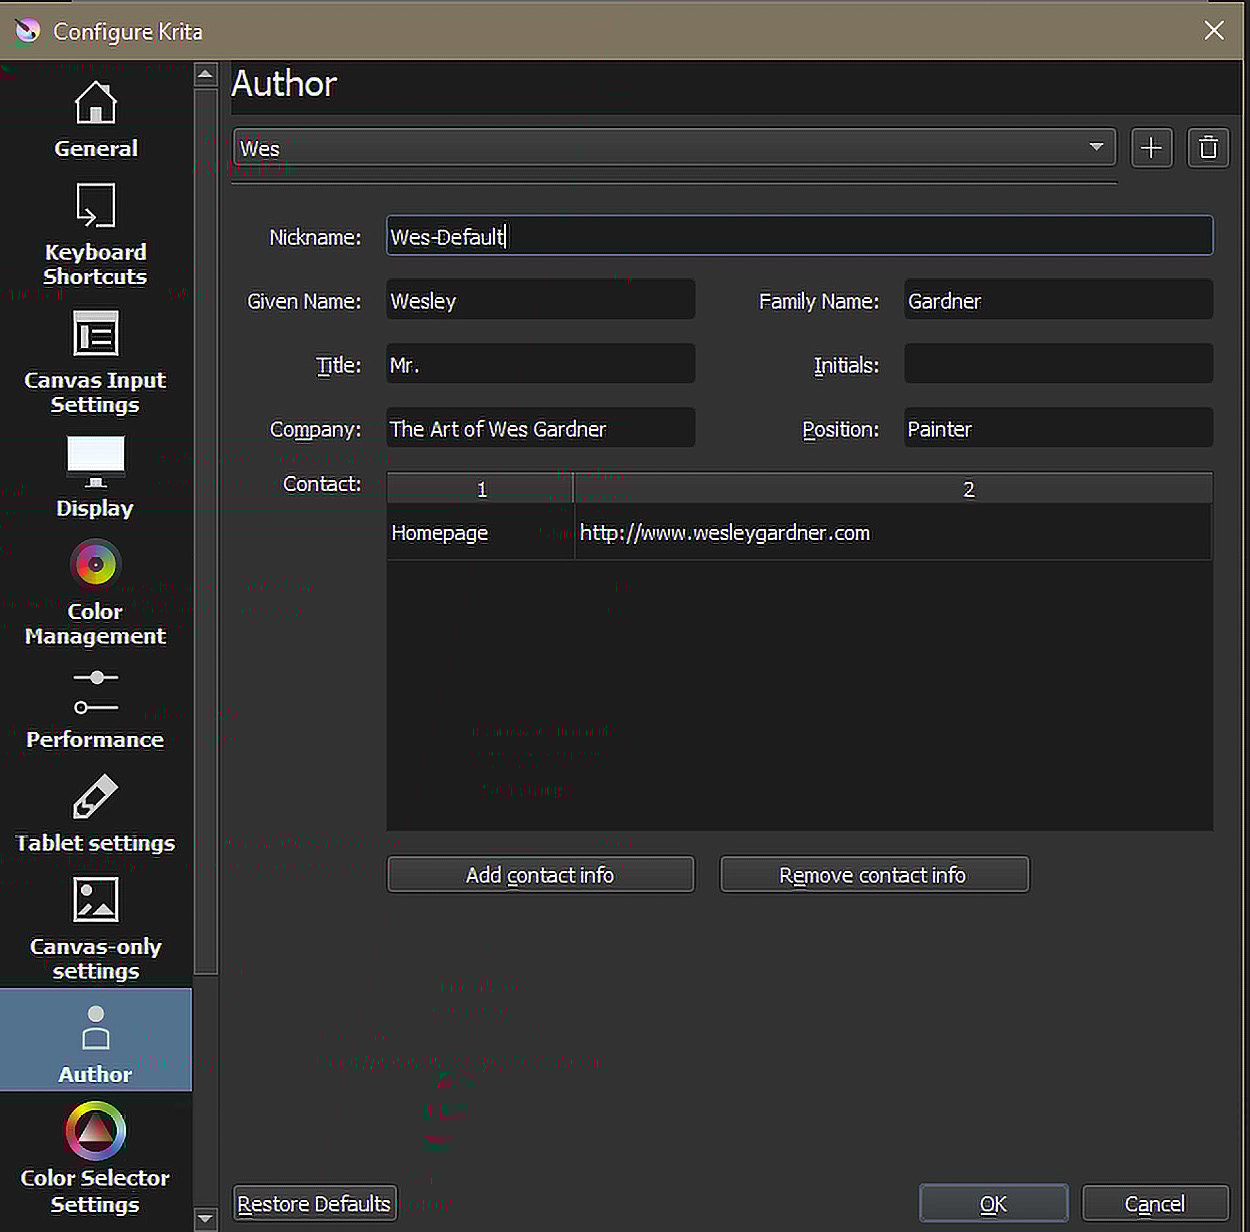
Figure 1.20 – The Author information panel
- After filling out the information that you would like to provide in your image's metadata, click on the OK button to save your changes.
Now, let's make sure that your new author profile has been enabled so that you can receive that sweet credit for your artwork online! To enable your newly created author profile, perform the following steps:
- Click on the Settings menu. Then, scroll to Active Author Profile near the bottom of the list.
- From here, you will see all of the author personas you have created (as shown in Figure 1.21):
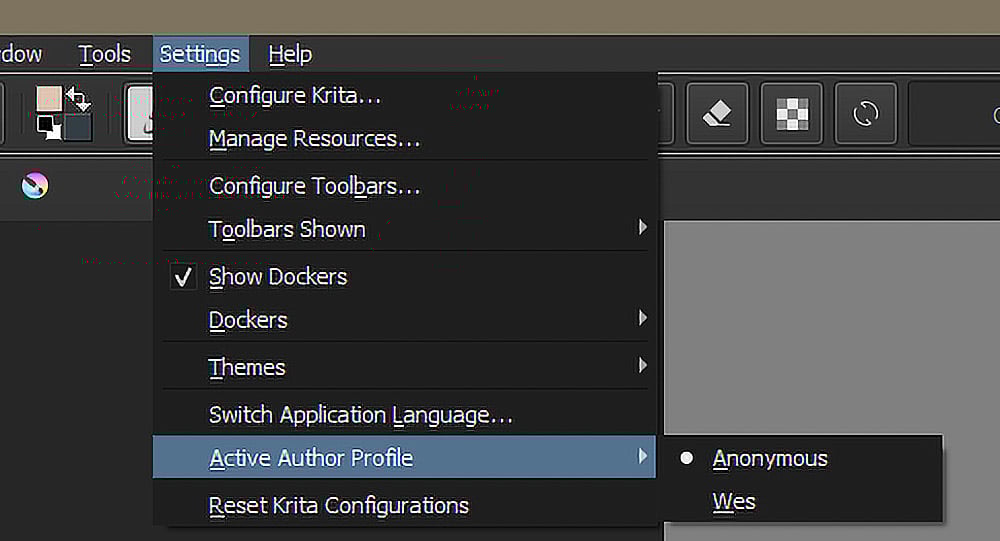
Figure 1.21 – Activating your custom author profile
Now you can make as many author personas as you wish!
Exporting Images with Author Information
To successfully export your images with your author metadata, make sure that the Sign with Author Data option is checked while exporting your image. Please note that only JPG and PNG exports allow the metadata to carry over and, initially, the export's metadata fields will only provide what you have listed as the Nickname value and the first entry of Contact information. In the example shown in Figure 1.20, my file would export with Wes-Default (http://www.wesleygardner.com) as my metadata.
Color selector settings
In the next chapter, we will be looking at a comprehensive guide on how to color in Krita (and, in general, digital art). To get us up to speed and set up for the upcoming chapter, let's look at a few of the Color Selector Settings options that Krita provides in the Configure Krita prompt (as shown in Figure 1.22):
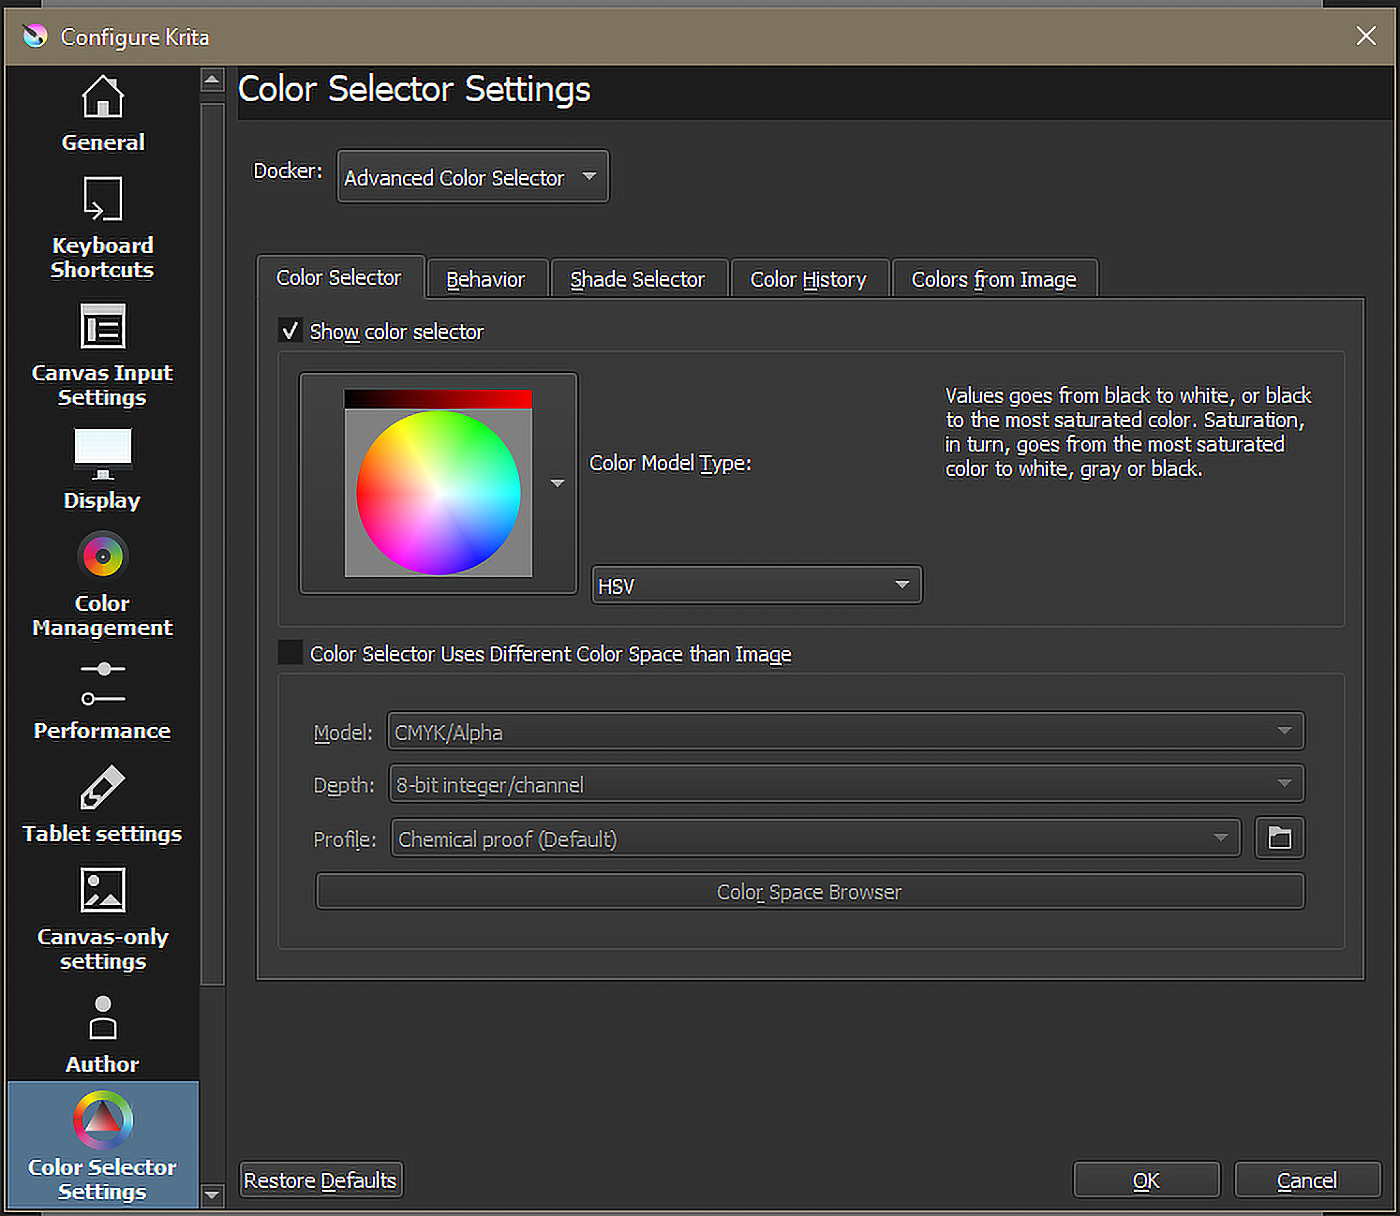
Figure 1.22 – The Color Selector Settings panel
As you can see, there are a variety of options available for color within this screen. For our setup, we will look at the Color Selector panel, customizing the look of our selector itself and the mode in which it displays information.
You have a variety of options for choosing your "color wheel" within Krita. To see the different options available, click on the down arrow next to the current Color Model Type graphic. A list of different graphics should be displayed (as shown in Figure 1.23):
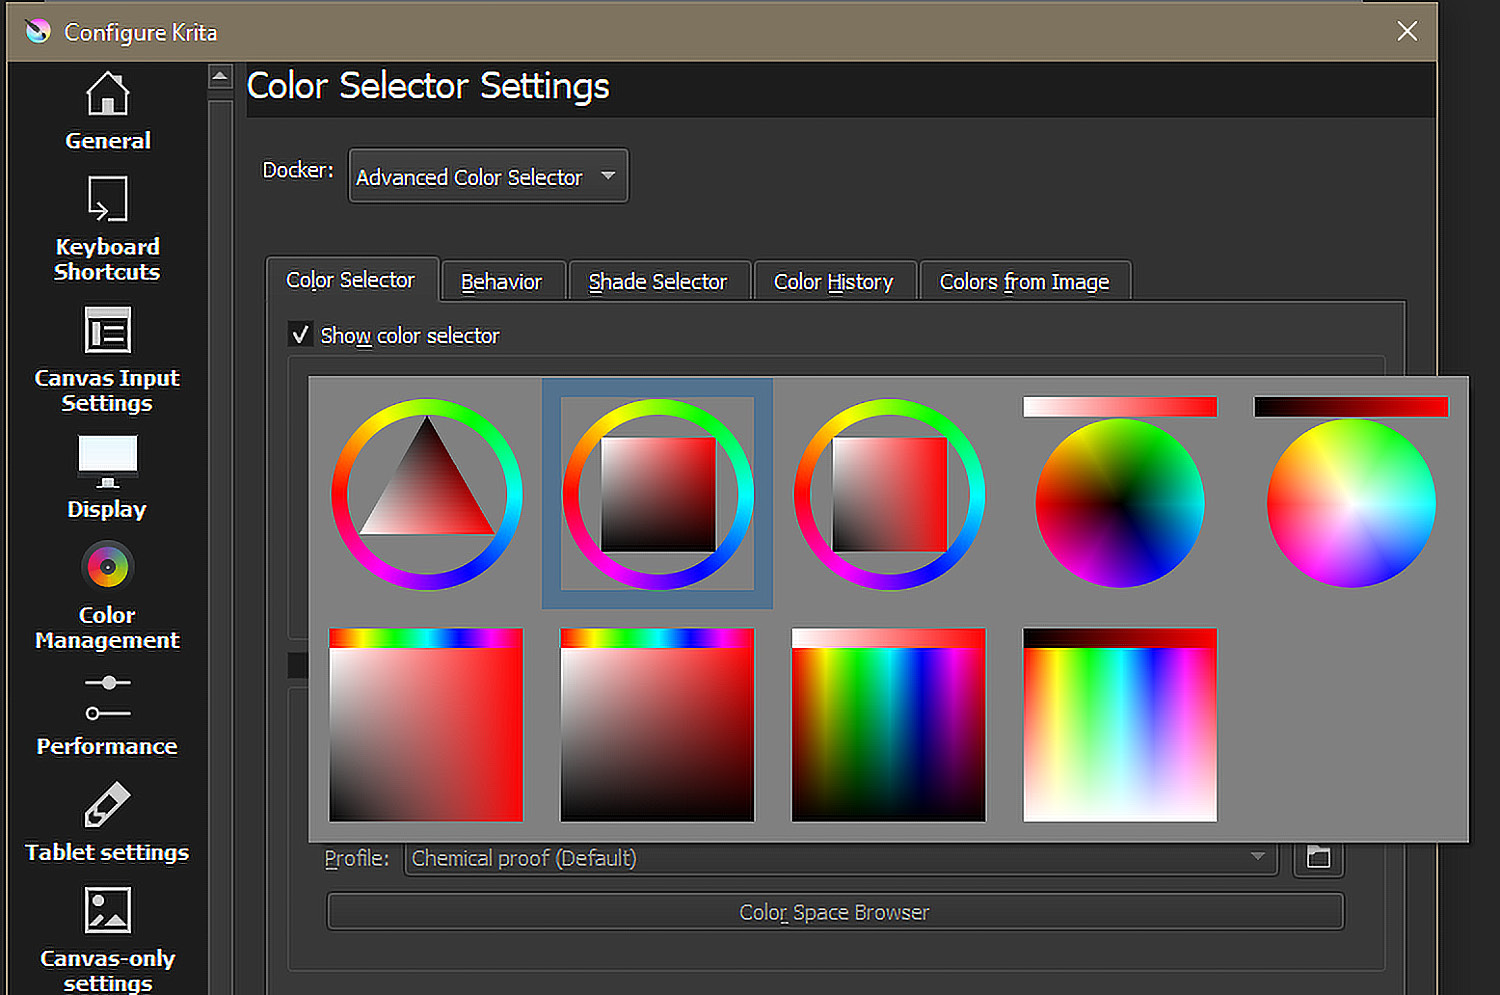
Figure 1.23 – The full range of color wheels available in Krita
Wow, there are so many options! Which one should you choose? My recommendation is to select the color wheel that makes the most sense to you. My usual color wheel is the rightmost option on the top row in Figure 1.23, and will be the one I recommend using if you want to follow directly along with the examples in this book. After selecting your preferred color selector, go ahead and change the mode in the drop-down menu to HSL (as shown in Figure 1.24):
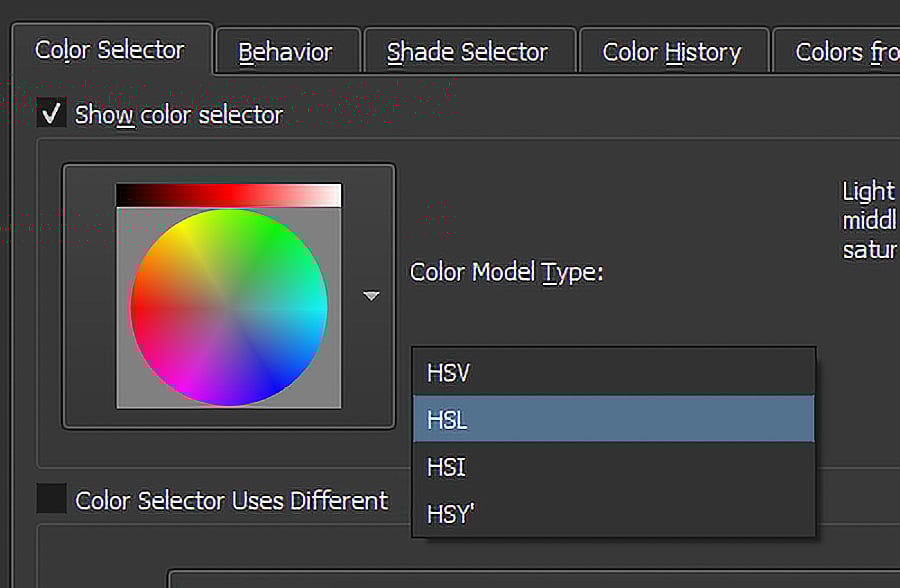
Figure 1.24 – The color mode hue/saturation format selector
Do not worry if you are not sure what the hue and saturation modes mean. We will cover that (and much more!) in the next chapter when we discuss color.
While we are moving forward through the book, we will keep discussing UI customizations and how slight tweaks could help your workflow become more refined, structured, and easier to handle.
The beauty of Krita's UI is in its flexibility, and the more you experiment with different setups and settings, the greater and more enriched your digital art experience will become.
Summary
In this chapter, we looked at the basics of Krita, hardware recommendations, and a few customization options for Krita's interface and tools. We learned about dockers, toolbars, workspaces, the pop-up palette, and more advanced options to make Krita feel like our own personal art studio. Getting comfortable with Krita is a foundational component of being an effective digital artist, as the more comfortable you feel when using the tools provided in Krita, the more you can focus on the fun part of creating art!
In Chapter 2, Reviewing Canvas Properties and Color, we will do an extensive deep-dive into what makes up color. We will not only look at how Krita displays and uses it but in general, how to best utilize color theory in the creation of art. We will discuss the differences (and similarities) in how the human eye perceives color in traditional art versus digital art, what the differences are between RGB color and CMYK color, how to build any color from memory, highly effective ways to read the color wheel, and even dissect the components that make a color what it is.
Join me in the next chapter, where we will cover topics such as resolution and color theory. These topics may seem intimidating and dense at first, but hopefully we will break them down into something much more approachable and easy to understand!

