In this article by Andrew Mallett, author of the book Learning RHEL Networking, we see on how to secure our network using the firewall daemon, that is, firewalld.
The default user interface for netfilter, the kernel-based firewall, on RHEL7 is firewalld. Administrators now have a choice to use firewalld or iptables to manage firewalls. Underlying either process, we can still implement the kernel-based netfilter firewall. The frontend command to this new interface is firewall-cmd. The main benefit this offers is the ability to refresh the netfilter setting when the firewall is running. This is not possible with the iptables interface; additionally, we are able to use zone management. This enables us to have different firewall configurations, which depends on the network we are connected to.
In this article, we will be cover the following topics:
- The firewall status
- Routing
- The zone management
- The source management
- Firewall rules using services
- Firewall rules using ports
- Masquerading and the network address translation
- Using rich rules
- Implementing direct rules
- Reverting to iptables
(For more resources related to this topic, see here.)
The firewall status
The firewall service can provide protection for your RHEL system and services from other hosts on the local network or Internet. Although firewalling is often maintained on the border routers to your network, additional protection can be provided by host-based firewalls, such as the netfilter firewall on the Linux kernel. The netfilter firewall on RHEL 7 can be implemented via the iptables or firewalld service, with the latter being the default.
The status of the firewalld service can be interrogated in a normal manner using the systemctl command. This will provide a verbose output if the service is running. This will include the PID (process ID) of firewalld along with recent log messages. The following is a command from RHEL7.1:
# systemctl status firewalld
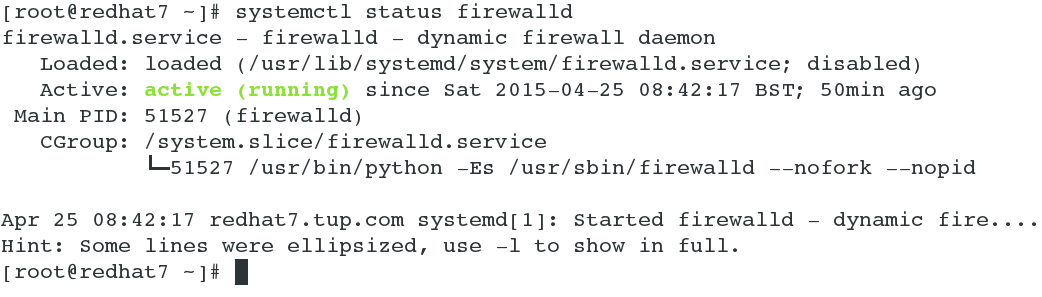
If you just need a quick check with a less verbose output, make use of the firewall-cmd command. This is the main administrative tool used to manage firewalld. If firewalld was not active, the output would show as not running.

Routing
Although not strictly necessary for a firewall, you may need to implement routing on your RHEL7 system. Often, this will be associated with multi-homed systems with more than one network interface card; however, this is not a requirement of network routing, which allows packets to be forwarded to the correct destination network. Network routing is enabled in procfs in the /proc/sys/net/ipv4/ip_forward file. If this file contains a value of 0, then routing is disabled; if it has a value of 1, routing is enabled. This can be set using the echo command as follows:
# echo 1 > /proc/sys/net/ipv4/ip_forward
However, this is then turned on until the next reboot when the routing will revert to the configured setting. To make this setting permanent traditionally, the /etc/sysctl.conf file has been used. It's now recommended to add you own configurations to /etc/sysctl.d/. Here is an example of this:
# echo "net.ipv4.ip_forward = 1" > /etc/sysctl.d/ipforward.conf
This will create a file and set its directive. To make this setting effective prior to the next reboot, we can make use of the sysctl command, as shown in the following command:
# sysctl -p /etc/sysctl.d/ipforward.conf

Zone management
A new feature you will find in firewalld that is more aimed at mobile systems—such as laptops—is the inclusion of zones. However, these zones can be equally used on a multihomed system, which associates different NICs with appropriate zones. Using zones in either mobile or multihomed systems, firewall rules can be assigned to zones and these rules will be associated with NICs included in that zone. If an interface is not assigned explicitly to a zone, then it will become a part of the default zone. To interrogate the default zone on your system, we can use the firewall-cmd command, as shown in the following command line:
# firewall-cmd --get-default-zone
Should you need to list all the configured zones on your system, the following command can be used:
# firewall-cmd --get-zones

Perhaps more usefully, we can display zones with interfaces assigned to them; if no assignments have been made, then all the interfaces will be in the public zone. The --get-active-zones option will help us with this, as shown in the following command:
# firewall-cmd --get-active-zones
Should we require a more verbose output, we can list all the zone names, associated rules, and interfaces. The following command demonstrates how this can be achieved:
# firewall-cmd --list-all-zones
If you need to utilize zones, you can choose the default zone and assign interfaces to specific zones as well. Firstly, assign a new default zone as follows:
# firewall-cmd --set-default-zone=work
Here, we redirect the default zone to the work zone. In this way, all NICs that have not been explicitly assigned will participate in the work zone. The preceding command should report back with success.

We can also explicitly assign a zone to an interface as follows:
# firewall-cmd --zone=public --change-interface=eno16777736
The change made through this command will be temporary until the next reboot; to make it permanent, we will add the --permanent option:
# firewall-cmd --zone=public --change-interface=eno16777736 --permanent
Making a setting permanent will persist the configuration within the zone file located in the /etc/firewalld/zones/ directory. In our case, the file is /etc/firewalld/zones/public.xml. After having implemented the permanent change as detailed here, we can list the contents of the XML file with the cat command.

We can either interrogate an individual NIC to view the zone it's associated with or list all interfaces within a zone; the following commands illustrate this:
# firewall-cmd --get-zone-of-interface=eno16777736
# firewall-cmd --zone=public --list-all
You can use tab completion to assist with options and arguments with firewall-cmd.
If the supplied zones are not ample or perhaps the names do not work for your naming schemes, it's possible to create your own zones and add interfaces and rules. After adding your zone, you can reload the configuration to allow it to be used immediately as follows:
# firewall-cmd --permanent --new-zone=packt
# firewall-cmd --reload
The --reload option can reload the configuration that allows current connections to continue uninterrupted; whereas the --complete-reload option will stop all connections during the process.
Source management
The problem that you may encounter using interfaces assigned to your zones is that it does not differentiate between network addresses. Often, this is not an issue as only one network address is bound to the NIC; however, if you have more than one address bound to the NIC, you may want to implement the firewalld source. Like interfaces, sources can be assigned to zones. In the following command, we will add a network range to the trusted zone and another range, perhaps on the same NIC to the public zone:
# firewall-cmd --permanent --zone=trusted --add-source=192.168.1.0/24
# firewall-cmd --permanent --zone=public --add-source=172.17.0.0/16
Similar to interfaces, binding a source to a zone will activate that zone and will be listed with the --get-active-zones option.
Firewall rules using services
When we think of firewalls, we think of allowing or denial of access to ports. The use of service XML files can ease the port management with one service, perhaps listing multiple ports. The other point to take note of is that firewalld daemon's default policy is to deny access, so any access needed has to be explicitly granted to a port associated with a service. To list services that have been allowed on the default zone, we can simply use the --list-services option, as shown in the following example:
# firewall-cmd --list-services
Similarly, we can gain access to services allowed in a specific zone by including the --zone= option. This can be seen in the following example:
Unlock access to the largest independent learning library in Tech for FREE!
Get unlimited access to 7500+ expert-authored eBooks and video courses covering every tech area you can think of.
Renews at $19.99/month. Cancel anytime
# firewall-cmd --zone=home --list-services

As you start enabling services, you can easily allow a predefined service through a zone. Predefined services are listed as XML files in the /usr/lib/firewalld/services directory.

RHEL 7 is representative of a more mature Linux distribution; as such, it recognizes that the need to separate the /usr directory from the root filesystem is depreciated and the /lib, /bin, and /sbin directories are soft-linked to their respective directories after /usr/. Hence, /lib is now the same as /usr/lib.

While defining your own services, you may create XML files within the /etc/firewalld/services directory. The squid proxy server does not have its own service file, and if we choose to allow this as a service rather than just opening the required port the file would look similar to the /etc/firewalld/services/squid.xml, as follows:
<?xml version="1.0" encoding="utf-8"?>
<service>
<short>Squid</short>
<description>Squid Web Proxy</description>
<port protocol="tcp" port="3128"/>
</service>
Assuming that we are using SELinux in the Enforcing mode, we will need to set the correct context for the new file using the following commands:
# cd /etc/firewalld/services
# restorecon squid.xml
The permissions on this file should be 640 and it will be set using the following command:
# chmod 640 /etc/firewalld/services/squid.xml

Having defined the new service now or using pre-existing services, we can add them to a zone. If we are using the default zone, this is achieved simply with the following commands. Note that we reload the configuration at the start to identify the new squid service as follows:
# firewall-cmd --reload
# firewall-cmd --permanent --add-service=squid
# firewall-cmd --reload
Similarly, to update a specified zone other than the default zone, we will use the following commands:
# firewall-cmd --permanent --add-service=squid --zone=work
# firewall-cmd --reload
Should we later need to remove this service from the work zone, we can use the following command:
# firewall-cmd --permanent --remove-service=squid --zone=work
# firewall-cmd --reload
Firewall rules using ports
In the previous example, where the squid service only required a single port, we could easily add a port rule to allow access to a service. Although the process is simple, in some organizations, the preference will still be to create the service file that documents the need of the port in the description field.
If we need to add a port, we have similar options in --add-port and --remove-port. The following command shows how to add the squid TCP port 3128 to the work zone without the need to define the service file:
# firewall-cmd --permanent --add-port=3128/tcp --zone=work
# firewall-cmd --reload
Masquerading and Network Address Translation
If your firewalld server is your network router running RHEL 7, you may wish to provide access to the Internet to your internal hosts on a private network. If this is the case, we can enable masquerading. This is also known as NAT (Network Address Translation), where the server's public IP address is used by internal clients. To establish this, we can make use of the built-in internal and external zones and configure masquerading on the external zone. The internal NIC should be assigned to the internal zone and the external NIC should be assigned to the external zone.
To establish masquerading on the external zone, we can use the following command:
# firewall-cmd --zone=external --add-masquerade
Masquerading is removed using the --remove-masquerade option. We may also query the status of masquerading in a zone using the --query-masquerade option.

Using rich rules
The firewalld rich language allows an administrator to easily configure more complex firewall rules without having knowledge of the iptables syntax. This can include logging and examination of the source address.
To add a rule to allow NTP connection on the default zone, but logging the connection at no more than 1 per minute, use the following command:
# firewall-cmd --permanent
--add-rich-rule='rule service name="ntp" audit limit value="1/m" accept'
# firewall-cmd --reload
Similarly, we can add a rule that only allows access to the squid service from one subnet only:
# firewall-cmd --permanent
--add-rich-rule='rule family="ipv4"
source address="192.166.0.0/24" service name="squid" accept'
# firewall-cmd --reload

The Fedora project maintains the documentation for rich rules in firewalld and these can be accessed at https://fedoraproject.org/wiki/Features/FirewalldRichLanguage should you need more detailed examples.
Implementing direct rules
If you have a prior experience with iptables and want to combine you knowledge of iptables with the features in firewalld, direct rules are here to help with this migration. Firstly, if we want to implement a rule on the INPUT chain, we can check the current settings with the following command:
# firewall-cmd --direct --get-rules ipv4 filter INPUT
If you have not added any rules, the output will be empty. We will add a new rule and use a priority of 0. This means that it will be listed at the top of the chain; however, this means little when no other rules are in place. We do need to verify that rules are added in the correct order to process if other rules are implemented:
# firewall-cmd --permanent --direct --add-rule ipv4 filter
INPUT 0 -p tcp --dport 3128 -j ACCEPT
# firewall-cmd --reload
Reverting to iptables
Additionally, there is nothing stopping you from using the iptables service if this is what you are most familiar with.
Firstly, we can install iptables with the following command:
# yum install iptables-service
We can mask the firewalld service to more effectively disable the service, preventing it from being started without first unmasking this service:
# systemctl mask firewalld
We can enable iptables with the following commands:
# systemctl enable iptables
# systemctl enable ip6tables
# systemctl start iptables
# systemctl start ip6tables
Permanent rules are added as they always have been, via the /etc/sysconfig directory and the iptables and ip6tables files.
The firewalld project is maintained by Fedora and is the new administrative service and interface for the netfilter firewall on the Linux Kernel. As administrators, we can choose to use this default service or switch back to iptables; however, firewalld is able to provide us with the ability to reload configuration without dropping connections and mechanisms to migrate from iptables. We have seen how we can use zones to segregate network interfaces and sources if we need to share address ranges on a single NIC. Neither the NIC nor the source is bound to the zone. We can then add rules to a zone to control access to our resources. These rules are based on services or ports. If more complexity is required, we have the option of using rich or direct rules. Rich rules are written in the rich language from firewalld, whereas direct rules are written in the iptables syntax.
Summary
In this article, you learned on how to secure your network using firewalld.
Resources for Article:
Further resources on this subject:

 United States
 Great Britain
 India
India
 Germany
 France
 Canada
 Russia
 Spain
Spain
 Brazil
 Australia
 Singapore
 Canary Islands
 Hungary
 Ukraine
 Luxembourg
 Estonia
 Lithuania
 South Korea
 Turkey
 Switzerland
 Colombia
 Taiwan
 Chile
Chile
 Norway
 Ecuador
 Indonesia
 New Zealand
 Cyprus
 Denmark
 Finland
 Poland
 Malta
Malta
 Czechia
 Austria
 Sweden
 Italy
Italy
 Egypt
Egypt
 Belgium
 Portugal
 Slovenia
 Ireland
 Romania
 Greece
 Argentina
 Netherlands
 Bulgaria
 Latvia
 South Africa
 Malaysia
 Japan
Japan
 Slovakia
 Philippines
 Mexico
 Thailand


