In this article by Maxwell Dayvson Da Silva and Hugo Lopes Tavares, the authors of Redis Essentials, we will get an overview of many different Redis commands and features, from techniques to reduce network latency to extending Redis with Lua scripting. At the end of this article, we will explain optimizations further.
(For more resources related to this topic, see here.)
Pub/Sub
Pub/Sub stands for Publish-Subscribe, which is a pattern where messages are not sent directly to specific receivers. Publishers send messages to channels, and subscribers receive these messages if they are listening to a given channel.
Redis supports the Pub/Sub pattern and provides commands to publish messages and subscribe to channels.
Here are some examples of Pub/Sub applications:
- News and weather dashboards
- Chat applications
- Push notifications, such as subway delay alerts
- Remote code execution, similar to what the SaltStack tool supports
The following examples implement a remote command execution system, where a command is sent to a channel and the server that is subscribed to that channel executes the command.
The command PUBLISH sends a message to the Redis channel, and it returns the number of clients that received that message. A message gets lost if there are no clients subscribed to the channel when it comes in.
Create a file called publisher.js and save the following code into it:
var redis = require("redis");
var client = redis.createClient();

var channel = process.argv[2]; // 1
var command = process.argv[3]; // 2

client.publish(channel, command); // 3

client.quit();
- Assign the third argument from the command line to the variable channel (the first argument is node and the second is publisher.js).
- Assign the fourth argument from the command line to the variable command.
- Execute the command PUBLISH, passing the variables channel and command.
The command SUBSCRIBE subscribes a client to one or many channels. The command UNSUBSCRIBE unsubscribes a client from one or many channels.
The commands PSUBSCRIBE and PUNSUBSCRIBE work the same way as the SUBSCRIBE and UNSUBSCRIBE commands, but they accept glob-style patterns as channel names.
Once a Redis client executes the command SUBSCRIBE or PSUBSCRIBE, it enters the subscribe mode and stops accepting commands, except for the commands SUBSCRIBE, PSUBSCRIBE, UNSUBSCRIBE, and PUNSUBSCRIBE.
Create a file called subscriber.js and save the following:
var os = require("os"); // 1
var redis = require("redis");
var client = redis.createClient();

var COMMANDS = {}; // 2

COMMANDS.DATE = function() { // 3
   var now = new Date();
   console.log("DATE " + now.toISOString());
};

COMMANDS.PING = function() { // 4
console.log("PONG");
};

COMMANDS.HOSTNAME = function() { // 5
console.log("HOSTNAME " + os.hostname());
};

client.on("message", function(channel, commandName) { // 6
if (COMMANDS.hasOwnProperty(commandName)) { // 7
   var commandFunction = COMMANDS[commandName]; // 8
     commandFunction(); // 9
} else { // 10
   console.log("Unknown command: " + commandName);
}
});
client.subscribe("global", process.argv[2]); // 11
- Require the Node.js module os.
- Create the variable COMMANDS, which is a JavaScript object. All command functions in this module will be added to this object. This object is intended to act as a namespace.
- Create the function DATE, which displays the current date.
- Then create the function PING, which displays PONG.
- Create the function HOSTNAME, which displays the server hostname.
- Register a channel listener, which is a function that executes commands based on the channel message.
- Check whether the variable commandName is a valid command.
- Create the variable commandFunction and assign the function to it.
- Execute commandFunction.
- Display an error message if the variable commandName contains a command that is not available.
- Execute the command SUBSCRIBE, passing "global", which is the channel that all clients subscribe to, and a channel name from the command line.
Open three terminal windows and run the previous files, as shown the following screenshot (from left to right and top to bottom):

- terminal-1: A subscriber that listens to the global channel and channel-1
- terminal-2: A subscriber that listens to the global channel and channel-2
- terminal-3: A publisher that publishes the message PING to the global channel (both subscribers receive the message), the message DATE to channel-1 (the first subscriber receives it), and the message HOSTNAME to channel-2 (the second subscriber receives it)
The command PUBSUB introspects the state of the Redis Pub/Sub system. This command accepts three subcommands: CHANNELS, NUMSUB, and NUMPAT.
The CHANNELS subcommand returns all active channels (channels with at least one subscriber). This command accepts an optional parameter, which is a glob-style pattern. If the pattern is specified, all channel names that match the pattern are returned; if no pattern is specified, all channel names are returned. The command syntax is as follows:
PUBSUB CHANNELS [pattern]
The NUMSUB subcommand returns the number of clients connected to channels via the SUBSCRIBE command. This command accepts many channel names as arguments. Its syntax is as follows:
PUBSUB NUMSUB [channel-1 … channel-N]
The NUMPAT subcommand returns the number of clients connected to channels via the PSUBSCRIBE command. This command does not accept channel patterns as arguments. Its syntax is as follows:
PUBSUB NUMPAT
Redis contributor Pieter Noordhuis created a web chat implementation in Ruby using Redis and Pub/Sub. It can be found at https://gist.github.com/pietern/348262.
Transactions
A transaction in Redis is a sequence of commands executed in order and atomically. The command MULTI marks the beginning of a transaction, and the command EXEC marks its end. Any commands between the MULTI and EXEC commands are serialized and executed as an atomic operation. Redis does not serve any other client in the middle of a transaction.
All commands in a transaction are queued in the client and are only sent to the server when the EXEC command is executed. It is possible to prevent a transaction from being executed by using the DISCARD command instead of EXEC. Usually, Redis clients prevent a transaction from being sent to Redis if it contains command syntax errors.
Unlike in traditional SQL databases, transactions in Redis are not rolled back if they produce failures. Redis executes the commands in order, and if any of them fail, it proceeds to the next command. Another downside of Redis transactions is that it is not possible to make any decisions inside the transaction, since all the commands are queued.
For example, the following code simulates a bank transfer. Here, money is transferred from a source account to a destination account inside a Redis transaction. If the source account has enough funds, the transaction is executed. Otherwise, it is discarded.
Save the following code in a file called bank-transaction.js:
var redis = require("redis");
var client = redis.createClient();

function transfer(from, to, value, callback) { // 1
client.get(from, function(err, balance) { // 2
   var multi = client.multi(); // 3
   multi.decrby(from, value); // 4
   multi.incrby(to, value); // 5
   if (balance >= value) { // 6
     multi.exec(function(err, reply) { // 7
       callback(null, reply[0]); // 8
     });
   } else {
     multi.discard(); // 9
     callback(new Error("Insufficient funds"), null); // 10
   }
});
}
- Create the function transfer, which receives an account ID from which to withdraw money, another account ID from which to receive money, the monetary value to transfer, and a callback function to call after the transfer.
- Retrieve the current balance of the source account.
- Create a Multi object, which represents the transaction. All commands sent to it are queued and executed after the EXEC command is issued.
- Enqueue the command DECRBY into the Multi object.
- Then enqueue the command INCRBY into the Multi object.
- Check whether the source account has sufficient funds.
- Execute the EXEC command, which triggers sequential execution of the queued transaction commands.
- Execute the callback function and pass the value null as an error, and the balance of the source account after the command DECRBY is executed.
- Execute the DISCARD command to discard the transaction. No commands from the transaction will be executed in Redis.
- Execute the function callback and pass an error object if the source account has insufficient funds.
The following code uses the previous example, transferring $40 from Max's account to Hugo's account (both accounts had $100 before the transfer).
Append the following to the file bank-transaction.js:
client.mset("max:checkings", 100, "hugo:checkings", 100, function(err, reply) { // 1
console.log("Max checkings: 100");
console.log("Hugo checkings: 100");
transfer("max:checkings", "hugo:checkings", 40,     function(err, balance) { // 2
   if (err) {
     console.log(err);
   } else {
     console.log("Transferred 40 from Max to Hugo")
     console.log("Max balance:", balance);
   }
   client.quit();
});
});
- Set the initial balance of each account to $100.
- Execute the function transfer to transfer $40 from max:checkings to hugo:checkings.
Then execute the file using the following command:
$ node bank-transaction.js
Max checkings: 100
Hugo checkings: 100
Transferred 40 from Max to Hugo
Max balance: 60
It is possible to make the execution of a transactionconditional using the WATCH command, which implements an optimistic lock on a group of keys. The WATCH command marks keys as being watched so that EXEC executes the transaction only if the keys being watched were not changed. Otherwise, it returns a null reply and the operation needs to be repeated; this is the reason it is called an optimistic lock. The command UNWATCH removes keys from the watch list.
The following code implements a zpop function, which removes the first element of a Sorted Set and passes it to a callback function, using a transaction with WATCH. A race condition could exist if the WATCH command is not used.
Create a file called watch-transaction.js with the following code:
var redis = require("redis");
var client = redis.createClient();

function zpop(key, callback) { // 1
client.watch(key, function(watchErr, watchReply) { // 2
   client.zrange(key, 0, 0, function(zrangeErr, zrangeReply) { // 3
     var multi = client.multi(); // 4
     multi.zrem(key, zrangeReply); // 5
     multi.exec(function(transactionErr, transactionReply) { // 6
       if (transactionReply) {
         callback(zrangeReply[0]); // 7
       } else {
         zpop(key, callback); // 8
       }
     });
   });
});
}
client.zadd("presidents", 1732, "George Washington");
client.zadd("presidents", 1809, "Abraham Lincoln");
client.zadd("presidents", 1858, "Theodore Roosevelt");

zpop("presidents", function(member) {
console.log("The first president in the group is:", member);
client.quit();
});
- Create the function zpop, which receives a key and a callback function as arguments.
- Execute the WATCH command on the key passed as an argument.
- Then execute the ZRANGE command to retrieve the first element of the Sorted Set.
- Create a multi object.
- Enqueue the ZREM command in the transaction.
- Execute the transaction.
- Execute the callback function if the key being watched has not been changed.
- Execute the function zpop with the same parameters as before if the key being watched has not been changed.
Then execute the file using the following command:
$ node watch-transaction.js
The first president in the group is: George Washington
Pipelines
In Redis, a pipeline is a way to send multiple commands together to the Redis server without waiting for individual replies. The replies are read all at once by the client. The time taken for a Redis client to send a command and obtain a reply from the Redis server is called Round Trip Time (RTT). When multiple commands are sent, there are multiple RTTs.
Pipelines can decrease the number of RTTs because commands are grouped, so a pipeline with 10 commands will have only one RTT. This can improve the network's performance significantly.
For instance, if the network link between a client and server has an RTT of 100 ms, the maximum number of commands that can be sent per second is 10, no matter how many commands can be handled by the Redis server. Usually, a Redis server can handle hundreds of thousands of commands per second, and not using pipelines may be a waste of resources.
When Redis is used without pipelines, each command needs to wait for a reply. Assume the following:
var redis = require("redis");
var client = redis.createClient();

client.set("key1", "value1");
client.set("key2", "value2");
client.set("key3", "value3");
Three separate commands are sent to Redis, and each command waits for its reply. The following diagram shows what happens when Redis is used without pipelines:

Redis commands sent in a pipeline must be independent. They run sequentially in the server (the order is preserved), but they do not run as a transaction. Even though pipelines are neither transactional nor atomic (this means that different Redis commands may occur between the ones in the pipeline), they are still useful because they can save a lot of network time, preventing the network from becoming a bottleneck as it often does with heavy load applications.
By default, node_redis, the Node.js library we are using, sends commands in pipelines and automatically chooses how many commands will go into each pipeline. Therefore, you don't need to worry about this. However, other Redis clients may not use pipelines by default; you will need to check out the client documentation to see how to take advantage of pipelines. The PHP, Python, and Ruby clients do not use pipelines by default.
This is what happens when commands are sent to Redis in a pipeline:

When sending many commands, it might be a good idea to use multiple pipelines rather than one big pipeline.
Pipelines are not a new idea or an exclusive feature or command in Redis; they are just a technique of sending a group of commands to a server at once.
Commands inside a transaction may not be sent as a pipeline by default. This will depend on the Redis client you are using. For example, node_redis sends everything automatically in pipelines (as we mentioned before), but different clients may require additional configuration. It is a good idea to send transactions in a pipeline to avoid an extra round trip.
Scripting
Redis 2.6 introduced the scripting feature, and the language that was chosen to extend Redis was Lua. Before Redis 2.6, there was only one way to extend Redis—changing its source code, which was written in C.
Lua was chosen because it is very small and simple, and its C API is very easy to integrate with other libraries. Although it is lightweight, Lua is a very powerful language (it is commonly used in game development).
Lua scripts are atomically executed, which means that the Redis server is blocked during script execution. Because of this, Redis has a default timeout of 5 seconds to run any script, although this value can be changed through the configuration lua-time-limit.
Redis will not automatically terminate a Lua script when it times out. Instead, it will start to reply with a BUSY message to every command, stating that a script is running. The only way to make the server return to normalcy is by aborting the script execution with the command SCRIPT KILL or SHUTDOWN NOSAVE.
Ideally, scripts should be simple, have a single responsibility, and run fast.
The popular games Civilization V, Angry Birds, and World of Warcraft use Lua as their scripting language.
Lua syntax basics
Lua is built around basic types such as booleans, numbers, strings, tables (the only composite data type), and functions.
Let's see some basics of Lua's syntax:
- Comments:
-- this is a comment
- Global variable declaration:
x = 123
- Local variable declaration:
local y = 456
- Function definition:
function hello_world()
return "Hello World"
end
- Iteration:
for i = 1, 10 do
   print(i)
end
- Conditionals:
if x == 123 then
print("x is the magic number")
else
print("I have no idea what x is")
end
- String concatenation:
print("Hello" .. " World")
- Using a table as an array — arrays in Lua start indexing at 1, not at 0 (as in most languages):
data_types = {1.0, 123, "redis", true, false, hello_world}
print(data_types[3]) -- the output is "redis"
- Using a table as a hash:
languages = {lua = 1993, javascript = 1995, python = 1991, ruby = 1995}
print("Lua was created in " .. languages["lua"])
print("JavaScript was created in " .. languages.javascript)
Redis meets Lua
A Redis client must send Lua scripts as strings to the Redis server. Therefore, this section will have JavaScript strings that contain Lua code.
Redis can evaluate any valid Lua code, and a few libraries are available (for example, bitop, cjson, math, and string). There are also two functions that execute Redis commands: redis.call and redis.pcall. The function redis.call requires the command name and all its parameters, and it returns the result of the executed command. If there are errors, redis.call aborts the script. The function redis.pcall is similar to redis.call, but in the event of an error, it returns the error as a Lua table and continues the script execution. Every script can return a value through the keyword return, and if there is no explicit return, the value nil is returned.
It is possible to pass Redis key names and parameters to a Lua script, and they will be available inside the Lua script through the variables KEYS and ARGV, respectively.
Both redis.call and redis.pcall automatically convert the result of a Redis command to a Lua type, which means that if the Redis command returns an integer, it will be converted into a Lua number. The same thing happens to commands that return a string or an array. Since every script will return a value, this value will be converted from a Lua type to a Redis type.
There are two commands for running Lua scripts: EVAL and EVALSHA. The next example will use EVAL, and its syntax is the following:
EVAL script numkeys key [key ...] arg [arg ...]
The parameters are as follows:
- script: The Lua script itself, as a string
- numkeys: The number of Redis keys being passed as parameters to the script
- key: The key name that will be available through the variable KEYS inside the script
- arg: An additional argument that will be available through the variable ARGV inside the script
The following code uses Lua to run the command GET and retrieve a key value. Create a file called intro-lua.js with the following code:
var redis = require("redis");
var client = redis.createClient();

client.set("mykey", "myvalue"); // 1

var luaScript = 'return redis.call("GET", KEYS[1])'; // 2
client.eval(luaScript, 1, "mykey", function(err, reply) { // 3
console.log(reply); // 4
client.quit();
});
- Execute the command SET to create a key called mykey.
- Create the variable luaScript and assign the Lua code to it. This Lua code uses the redis.call function to execute the Redis command GET, passing a parameter. The KEYS variable is an array with all key names passed to the script.
- Execute the command EVAL to execute a Lua script.
- Display the return of the Lua script execution.
Then execute it:
$ node intro-lua.js
myvalue
Avoid using hardcoded key names inside a Lua script; pass all key names as parameters to the commands EVAL/EVALSHA.
Previously in this article, in the Transactions section, we presented an implementation of a zpop function using WATCH/MULTI/EXEC. That implementation was based on an optimistic lock, which meant that the entire operation had to be retried if a client changed the Sorted Set before the MULTI/EXEC was executed.
The same zpop function can be implemented as a Lua script, and it will be simpler and atomic, which means that retries will not be necessary. Redis will always guarantee that there are no parallel changes to the Sorted Set during script execution.
Create a file called zpop-lua.js and save the following code into it:
var redis = require("redis");
var client = redis.createClient();

client.zadd("presidents", 1732, "George Washington");
client.zadd("presidents", 1809, "Abraham Lincoln");
client.zadd("presidents", 1858, "Theodore Roosevelt");

var luaScript = [
'local elements = redis.call("ZRANGE", KEYS[1], 0, 0)',
'redis.call("ZREM", KEYS[1], elements[1])',
'return elements[1]'
].join('n'); // 1

client.eval(luaScript, 1, "presidents", function(err, reply){ // 2
console.log("The first president in the group is:", reply);
client.quit();
});
- Create the variable luaScript and assign the Lua code to it. This Lua code uses the redis.call function to execute the Redis command ZRANGE to retrieve an array with only the first element in the Sorted Set. Then, it executes the command ZREM to remove the first element of the Sorted Set, before returning the removed element.
- Execute the command EVAL to execute a Lua script.
Then, execute the file using the following command:
$ node zpop-lua.js
The first president in the group is: George Washington
Many Redis users have replaced their transactional code in the form of WATCH/MULTI/EXEC with Lua scripts.
It is possible to save network bandwidth usage by using the commands SCRIPT LOAD and EVALSHA instead of EVAL when executing the same script multiple times. The command SCRIPT LOAD caches a Lua script and returns an identifier (which is the SHA1 hash of the script). The command EVALSHA executes a Lua script based on an identifier returned by SCRIPT LOAD. With EVALSHA, only a small identifier is transferred over the network, rather than a Lua code snippet:
var redis = require("redis");
var client = redis.createClient();

var luaScript = 'return "Lua script using EVALSHA"';
client.script("load", luaScript, function(err, reply) {
var scriptId = reply;

client.evalsha(scriptId, 0, function(err, reply) {
   console.log(reply);
   client.quit();
})
});
Then execute the script:
Unlock access to the largest independent learning library in Tech for FREE!
Get unlimited access to 7500+ expert-authored eBooks and video courses covering every tech area you can think of.
Renews at $19.99/month. Cancel anytime
$ node zpop-lua-evalsha.js
Lua script using EVALSHA
In order to make scripts play nicely with Redis replication, you should write scripts that do not change Redis keys in non-deterministic ways (that is, do not use random values). Well-written scripts behave the same way when they are re-executed with the same data.
Miscellaneous commands
This section covers the most important Redis commands that we have not previously explained. These commands are very helpful in a variety of situations, including obtaining a list of clients connected to the server, monitoring the health of a Redis server, expiring keys, and migrating keys to a remote server. All the examples in this section use redis-cli.
INFO
The INFO command returns all Redis server statistics, including information about the Redis version, operating system, connected clients, memory usage, persistence, replication, and keyspace. By default, the INFO command shows all available sections: memory, persistence, CPU, command, cluster, clients, and replication. You can also restrict the output by specifying the section name as a parameter:
127.0.0.1:6379> INFO memory
# Memory
used_memory:354923856
used_memory_human:338.48M
used_memory_rss:468979712
used_memory_peak:423014496
used_memory_peak_human:403.42M
used_memory_lua:33792
mem_fragmentation_ratio:1.32
mem_allocator:libc

127.0.0.1:6379> INFO cpu
# CPU
used_cpu_sys:3.71
used_cpu_user:40.36
used_cpu_sys_children:0.00
used_cpu_user_children:0.00
DBSIZE
The DBSIZE command returns the number of existing keys in a Redis server:
127.0.0.1:6379> DBSIZE
(integer) 50
DEBUG SEGFAULT
The DEBUG SEGFAULT command crashes the Redis server process by performing an invalid memory access. It can be quite interesting to simulate bugs during the development of your application:
127.0.0.1:6379> DEBUG SEGFAULT
MONITOR
The command MONITOR shows all the commands processed by the Redis server in real time. It can be helpful for seeing how busy a Redis server is:
127.0.0.1:6379> MONITOR
The following screenshot shows the MONITOR command output (left side) after running the leaderboard.js example (right side):

While the MONITOR command is very helpful for debugging, it has a cost. In the Redis documentation page for MONITOR, an unscientific benchmark test says that MONITOR could reduce Redis's throughput by over 50%.
CLIENT LIST and CLIENT SET NAME
The CLIENT LIST command returns a list of all clients connected to the server, as well as relevant information and statistics about the clients (for example, IP address, name, and idle time).
The CLIENT SETNAME command changes a client name; it is only useful for debugging purposes.

CLIENT KILL
The CLIENT KILL command terminates a client connection. It is possible to terminate client connections by IP, port, ID, or type:
127.0.0.1:6379> CLIENT KILL ADDR 127.0.0.1:51167
(integer) 1
127.0.0.1:6379> CLIENT KILL ID 22
(integer) 1
127.0.0.1:6379> CLIENT KILL TYPE slave
(integer) 0
FLUSHALL
The FLUSHALL command deletes all keys from Redis—this cannot be undone:
127.0.0.1:6379> FLUSHALL
OK
RANDOMKEY
The command RANDOMKEY returns a random existing key name. This may help you get an overview of the available keys in Redis. The alternative would be to run the KEYS command, but it analyzes all the existing keys in Redis. If the keyspace is large, it may block the Redis server entirely during its execution:
127.0.0.1:6379> RANDOMKEY
"mykey"
EXPIRE and EXPIREAT
The command EXPIRE sets a timeout in seconds for a given key. The key will be deleted after the specified amount of seconds. A negative timeout will delete the key instantaneously (just like running the command DEL).
The command EXPIREAT sets a timeout for a given key based on a Unix timestamp. A timestamp of the past will delete the key instantaneously.
These commands return 1 if the key timeout is set successfully or 0 if the key does not exist:
127.0.0.1:6379> MSET key1 value1 key2 value2
OK
127.0.0.1:6379> EXPIRE key1 30
(integer) 1
127.0.0.1:6379> EXPIREAT key2 1435717600
(integer) 1
TTL and PTTL
The TTL command returns the remaining time to live (in seconds) of a key that has an associated timeout. If the key does not have an associated TTL, it returns -1, and if the key does not exist, it returns -2. The PTTL command does the same thing, but the return value is in milliseconds rather than seconds:
127.0.0.1:6379> SET redis-essentials:authors "By Maxwell Dayvson da Silva, Hugo Lopes Tavares" EX 30
OK
127.0.0.1:6379> TTL redis-essentials:authors
(integer) 18
127.0.0.1:6379> PTTL redis-essentials:authors
(integer) 13547
The SET command has optional parameters, and these were not shown before. The complete command syntax is as follows:
SET key value [EX seconds|PX milliseconds] [NX|XX]
The parameters are explained as follows:
EX: Set an expiration time in seconds
PX: Set an expiration time in milliseconds
NX: Only set the key if it does not exist
XX: Only set the key if it already exists
PERSIST
The PERSIST command removes the existing timeout of a given key. Such a key will never expire, unless a new timeout is set. It returns 1 if the timeout is removed or 0 if the key does not have an associated timeout:
127.0.0.1:6379> SET mykey value
OK
127.0.0.1:6379> EXPIRE mykey 30
(integer) 1
127.0.0.1:6379> PERSIST mykey
(integer) 1
127.0.0.1:6379> TTL mykey
(integer) -1
SETEX
The SETEX command sets a value to a given key and also sets an expiration atomically. It is a combination of the commands, SET and EXPIRE:
127.0.0.1:6379> SETEX mykey 30 value
OK
127.0.0.1:6379> GET mykey
"value"
127.0.0.1:6379> TTL mykey
(integer) 29
DEL
The DEL command removes one or many keys from Redis and returns the number of removed keys—this command cannot be undone:
127.0.0.1:6379> MSET key1 value1 key2 value2
OK
127.0.0.1:6379> DEL key1 key2
(integer) 2
EXISTS
The EXISTS command returns 1 if a certain key exists and 0 if it does not:
127.0.0.1:6379> SET mykey myvalue
OK
127.0.0.1:6379> EXISTS mykey
(integer) 1
PING
The PING command returns the string PONG. It is useful for testing a server/client connection and verifying that Redis is able to exchange data:
127.0.0.1:6379> PING
PONG
MIGRATE
The MIGRATE command moves a given key to a destination Redis server. This is an atomic command, and during the key migration, both Redis servers are blocked. If the key already exists in the destination, this command fails (unless the REPLACE parameter is specified).
The command syntax is as follows:
MIGRATE host port key destination-db timeout [COPY] [REPLACE]
There are two optional parameters for the command MIGRATE, which can be used separately or combined:
- COPY: Keep the key in the local Redis server and create a copy in the destination Redis server
- REPLACE: Replace the existing key in the destination server
SELECT
Redis has a concept of multiple databases, each of which is identified by a number from 0 to 15 (there are 16 databases by default). It is not recommended to use multiple databases with Redis. A better approach would be to use multiple redis-server processes rather than a single one, because multiple processes are able to use multiple CPU cores and give better insights into bottlenecks.
The SELECT command changes the current database that the client is connected to. The default database is 0:
127.0.0.1:6379> SELECT 7
OK
127.0.0.1:6379[7]>
AUTH
The AUTH command is used to authorize a client to connect to Redis. If authorization is enabled on the Redis server, clients are allowed to run commands only after executing the AUTH command with the right authorization key:
127.0.0.1:6379> GET mykey
(error) NOAUTH Authentication required.
127.0.0.1:6379> AUTH mysecret
OK
127.0.0.1:6379> GET mykey
"value"
SCRIPT KILL
The SCRIPT KILL command terminates the running Lua script if no write operations have been performed by the script. If the script has performed any write operations, the SCRIPT KILL command will not be able to terminate it; in that case, the SHUTDOWN NOSAVE command must be executed.
There are three possible return values for this command:
- OK
- NOTBUSY No scripts in execution right now.
- UNKILLABLE Sorry the script already executed write commands against the dataset. You can either wait the script termination or kill the server in a hard way using the SHUTDOWN NOSAVE command.
127.0.0.1:6379> SCRIPT KILL
OK
SHUTDOWN
The SHUTDOWN command stops all clients, causes data to persist if enabled, and shuts down the Redis server.
This command accepts one of the following optional parameters:
- SAVE: Forces Redis to save all of the data to a file called dump.rdb, even if persistence is not enabled
- NOSAVE: Prevents Redis from persisting data to the disk, even if persistence is enabled
127.0.0.1:6379> SHUTDOWN SAVE
not connected>
127.0.0.1:6379> SHUTDOWN NOSAVE
not connected>
OBJECT ENCODING
The OBJECT ENCODING command returns the encoding used by a given key:
127.0.0.1:6379> HSET myhash field value
(integer) 1
127.0.0.1:6379> OBJECT ENCODING myhash
"ziplist"
Data type optimizations
In Redis, all data types can use different encodings to save memory or improve performance. For instance, a String that has only digits (for example, 12345) uses less memory than a string of letters (for example, abcde) because they use different encodings. Data types will use different encodings based on thresholds defined in the Redis server configuration.
The redis-cli will be used in this section to inspect the encodings of each data type and to demonstrate how configurations can be tweaked to optimize for memory.
When Redis is downloaded, it comes with a file called redis.conf. This file is well documented and has all the Redis configuration directives, although some of them are commented out. Usually, the default values in this file are sufficient for most applications. The Redis configurations can also be specified via the command-line option or the CONFIG command; the most common approach is to use a configuration file.
For this section, we have decided to not use a Redis configuration file. The configurations are passed via the command line for simplicity.
Start redis-server with low values for all configurations:
$ redis-server --hash-max-ziplist-entries 3 --hash-max-ziplist-value 5 --list-max-ziplist-entries 3 --list-max-ziplist-value 5 --set-max-intset-entries 3 --zset-max-ziplist-entries 3 --zset-max-ziplist-value 5
The default redis.conf file is well documented, and we recommend that you read it and discover new directive configurations.
String
The following are the available encoding for Strings:
- int: This is used when the string is represented by a 64-bit signed integer
- embstr: This is used for strings with fewer than 40 bytes
- raw: This is used for strings with more than 40 bytes
These encodings are not configurable. The following redis-cli examples show how the different encodings are chosen:
127.0.0.1:6379> SET str1 12345
OK
127.0.0.1:6379> OBJECT ENCODING str1
"int"
127.0.0.1:6379> SET str2 "An embstr is small"
OK
127.0.0.1:6379> OBJECT ENCODING str2
"embstr"
127.0.0.1:6379> SET str3 "A raw encoded String is anything greater than 39 bytes"
OK
127.0.0.1:6379> OBJECT ENCODING str3
"raw"
List
These are the available encodings for Lists:
- ziplist: This is used when the List size has fewer elements than the configuration list-max-ziplist-entries and each List element has fewer bytes than the configuration list-max-ziplist-value
- linkedlist: This is used when the previous limits are exceeded
127.0.0.1:6379> LPUSH list1 a b
(integer) 2
127.0.0.1:6379> OBJECT ENCODING list1
"ziplist"
127.0.0.1:6379> LPUSH list2 a b c d
(integer) 4
127.0.0.1:6379> OBJECT ENCODING list2
"linkedlist"
127.0.0.1:6379> LPUSH list3 "only one element"
(integer) 1
127.0.0.1:6379> OBJECT ENCODING list3
"linkedlist"
Set
The following are the available encodings for Sets:
- intset: This is used when all elements of a Set are integers and the Set cardinality is smaller than the configuration set-max-intset-entries
- hashtable: This is used when any element of a Set is not an integer or the Set cardinality exceeds the configuration set-max-intset-entries
127.0.0.1:6379> SADD set1 1 2
(integer) 2
127.0.0.1:6379> OBJECT ENCODING set1
"intset"
127.0.0.1:6379> SADD set2 1 2 3 4 5
(integer) 5
127.0.0.1:6379> OBJECT ENCODING set2
"hashtable"
127.0.0.1:6379> SADD set3 a
(integer) 1
127.0.0.1:6379> OBJECT ENCODING set3
"hashtable"
Hash
The following are the available encodings for Hashes:
- ziplist: Used when the number of fields in the Hash does not exceed the configuration hash-max-ziplist-entries and each field name and value of the Hash is less than the configuration hash-max-ziplist-value (in bytes).
- hashtable: Used when a Hash size or any of its values exceed the configurations hash-max-ziplist-entries and hash-max-ziplist-value, respectively:
127.0.0.1:6379> HMSET myhash1 a 1 b 2
OK
127.0.0.1:6379> OBJECT ENCODING myhash1
"ziplist"
127.0.0.1:6379> HMSET myhash2 a 1 b 2 c 3 d 4 e 5 f 6
OK
127.0.0.1:6379> OBJECT ENCODING myhash2
"hashtable"
127.0.0.1:6379> HMSET myhash3 a 1 b 2 c 3 d 4 e 5 f 6
OK
127.0.0.1:6379> OBJECT ENCODING myhash3
"hashtable"
Sorted Set
The following are the available encodings:
- ziplist: Used when a Sorted Set has fewer entries than the configuration set-max-ziplist-entries and each of its values are smaller than zset-max-ziplist-value (in bytes)
- skiplist and hashtable: These are used when the Sorted Set number of entries or size of any of its values exceed the configurations set-max-ziplist-entries and zset-max-ziplist-value
127.0.0.1:6379> ZADD zset1 1 a
(integer) 1
127.0.0.1:6379> OBJECT ENCODING zset1
"ziplist"
127.0.0.1:6379> ZADD zset2 1 abcdefghij
(integer) 1
127.0.0.1:6379> OBJECT ENCODING zset2
"skiplist"
127.0.0.1:6379> ZADD zset3 1 a 2 b 3 c 4 d
(integer) 4
127.0.0.1:6379> OBJECT ENCODING zset3
"skiplist"
Measuring memory usage
Previously, redis-server was configured to use a ziplist for Hashes with a maximum of three elements, in which each element was smaller than 5 bytes. With that configuration, it was possible to check how much memory Redis would use to store 500 field-value pairs:
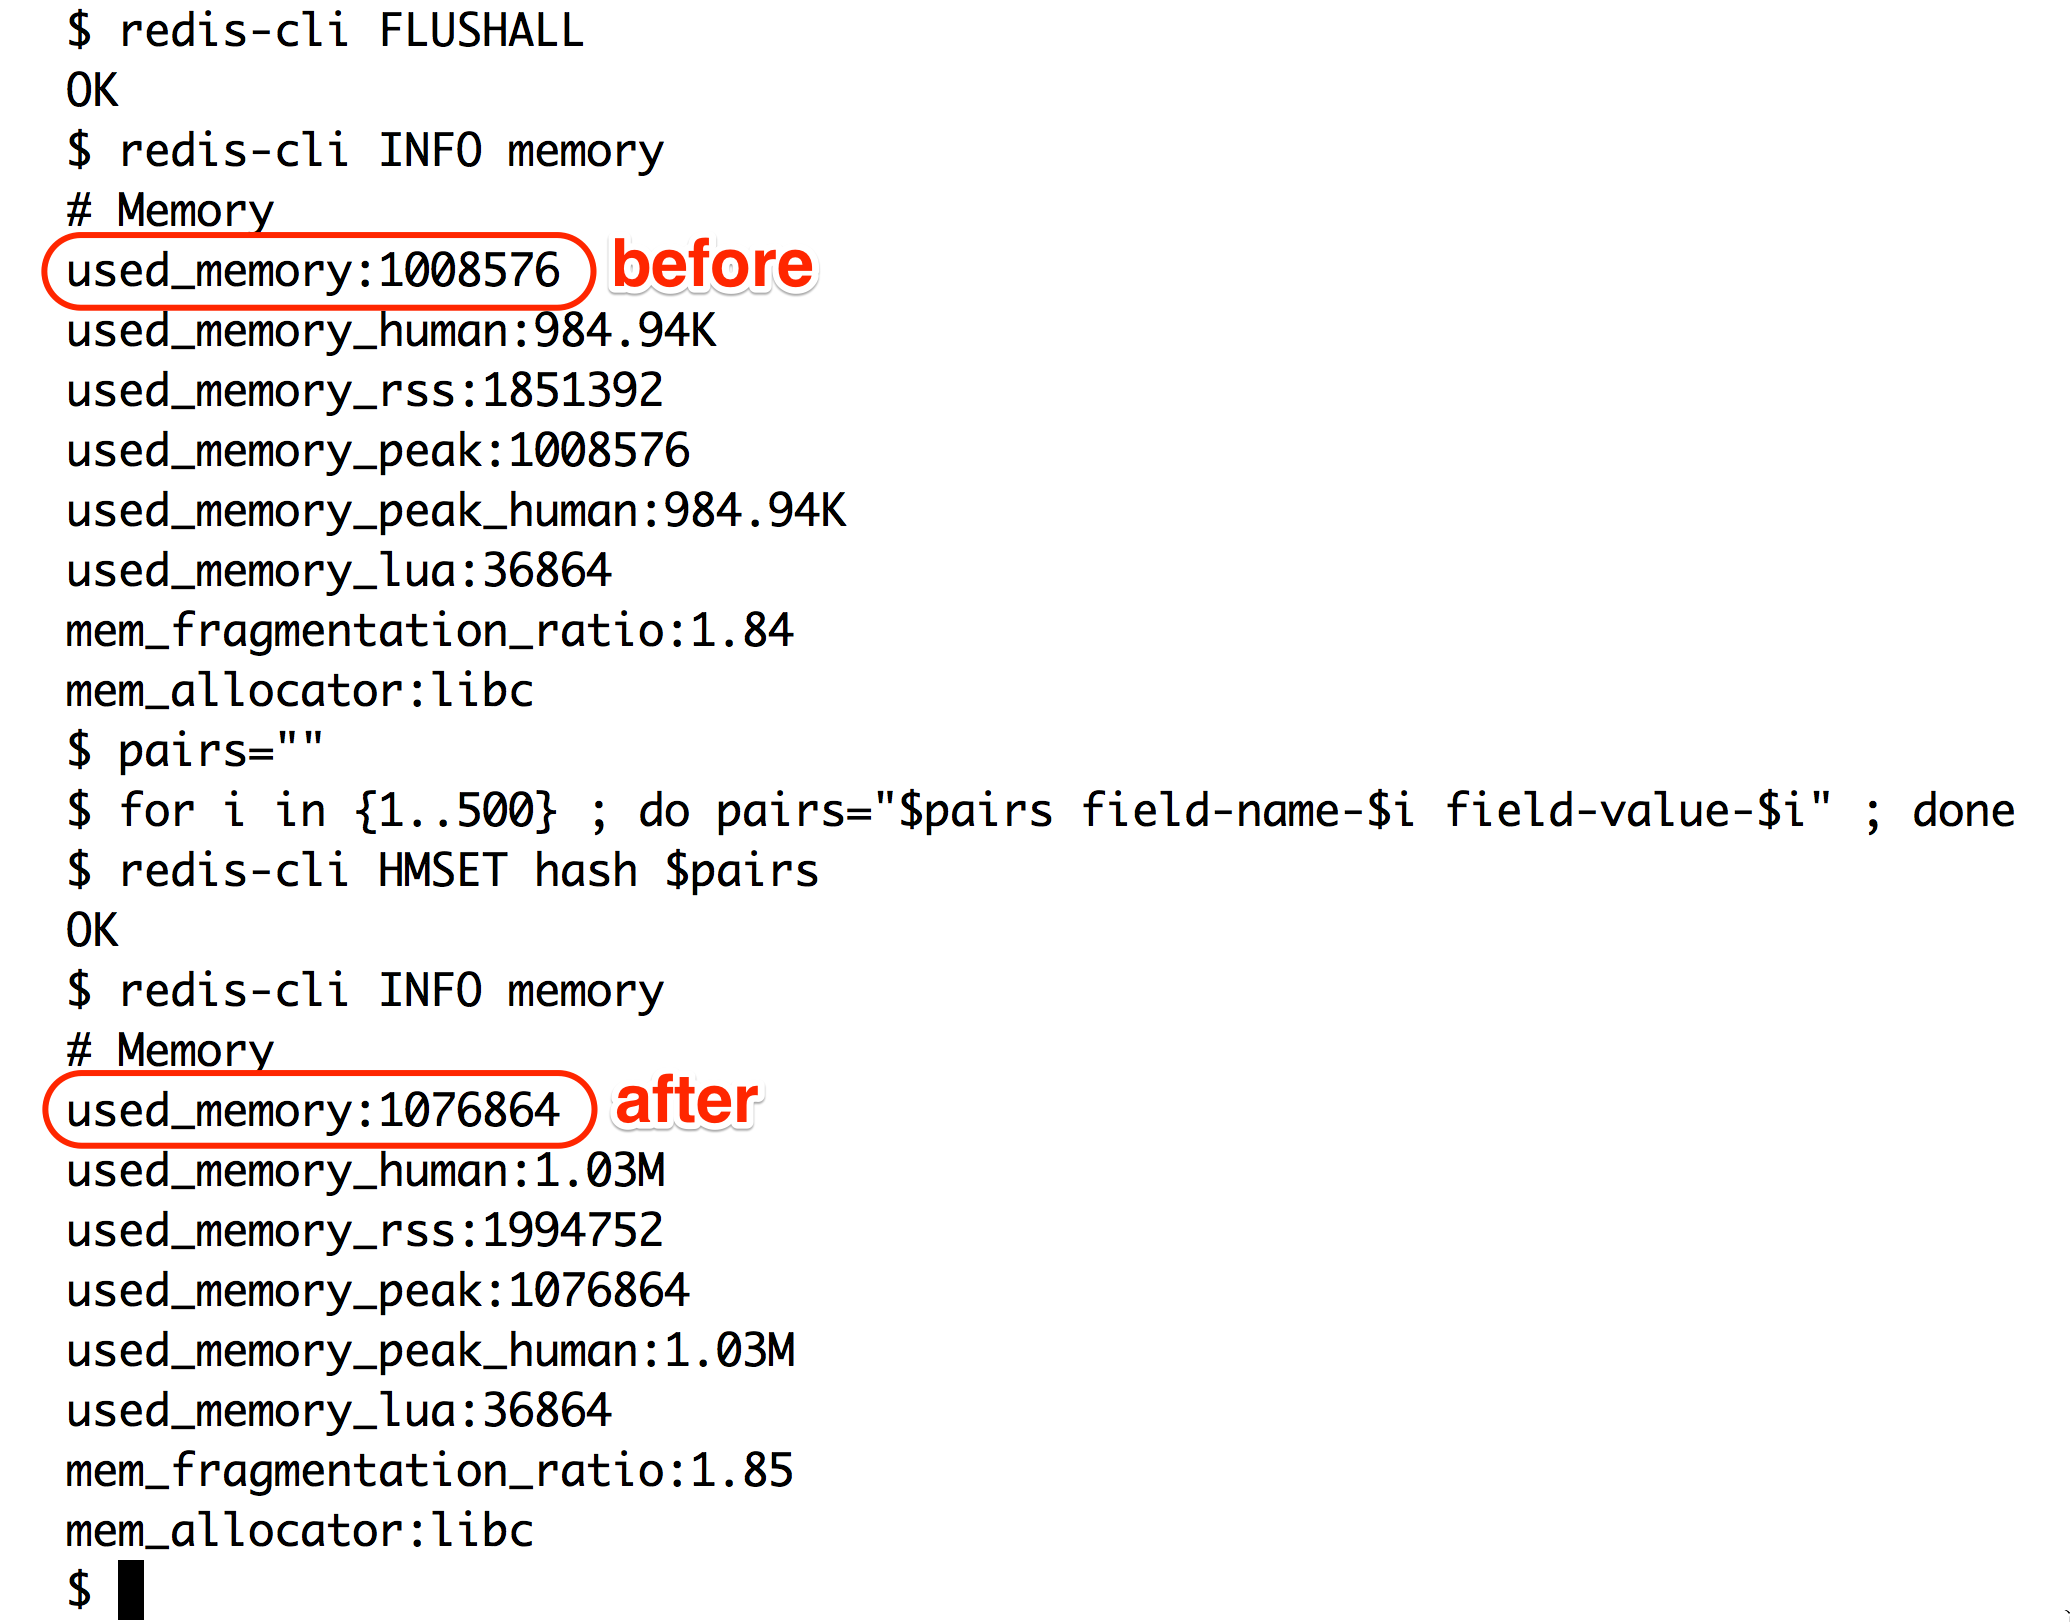
The total used memory was approximately 68 kB (1,076,864 – 1,008,576 = 68,288 bytes).
If redis-server was started with its default configuration of 512 elements and 64 bytes for hash-max-ziplist-entries and hash-max-ziplist-value, respectively, the same 500 field-value pairs would use less memory, as shown here:
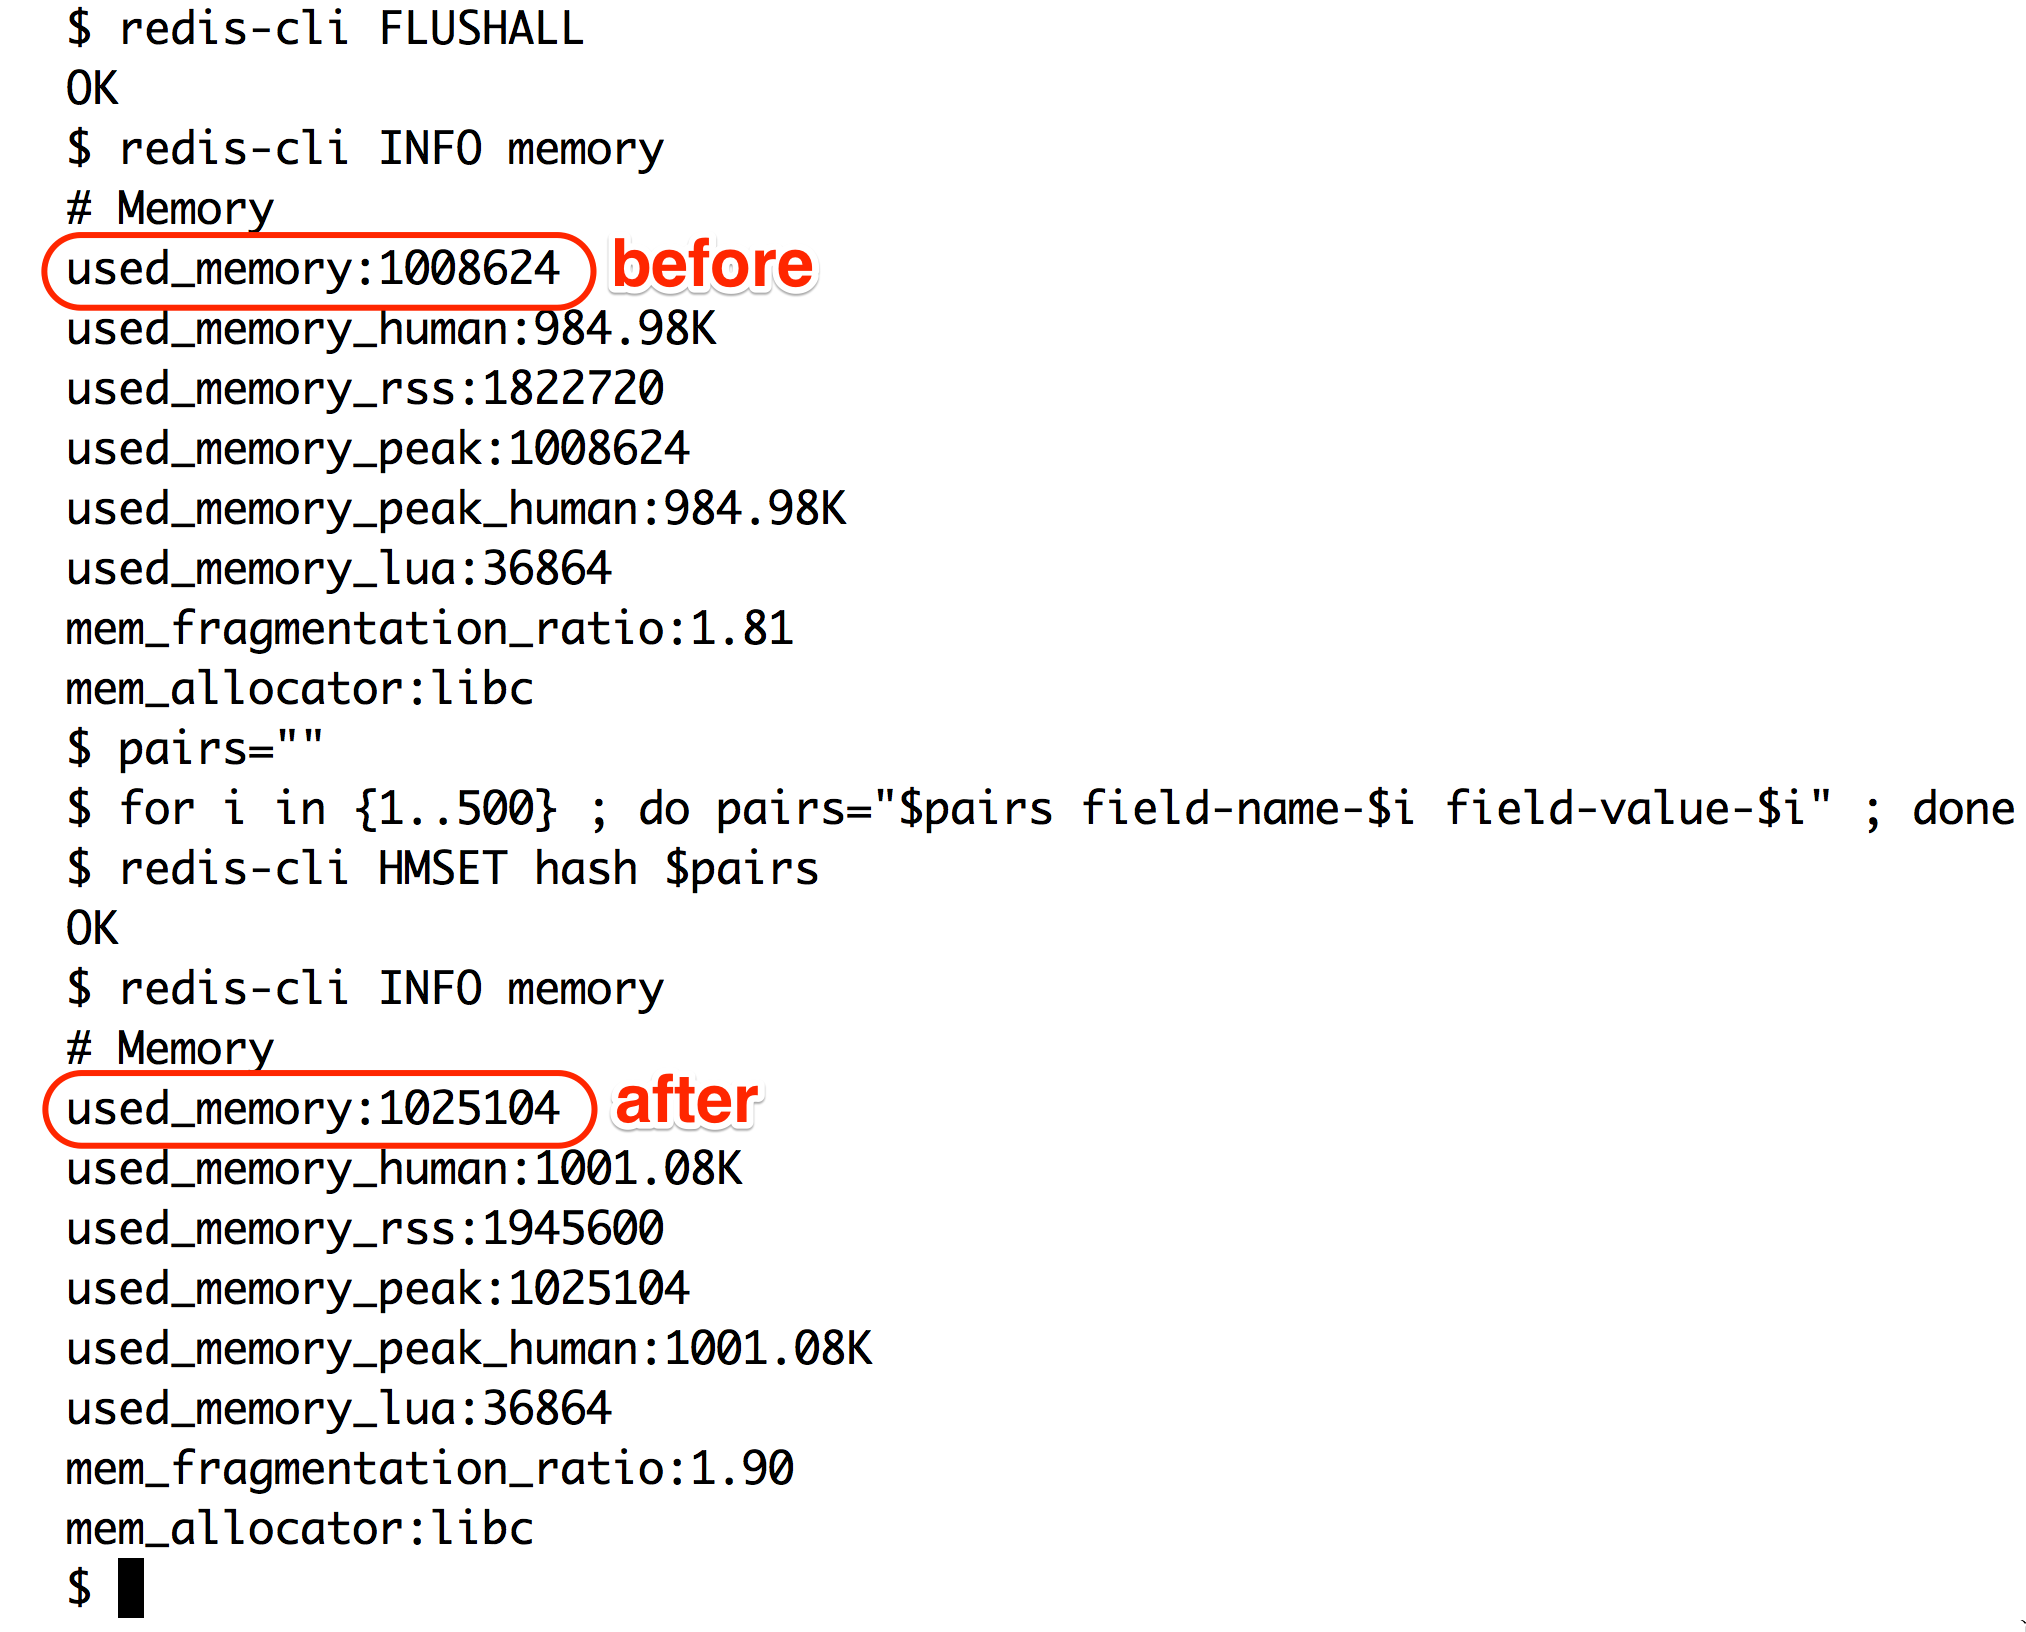
The total used memory is approximately 16 kB (1,025,104 – 1,008,624 = 16,480 bytes). The default configuration in this case was more than four times more memory-efficient.
Forcing a Hash to be a ziplist has a trade-off—the more elements a Hash has, the slower the performance. A ziplist is a dually linked list designed to be memory-efficient, and lookups are performed in linear time (O(n), where n is the number of fields in a Hash). On the other hand, a hashtable's lookup runs in constant time (O(1)), no matter how many elements exist.
If you have a large dataset and need to optimize for memory, tweak these configurations until you find a good trade-off between memory and performance. Instagram tweaked their Hash configurations and found that 1,000 elements per Hash was a good trade-off for them. You can learn more about the Instagram solution in the blog post at http://instagram-engineering.tumblr.com/post/12202313862/storing-hundreds-of-millions-of-simple-key-value.
The same logic for tweaking configurations and trade-offs applies to all other data type encodings presented previously.
Algorithms that run in linear time (O(n)) are not always bad. If the input size is very small, they can run in near-constant time.
Summary
This article introduced the concepts behind Pub/Sub, transactions, and pipelines. It also showed the basics of the Lua language syntax, along with explanations on how to extend Redis with Lua.
A good variety of Redis commands was presented, such as commands that are used to monitor and debug a Redis server.
This article also showed how to perform data type optimizations by tweaking the redis-server configuration.
Resources for Article:
Further resources on this subject:

 United States
 Great Britain
 India
India
 Germany
 France
 Canada
 Russia
 Spain
Spain
 Brazil
 Australia
 Singapore
 Canary Islands
 Hungary
 Ukraine
 Luxembourg
 Estonia
 Lithuania
 South Korea
 Turkey
 Switzerland
 Colombia
 Taiwan
 Chile
Chile
 Norway
 Ecuador
 Indonesia
 New Zealand
 Cyprus
 Denmark
 Finland
 Poland
 Malta
Malta
 Czechia
 Austria
 Sweden
 Italy
Italy
 Egypt
Egypt
 Belgium
 Portugal
 Slovenia
 Ireland
 Romania
 Greece
 Argentina
 Netherlands
 Bulgaria
 Latvia
 South Africa
 Malaysia
 Japan
Japan
 Slovakia
 Philippines
 Mexico
 Thailand


