Note
Learning Objectives
By the end of this chapter, you will be able to:
Use the Python interactive shell to write simple programs
Write and run simple Python scripts
Write and run dynamic scripts that take arguments from the command line
Use variables and describe the different types of values that variables can be assigned
Get user input from the keyboard for your Python programs
Explain the importance of comments and write them in Python
Explain the importance of whitespace and indentation in Python
Python is a high-level, general-purpose programming language. It is notorious for having a very simple "pseudocode-like" syntax that places emphasis on readability and expressiveness. This not only makes code simpler to write but also easier to maintain. Additionally, it features a vast standard library that is augmented by an even larger array of third-party libraries. These are all developed and supported by Python's very active community.
Development is also faster in Python, as it is an interpreted language. This means that the instructions are interpreted at runtime and there's no need to pre-compile the program into machine language instructions. This makes for quick prototyping and experimentation. Python's interpreted nature, along with its dynamic typing system, are what really set it apart from languages such as Java or C++.
Python also supports multiple paradigms, such as the following:
Object-oriented programming
Functional programming
Imperative programming
Procedural programming
This versatility, coupled with Python's ability to run on all operating system platforms from Windows and GNU/Linux to macOS, have led to its popularity. As a matter of fact, today, Python comes built-in into most GNU/Linux distributions as well as macOS.
Python can be applied for writing automation scripts, machine learning, scientific computation, big data, web applications, GUI programming, IoT devices—just about anything. It's a multipurpose language and is easy to extend. Due to this, Python has been adopted by tech companies such as Google (for YouTube), Uber, Facebook, and Mozilla, further ensuring its support and development.
In this chapter, we will write our first Python program and play with the interpreter through the use of the Python interactive shell. We will also take a look at the different ways of running a Python program.
Before we move on to getting our hands dirty, we'll take a brief look at the history of Python. Out there in the wild, you'll find codebases that use Python 3 or the older Python 2. The two are very similar. Generally, a lot of the code written for Python 3 will run on Python 2 and vice versa, but this should not be practiced as there are a few syntactic differences that can bring about issues. However, the majority of the differences between the two are under the bonnet.
Currently, support still runs for Python 2, but Python 3 is the only one in active development, meaning any new features brought to the language are only developed for Python 3. Additionally, the majority of commonly used third-party libraries have now ported to Python 3 and are withdrawing development for their Python 2 versions. For this reason, we will be using Python 3.6 for all of the examples in this book.
We are going to be writing our first program through the Python interactive shell. Before we begin, ensure that you have Python installed on your machine.
To check whether Python is installed properly, perform the following steps:
Open the command prompt.
Type in the command python and press Enter. This should open the Python interpreter, and you should see a message containing the Python version you installed.
Observe the output. It should be similar to what's shown in the following screenshot:

Figure 1.1: Checking the Python installation
Once the interactive shell opens, on the first line, you should see the Python version information. This includes its major version and the release date. As you can see from the preceding screenshot, it shows us that we're using Python 3, minor version 6, which was released on December 19, 2017. We can also see information on the system the interactive shell is running on. On the second line, we can see a few examples of commands we can write, and finally the prompt to enter a command >>> on the third line.
The Python interactive shell can be thought of as just any other shell that interfaces with the operating system (for example, Bash or CMD), but in this case, it interfaces with the Python interpreter. Through it, we can execute Python instructions. It presents a command-line interface.
In this exercise, we will learn how to work with the Python interpreter:
At the command prompt, enter the following command to run the popular Hello World! program:
>>> print("Hello World!")
Hello World
>>>
Calling print logs the passed message to the standard output.
Anything you type into the shell is echoed back. Type "Echo" in the shell to check this:
>>> "Echo"
'Echo'
>>> 1234
1234
>>>
You can even do some calculations (note that the order of operations is observed). Carry out a few mathematical operations in the terminal, like this:
>>> 9 + 3
12
>>> 100 * 5
20
>>> -6 + 5 * 3
9
>>>
Exit the shell by running the exit command:
>>> exit
When you exit the Python interactive shell and relaunch it, you will notice that any variables you had defined or commands you had run in the previous session are gone. Therefore, we can't reuse them. Another way to run a Python program is by running code that has been saved in a file. This allows us to run many instructions at a time and also reuse them, as we'll see later on in the book. In the next section, we'll take a look at how to do this.
In this activity, we will perform some basic operations using the Python interactive shell.
The steps are as follows:
Open the terminal.
Open the interactive shell.
Print Happy birthday or any message to the standard output.
Run the operation 17 + 35 * 2. The result should be 87.
Print the numbers 1 to 9 on a single row.
Exit the shell.
Running quick commands through the interactive shell is fun. It comes in handy when you have a quick hypothesis that you want to test out or when you want to check whether a specific method exists for some data type. However, you can't really write a full-fledged program through the interactive shell.
Python allows you to run your instructions from a saved file. A file containing Python instructions is called a module. A script is a module that can be run. Anything you can run on the interactive shell can be written and ran as a Python script.
By convention, Python scripts should have the file extension .py. The filename should be a valid filename, as defined by your operating system.
In this exercise, we will create a script that displays Hello five times in a single line:
Open your text editor.
Create a file called test1.py and insert the following code:
print("---------------------------------")
print("Hello " * 5)
print("---------------------------------")
Save it to your working directory.
Open your terminal, change into the directory where the file is saved, and run the following command: python test1.py. You should see the following output:

Figure 1.2: Creating and running a script
Python opens the file and executes each instruction, line by line. First, it runs the call to print on the first line and prints out a series of dashes. It then calls the second print, which prints our message five times, hence the * 5 bit. This can be any value you want and is basically a shorthand way of saying, "repeat that string of characters an n number of times", n being 5 in our case. For example, if you change that 5 to 100, it'll print Hello 100 times, as shown in the following code:
print("---------------------------------")
print("Hello " * 100)
print("---------------------------------")
This will be the output:
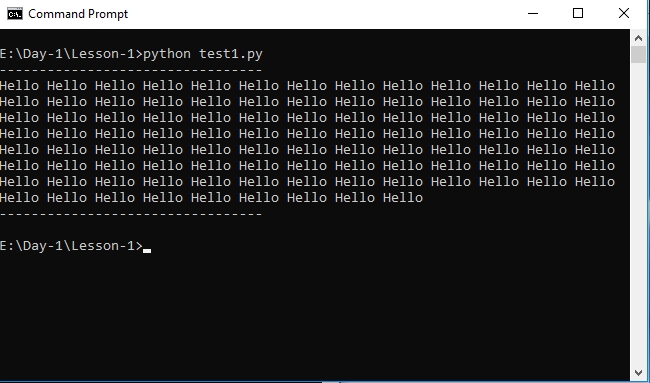
Figure 1.3: Creating and running the script with modified values
Finally, the last line is executed, just like our first, and prints out dashes. This execution is done in a blocking manner, so each line is executed after the previous line has completed running.
As with the interactive shell, putting in invalid instructions also causes an error. Make the following changes to your file and run it:
print("---------------------------------")
print(invalid instruction)
print("---------------------------------")
You should see an error. This output is called a stack trace. It tells us useful things such as where the error happened, what kind of error it was, and what other calls were triggered along the way when we ran our command. Stack traces should be read from bottom to top. Another name for a stack trace is a traceback:
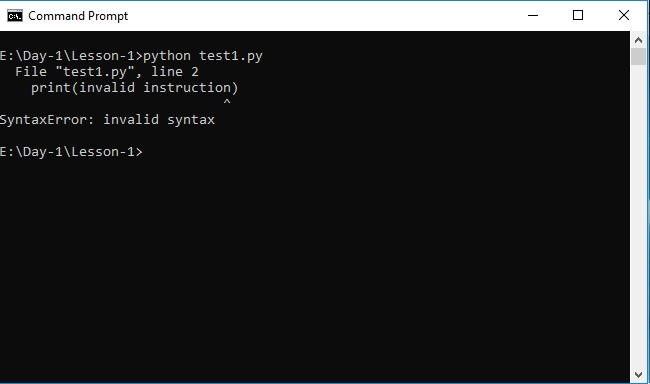
Figure 1.4: Running the file with invalid syntax
The last line tells us what kind of error was raised, that is, a SyntaxError, meaning that our instructions were invalid. The line above it logs out the source line that caused the error, and the first line references our test1.py module where the line is. You'll be seeing different types of errors as you go through this book, and we'll have an in-depth look at errors and exception handling in one of the later chapters. For now, it is important that we understand how to read a stack trace and identify what is causing the error, and then act accordingly to fix it.
To make a script more dynamic, you can have the user provide arguments to it when calling it:
Create a new file called test2.py in the same directory that we created test1.py in. Then, add the following code:
import sys

print("This argument was passed to the script:", sys.argv[1])
Save and run the script as usual, passing it an argument, as illustrated here:
python test2.py foobar
The output should be as follows:
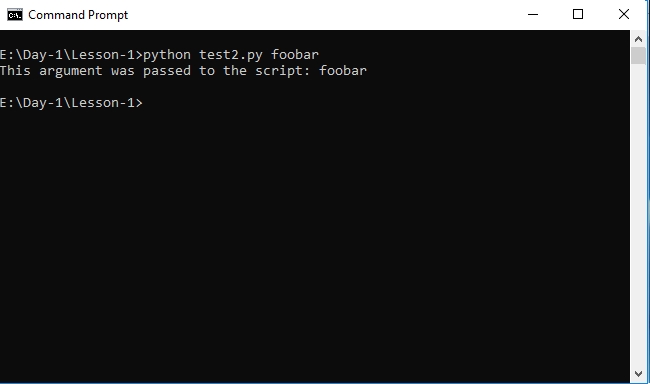
Figure 1.5: Passing arguments to the script
We have some new syntax in this script. We won't go over all of it in detail in this chapter, but for the purposes of this explanation, import sys imports the sys module that's built into Python into our module. This module provides access to Python interpreter functions. For our purposes, we're using it to read command-line arguments that have been passed to the interpreter when invoking our script.
When we call sys.argv[1], we're asking for the first argument that's been passed when running the script. Generally, you can pass as many arguments as you like by separating each argument with a blank space.
In this activity, we will create a name card generator script that, when called with a first name and last name, will generate a name card with the names.
The steps are as follows:
Open your editor and create a script named activity.py.
Use two print statements to print the First name and Last name. Also, use these print statements to print 20 underscores as borders above and below the names.
Two parameters should be passed with the script: one for the first name and the second for the last name.
Run the script by passing two string arguments.
Your output should be similar to the following:
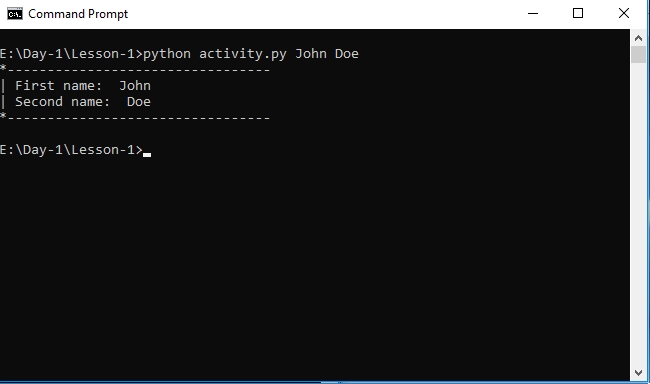
Figure 1.6: Running simple scripts
Note
Python comes with its own IDE (Integrated Development Environment) known as IDLE. IDLE comes with an editor and interactive shell that supports syntax highlighting, a debugger, and a handful of other practical features. Since it comes with your Python installation, it's ready to use immediately and can help improve your productivity as it offers a larger set of capabilities compared to a bare editor and shell. More information about it can be found on the Python website at https://docs.python.org/3/library/idle.html.
As we know, variables are references to values in memory.
Variables in Python can reference values of different data types such as strings, integers, floating point values, Booleans, and different data types and data structures, as we'll see later on in this book. Python, in contrast to statically typed languages such as Java or C++, doesn't require you to pre-declare a variable's data type. It determines the type during runtime.
You can think of a variable as a box with a named label on it. The box on its own has no value but becomes valuable once you put something inside it. The box represents the things inside it and, similarly, a variable is used to represent the value inside it.
Additionally, a variable's value and type can change during runtime. Any variable can be used to store any data type and can be used as long as it has already been defined. Before we begin taking a look at how to assign variables to values, let's briefly go over the different types of values/data types we've encountered thus far and the ones we'll be dealing with in this chapter.
Python supports several different types of values. These values are what variables can be assigned to. Thus far, we've encountered, strings and numeric values such as integers.
Numeric Values – Integers
Mathematically, integers are whole numbers that are either positive or negative. The same definition is applicable for Python integers.
Here is an example of an integer expression in Python. As we saw earlier, Python echoes whatever you write in the interactive shell:
Python 3.6.0 (default, Dec 24 2016, 08:01:42)
[GCC 4.2.1 Compatible Apple LLVM 8.0.0 (clang-800.0.42.1)] on darwin
Type "help", "copyright", "credits" or "license" for more information.
>>> 7
7
>>>
We also saw the different symbols, such as +, *, and -, that can be used to perform different arithmetic operations on the integer values:
>>> 5 + 4 + 6 + 9
24
>>> 5 * 5
25
>>> 42 - 16
26
>>>
We can also check the type of a value by using the type function that's built into Python:
Open the Python interactive shell.
Enter the following code to view the type of the numeric value 7. Observe the output:
>>> type(7)
<class 'int'>
>>>
As you can see, it tells us that the type of 7 is int (short for integer).
Now, enter the following code, and observe the output:
>>> type(4+3)
<class 'int'>
>>>
Enter the following code at the prompt, and observe the output:
>>> type("7")
<class 'str'>
>>>
Enter the following code at the prompt, and observe the output:
>>> type('7')
<class 'str'>
>>>
There are a few other numeric types of values, such as floating-point numbers, but we'll be taking a look at those in the next chapter.
String Values
Another type of value that we've seen in the previous section was a string value. This is a sequence of characters that's placed in between two quotation marks, for example, "January", "Chops Maloy", and 'UB40'. You can use both double and single quotes to denote strings. Strings can contain numbers, letters, and symbols, like so:
>>> type("3 Musketeers")
<class 'str'>
>>> type('First Order')
<class 'str'>
>>>
As you can see, it tells us the type of the value "3 Musketeers" is str (short for string).
Sometimes, you may have a string with an integer inside it or an integer that you want to put in a string. The first scenario often happens with user input where everything is returned inside a string. To be able to use it, we need to convert it to the desired data type.
Python allows you to convert string type values to integer type values and vice versa. Using the built-in str function, you can convert an integer to a string:
>>> str(7)
'7'
>>>
Strings can also be converted to integers, as long as they hold a valid integer value within. This is done by use of the built-in int function:
>>> int("100")
100
>>>
An error occurs if we try converting a string that doesn't contain an integer. Here, the string "Foobar" can't be converted because it's a string of letters. "3.14159" also fails because it is a float, and not an integer:
>>> int("Foobar")
Traceback (most recent call last):
  File "<stdin>", line 1, in <module>
ValueError: invalid literal for int() with base 10: 'Foobar'
>>> int("3.14159")
Traceback (most recent call last):
  File "<stdin>", line 1, in <module>
ValueError: invalid literal for int() with base 10: '3.14159'
>>>
These are the basic types of values we'll be dealing with in this chapter.
In this exercise, we will learn how to assign a value to a variable:
Assign a value to a variable in Python using the following syntax:
>>> number = 7
>>>
Print the variable to the standard output; this should reveal its value:
>>> print(number)
7
>>>
However, if we try using a variable before assigning it a value, the Python interpreter will raise an error. Check this as follows:
>>> del number
>>> print(number)
Traceback (most recent call last):
  File "<stdin>", line 1, in <module>
NameError: name 'number' is not defined
>>>
On the first line, we're using a new statement: del. del unbinds a name/variable (Python refers to variables as names) from the current namespace. Calling del number thus deletes the variable number from the current namespace.
This means that the reference number is removed and no longer points to the value 7. When we try printing out the now nonexistent variable, we get an error stating that the name number is not defined.
We use variables when we have a value in our code that we want to use multiple times. They prevent us from having to repeat that value each time we want to use it, as variables store the values in memory.
When we store values in memory, we can reuse them as many times as we'd like:
Assign the value 7 to the number variable:
>>> number = 7
We can now use this variable for any operations we'd like. Print out the value of the number variable, multiplied by 5:
>>> number * 5
35
Print out number added to 2:
>>> number + 2
9
Print out number divided by 3.5:
>>> number / 3.5
2.0
Print out number subtracted from itself:
>>> number - number
0
Note that, despite having used it, the value of number won't change unless we reassign it. Reassigning 22 to number changes its value and verifies this:
>>> print(number)
7
>>> number = 22
>>> print(number)
22
>>>
You can also assign the resulting value of another operation to a variable. Do this as follows:
>>> number = 7
>>> x = number + 1
>>> x
8
>>>
String values can also be assigned and used in a similar fashion. First, set the message variable to the string "I love Python":
>>> message = "I love Python"
Print out the value of the message variable and add an exclamation point at the end:
>>> message + "!"
'I love Python!'
Print out message plus three exclamation points:
>>> message + "!" * 3
'I love Python!!!'
>>>
Here, we can see the application of a new operation to strings: +. We use this whenever we want to concatenate (add together) two strings.
This only applies to strings, and thus trying to concatenate a string with any other data type will raise an error. We shall look at it in greater depth in the next chapter.
An interesting phenomenon with Python variables is that they are not deeply linked:
>>> x = 1
>>> y = x
>>> x = 2
>>> print(x)
2
>>> print(y)
1
>>>
A behavior you'd expect would be that y being assigned to x would change upon changing x, but it doesn't and stays the same. What do you think is happening?
Since Python variables point to values in memory, when y is assigned to x, it does not make an alias for x but instead points the variable y to where the value of x, 1, is. Changing x changes its pointer from 1 to 2, but y remains pointing to its initial value:

Figure 1.7: Variable assignment
In Python, you can also assign multiple variables in one statement, like so:
>>> a, b, c = 1, 2, 3
>>> print(a)
1
>>> print(b)
2
>>> print(c)
3
>>>
The assignment works so that the first variable, a, is assigned the first value, 1, after the = sign. The second variable, b, is assigned the second value, 2, and the third variable, c, is assigned the third value, 3.
What happens if we try to assign more variables than we pass values?
Python 3.6.0 (default, Dec 24 2016, 08:01:42)
[GCC 4.2.1 Compatible Apple LLVM 8.0.0 (clang-800.0.42.1)] on darwin
Type "help", "copyright", "credits" or "license" for more information.
>>> a, b, c = 1, 2
Traceback (most recent call last):
  File "<stdin>", line 1, in <module>
ValueError: not enough values to unpack (expected 3, got 2)
>>>
The Python interpreter raises an error and tells us it didn't get enough values to assign to the variables we declared in our statement.
A similar error is raised when we try to assign more values than there are variables:
>>> a, b = 1, 2, 3
Traceback (most recent call last):
  File "<stdin>", line 1, in <module>
ValueError: too many values to unpack (expected 2)
>>>
Write a script that will use distance in kilometers and time in hours to calculate and print out speed in kilometers per hour, miles per hour, and meters per second.
Here are some hints:
The formula for calculating speed is distance/time = speed.
To convert kilometers to miles, divide the kilometers by 1.6.
To convert kilometers to meters, multiply the kilometers by 1,000.
To convert hours to seconds, multiply hours by 3,600.
The steps are as follows:
Open your editor.
Create a file named calculate_speed.py and save it.
On the first two lines, declare two variables for the distance in kilometers and time in hours and assign the values 150 and 2, respectively.
In the next two lines, calculate the distances in miles and distance in meters based on the distance in kilometers.
Then, calculate the time in seconds based off the time in hours.
Next, calculate the speed in kilometers per hour, speed in miles per hour, and speed in meters per second.
Finally, add print statements to print out our results.
Save our script and run it by using the python calculate_speed.py command.
The output should look like this:

Figure 1.8: Output of running the calculate_speed.py script
So far, we've learned how variables are used in Python and a few of the different values you can assign to them. We've also learned how to use variables in our programs. In the next section, we will be looking at the rules for naming variables.
Python, like other languages, has a couple of rules on naming identifiers such as variable names, class names, function names, module names, and other objects. Some are strictly enforced by the interpreter, while others are simply by convention, and developers are at liberty to ignore them. The rules and conventions are designed to avoid confusion when the interpreter is parsing through code or to make the code more easily readable by humans.
We'll start off by going through some of the rules for naming variables and other identifiers:
An identifier can consist of upper and lowercase letters of the alphabet, underscores, unicode identifiers, and digits 0 to 9.
Note
As per the Python documentation, you can find the list of permitted unicode identifiers here: https://www.dcl.hpi.uni-potsdam.de/home/loewis/table-3131.html.
An identifier cannot begin with a digit; for example, 7x is an invalid variable name.
No other characters can be in identifiers. This means spaces or any other symbols. Spaces most notably occur in module names as some operating systems will permit filenames with spaces. This should be avoided.
A Python keyword cannot be used in an identifier name, for example, import, if, for, and lambda.
The following are examples of valid variable definitions:
>>> meaning_of_life = 42
>>> COUNTRY = "Wakanda"
>>> Ω = 38.12
>>> myDiv = "<div></div>"
>>> letter6 = "f"
>>>
It should also be noted that Python identifier names are case sensitive. Consider this:
>>> foobar = 5
This is a different variable from the following one:
>>> Foobar = 5
Certain names in Python cannot be used as they are parts of the language syntax. Such words are known as reserved words or keywords. An example of a reserved word is import, which is a statement used for when you want to import a module into your code.
Python has several keywords. To get the full list, perform the following steps:
Open the Python interactive shell:
Python 3.6.0 (default, Dec 24 2016, 08:01:42)
[GCC 4.2.1 Compatible Apple LLVM 8.0.0 (clang-800.0.42.1)] on darwin
Type "help", "copyright", "credits" or "license" for more information.
>>>
In the output, you will see a line saying Type "help", "copyright", "credits" or "license" for more information.
Run help() to open the help utility.
Type keywords in the prompt:
help> keywords
You should see the following output:
Here is a list of the Python keywords. Enter any keyword to get more help.

False               def                 if                  raise
None                del                 import              return
True                elif                in                  try
and                 else                is                  while
as                  except              lambda              with
assert              finally             nonlocal            yield
break               for                 not
class               from                or
continue            global              pass

help>
Quit the help utility by typing quit. This should take you back to the interpreter prompt:
help> quit
You should not use any word from this list of keywords as an identifier name. Note that you don't have to remember them all as the Python interpreter will restrict you from using them.
In the following example, we are trying to use the keyword for, but we get a syntax error upon doing so. The same applies for all keywords:
>>> for = "Elise"
  File "<stdin>", line 1
    for = "Elise"
        ^
SyntaxError: invalid syntax
>>>
Python has several guidelines for naming identifiers that aren't enforced by the interpreter. These guidelines are meant for consistent code and making it more readable. Please note that these are simply guidelines and the programmer is at liberty to ignore them.
It should be counterpointed that ignoring naming conventions eventually leads to a road of regret as they provide several advantages, such as the following:
Makes the code easier to read and understand for other programmers, since they'd find consistent and instantly recognizable patterns
Enhances clarity and reduces ambiguity
Makes automated refactoring easier, as the automation tools would have consistent patterns to look for
Provides additional information about the identifiers; for example, when you see a variable name in all caps, you immediately know that it is a constant
Note
For a more in-depth look at Python naming conventions, visit https://www.python.org/dev/peps/pep-0008/#naming-conventions.
Some of these conventions and guidelines are given here.
Compound variable names should be written in snake_case notation.
Prefer this:
>>> first_letter = "a"
Over this:
>>> firstLetter = "a"  # camelCase
>>> FirstLetter = "a"  # PascalCase
Naming for constants should be written in capital letters to denote that their values are not meant to change. In reality, though, Python has no way of restricting the value of a constant from being changed as they are variables, just like any other:
>>> NUMBER_OF_PLANETS = 8
>>> RADIUS_OF_THE_EARTH_IN_KM = 6371
Note that we can change a constant's value:
>>> NUMBER_OF_PLANETS = 9
>>>
Avoid lower case l or uppercase O as single character variable names, as in some fonts, these letters can be mistaken for 1 and 0, respectively, making the code harder to read.
In the next section, we'll learn about comments, their importance, and how to write them in Python.
Write a script that will calculate the area and circumference of a circle with a radius of 7. In this activity, we'll get better acquainted with variable assignment as well as variable naming conventions.
Here are some hints:
The formula for calculating area is π * r², r being the radius.
The formula for calculating circumference is 2 * π * r.
π can be approximated to 3.14159.
The steps are as follows:
Open your editor.
Create a file named circle.py and save it.
On the first two lines, declare our constant, π (PI), and the radius of the circle with a value of 7.
Write the lines to run our calculations.
Display the results by using print statements.
Save the script and run it by using the python circle.py command.
The output should look like this:

Figure 1.9: Output of running the circle.py script
In this section, we will look at how we can take user input from the keyboard, how to write comments, and the importance of indentation while writing Python code.
Python has a very handy function for obtaining user keyboard input from the CLI called input(). When called, this function allows the user to type input into your program using their keyboard. The execution of your program pauses until the user presses the Enter key after completing the input. The user's input is then passed to your program as a string that you can use. The following is an example of this:
Declare the following variable:
>>> message = input()
The program execution will halt until you input a value and hit the Enter key:
Peter Piper picked a peck of pickled peppers
>>>
The message variable was assigned to the value that we passed. Let's print it out:
>>> print(message)
Peter Piper picked a peck of pickled peppers
>>>
You may have noted that there is no cue that lets us know when to type or what to type. You can pass a prompt to the input function to do this. The prompt is written to standard output without a trailing newline and serves as a cue for the user to pass in their input. Let's view this in action.
Declare the following variable, passing in the prompt Enter a tongue twister: to the input function. This will be displayed to the user:
>>> tongue_twister = input("Enter a tongue twister: ")
Enter a tongue twister:
Let's type in our tongue twister and hit the Enter key. The tongue_twister variable will then be set, and printing it out should reveal the value we passed:
Enter a tongue twister: She sells seashells by the seashore
>>> print(tongue_twister)
She sells seashells by the seashore
>>>
The values returned by the input function are always strings. Sometimes, a string may not be the data type you're expecting in your program. As we saw earlier, you can convert strings to integers using the built-in int function. To retrieve integer values from user input, all your program needs to do is cast the string that is returned as a value by the input function. Let's take a look at an example of this:
>>> number = int(input("Find the square root of: "))
Find the square root of: 49
>>> print("The square root of", number, "is", number ** 0.5 )
The square root of 49 is 7.0
Here, we take the user's input which is a string, convert it to an integer using the int function, and print out its square root.
In this exercise, we will aim to get better acquainted with fetching and using user input as well as practice multiple assignment:
Open your interpreter.
Declare the following variables:
>>> name, hobbies = input("What is your name? "), input("What are your hobbies? ")Type in the values when prompted:
What is your name? John Doe
What are your hobbies? swimming, reading, playing instruments, drawing, programming
>>>
Print out the values of the variables:
>>> print("Your name is", name, "and your hobbies are", hobbies)
Your name is John Doe and your hobbies are swimming, reading, playing instruments, drawing, programming
We can get user input to use in our program in Python by using the built-in input function. You can pass a prompt argument to the input function that'll act as a cue for the user to pass their input. The input function always returns values as strings that we can optionally cast to the data type we desire.
Comments are an integral part of programming.
Comments can be thought of as notes on the code that give us more contextual information about it. They can tell us why certain decisions were made, some improvements that can be made in future, and also explain the business logic. In short, they make the code easier to understand for humans.
There are three different ways to write Python comments, documentation strings (docstrings for short), inline comments, and block comments.
Block and Inline Comments
Block and inline comments start with a pound sign, #. A block comment comes in the line before the statement it annotates and is placed at the same indentation level:
# increment counter
counter = counter + 1
Inline comments are placed on the same line as the statement it annotates:
>>> print(foobar) # this will raise an error since foobar isn't defined
Block comments are applied to the code that follows them and should be indented at the same level as the code it's meant for. While they serve the same purpose as inline comments, block comments are to be preferred by convention as they are more immediately noticeable and unambiguous as to the code they are annotating.
Documentation Strings
A documentation string, or docstring for short, is a literal string used as a Python comment. It is written and wrapped within triple quotation marks; """ or '''. Docstrings are often used to document modules, functions, and class definitions. The following is an example module that's been documented with a docstring. Module docstrings should be put at the beginning of the file:
"""
This script can be called with two integer arguments to return their sum
"""
import sys
num_1  = int(sys.argv[1])
num_2  = int(sys.argv[2])

print(num_1, "+", num_2, "=", num_1 + num_2)
Furthermore, you can also use docstrings to write multiline comments:
"""
This loop goes through all the numbers from 1 to 100
printing each out
"""
for i in range(1, 101):
    print(i)
Sufficiently commenting our code leads to easily maintainable and easier-to-read code. Since we often spend more time reading code than writing it, it is important that we write comments, but even more important is that we write code readable enough to need as few explanations as possible.
A block is a group of statements that are meant to be executed together. Blocks are a fundamental aspect of modern programming languages since flow of control structures (structures that determine the flow of execution of code) are formed from blocks. Blocks allow a set of statements to be executed as though they were a single statement. Different languages represent blocks differently, but most commonly, the following syntax is used:
if (true) {
  // execute this block of statements
} else {
  // execute other block of statements
}
Note
if is a common control flow structure that evaluates Boolean expressions and determines where the program should go.
In the preceding code snippet, a block is denoted by whatever is inside the curly braces. If the condition is true, then execute a certain block of statements; otherwise, execute the other block. Often, blocks can be nested within other blocks.
In Python, statements are grouped using whitespace, that is, blocks are indented within other blocks instead of using curly braces.
Note
Whitespace is any character in a piece of text that occupies space but doesn't correspond to a visible marking.
Observe the following, which is the Python equivalent of the previous code snippet:
if True:
    # execute this block of statements
    print("Block 1")
else:
    # execute other block of statements
    print("Block 2")
Python uses whitespace to denote blocks. Just as blocks are denoted by statements enclosed in curly braces in several other languages, any statement that's indented in Python forms a new block, becoming a child of the previous statement with the parent statement being suffixed with a colon, :. In place of a closing curly brace, a statement that would come after that block would be outdented outside it, as we've seen with the else statement that came after the if block.
Generally, you can use any number of spaces as long as every statement in the block has an equal amount of indentation, although the standard is four spaces:
if True:
    x = 5
    y = x
print(x, y ** 2)If we try running a piece of code without proper indentation, Python will raise an error. Let's take a look at this:
Open your interpreter and type the following:
>>> if True:
Press the Shift + Enter keys to create a new line. The interpreter will show three dots … in place of the usual >>> prompt, which means you're on another line. Type four spaces and then write your statement:
>>> if True:
...     print(1)
We'll then type our last statement with an unequal number of spaces. This should raise an error when we execute it. Create another new line, type three spaces, and write the final statement as follows. Then, press the Enter key to execute the whole snippet:
>>> if True:
...     print(1)
...    print(2)
Executing this should raise the following indentation error:
  File "<stdin>", line 3
    print(2)
           ^
IndentationError: unindent does not match any outer indentation level
This error tells us that the indentation for our last line, which was three spaces, didn't match our first line's indentation, which was four spaces. Indentation for statements in a block is dictated by the first statement's indentation level. To fix this, indent that line in the same way as the first, and it should run normally now:
>>> if True:
...     print(1)
...     print(2)
...
1
2
>>>
Fix the code snippet in the incorrect_indentation.py file from the code bundle to have the appropriate indentation in each block. Once you fix it, run the script in the terminal and verify that you get the output. Don't worry if you don't understand what the code is doing; the goal is to get comfortable with indentations. The incorrect code is also shown here:
>>> if 5 > 2:
...     print("Greater than")
...    x = 5
...   print(x * 2)
... else:
...     print("Less than")
...    print(2)
Here's a hint: Indentation for statements in a block is dictated by the first statement's indentation level.
The output of the correct syntax should be as follows:
Greater than
10
Write a script that takes a number from a user's input and prints out its multiplication table from 1 to 10.
The steps are as follows:
Open your editor.
Create a file named multiplication_table.py and save it.
On the first line, add a docstring explaining what our file does. Then, we'll assign a variable called number to the user's input and cast it to an integer.
Next, print 20 underscores as the top border of the table.
Multiply our number with each number from 1 to 10 and print that out.
Finally, print 20 underscores again for the bottom border of the table, as in step 4.
Save the file and run it by using the python multiplication_table.py command.
The output should look like this:
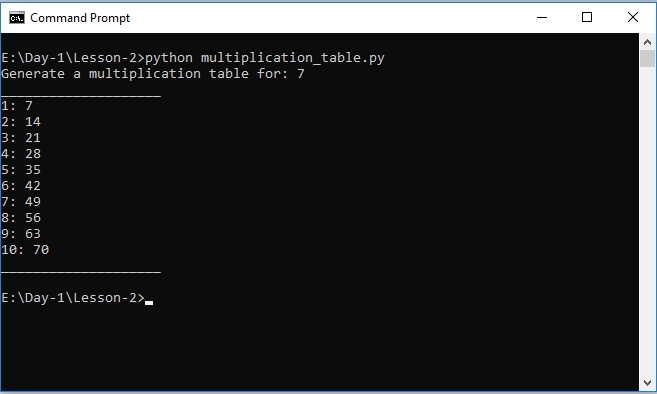
Figure 1.10: Output of running the multiplication_table.py script
In this chapter, we have looked at two ways of running Python programs. We can run commands through the Python interactive shell or by running saved scripts. While you'll mostly find yourself running programs from saved scripts, you will find the freedom and quick gratification of using the interactive shell to run a quick check very convenient. These two methods will come in handy on your Python journey.
We have also covered the Python syntax in detail in this chapter. We started with variable assignment in Python. We looked at the different types of values Python variables can be assigned to, the syntax for assigning them, as well as the importance of reserved keywords in Python.
We then looked at the built-in input function and how it enables us to take input from a user keyboard. We looked at the different ways of writing comments in Python code, and then we finished the chapter by looking at the importance of indentation in writing readable, maintainable Python code.
In the next chapter, we will look at data types such as integers, strings, Booleans, and more.