


In this chapter, you'll learn how to set up and run our own Cassandra cluster. We'll look at the prerequisites that need to be considered before setting up a Cassandra cluster. We'll also see a Cassandra installation layout, so that we can easily locate different configuration files, tools, and utilities later on. We will discuss key configuration options that are required for cluster deployment. Then, we'll run our cluster and use Cassandra tools to verify our cluster status, some stats, and its version.
Apache provides source as well as binary tarballs and Debian packages. However, third-party vendors, such as Datastax, provide MSI installer, Linux RPM, Debian packages, and UNIX and Mac OS X binary in the form of community edition, which is a free packaged distribution of Apache Cassandra by Datastax. Here, we'll cover installation using binary tarball and source tarball packages.
The following are the prerequisites for installing Cassandra:
Hardware requirements: Cassandra employs various caching techniques to enable ultra-fast read operations; hence more memory enables Cassandra to cache more data hence more memory would lead to better performance. Minimum 4GB memory is recommended for development environments and minimum 8GB memory for production environments. If our data set is bigger we should consider upgrading memory used by Cassandra. We'll discuss more about tuning Cassandra memory in later chapters. Similar to memory, more number of CPUs helps Cassandra to perform better as Cassandra performs its task concurrently. For bare-metal hardware, 8-core servers are recommended and for virtualized machines it's recommended that CPU cycles allocated to machines could grow on demand, for example some vendors like Rackspace and Amazon use CPU bursting. For development environments you could use single disk machine, however for production machines ideally there should be at least two disks. One disk is used for commitlog and other for storing data files called SSTables, so that I/O contention doesn't happen for both these operations. The
commitlogfile is used by Cassandra to make write requests durable. Every write request is first written to this file in append only mode and an in memory representation of column family calledmemtable.Java: Cassandra can run on Oracle/Sun JVM, OpenJDK, and IBM JVM. The current stable version of Cassandra requires Java 7 or later version. Set your
JAVA_HOMEenvironment variable to the correct version of Java if you are using multiple Java versions on your machine.Python: The current version of Cassandra requires Python 2.6 or above. Cassandra tools, such as
cqlsh, are based on Python.Firewall configurations: Since we are setting up a cluster, let's see which ports are used by Cassandra on various interfaces. If the firewall blocks these ports because we fail to configure them, then our cluster won't function properly. For example, if the internode communication port is being blocked, then nodes will not be able to join the cluster.
Lets have a look at the following table
Port/Protocol
Configuration file
Configuration name
Firewall setting
Description
7000/tcpcassandra.yamlstorage_portOpen among nodes in the cluster
It acts as an internode communication port in a Cassandra cluster.
7001/tcpcassandra.yamlssl_storage_portOpen among nodes in the cluster
It is a SSL port for encrypted communication among cluster nodes.
9042/tcpcassandra.yamlnative_transport_portBetween the Cassandra client and the cluster
Cassandra clients, for example
cqlsh,or clients using the JAVA driver use this port to communicate with the Cassandra server.9160/tcpcassandra.yamlrpc_portThe Thrift client and the Cassandra cluster
Thrift uses this port for client connections.
7199/tcpcassandra-env.shJMX_PORTBetween the JMX console and the Cassandra cluster
It acts as an JMX console port for monitoring the Cassandra server.
Clock syncronization: Since Cassandra depends heavily on timestamps for data consistency purposes, all nodes of our cluster should be time synchronized. Ensure that we verify this. One of the methods we can use for time synchronization is configuring NTP on each node. NTP (Network Time Protocol) is widely used protocol for clock synchronization of computers over a network.
The following method of installation is less used. One of the cases when we might use this method is if we're doing some optimization work on Cassandra. We'll need JDK 1.7, ANT 1.8, or later versions to compile the Cassandra code. Optionally, we can directly clone from the Cassandra Git repository or we can use the source tarball. Git client 1.7 will be required for cloning git repo.
To obtain the latest source code from Git, use the following command:
$ git clone http://git://git-wip-us.apache.org/repos/asf/cassandra.git Cassandra
For a specific branch, use the following command:
$ git clone -b cassandra-<version> http://git://git-wip-us.apache.org/repos/asf/cassandra.git
Use this command for version 1.2:
$ git clone -b cassandra-2.1.2 http://git://git-wip-us.apache.org/repos/asf/cassandra.git
Then, use the ant command to build the code:
$ ant
Alternatively, if a proxy is needed to connect to the Internet, use the autoproxy flag:
$ ant –autoproxy
or
$ export ANT_OPTS="-Dhttp.proxyHost=<your-proxy-host> -Dhttp.proxyPort=<your-proxy-port>"
Download a binary tarball from the Apache website; open it using the following command. Here, we will extract it in the /opt directory:
$ tar xzf apache-cassandra-<Version>.bin.tar.gz –C /opt
Consider the following example:
$ tar xzf apache-cassandra-2.1.2.bin.tar.gz –C /opt
Optionally, you can create a soft link as a best practice, which will help in scenarios where you need to change the installation location:
$ ln –s apache-cassandra-2.1.2 cassandra
The Cassandra installation layout may be different based on your type of installation. If you're installing using Debian or an RPM package, then the installation creates the required directories and applies the required permissions.
In older versions of Cassandra, you might need to create Cassandra log and data directories before running; by default, they are pointed to /var/lib/cassandra and /var/log/Cassandra. Running Cassandra will fail if the user running Cassandra doesn't have permissions for these paths. You can create and set permissions as shown here:
$ sudo mkdir -p /var/log/Cassandra
$ sudo chown -R `whoami` /var/log/Cassandra
$ sudo mkdir -p /var/lib/Cassandra
$ sudo chown -R `whoami` /var/lib/cassandra
The tarball installation layout is different from RPM or Debian packages. Let's see how they differ.
The following table shows the list of directories and their description:
The following table describes the installation layout if you use RPM or Debian packages:
|
Directory |
Description |
|---|---|
|
|
This is the data directory. |
|
|
This is the log directory. |
|
|
This is the runtime file location, for example, the PID file. |
|
|
This is the home of the include file |
|
|
This is Cassandra's Java dependency folder; JAR files are placed here. |
|
|
This is the home of tools and utilities such as |
|
|
This is the home of the configuration. |
|
| |
|
|
Now, let's look at some key configuration files and the options that we can configure in them:
The configuration files are as follows:
Cluster configurations
cluster_name: This is the identification string for a logical cluster. All nodes in a cluster must have the same value for this configuration.Default value: The default value is
Test Cluster.listen_address: The Cassandra node will bind to this address. The other nodes in the cluster can communicate with this node if it is set correctly; leaving it to default will cause a failure in this node's communication with other nodes as default value is loopback addresslocalhosthence node will not be able to communicate with other nodes running on different machines.Default value: The default value is
localhost.seed_provider: The seed node helps Cassandra nodes to learn about other nodes in the cluster and ring topology usingGossipprotocol. We'll learn more about Gossip protocol in later chapters. It has two suboptions, one isclass_nameand the other is number of seeds. The default seeding class takes a comma-delimited list of node addresses. In a multinode cluster, the seed list should have at least one node. This list should be common for all nodes.Default value: The default value is
-class_name:org.apache.cassandra.locator.SimpleSeedProvider-seeds: "127.0.0.1".Data partitioning
num_tokens: This configuration defines the number of random tokens this node will hold, hence defining the partitioning ranges that this node can hold. This is a relative configuration. For example, if a node hasnum_tokensas128while another node has256, then it means that the second node is handling twice the data partition ranges than the first node is handling.Default value: The default value is
256.partitioner: This defines the data partition algorithm used in the Cassandra cluster. The current default algorithm—Murmur3— is very fast and is considered as a good data partition algorithm as compared to its predecessors. So, while forming a new cluster, you should go with the default value, which isorg.apache.cassandra.dht.Murmur3Partitioner.Storage configurations
data_file_directories: Using this configuration option, we can set the data storage location.Default value: The default value is
$CASSANDRA_HOME/data/data/var/lib/cassandra/datain older versions.commitlog_directory: This is the location in HDD where Cassandra will storecommitlog.Default value: The default value is
$CASSANDRA_HOME/data/commitlog /var/lib/cassandra/commitlogin older versions.Tip
If using non-SSDs, you should have a separate disk for storing
commitlog. Commit logs are append-only logs, however data files are random seeks in nature; so, using the same disk will affect the write performance of commit logs. Also, commit logs disks can be smaller in size. As thecommitlogspace is reusable once flushed to Disk from Memtable.saved_caches_directory: This is the location where cached rows, partition keys, or counters will be saved to disk after a certain duration of time.Default value: The default value is $CASSANDRA_HOME/data/saved_caches/var/lib/cassandra/saved_caches
Client configurations
rpc_address: This is the thrift RPC service bind interface. You should set it appropriately; using the default won't allow connections from outside the node.Default value: The default value is
localhost.rpc_port: This acts as a thrift service port.Default value: The default value is
9160native_transport_port: This is the port on which the CQL native transport will listen for clients; for example,cqlshor Java Driver. This will userpc_addressas the connection interface.Default Value: The default value is
9042.Security configurations
authenticator: This configuration is used to specify whether you want to use a password-based authentication or none. For password-based authentication,authenticatorshould be set toPasswordAuthenticator. IfPasswordAuthenticatoris used, a username and hashed password are saved in thesystem_auth.credentialstable.Default value: The default value is
AllowAllAuthenticator, which means no authentication.authorizer: This configuration is used if you want to limit permissions to Cassandra objects, for example, tables. To enable authorization, set its value toCassandraAuthorizer. If enabled, it stores authorization information in thesystem_auth.pemissionstable.Default value: The default value is
AllowAllAuthorizer, which means authorization disabled.cassandra-env.shThis file can be used to fine-tune Cassandra. Here, you can set/tune a Java environement variable such as
MAX_HEAP_SIZE,HEAP_NEWSIZE, andJAVA_OPTS.cassandra-in.shHere, you can alter the default values for environment variables such as
JAVA_HOME,CASSANDRA_HOMEandCLASSPATH. Its location is in$CASSANDRA_HOME/bin/in binary tarball installations. Package-based installations put this file inside the/user/share/cassandradirectory.cassandra-rackdc.propertiesThe rack and data center configurations for a node are defined here. The default datacenter is
DC1and the default rack isRAC1.cassandra-topology.propertiesThis file contains mapping of Cassandra node IPs to data center and racks.
logback.xmlThis file lets you configure the logging properties of Cassandra's
system.log. It is not available in older versions of Cassandra.
Now that we know the prerequisites, let's quickly check the language dependencies:
We can check the Java version using the following code:
$ java –version
java version "1.7.0_45"
The Python version can be checked using this command:
$ python –version
Python 2.6.6
Since we're running only single node, we can skip configurations and directly start our node. Run the Cassandra node using the command for tarball installation:
$ bin/Cassandra
We can stop the server by using the following command:
$ pgrep -u `whoami` -f cassandra | xargs kill -9
Sometimes, we might want to run a Cassandra node in the foreground for debugging purposes, then we'll run it with –f flag:
$ bin/cassandra –f
To stop, press Ctrl + C.
For package-based installations, use the following commands to start and stop, respectively:
$ sudo service Cassandra start
$ sudo service Cassandra stop
Wohooo!! Our node is running, let's check our Cassandra server version:
$nodetool version
ReleaseVersion: 2.1.2
Let's set up a three-node cluster with the IPs 127.0.0.1, 127.0.0.2 and 127.0.0.3. So, our Cassandra.yaml for each node will look like this:
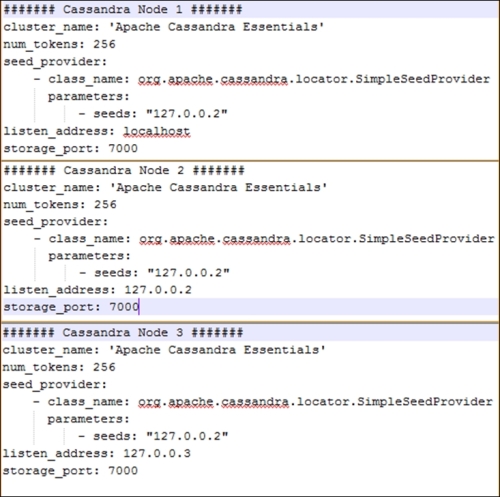
Since all our nodes are the same from a hardware configuration perspective, we used num_tokens: 256 for all of them. The second node with an IP address of 127.0.0.2 acts as a seed node.
Additionally, we can set rpc_address and native_transport_ports for each node so that our Java client can connect to our nodes.
Now, we'll run the Cassandra server on each node using as discussed in the previous section, and our cluster with three nodes is ready.
Now that our cluster is up and running, let's check its status. We can use the Cassandra tool called nodetool to check the status:
$ nodetool status
Datacenter: datacenter1
=======================
Status=Up/Down
|/ State=Normal/Leaving/Joining/Moving
--  Address        Load       Tokens  Owns    Host ID
Rack
UN  127.0.0.1   171.88 MB     256     ?       940ba0cf-b75a-448c-a15e-40e05efbeb34  rack1
UN  127.0.0.2   141.12 MB     256     ?       4b728c3c-c545-4e4d-b1aa-2f66ef6bdce  rack1
UN  127.0.0.3   174.71 MB     256     ?       d63a18c4-0d2c-4574-8f66-c4eb1e5ca5a8  rack1
Note: Non-system keyspaces don't have the same replication settings, effective ownership information is meaningless
The first character in the status, which is U in our example, denotes the node's status whether it is Up (U) or Down (D). The second character tells us about the state of the joining cluster; it can be Normal (N), Leaving (L), Joining (J), or Moving (M). In our example, every node in the cluster is Up (U) and in the Normal (N) state. So, the first column is UN for each node. It also tells us about the data center in which our node lies. In our example, all the nodes lie in 'DataCenter 1' and rack 'rack1'.
Now, let's use the nodetool info command to check the individual node statistics such as its uptime, caching details, load details, and so on. We'll discuss Cassandra caching in detail in Chapter 4, Read and Write – Behind the Scenes:
$ nodetool info
ID               : 2f9bb0a9-db48-4146-83c6-4ce06bd22259
Gossip active    : true
Thrift active    : true
Native Transport active: true
Load             : 179.4 MB
Generation No    : 1422937400
Uptime (seconds) : 593431
Heap Memory (MB) : 474.63 / 920.00
Data Center      : datacenter1
Rack             : rack1
Exceptions       : 0
Key Cache        : entries 226, size 23.07 KB, capacity 45 MB, 4714 hits, 5006 requests, 0.942 recent hit rate, 14400 save period in seconds
Row Cache        : entries 0, size 0 bytes, capacity 600 MB, 0 hits, 0 requests, NaN recent hit rate, 3000 save period in seconds
Counter Cache    : entries 0, size 0 bytes, capacity 22 MB, 0 hits, 0 requests, NaN recent hit rate, 7200 save period in seconds
Token            : (invoke with -T/--tokens to see all 256 tokens)
Cassandra can be installed via various methods. We can install it on different platforms based on our requirements. However, platforms based on *NIX are very popular for production deployments. While deploying, we should consider various configuration options based on our deployment type. There are the configuration options that are used for performance tuning; we'll uncover more options later. The Cassandra nodetool is very handy to monitor and debug clusters and column families. We discussed some of them in this chapter.
In the next chapter, we'll see more of the nodetool options in more detail.