1. JavaScript, HTML, and the DOM
Learning Objectives
By the end of this chapter, you will be able to:
- Describe the HTML Document Object Model (DOM)
- Use the Chrome DevTools source tab to explore the DOM of a web page
- Implement JavaScript to query and manipulate the DOM
- Build custom components using Shadow DOM
In this chapter, we will learn about the DOM and how to interact with and manipulate it using JavaScript. We will also learn how to build dynamic applications using reusable custom components.
Introduction
HTML started as a markup language for static documents that was easy to use and could be written using any text editor. After JavaScript became a major player in the internet world, there was a need to expose the HTML documents to the JavaScript runtime. That's when the DOM, was created. The DOM is HTML mapped to a tree of objects that can be queried and manipulated using JavaScript.
In this chapter, you'll learn what the DOM is and how to use JavaScript to interact with it. You'll learn how to find elements and data in a document, how to manipulate elements states, and how to modify their content. You'll also learn how to create DOM elements and append them to a page.
After learning about the DOM and how to manipulate it, you'll build a dynamic application using some sample data. Lastly, you'll learn how to create custom HTML elements to build reusable components using Shadow DOM.
HTML and the DOM
When a browser loads an HTML page, it creates a tree that represents that page. This tree is based on the DOM specification. It uses tags to determine where each node starts and ends.
Consider the following piece of HTML code:
<html>
  <head>
    <title>Sample Page</title>
  </head>
  <body>
    <p>This is a paragraph.</p>
    <div>
      <p>This is a paragraph inside a div.</p>
    </div>
    <button>Click me!</button>
  </body>
</html>
The browser will create the following hierarchy of nodes:
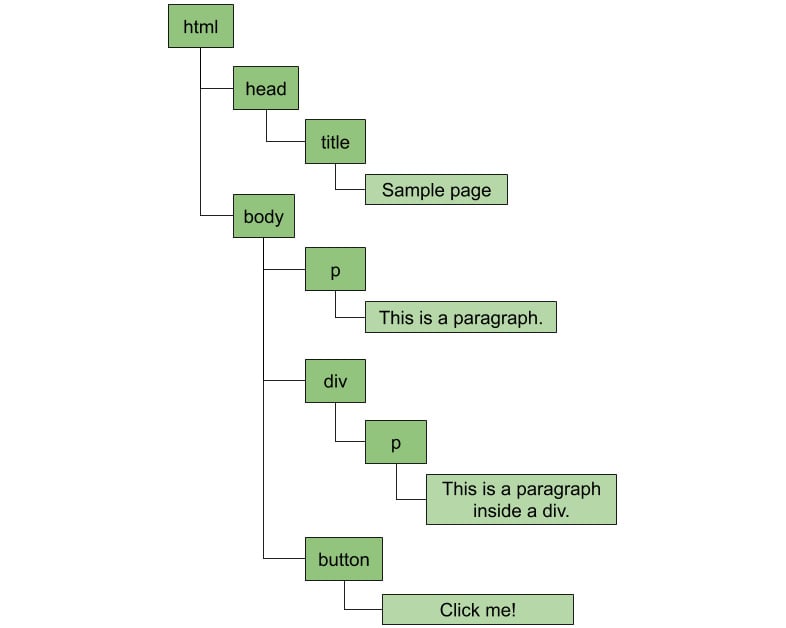
Figure 1.1: A paragraph node contains a text node
Everything becomes a node. Texts, elements, and comments, all the way up to the root of the tree. This tree is used to match styles from CSS and render the page. It's also transformed into an object and made available to the JavaScript runtime.
But why is it called the DOM? Because HTML was originally designed to share documents and not to design the rich dynamic applications we have today. That means that every HTML DOM starts with a document element, to which all elements are attached. With that in mind, the previous illustration of the DOM tree actually becomes the following:

Figure 1.2: All DOM trees have a document element at the root
What does it mean when I say that the browser makes the DOM available to the JavaScript runtime? It means that if you write some JavaScript code in your HTML page, you can access that tree and do some pretty interesting things with it. For example, you can easily access the document root element and access all of the nodes on a page, which is what you're going to do in the next exercise.
Exercise 1: Iterating over Nodes in a Document
In this exercise, we'll write JavaScript code to query the DOM to find a button and add an event listener to it so that we can execute some code when the user clicks on it. When the event happens, we'll query for all paragraph elements, count and store their content, then show an alert at the end.
The code files for this exercise can be found at https://github.com/TrainingByPackt/Professional-JavaScript/tree/master/Lesson01/Exercise01.
Perform the following steps to complete the exercise:
- Open the text editor of your preference and create a new file called
alert_paragraphs.htmlcontaining the sample HTML from the previous section (which can be found on GitHub: https://bit.ly/2maW0Sx):<html> <head> <title>Sample Page</title> </head> <body> <p>This is a paragraph.</p> <div> <p>This is a paragraph inside a div.</p> </div> <button>Click me!</button> </body> </html>
- At the end of the
bodyelement, add ascripttag such that the last few lines look like the following:</div> <button>Click me!</button> <script> </script> </body> </html>
- Inside the
scripttag, add an event listener for the click event of the button. To do that, you query the document object for all elements with thebuttontag, get the first one (there's only one button on the page), then calladdEventListener:document.getElementsByTagName('button')[0].addEventListener('click', () => {}); - Inside the event listener, query the document again to find all paragraph elements:
const allParagraphs = document.getElementsByTagName('p'); - After that, create two variables inside the event listener to store how many paragraph elements you found and another to store their content:
let allContent = "";
let count = 0;
- Iterate over all paragraph elements, count them, and store their content:
for (let i = 0; i < allParagraphs.length; i++) { const node = allParagraphs[i]; count++; allContent += `${count} - ${node.textContent}\n`; } - After the loop, show an alert that contains the number of paragraphs that were found and a list with all their content:
alert(`Found ${count} paragraphs. Their content:\n${allContent}`);You can see how the final code should look here: https://github.com/TrainingByPackt/Professional-JavaScript/blob/master/Lesson01/Exercise01/alert_paragraphs.html.
Opening the HTML document in the browser and clicking the button, you should see the following alert:
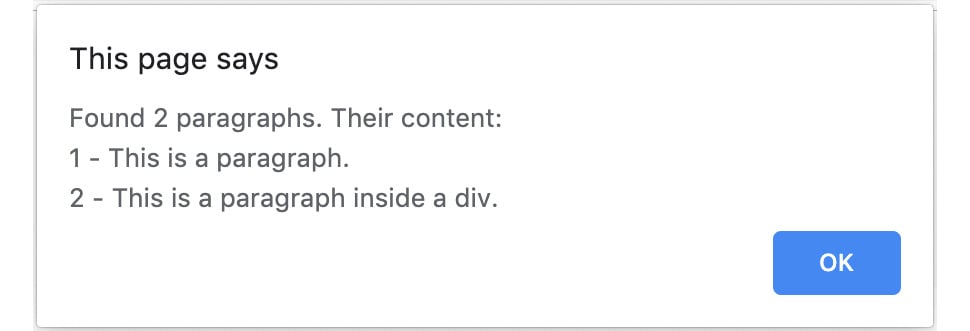
Figure 1.3: Alert box showing information about paragraphs on the page
In this exercise, we wrote some JavaScript code that queried the DOM for specific elements. We collected the contents of the elements to show them in an alert box.
We're going to explore other ways to query the DOM and iterate over nodes in later sections of this chapter. But from this exercise, you can already see how powerful this is and start imagining the possibilities this opens up. For example, I frequently use this to count things or extract data that I need from web pages all around the internet.
Developer Tools
Now that we understand the relationship between the HTML source and the DOM, we can explore it in more detail using a very powerful tool: browser developer tools. In this book, we're going to explore Google Chrome's DevTools, but you can easily find equivalent tools in all other browsers.
The first thing we're going to do is explore the page we created in the previous section. When you open it in Google Chrome, you can find the developer tools by opening the Chrome menu. Then select More Tools and Developer Tools to open the developer tools:
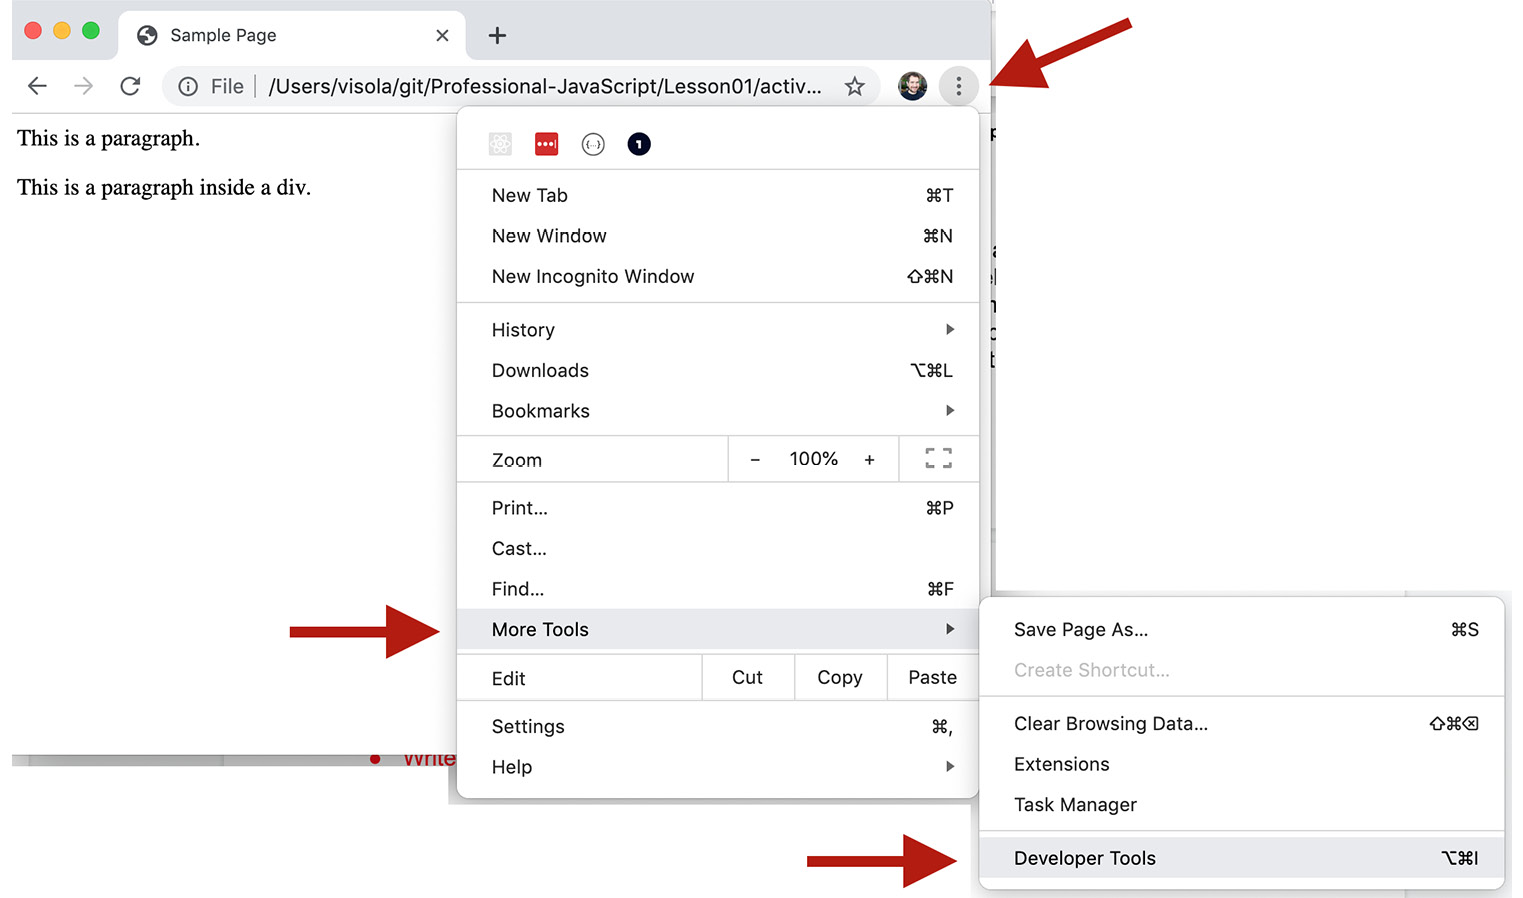
Figure 1.4: Accessing the developer tools in Google Chrome
Developer Tools will open a panel at the bottom of the page:
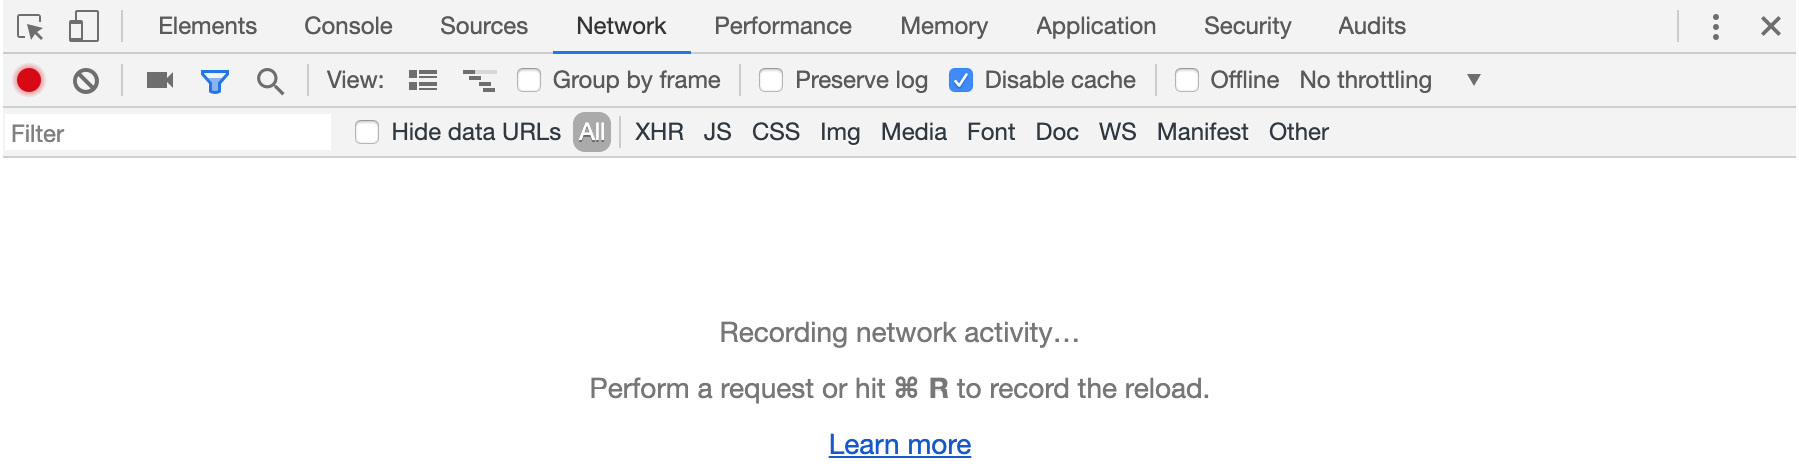
Figure 1.5: Google Chrome DevTools panel when open
You can see at the top the various tabs that provide different perspectives on what's happening on the loaded page. For this chapter, we're going to be focusing mostly on three tabs:
- Elements – Shows the DOM tree as the browser sees it. You can check how the browser is looking at your HTML, how CSS is being applied, and what selectors activated each style. You can also change the state of the nodes to simulate specific states such as
hoverorvisited:
Figure 1.6: View of the Elements tab
- Console – Gives access to a JavaScript runtime in the context of the page. The console can be used after loading the page to test short snippets of code. It can also be used to print important debugging information:

Figure 1.7: View of the Console tab
- Sources – Shows all the source code loaded for the current page. This view can be used to set breakpoints and start a debugging session:

Figure 1.8: View of the Sources tab
Select the Elements tab and you'll see the DOM tree for the current document:

Figure 1.9: DOM tree viewed inside the Elements tab in Chrome DevTools
Exercise 2: Manipulating the DOM from the Elements Tab
To get a sense of how powerful this tool is, we'll make some changes to the page from Exercise 1, Iterating over Nodes in a Document. We'll add a new paragraph to it and remove an existing one. Then, we'll use the Styles sidebar to change some styles of the element.
Perform the following steps to complete the exercise:
- To start, right-click the
bodyelement and select Edit as HTML:
Figure 1.10: Editing the body element as HTML
- That will change the node to a textbox that you can type in. Under the first paragraph, add another one with the text Another paragraph. It should look like the following:

Figure 1.11: Add a new paragraph in the body of the HTML
- Press Ctrl + Enter (or Cmd + Enter on a Mac) to save your changes.
- Click the Click me! button again and you should see that the new paragraph and its contents are now shown in the list:

Figure 1.12: Alert showing the content of all paragraphs, including the one added to the page
- You can also play around with the styles of the elements and see the changes reflected live on the page. Let's change the background to black and the color to white for the first paragraph. First, we select it on the DOM tree by clicking on it; it will turn blue to indicate that it is selected:

Figure 1.13: DOM element selected on the Elements tab
- Now, on the right-hand side, you will see the Styles tab. It contains the styles already applied to the element and one empty placeholder for styles for the element. Clicking on it, you'll get an input box. Type background: black, hit Enter, and then type color: white, and hit Enter again. You'll see that the element changes as you type. In the end, it will look like the following:

Figure 1.14: The styled paragraph on the left and the applied styles on the right
- You can also create a new CSS rule to apply to the page by clicking on the new rule button at the top right of the Styles tab:

Figure 1.15: When you click to add a new rule, it will add a new rule based on the element selected – a paragraph, in this case
- Let's add similar rules to affect all paragraphs by typing background: green, pressing Enter, entering color: yellow, and then press Enter. Now all paragraphs with the exception of the first will have a green background with yellow text. This is how the page should look now:
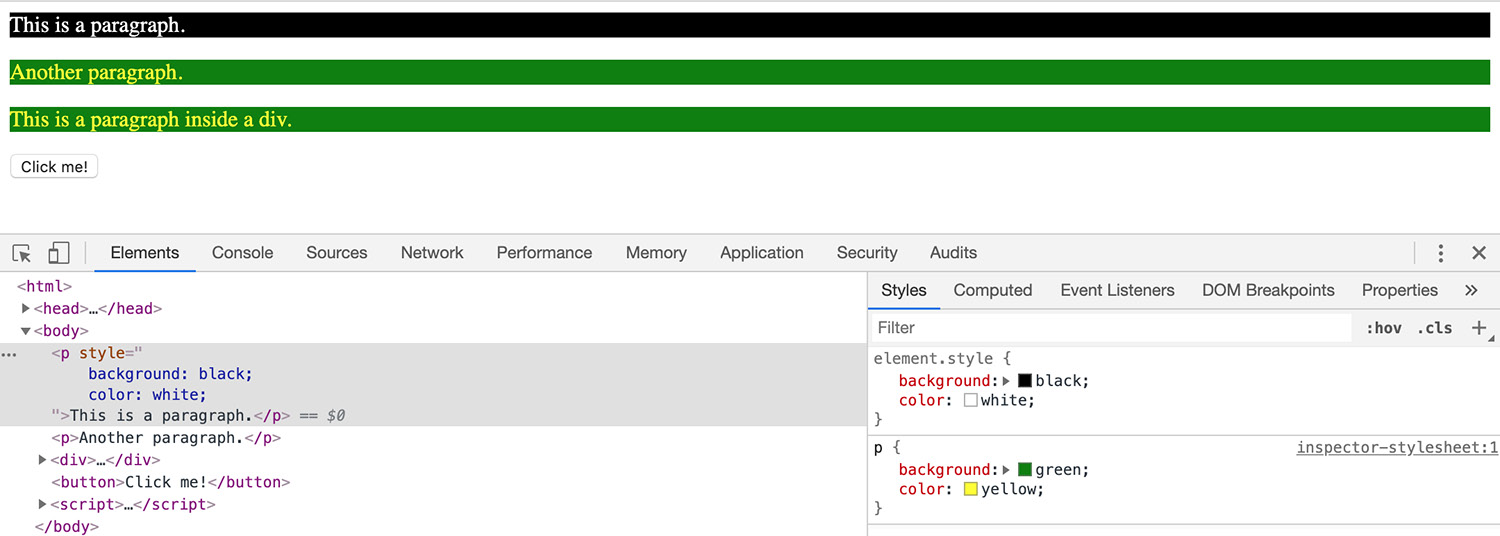
Figure 1.16: Adding rules to a paragraph
In this exercise, you changed the DOM from a page and saw the changes reflected live. You added elements to the page, changed the style of one element, and then added a new CSS rule to affect a wider group of elements.
Manipulating the DOM in real-time like this is really useful for situations where you're trying to figure out a layout and test some code that iterates or manipulates DOM elements. In our case, we could easily test what would happen if we added a new paragraph element to the page.
Exercise 3: Debugging Code from the Sources Tab
We mentioned previously that you can debug your code from the Sources tab. To do that, you just need to set a breakpoint and ensure that the code passes through that point. For this exercise, we'll explore the Sources tab while debugging our code.
Perform the following steps to complete the exercise:
- The first thing you'll need to do is select the Sources tab in the Developer Tools panel. Then, open the one source file we have so far. You do that by clicking on it in the left-hand side panel:

Figure 1.17: Sources tab showing where to find your source files
- To set a breakpoint in the source, you click on the gutter where the line numbers are, at the line you want to set a breakpoint at. For this exercise, we'll set a breakpoint at the first line inside the event handler. A blue arrow-like symbol will appear on that line:

Figure 1.18: Breakpoints show as arrow-like markers on the gutter of the source file
- Click the Click me! button on the page to trigger the code execution. You'll notice that two things happen – the browser window freezes and there's a message indicating that the code is paused:

Figure 1.19: The browser pauses the execution when it hits a breakpoint
- Also, the line of code being executed gets highlighted in the Sources tab:

Figure 1.20: Execution paused in the source code, highlighting the line that will be executed next
- In the side panel, notice the currently executing stack and everything that's in the current scope, both globally and locally. This is the view of the right-hand panel, showing all the important information about the running code:

Figure 1.21: The right-hand side of the Sources tab shows the execution context and stack trace of the currently paused execution
- The bar at the top can be used to control code execution. This is what each button can do:
 The play button ends the pause and continues execution normally.
 The step over button executes the current line through completion and pauses again at the next line.
 The step in button will execute the current line and step in any function call, which means it will pause at the first line inside any function being called on that line.
 The step out button will execute all of the steps required to exit the current function.
 The step button will execute the next action. If it's a function call, it will step in. If not, it will continue execution on the next line.
 - Press the step over the button until the execution gets to line 20:

Figure 1.22: The highlighted line shows the execution paused for debugging
- In the Scope panel on the right-hand side, you'll see four scopes: two scopes for Block, then one Local and one Global. The scopes will vary depending on where you are in the code. In this case, the first Block scope includes only what's inside the
forloop. The second Block scope is the scope for the whole loop, including the variable defined in theforstatement. Local is the function scope and Global is the browser scope. This is what you should see:
Figure 1.23: The Scope panel shows all the variables in the different scopes for the current execution context
- Another interesting thing to notice at this point is that if you hover your mouse over a variable that is an HTML element in the current page, Chrome will highlight that element in the page for you:
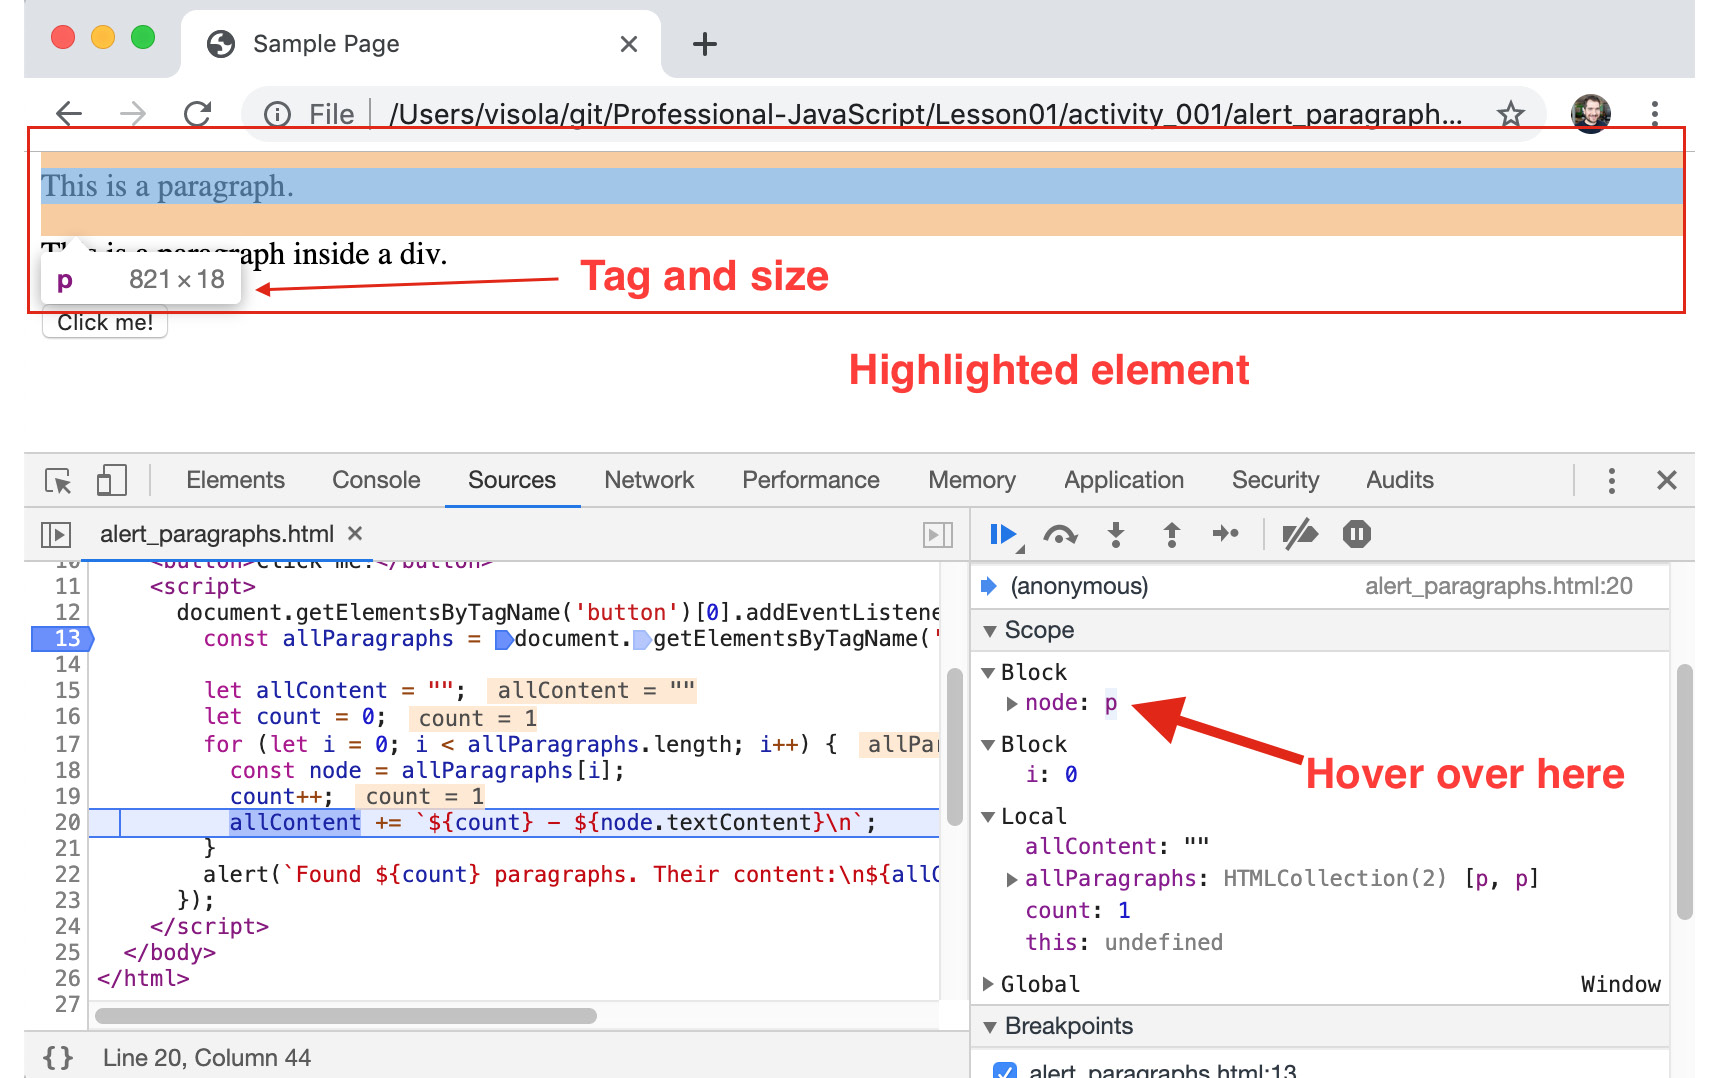
Figure 1.24: Chrome highlights DOM elements when you hover over them in various places
Debugging code using the Sources tab is one of the most important things you'll do as a web developer. Understanding how the browser sees your code and what the values of variables in each line are is the easiest way to get to the root of problems in complex applications.
Note
In-line values: As you step over the code in the Sources tab while debugging, you'll notice that Chrome adds some light-orange highlights on the side of each line, showing the current values for variables that are being affected in that line.
The Console Tab
Now that you know how to traverse and manipulate the DOM tree in the Elements tab, as well as how to explore and debug code in the Sources tab, let's explore the Console tab a bit.
The Console tab can help you to debug issues and also explore and test code. To understand what it can do, we'll use the sample storefront in the Lesson01/sample_002 folder in the code repository for this book.
Opening the storefront page, you can see that it's a store for food products. This is how it looks:
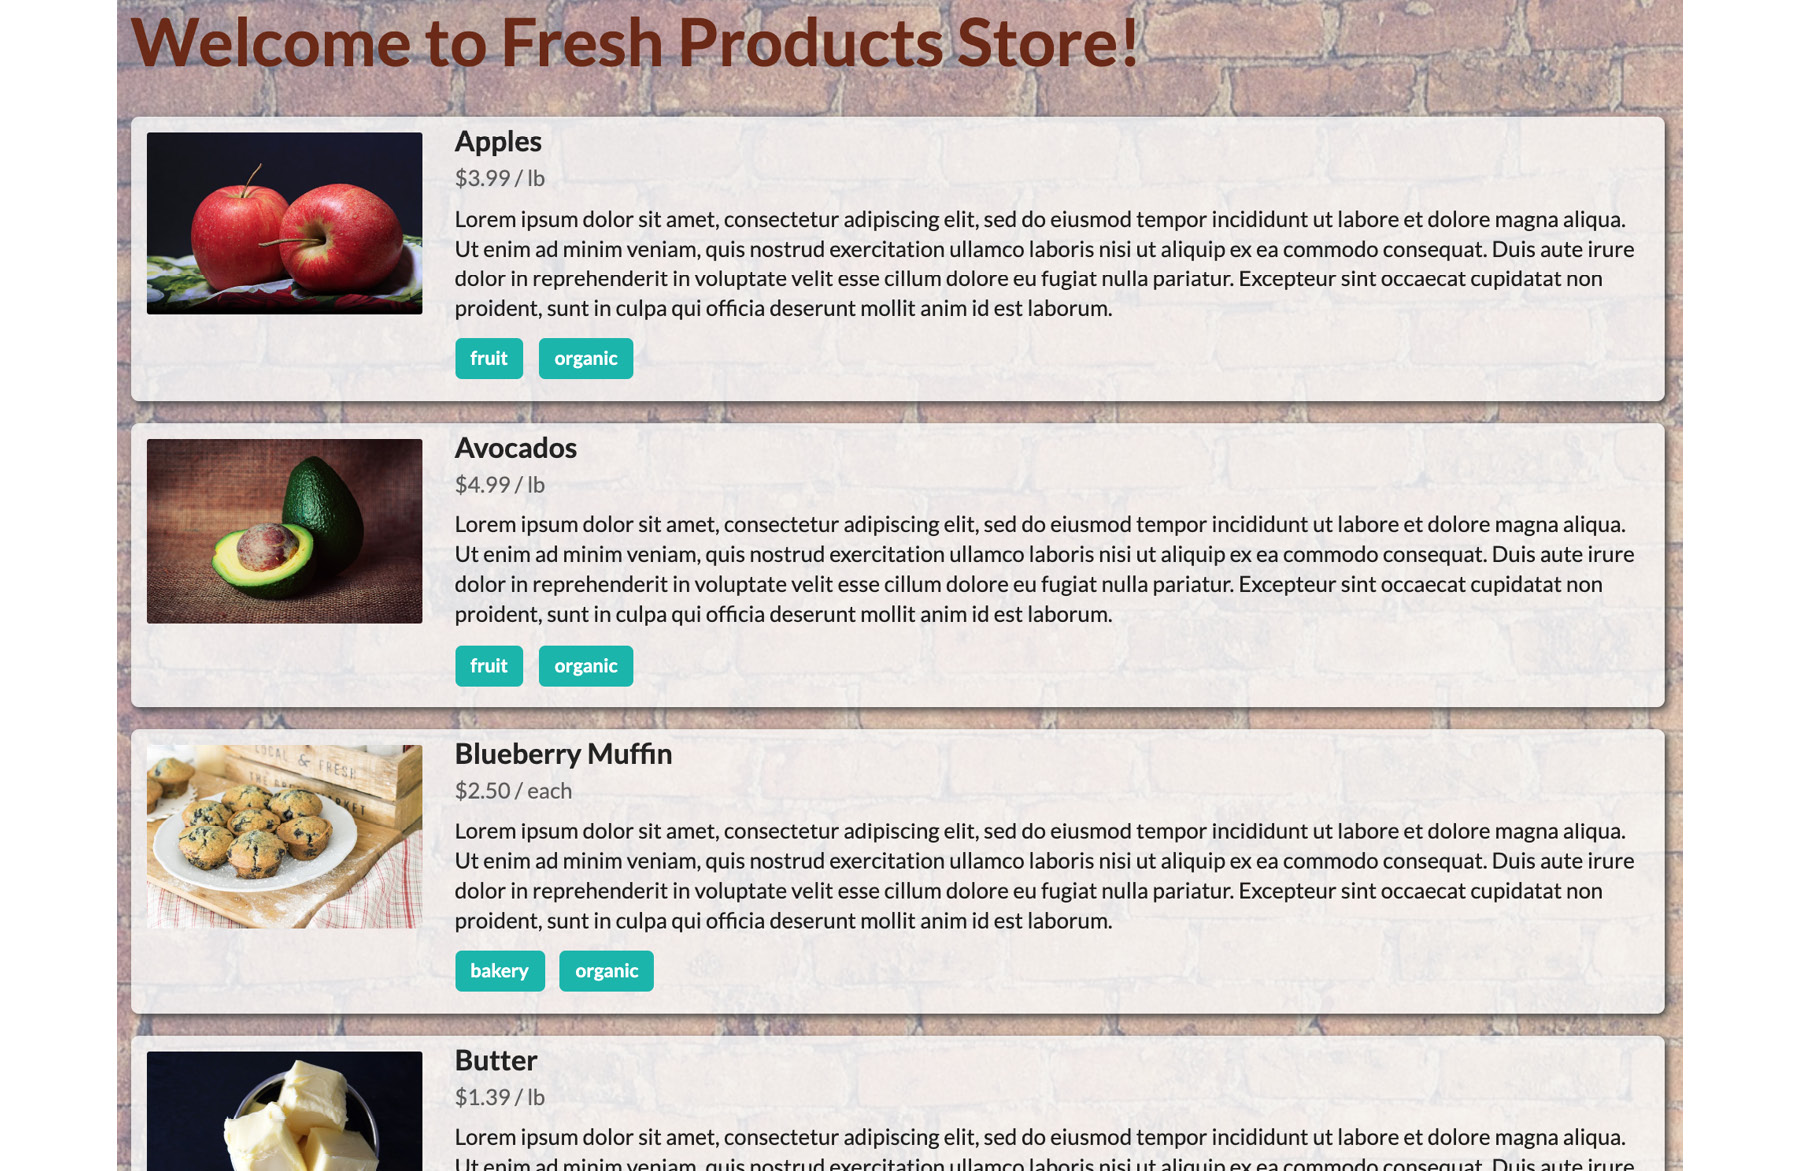
Figure 1.25: Screenshot of the storefront sample page
Underneath the hood, you can see that the DOM is very simple. It has a section element, which contains all the page content. Inside, it has a div tag with class items that represent the list of products and a div with a class item for each product. Looking in the Elements tab, this is what you would see:
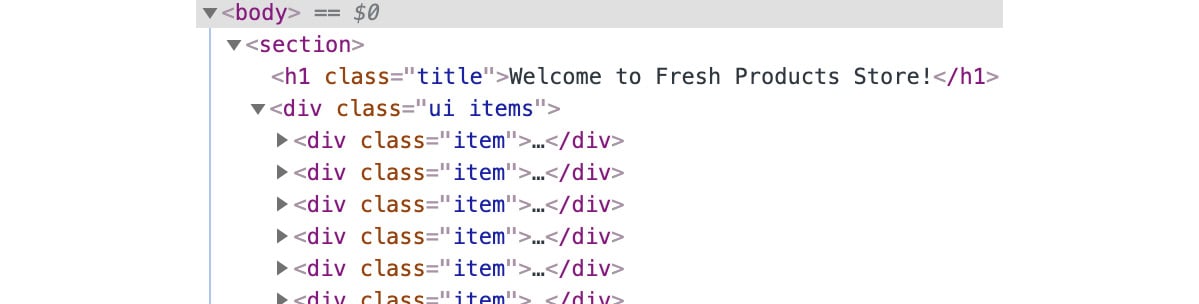
Figure 1.26: The DOM tree for the storefront page is very simple
Back to the Console tab: you can run a few queries in this DOM to learn more about the elements and the content. Let's write some code to list the prices for all of the products. First, we need to find where in the DOM tree the price is. We could look at the Elements tab, but for now, we'll just stick to the Console tab to learn more. Running the following code in the Console tab would print an HTMLCollection object with 21 items in it:
document.getElementsByClassName('item')
Let's unwrap the first one and see what's inside:
document.getElementsByClassName('item')[0]
Now you see that Chrome printed one DOM element, and if you hover over it, you'll see it highlighted on the screen. You can also open the mini DOM tree that is shown in the Console tab to see what the element looks like, just like in the Elements tab:

Figure 1.27: The Console tab printing elements from the DOM
You can see that the price is inside a span tag. To fetch the price, you can query an element just like you query the root document.
Note: Autocomplete and previous commands
In the Console tab, you can use autocomplete based on the current context by pressing Tab and quickly access previous commands by pressing the up/down arrow keys.
Run the following code to fetch the price of the first product in the list:
document.getElementsByClassName('item')[0]
  .getElementsByTagName('span')[0].textContent
The price of the product will show in the console as a string:

Figure 1.28: Querying for the DOM element that contains the price and fetching its content
Activity 1: Extracting Data from a Page
Suppose you're writing an application that needs the products and prices from Fresh Products Store. The store doesn't provide an API and its products and prices change about once a week – not frequent enough to justify automating the whole process, but also not slow enough that you could do it once manually. You also don't want to go through much trouble if they change the way their site looks.
You want to provide the data for your application in a way that is simple to generate and parse. You finally conclude that the simplest way to do that is to generate a CSV that you can feed to your application.
In this activity, you'll write some JavaScript code that can be pasted inside the Console tab in the storefront page and use that to extract data from the DOM, printing it as a CSV that you can copy and paste for your application to consume.
Note: Long code in the Console tab
When writing long snippets of code in the Chrome console, I recommend doing it inside a text editor and then pasting it when you want to test it. The console is not bad when editing the code, but it's easy to mess things up while trying to modify long codes.
The following are the steps to perform:
- Initialize a variable to store the entire content of the CSV.
- Query the DOM to find all the elements that represent each product.
- Iterate over each element found.
- From the
productelement, the query to find the price with the unit. Split the string using a slash. - Again, from the
productelement, query for the name. - Append all information to the variable initialized in step 1, separating the values with commas. Don't forget to add newline characters to each line you append.
- Print the variable containing the accumulated data using the
console.logfunction. - Run the code in the Console tab with the storefront page open.
You should see the following content in the Console tab:
name,price,unit
Apples,$3.99,lb
Avocados,$4.99,lb
Blueberry Muffin,$2.50,each
Butter,$1.39,lb
...
Note
The solution for this activity can be found on page 582.
In this activity, you were able to use the Console tab to query an existing page to extract data from it. Sometimes, extracting data from a page is very complicated and scraping can get very brittle. Depending on how frequently you'll need data from the page, it might be easier to run a script from the Console tab instead of writing a full-fledged application.
Nodes and Elements
In previous sections, we learned about the DOM and how to interact with it. We saw that there's a global document object in the browser that represents the root of the tree. Then, we observed how to query it to fetch nodes and access their content.
But while exploring the DOM in the previous sections, there were some object names, attributes, and functions that were accessed and called without introduction. In this section, we'll dig deeper into those and learn how to find the available properties and methods in each of those objects.
The best place to find documentation about what's going to be discussed in this section is the Mozilla Developer Network web documentation. You can find that at developer.mozilla.org. They have detailed documentation about all the JavaScript and DOM APIs.
The node is where everything starts. The node is an interface that represents in the DOM tree. As mentioned before, everything in the tree is a node. All nodes have a nodeType property, which describes what type of node it is. It is a read-only property with a value that is a number. The node interface has a constant for each of the possible values. The most frequently seen node types are the following:
Node.ELEMENT_NODE– HTML and SVG elements are of this type. In the storefront code, if you fetch thedescriptionelement from the product, you'll see itsnodeTypeproperty is1, which means it's an element:

Figure 1.29: The description element node type is Node.ELEMENT_NODE
This is the element we fetched from the DOM as viewed in the Elements tab:
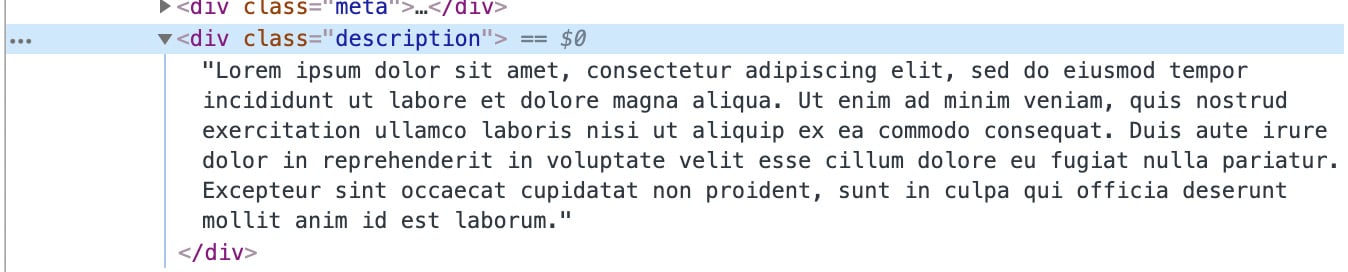
Figure 1.30: The description node as seen in the Elements tab
Node.TEXT_NODE– The text inside tags becomes text nodes. If you get the first child from thedescriptionnode, you can see that it is of typeTEXT_NODE:

Figure 1.31: The text inside tags becomes text nodes
This is the node as viewed in the Elements tab:
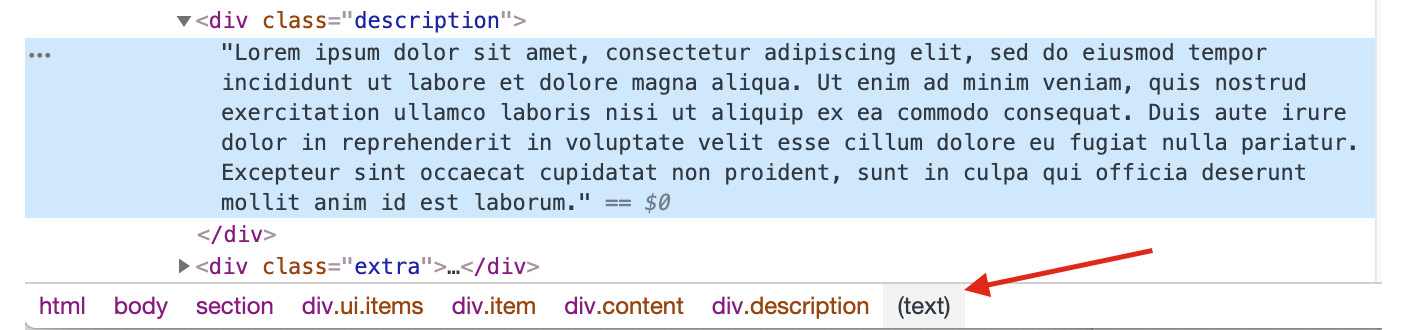
Figure 1.32: The text node selected in the Elements tab
Node.DOCUMENT_NODE– The root of every DOM tree is adocumentnode:

Figure 1.33: The root of the tree is always a document node
One important thing to notice is that the html node is not the root. When a DOM is created, the document node is the root and it contains the html node. You can confirm that by fetching the first child of the document node:
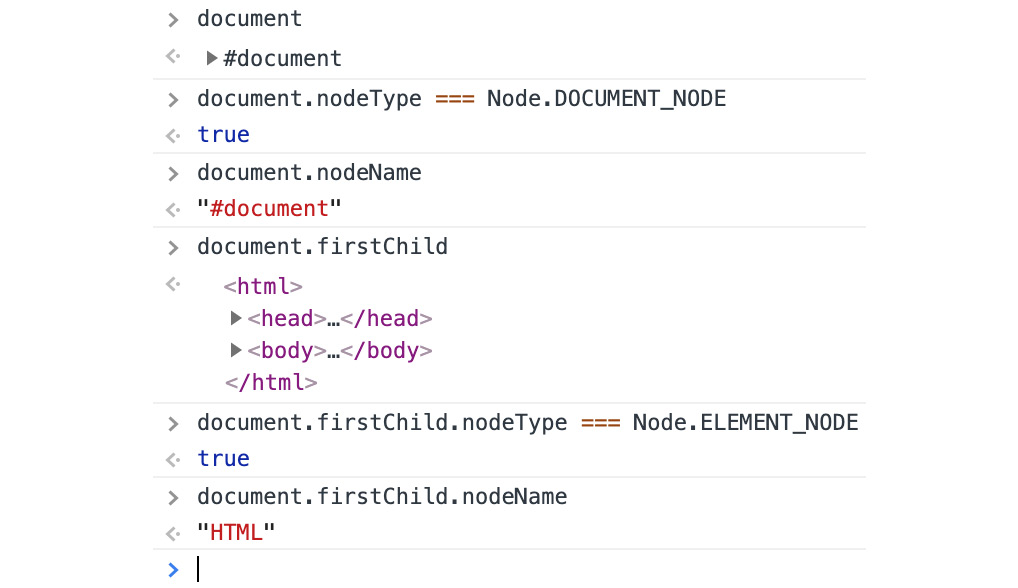
Figure 1.34: The html node is the first child of the document node
nodeName is another important property that nodes have. In element nodes, nodeName will give you the HTML tag for them. Other node types will return different things. The document node will always return #document (as seen in the preceding figure) and Text nodes will always return #text.
For text-like nodes such as TEXT_NODE, CDATA_SECTION_NODE, and COMMENT_NODE, you can use nodeValue to get the text that they hold.
But the most interesting thing about nodes is that you can traverse them like a tree. They have child nodes and siblings. Let's practice using these properties a little bit in the following exercise.
Exercise 4: Traversing the DOM Tree
In this exercise, we will traverse all the nodes in the sample page from Figure 1.1. We'll use a recursive strategy to iterate over all nodes and print the whole tree.
Perform the following steps to complete the exercise:
- The first step is to open your text editor and set it up to write some JavaScript code.
- To use a recursive strategy, we'll need a function that will be called for each node in the tree. This function will receive two arguments: the node to print and the depth that the node is at in the DOM tree. Here is how the declaration of the function looks:
function printNodes(node, level) { } - The first thing we'll do inside the function is to start the message that will identify the opening of this node. For that, we'll use
nodeName, which forHTMLElementswill give the tag, and for other types of nodes will give us a reasonable identifier:let message = `${"-".repeat(4 * level)}Node: ${node.nodeName}`; - If the node also has
nodeValueassociated with it, likeTextand other text-line nodes, we'll also append that to the message and then print it to the console:if (node.nodeValue) { message += `, content: '${node.nodeValue.trim()}'`; } console.log(message); - After that, we'll fetch all the child nodes for the current node. For some node types, the
childNodesproperty will return null, so we will add a default value of an empty array to make the code simpler:var children = node.childNodes || [];
- Now we can iterate over the array using a
forloop. For each child node we find, we'll call the function again, initiating the recursive nature of the algorithm:for (var i = 0; i < children.length; i++) { printNodes(children[i], level + 1); } - The last thing we'll do inside the function is print a closing message for nodes that have children:
if (children.length > 0) { console.log(`${"-".repeat(4 * level)}End of:${node.nodeName}`);} - Now we can initiate the recursion by calling the function and passing the document as the root node with level zero, just after the function declaration ends:
printNodes(document, 0);
The final code should look like the following: https://github.com/TrainingByPackt/Professional-JavaScript/blob/master/Lesson01/Exercise04/open_close_tree_print.js.
- Open the sample HTML in Chrome. This is where the file lives: https://bit.ly/2maW0Sx.
- Open the Developer Tools panel, paste the JavaScript code in the Console tab, and run it. The following is the output you should see:
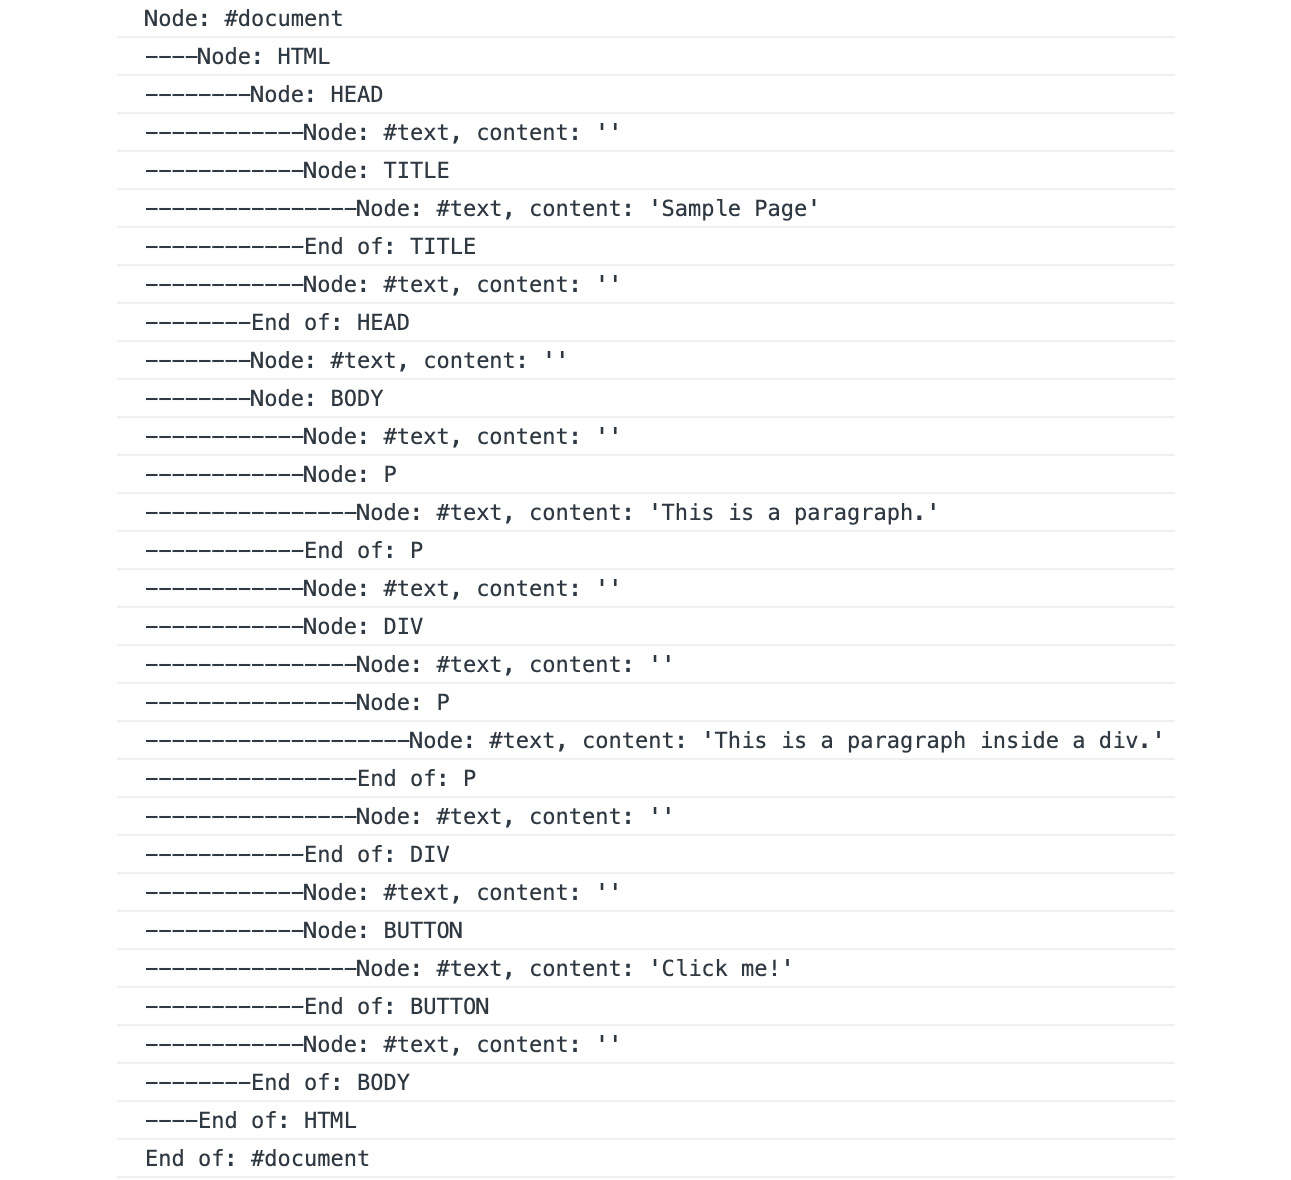
Figure 1.35: Traversing the DOM and printing all the nodes and its children recursively
In this exercise, you learned how to use recursion to navigate the whole DOM tree, node by node. You also learned how to check the node for attributes since, when navigating the whole tree, you will see nodes that are not HTML, such as texts and comments.
One very interesting thing to notice is that the browser also preserves the whitespace you add to your HTML. The following screenshot compares the source code with the printed tree from the exercise:
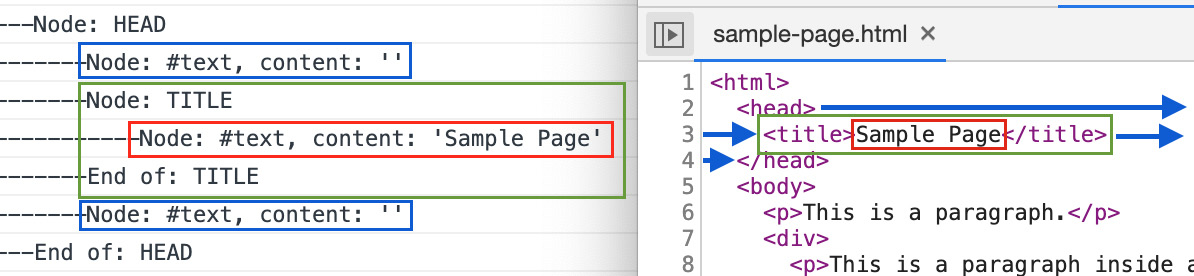
Figure 1.36: Demonstration of how whitespaces also become nodes in your DOM tree
You can see the mapping using color code:
- Red marks the text node containing the text for the title.
- Green marks the whole
titleelement. - Blue boxes and arrows mark the whitespace before and after the
titleelement.Note: Mind the gap
When dealing with DOM nodes, it's very important to keep in mind that not all nodes are HTML elements. Some might even be things that you didn't purposely put in your document, such as a line break.
We've talked about nodes a lot. You can check the Mozilla Developer Network documentation for other node attributes and methods. But you will notice that the node interface focuses a lot on the relationship between nodes in the DOM tree, things such as siblings and children. They are very abstract. So, let's get more specific and explore the nodes of the Element type.
All HTML elements are transformed into HTMLElement nodes, which inherit from Element, which inherits from a node. They inherit all attributes and methods of the parent type. That means that an element is a node and an HTMLElement instance is an element.
Because element represents an element (a tag with all its attributes and inner tags), you can access its attributes. For example, in an image element, you can read the src attribute. The following is an example of getting the src attribute for the first img element of the storefront page:

Figure 1.37: Fetching the src attribute of the first image of a page
Another useful attribute that HTML elements have is the innerHTML attribute. With it, you can get (and set) the HTML for an element. The following is an example of fetching the first div that has the image class and printing its innerHTML:

Figure 1.38: innerHTML can be used to access the HTML inside an element
There's also the outerHTML attribute, which will give the HTML for the element itself, including everything that's inside it:
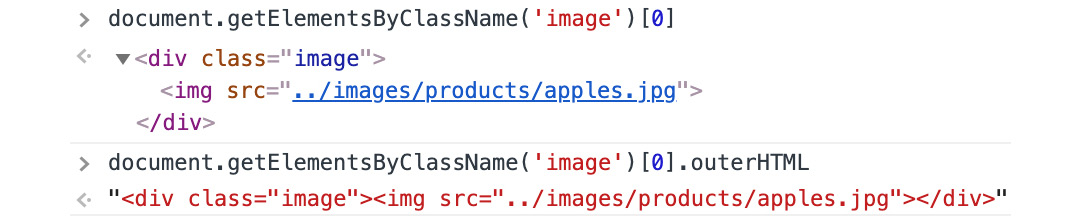
Figure 1.39: outerHTML gives the HTML for the element and everything inside it
And last but not least, there's the className attribute, which gives you access to the classes applied to an element:

Figure 1.40: className gives access to the classes the element has
What's more important about these attributes is that they are read/write, which means you can use them to modify the DOM, adding classes and changing the content of an element. In the upcoming sections, we will use what we've looked at here to create dynamic pages that change based on user interaction.
Special Objects
So far, we've accessed the document object in many of our examples and exercises. But what exactly is it and what else can it do? A document is a global object that represents the page loaded in the browser. And as we have seen, it serves as an entry point to the elements in the DOM tree.
Another important role it has that we haven't discussed so far is the ability to create new nodes and elements in a page. These elements can then be attached to the tree in different positions to modify it after the page is already loaded. We're going to explore this ability in upcoming sections.
Besides document, there's another object that is part of the DOM specification, which is the window object. A window object is a global object that is also the bind target for all JavaScript code running in the browser that doesn't have a bind target explicitly defined. That means that the variable is a pointer to the window object:

Figure 1.41: The global scope and default bind target in the browser is the window object
The window object contains everything you need to access from the browser: location, navigation history, other windows (popups), local storage, and much more. The document and console objects are also attributed to the window object. When you access the document object, you're actually using the window.document object, but the binding is implicit, so you don't need to write window all the time. And because the window is a global object, it means that it has to contain a reference to itself:

Figure 1.42: The window object contains a reference to itself
Using JavaScript to Query the DOM
We have been talking about querying the DOM through the document object. But all the methods we've used to query the DOM can also be called from elements in the DOM. The ones introduced in this section are also available from the elements in the DOM. We'll also see some that are only available in elements and not in the document object.
Querying from elements is very handy since the scope of the query is limited to where it gets executed. As we saw in Activity 1, Extracting Data from the DOM, we can start with a query that finds all base elements – the product element, in that specific case, then we can execute a new query from the element that will only search for elements inside the element that query was executed from.
The methods we used to query the DOM in the previous section include accessing elements from the DOM directly using the childNodes list, or using the getElementsByTagName and getElementsByClassName methods. Besides these methods, the DOM provides some other very powerful ways of querying for elements.
For starters, there is the getElement* methods family:
getElementsByTagName– We've seen and used this one before. It fetches all elements for the specified tag.getElementsByClassName– This is a variant ofgetElementthat returns all elements that have the specified class. Remember that an element can contain a list of classes by separating them with spaces. The following is a screenshot of code that ran in the storefront page, and you can see that selecting theuiclass name will fetch elements that also have theitems,teal(color), andlabelclasses:

Figure 1.43: Fetching elements by class name usually returns elements that contain other classes
getElementById– Notice the singular in the name of this method. This method will fetch the only element that has the specified ID. That's because IDs are expected to be unique on the page.
The getElement* family of methods is very useful. But sometimes, specifying a class or tag name is not enough. This means you have to use a combination of actions that make your code very complicated: get all elements with this class, and then fetch the elements with this other tag, then fetch elements with this class, then pick the third, and so on.
For many years, jQuery was the only solution for that – until the querySelector and querySelectorAll methods were introduced. These two methods can be used to execute complex queries on the DOM tree. They work in exactly the same way. The only difference between the two is that querySelector will only return the first element that matches the query, while querySelectorAll will return a list that can be iterated over.
The querySelector* methods use a CSS selector. You can use any CSS selector to query for elements. Let's explore that a bit more in the next exercise.
Exercise 5: Querying the DOM Using querySelector
In this exercise, we'll explore the various querying and node navigation techniques learned in previous sections. To do that, we'll use the storefront code as the base HTML to explore and we'll write JavaScript code to find the names of all the organic fruits available on the storefront page. To make things a bit harder, there's a blueberry muffin that is labeled as organic.
Before we start, let's take a look at the product element and its sub-elements. The following is the DOM tree for the product element as viewed from the Elements tab:
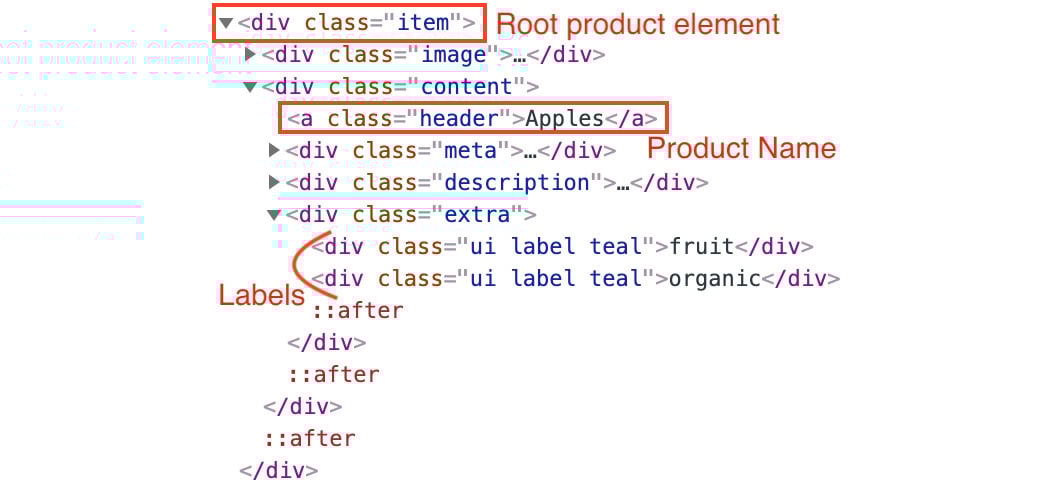
Figure 1.44: The product element and its sub-elements
You can see that the root element for each product is a div tag with a class item. The name and the tags are inside a sub-div with class content. The name of the product is inside an anchor with a class header. The tags are a group of div tags with three classes: ui, label, and teal.
When dealing with a problem such as this, where you want to query and filter by a group of elements that are related to each other under one common parent, there are two common approaches:
- Start by querying for the root element, then filtering and finding the element you want. The following is a graphical representation of this approach:
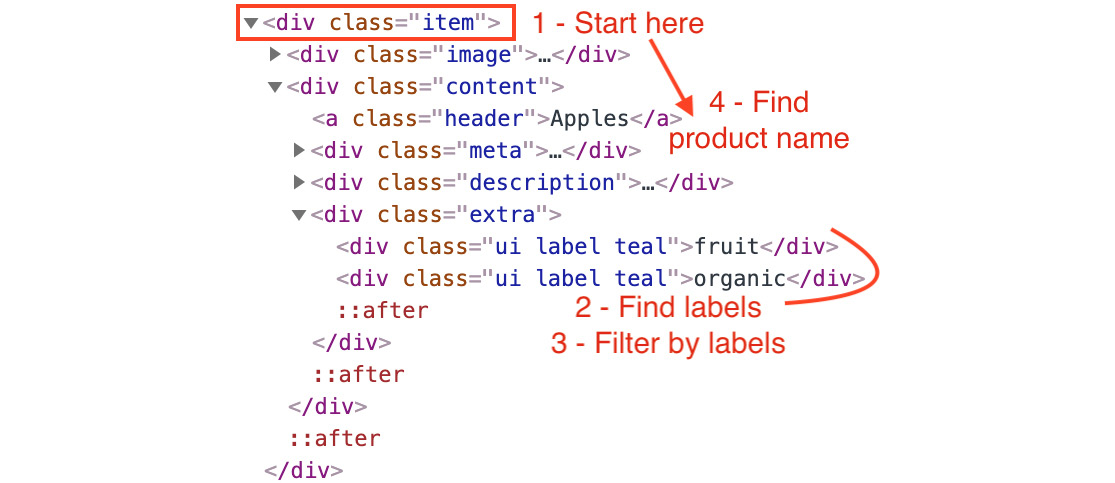
Figure 1.45: The first approach involves starting from the root element
- Start with a sub-element that matches one part of your filtering criteria, applying extra filtering if necessary, then navigate to the element you are looking for. The following is a graphical representation of this approach:
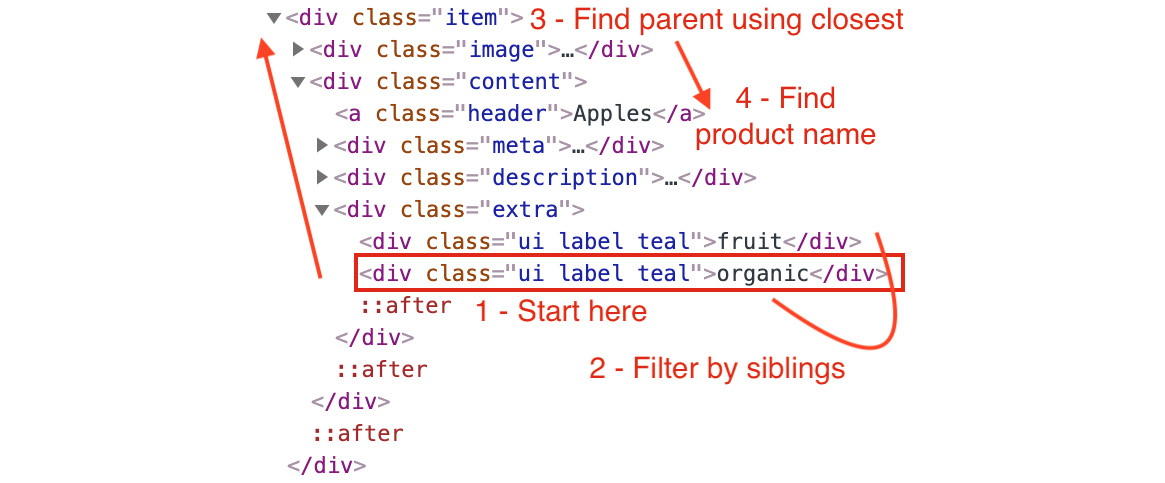
Figure 1.46: The second approach involves starting from a filtering condition
Perform the following steps to complete the exercise:
- To solve the exercise using the first approach, we'll need a function that checks whether a product contains a specified list of labels. The name of this function is going to be
theand it receives two parameters – the product root element and a list of labels to check for:function containLabels(element, ...labelsToCheck) { } - Inside this function, we'll use some array mapping and filtering to find the intersection between the labels specified in the parameters and the ones that the product being inspected has:
const intersection = Array.from(element.querySelectorAll('.label')) .map(e => e.innerHTML) .filter(l => labelsToCheck.includes(l)); - The last thing in the function is to return the check that will tell us whether the product contains all the labels or not. The check tells us whether the size of the intersection is the same as the size of all labels to be checked if so we have a match:
return intersection.length == labelsToCheck.length;
- Now we can use the query methods to find the elements, add them to an array, filter, and map to what we want, then print to the console:
//Start from the product root element Array.from(document.querySelectorAll('.item')) //Filter the list to only include the ones with both labels .filter(e => containLabels(e, 'organic', 'fruit')) //Find the product name .map(p => p.querySelector('.content a.header')) .map(a => a.innerHTML) //Print to the console .forEach(console.log); - To solve the problem using the second approach, we will need a function to find all the siblings of a specified element. Open your text editor and let's start by declaring the function with an array to store all the siblings we find. Then, we'll return the array:
function getAllSiblings(element) { const siblings = []; // rest of the code goes here return siblings; } - Then, we'll iterate over all previous sibling elements using a
whileloop and thepreviousElementSiblingattribute. As we iterate over the siblings, we'll push them into the array:let previous = element.previousElementSibling; while (previous) { siblings.push(previous); previous = previous.previousElementSibling; }Note: Mind the gap, again
We use
previousElementSiblinginstead ofpreviousNodebecause that will exclude all text nodes and other nodes to avoid having to checknodeTypefor each one. - We do the same for all the siblings coming after the specified element:
let next = element.nextElementSibling; while (next) { siblings.push(next); next = next.nextElementSibling; } - Now that we have our
getAllSiblingsfunction, we can start looking for the products. We can use thequerySelectorAllfunction, and some array mapping and filtering to find and print the data that we want://Start by finding all the labels with content 'organic' Array.from(document.querySelectorAll('.label')) .filter(e => e.innerHTML === 'organic') //Filter the ones that don't have a sibling label 'fruit' .filter(e => getAllSiblings(e).filter(s => s.innerHTML === 'fruit').length > 0) //Find root product element .map(e => e.closest('.item')) //Find product name .map(p => p.querySelector('.content a.header').innerHTML) //Print to the console .forEach(console.log); - Executing the code in the Console tab in Developer Tools, you'll see the following output:
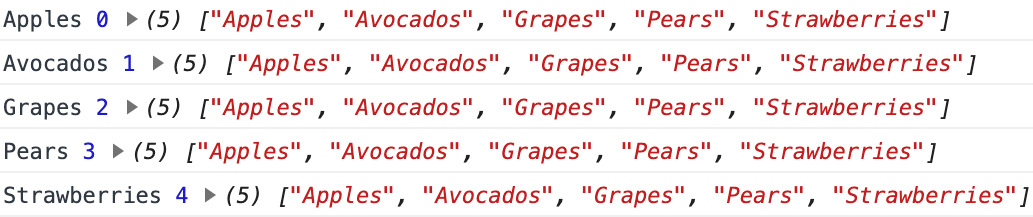
Figure 1.47: Output of the code from the exercise. Prints the names of all organic fruits.
Note
The code for this exercise can be found on GitHub. This is the path for the file that contains the code for the first approach: https://github.com/TrainingByPackt/Professional-JavaScript/blob/master/Lesson01/Exercise05/first_approach.js.
The path for the file that contains the code for the second approach is this: https://github.com/TrainingByPackt/Professional-JavaScript/blob/master/Lesson01/Exercise05/second_approach.js.
In this exercise, we used two different techniques to fetch data from a page. We used many querying and node navigation methods and attributes to find elements and move around the DOM tree.
These techniques are essential to know when building modern web applications. Navigating the DOM and fetching data are the most common tasks in this type of application.
Manipulating the DOM
Now that we know what the DOM is and how to query for elements and navigate around it, it's time to learn how to change it using JavaScript. In this section, we're going to rewrite the storefront to be more interactive by loading the list of products and creating the page elements using JavaScript.
The sample code for this section can be found on GitHub at https://bit.ly/2mMje1K.
The first thing we need to know when creating dynamic applications using JavaScript is how to create new DOM elements and append them to the tree. Since the DOM specification is all based on interfaces, there's no concrete class to instantiate. When you want to create DOM elements, you need to use the document object. The document object has a method called createElement, which receives a tag name as a string. The following is an example of code that creates a div element:
const root = document.createElement('div');
The product item element has an item class. To add that class to it, we can just set the className attribute, as follows:
root.className = 'item';
And now we can attach the element to where it needs to go. But first, we need to find where it needs to go. The HTML for this sample code can be found on GitHub at https://bit.ly/2nKucVo. You can see that it has an empty div element where the product items will be added:
<div class="ui items"></div>
We can use querySelector to find that element and then call the appendChild method on it, which is a method that every node has, and pass the element node we just created to it so that it gets added to the DOM tree:
const itemsEl = document.querySelector('.items');
products.forEach((product) => {
  itemsEl.appendChild(createProductItem(product));
});
Here, createProductItem is the function that receives a product and creates the DOM element for it using the createElement function mentioned previously.
Creating one DOM element is not very useful. For the dynamic storefront example, we have an array of objects with all the data we need to build the page. For each one of them, we need to create all the DOM elements and glue them together in the right place and order. But first, let's take a look at how the data looks. The following shows how each product object looks:
{
  "price": 3.99,
  "unit": "lb",
  "name": "Apples",
  "description": "Lorem ipsum dolor sit amet, ...",
  "image": "../images/products/apples.jpg",
  "tags": [ "fruit", "organic" ]
}
And the following is how the DOM for the same product looks in the static storefront code we used in previous sections:
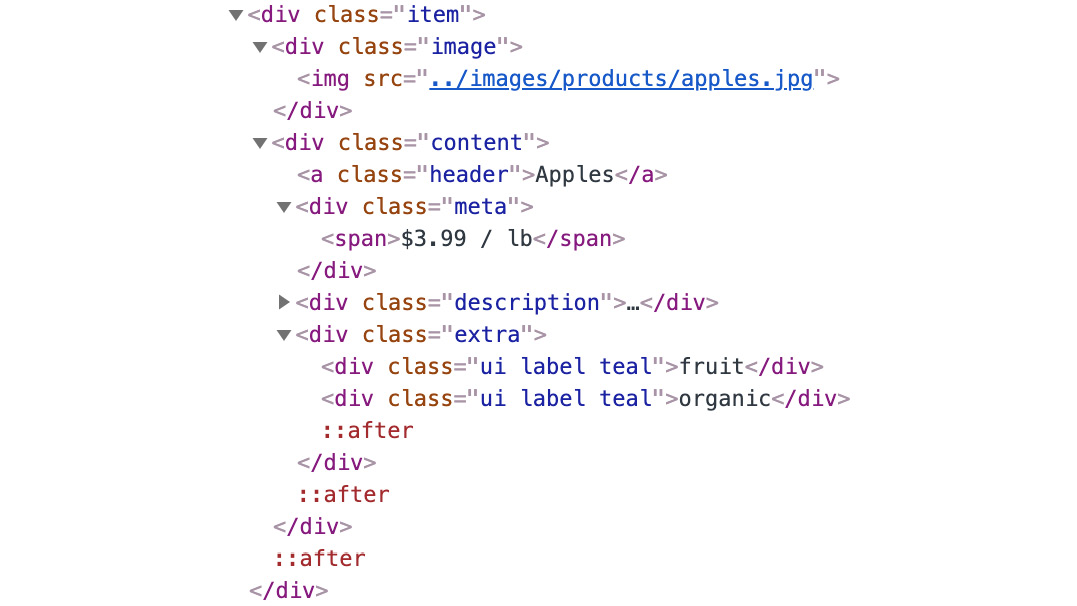
Figure 1.48: The DOM tree section for a product
You can see that there are a lot of nested elements that need to be created to get to the desired final DOM tree. So, let's take a look at a few techniques that are very helpful when building complex applications using JavaScript.
Let's get started by taking a look at createProductItem in the sample code:
function createProductItem(product) {
  const root = document.createElement('div');
  root.className = 'item';
  root.appendChild(createProductImage(product.image));
  root.appendChild(createContent(product));
  return root;
}
We start this method by creating the root element for the product tree, which is a div element. From the preceding screenshot, you see that this div needs an item class and that's what is happening on the next line after the element gets created, as described at the beginning of this section.
After the element is ready, it's time to start adding its children to it. Instead of doing everything in the same method, we create other functions that are responsible for creating each child and call them directly, appending the result of each function to the root element:
root.appendChild(createProductImage(product.image));
root.appendChild(createContent(product));
This technique is useful because it isolates the logic for each child in its own place.
Now let's take a look at the createProductImage function. From the previous sample code, you can see that the function receives the path for the product image. This is the code for the function:
function createProductImage(imageSrc) {
  const imageContainer = document.createElement('div');
  imageContainer.className = 'image';
  const image = document.createElement('img');
  image.setAttribute('src', imageSrc);
  imageContainer.appendChild(image);
  return imageContainer;
}
The function is divided into two major parts:
- It creates the container element for the image. From the DOM screenshot, you can see that the
imgelement is inside adivwith animageclass. - It creates the
imgelement, sets thesrcattribute, and then appends it to thecontainerelement.
This style of code is simple, readable, and easy to understand. But that's because the HTML that needs to be generated is quite short. It's one img tag inside a div tag.
Sometimes, though, the tree becomes pretty complex and using this strategy makes the code almost unreadable. So, let's take a look at another strategy. The other child element appended to the product root is the content element. That is a div tag that has many children, including some nested ones.
We could have approached it the same way as the createProductImage function. But the method would have to do the following:
- Create a
containerelement and add a class to it. - Create the anchor element that stores the product name and append it to the container.
- Create the container for the price and append it to the root container.
- Create the
spanelement with the price and append it to the element created in the previous step. - Create the element that contains the description and append it to the container.
- Create a
containerelement for thetagelement and append it to the root container. - For each tag, create the
tagelement and append it to the container from the previous step.
It sounds like a long list of steps, doesn't it? Instead of trying to write all that code, we can use a template string to generate the HTML and then set innerHTML for the container element. So, the steps would, instead, look like the following:
- Create the
containerelement and add a class to it. - Create the HTML for the inner content using a string template.
- Set
innerHTMLon thecontainerelement.
That sounds much simpler than the previous method. And, as we'll see, it's going to be much more readable too. Let's take a look at the code.
As stated before, the first step is to create the root container and add the class for it:
function createContent(product) {
  const content = document.createElement('div');
  content.className = 'content';
Then, we start by generating the HTML for the tag elements. For that, we have a function that receives the tag as a string and returns an HTML element for it. We use that to map all tags to elements using the map function on the tags array. Then, we map the element to HTML by using the outerHTML attribute from it:
 const tagsHTML = product.tags.map(createTagElement)
    .map(el => el.outerHTML)
    .join('');
With the container element created and the HTML for the tags ready, we can set the innerHTML attribute of the content element using a template string and return it:
  content.innerHTML = `
    <a class="header">${product.name}</a>
    <div class="meta"><span>$${product.price} / ${product.unit}</span></div>
    <div class="description">${product.description}</div>
    <div class="extra">${tagsHTML}</div>
  `;
  return content;
}
This code is much shorter and easier to reason about compared to the many steps that generating HTML elements and appending them would require. When writing your dynamic applications, it is up to you to decide what's best in each case. In this case, the trade-offs are basically readability and conciseness. But for others, trade-offs can also be requirements to cache elements to add event listeners or to hide/show them based on some filter, for example.
Exercise 6: Filtering and Searching Products
In this exercise, we'll add two features to our storefront application to help our customers to find products faster. First, we'll start by making labels clickable, which will filter the list of products by the selected label. Then, we'll add a search box at the top, for users to query by text in the name or description. This is how the page will look:
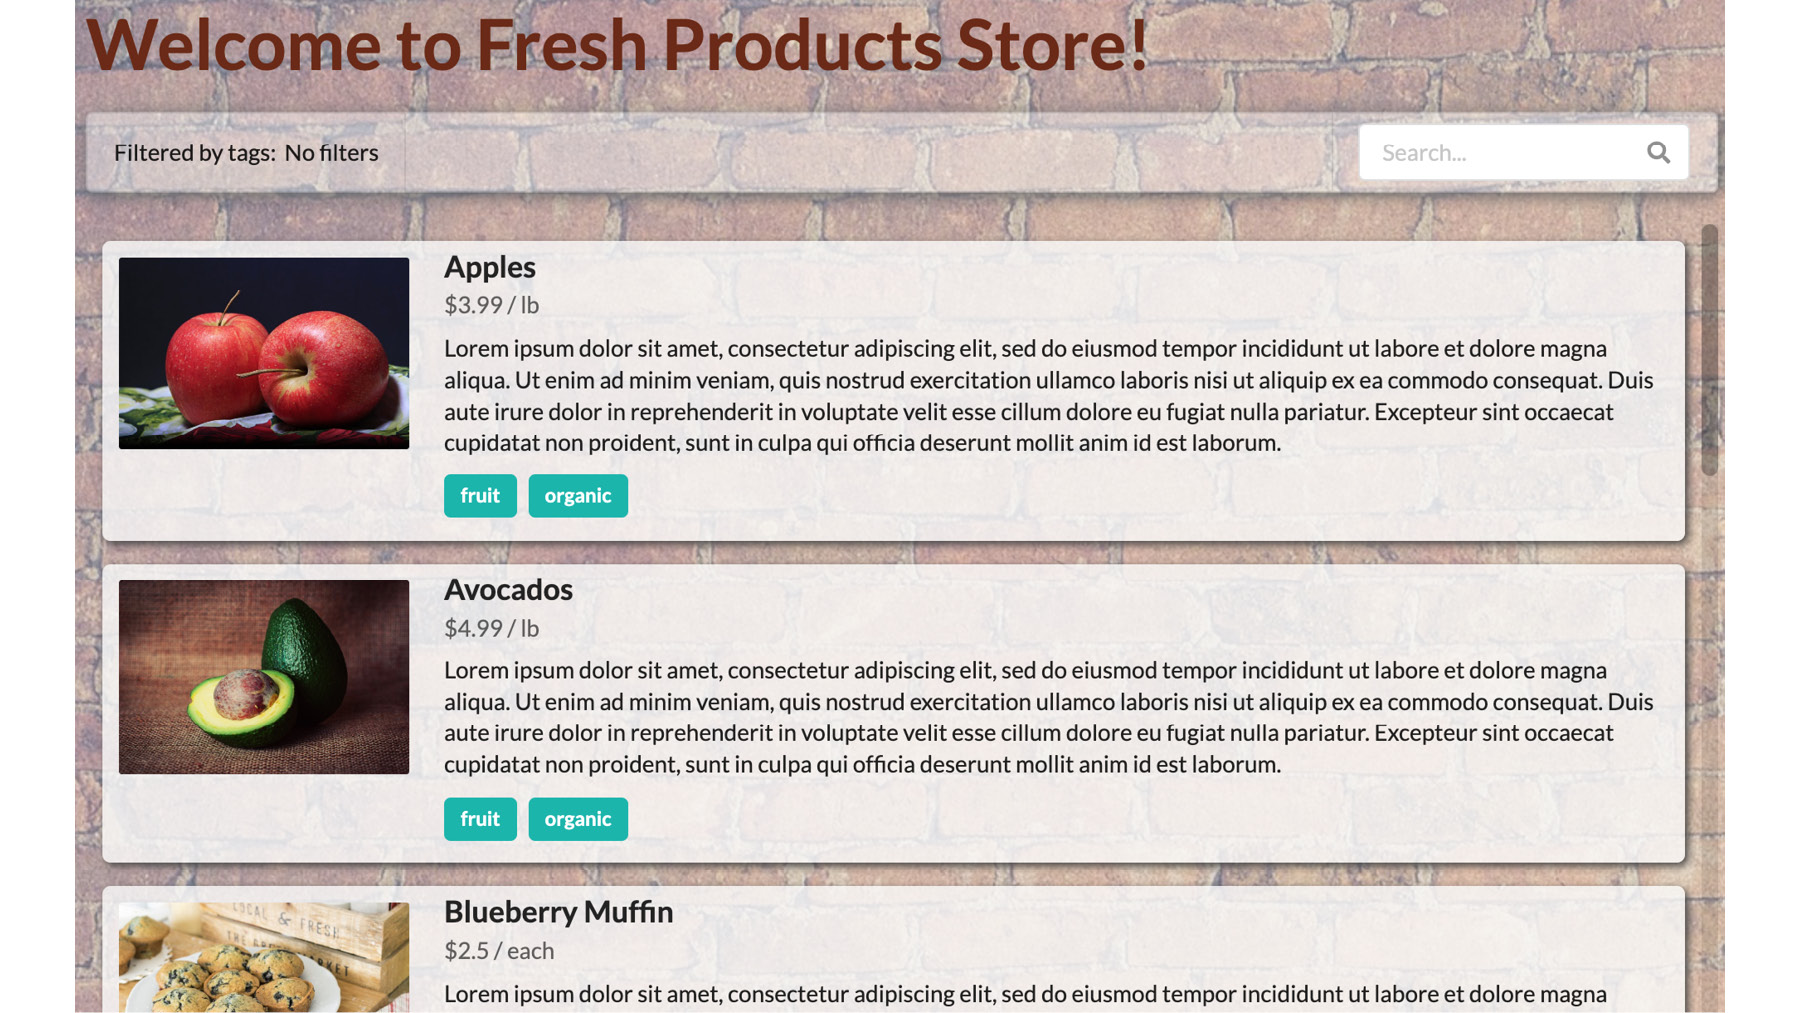
Figure 1.49: New storefront with a search bar at the top
In this new storefront, users can click on tags to filter products that have the same tag. When they do that, the tags being used to filter the list will show at the top, in orange. The user can click on the label in the search bar to remove the filter. This is how it looks:

Figure 1.50: How the tag filtering at the top works
Users can also use the search box on the right-hand side to search for products by name or description. The list will be filtered as they type.
The code for this exercise can be found on GitHub at https://github.com/TrainingByPackt/Professional-JavaScript/tree/master/Lesson01/Exercise06.
Perform the following steps to complete the exercise:
- The first thing we'll do is write the base HTML code where all the other elements will be added later using JavaScript. This HTML now contains a base
divcontainer, where all the content will be. The content inside it is then divided into two parts: a section with the header, which contains the title and the search bar, and adiv, which will contain all the product items. Create a file calleddynamic_storefront.htmland add the following code in it:<html> <head> <link rel="stylesheet" type="text/css" href="../css/semantic.min.css" /> <link rel="stylesheet" type="text/css" href="../css/store_with_header.css" /> </head> <body> <div id="content"> <section class="header"> <h1 class="title">Welcome to Fresh Products Store!</h1> <div class="ui menu"> <div class="right item"> <div class="ui icon input"> <input type="text" placeholder="Search..." /> <i class="search icon"></i> </div> </div> </div> </section> <div class="ui items"></div> </div> <script src="../data/products.js"></script> <script src="../sample_003/create_elements.js"></script> <script src="filter_and_search.js"></script> </body> </html>
This HTML uses the
products.jsandcreate_elements.jsscripts, which are the same as the sample code used in this section. It also uses the CSS files in theLesson01folder. You can refer to them directly if you are in the same folder or copy and paste them into your project. - Create a file called
filter_and_search.js, which is the last JavaScript code loaded in the HTML code. This is where we'll be adding all the code for this exercise. The first thing we need to do is to store the filter state. There will be two possible filters the user can apply to the page: selecting a tag and/or typing some text. To store them, we'll use an array and a string variable:const tagsToFilterBy = []; let textToSearch = '';
- Now we'll create a function that will add an event listener for all the tags in the page. This function will find all the
tagelements, wrap them in an array, and add an event listener using theaddEventListenermethod inElementto respond to theclickevent:function addTagFilter() { Array.from(document.querySelectorAll('.extra .label')).forEach(tagEl => { tagEl.addEventListener('click', () => { // code for next step goes here }); }); } - Inside the event listener, we will check whether the tag is already in the array of tags to filter by. If not, we'll add it and call another function, called
applyTagFilters:if (!tagsToFilterBy.includes(tagEl.innerHTML)) { tagsToFilterBy.push(tagEl.innerHTML); applyFilters(); } applyFiltersis just a catch-all function that will contain all the logic related to updating the page when the filtering conditions change. You'll just be calling functions we're going to write in the next steps:function applyFilters() { createListForProducts(filterByText(filterByTags(products))); addTagFilter(); updateTagFilterList(); }- Before we continue with the
applyFiltersfunction, we'll add another function to handle the events on the input box for the text search. This handler will listen tokeyupevents, which are triggered when the user finishes typing each letter. The handler will just get the current text in the input, set the value to thetextToSearchvariable, and call theapplyFiltersfunction:function addTextSearchFilter() { document.querySelector('.menu .right input' .addEventListener('keyup', (e) => { textToSearch = e.target.value; applyFilters(); }); } - Now, back to the
applyFiltersfunction. The first function called in there is almost hidden. It's thefilterByTagsfunction, which filters the list of products using thetagsToFilterByarray. It recursively filters the list of products passed in using the selected tags:function filterByTags() { let filtered = products; tagsToFilterBy .forEach((t) => filtered = filtered.filter(p => p.tags.includes(t))); return filtered; } - Whatever comes out of the filter function is passed to another filter function, the one that filters the products based on the text search. The
filterByTextfunction transforms all text to lowercase before comparing. That way, the search will always be case-insensitive:function filterByText(products) { const txt = (textToSearch || '').toLowerCase(); return products.filter((p) => { return p.name.toLowerCase().includes(txt) || p.description.toLowerCase().includes(txt); }); }After filtering by the selected tags and filtering by the typed text, we pass the filtered values to
createListForProducts, which is a function insidecreate_elements.jsand was described during this section, before the exercise. - Now that we have the new list of products already showing on the page, we need to re-register the tag filter event listener because the DOM tree elements were recreated. So, we call
addTagFilteragain. As shown previously, this is how theapplyFiltersfunction looks:function applyFilters() { createListForProducts(filterByText(filterByTags(products))); addTagFilter(); updateTagFilterList(); } - The last function called in the
applyTagFilterfunction isupdateTagFilterList. This function will find the element that will hold the filter indicator, check whether there are tags selected to filter by, and update it accordingly, either setting the text toNo filtersor adding an indicator for each tag applied:function updateTagFilterList() { const tagHolder = document.querySelector('.item span.tags'); if (tagsToFilterBy.length == 0) { tagHolder.innerHTML = 'No filters'; } else { tagHolder.innerHTML = ''; tagsToFilterBy.sort(); tagsToFilterBy.map(createTagFilterLabel) .forEach((tEl) => tagHolder.appendChild(tEl)); } } - The last function we need to tie all of this together is the
createTagFilterLabelfunction, which is used to create the indicator that a tag is selected in the search bar. This function will create the DOM element and add an event listener that, when clicked, will remove the tag from the array and call theapplyTagFilterfunction again:function createTagFilterLabel(tag) { const el = document.createElement('span'); el.className = 'ui label orange'; el.innerText = tag; el.addEventListener('click', () => { const index = tagsToFilterBy.indexOf(tag); tagsToFilterBy.splice(index, 1); applyTagFilter(); }); return el; } - The last step you need to take to make the page work is to call the
applyTagFilterfunction so that it will update the page to the initial state, which is no tags selected. Also, it will calladdTextSearchFilterto add the event handler for the textbox:addTextSearchFilter(); applyFilters();
Open the page in Chrome and you'll see that the filter is empty at the top and all products are shown in the list. It looks like the screenshot at the beginning of this exercise. Click on a tag or type something in the textbox and you'll see the page change to reflect the new state. For example, selecting the two cookie and bakery labels and typing chocolate in the textbox will make the page only show the products that have those two labels and chocolate in their name or description:
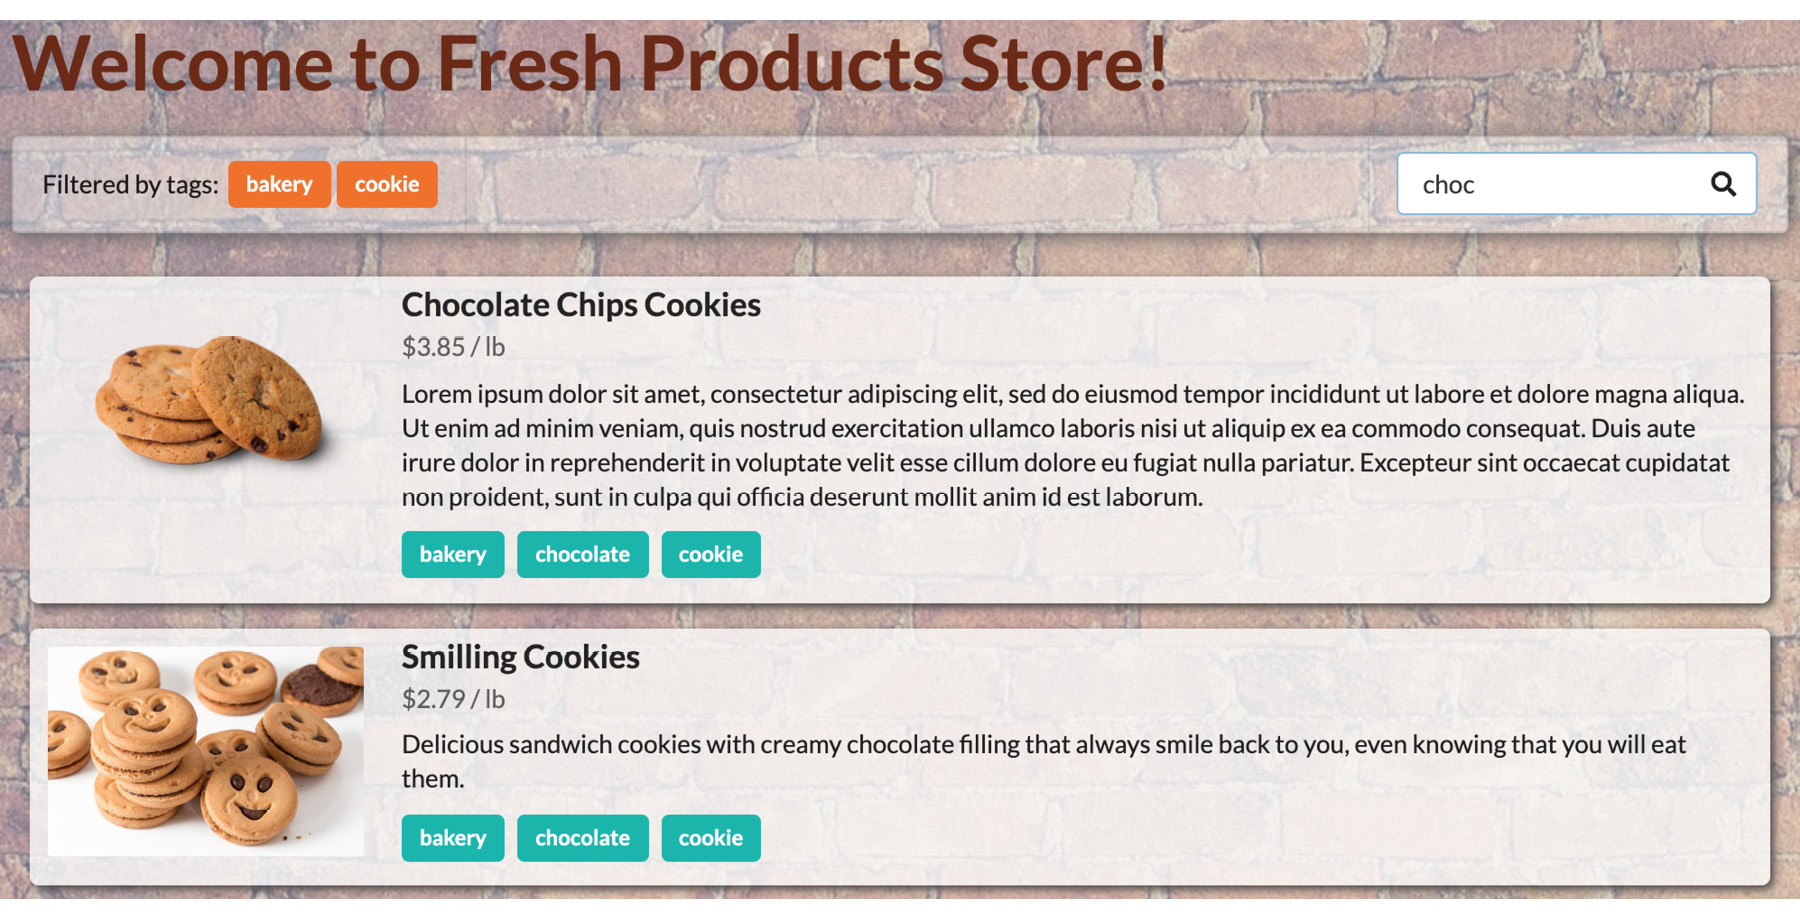
Figure 1.51: The storefront filtered by the two bakery and cookie tags and the word chocolate
In this exercise, you've learned how to respond to user events and change the page accordingly to reflect the state the user wants the page to be in. You've also learned that when elements get removed and re-added to the page, event handlers get lost and need to be re-registered.
Shadow DOM and Web Components
In previous sections, we've seen that a simple web application can require complex coding. When applications get bigger and bigger, they get harder and harder to maintain. The code starts to become tangled and a change in one place affects other unexpected places. That's because of the global nature of HTML, CSS, and JavaScript.
A lot of solutions have been created to try to circumvent this problem, and the World Wide Web Consortium (W3C) started to work on proposals for a standard way of creating custom, isolated components that could have their own styles and DOM root. Shadow DOM and custom components are two standards born from that initiative.
Shadow DOM is a way for you to create an isolated DOM subtree that can have its own styles and is not affected by styles added to the parent tree. It also isolates the HTML, which means IDs used on the document tree can be reused multiple times in each shadow tree.
The following figure illustrates the concepts involved when dealing with Shadow DOM:
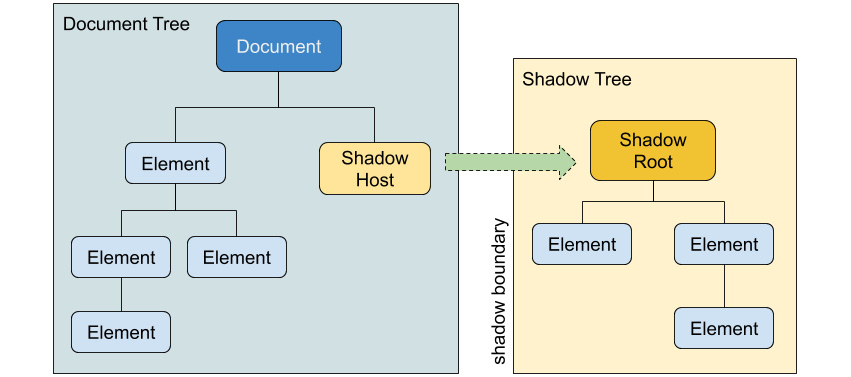
Figure 1.52: Shadow DOM concepts
Let's describe what these concepts mean:
- Document Tree is the main DOM tree for the page.
- Shadow Host is the node where the shadow tree is attached.
- Shadow Tree is an isolated DOM tree attached to the document tree.
- Shadow Root is the root element in the shadow tree.
The Shadow Host is an element in the document tree where the shadow tree is attached. The Shadow Root element is a node that is not displayed on the page, just like the document object in the main document tree.
To understand how this works, let's start with some HTML with some strange styles:
<style>
  p {
    background: #ccc;
    color: #003366;
  }
</style>
This would make every paragraph on the page have a greyish background with some blue color text in it. This is how a paragraph on this page would look:

Figure 1.53: Paragraph with the styles applied
Let's add a shadow tree and add a paragraph into it to see how it behaves. We will wrap the paragraph element with a div element and add some text to it:
<div><p>I'm in a Shadow DOM tree.</p></div>
Then we can use the attachShadow method in an element to create a shadow root element:
const shadowHost = document.querySelector('div');
const shadowRoot = shadowHost.attachShadow({ mode: 'open' });
The preceding code selects the div element from the page and then calls the attachShadow method, passing a configuration object to it. The configuration says that this shadow tree is open, which means the shadow root for it can be accessed through the shadowRoot property of the element the shadow tree was attached to – div, in this case:

Figure 1.54: Open shadow trees can be accessed through the element where the tree is attached
Shadow trees can be closed, but taking that approach is not recommended since it gives a false sense of security and it makes the user's life much harder.
After we attach a shadow tree to the document tree, we can start manipulating it. Let's copy the HTML from the shadow host into the shadow root and see what happens:
shadowRoot.innerHTML = shadowHost.innerHTML;
Now, if you load the page in Chrome, you'll see the following:

Figure 1.55: Page with the shadow DOM loaded
You can see that even though the styles added to the page are selecting all paragraphs, the paragraph added to the shadow tree is not affected by it. The elements in the Shadow DOM are completely isolated from the document tree.
If you look at the DOM now, you'll see that something looks strange. The shadow tree replaces and wraps the paragraph that was inside the div element, which is the shadow host:
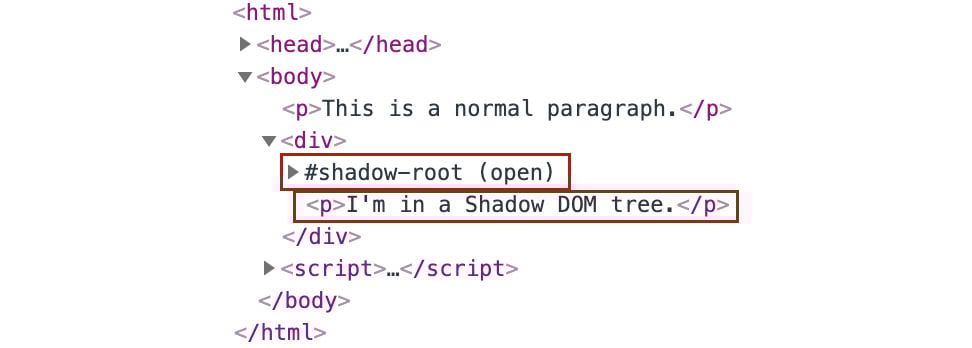
Figure 1.56: The shadow tree is at the same level as the other nodes in the shadow host
But the original paragraph inside the shadow host is not rendered on the page. That is because when the browser renders the page, if the element contains a shadow tree with new content, it will replace the current tree under the host. That process is called flattening and the following diagram depicts how it works:
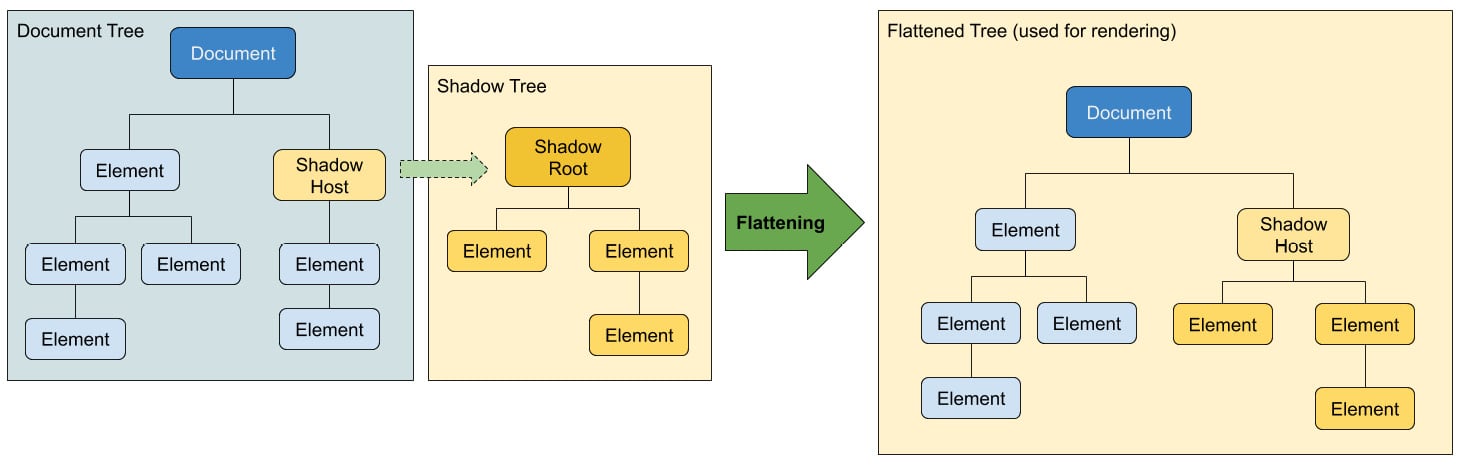
Figure 1.57: When flattened, the browser ignores the nodes under the shadow host
Now that we understand what Shadow DOM is, we can start using it to build or own HTML elements. That's right! With custom component APIs, you can create your own HTML element and then use it just like any other element.
In the rest of this section, we'll build a custom component called counter, which has two buttons and text in between. You can click the buttons to increment or decrement the value stored. You can also configure it to have an initial value and a different increment value. The following screenshot shows how the component will look when we are finished. The code for this lives on GitHub at https://bit.ly/2mVy1XP:

Figure 1.58: The counter component and how it is used in HTML
To define your custom component, you need to call the define method in the custom components registry. There's a global instance of the registry called customElements. To register your component you call define, passing the string that your component will be referenced by. It needs to have at least one dash. You also need to pass the constructor that instantiates your component. Here is the code:
customElements.define('counter-component', Counter);
Your constructor can be a normal function or, as in this example, you can use the new JavaScript class definition. It needs to extend HTMLElement:
class Counter extends HTMLElement {
}
For custom components to be isolated from the rest of the page, you use a shadow tree where the shadow host is your components element. You don't need to use Shadow DOM to build custom components, but it is recommended for more complex components that will also wrap some styles.
In the constructor of your element, you create the shadow root by calling attachShadow to your own instance:
constructor() {
  super(); // always call super first
  // Creates the shadow DOM to attach the parts of this component
  this.attachShadow({mode: 'open'});
  // ... more code here
}
Remember that when you attach a shadow DOM to an element using the open mode, the element stores that shadow root in a shadowRoot property. So, we can refer to it using this.shadowRoot from now on.
In the preceding figure, you saw that the counter component has two attributes that it uses to configure itself: value and increment. Those are set in the beginning of the constructor using the getAttribute method of Element and setting reasonable defaults, if they are not available:
this.value = parseInt(this.getAttribute('value') || 0);
this.increment = parseInt(this.getAttribute('increment') || 1);
After that, we create all the DOM elements for this component and append them to the shadow root. We're not going to dig into the details since you've seen enough DOM manipulation for now. In the constructor, we just call the functions that create those elements and append them using this.shadowRoot.appendChild:
// Create and attach the parts of this component
this.addStyles();
this.createButton('-', () => this.decrementValue());
this.createValueSpan();
this.createButton('+', () => this.incrementValue());
The first method creates a link element that imports the CSS file for the counter component. The second and fourth methods create the decrement and increment buttons and attach the event handlers. The third method creates a span element and keeps a reference to it under the property span.
The incrementValue and decrementValue methods increment the current value by the specified amount and then call an updateState method, which synchronizes the state of the values to the DOM (the Shadow DOM, in this case). The code for the incrementValue and updateState methods is as follows:
incrementValue() {
  this.value += this.increment;
  this.triggerValueChangedEvent();
  this.updateState();
}
updateState() {
  this.span.innerText = `Value is: ${this.value}`;
}
In the incrementValue function, we also call the function to trigger the event to notify users that the value changed. This function will be discussed later.
Now that you have your new HTMLElement defined and registered, you can use it just like any other existing HTML element. You can add it via tags in the HTML code as follows:
<counter-component></counter-component>
<counter-component value="7" increment="3"></counter-component>
Or, via JavaScript, by creating an element and appending it to the DOM:
const newCounter = document.createElement('counter-component');
newCounter.setAttribute('increment', '2');
newCounter.setAttribute('value', '3');
document.querySelector('div').appendChild(newCounter);
To completely understand the power of web components, there are two last things you need to know about: callbacks and events.
Custom components have life cycle callbacks that you can set in your class to get notified when things change around them. The two most important ones are connectedCallback and attributeChangedCallback.
The first one is useful when you want to manipulate the DOM after your component gets appended to it. For the counter component, we're just printing something on the console to show that the component is now connected to the DOM:
connectedCallback() {
  console.log("I'm connected to the DOM!");
}
When the page loads, you can see the statements printed for each counter component added to the DOM:

Figure 1.59: Statement printed in the console when counter components are attached to the DOM
attributeChangedCallback gets called when some attribute in your component is changed. But for it to work, you need a static getter that will tell what attributes you want to be notified about changes. The following is the code for the static getter:
static get observedAttributes() {
  return ['value', 'increment'];
}
It just returns an array with all the attributes we want to be notified about. attributeChangedCallback receives a few parameters: the name of the attribute that changed, the old value (this will be null if it wasn't set), and the new value. Here is the callback code for the counter component:
attributeChangedCallback(attribute, _, newValue) {
  switch(attribute) {
    case 'increment':
      this.increment = parseInt(newValue);
      break;
    case 'value':
      this.value = parseInt(newValue);
      break;
  }
  this.updateState();
}
Our callback checks for the attribute name ignores the old value since we don't need it, transforms it, parses it into an integer, and sets the new value accordingly based on the name of the attribute. Finally, it calls the updateState function, which will update the state of the component based on its properties.
The last thing about web components that you need to know is how to dispatch events. Events are a big part of the standard components; they form the basis for all interaction with the user. Because of that, a big part of encapsulating logic into components is to understand what events the users of your components will be interested in.
For our counter component, it makes a lot of sense to have an event dispatched every time the value changes. It would also be useful to have the value passed in the event. That way, users won't need to query your component to get the current value.
To dispatch custom events, we can use the dispatchEvent method of Element and use the CustomEvent constructor to build our event with the custom data. The name of our event will be value-changed. Users can add event handlers to listen to this event and be notified when the value changes.
The following code is for the triggerValueChangedEvent function, which was mentioned previously; this function is called from within the incrementValue and decrementValue functions:
triggerValueChangedEvent() {
  const event = new CustomEvent('value-changed', {
    bubbles: true,
    detail: { value: this.value },
  });
  this.dispatchEvent(event);
}
This function creates an instance of CustomEvent, which bubbles through the DOM and contains the current value in the detail property. We could've just created a normal event instance and set the property directly on the object, but for custom events, it's recommended to use the CustomEvent constructor, which handles custom data correctly. With the event created, the dispatchEvent method is called, passing the event.
Now that we have the events getting published, we can register and show the information on the page. The following is the code that queries for all counter-components and adds an event listener for the value-changed event. The handler adds a paragraph to an existing div every time one of the components is clicked:
const output = document.getElementById('output');
Array.from(document.querySelectorAll('counter-component'))
  .forEach((el, index) => {
    el.addEventListener('value-changed', (e) => {
    output.innerHTML += '<p>Counter ${index} value is now ${e.detail.value}</p>';
  });
});
This is how the page looks after clicking a few times on the different counters:
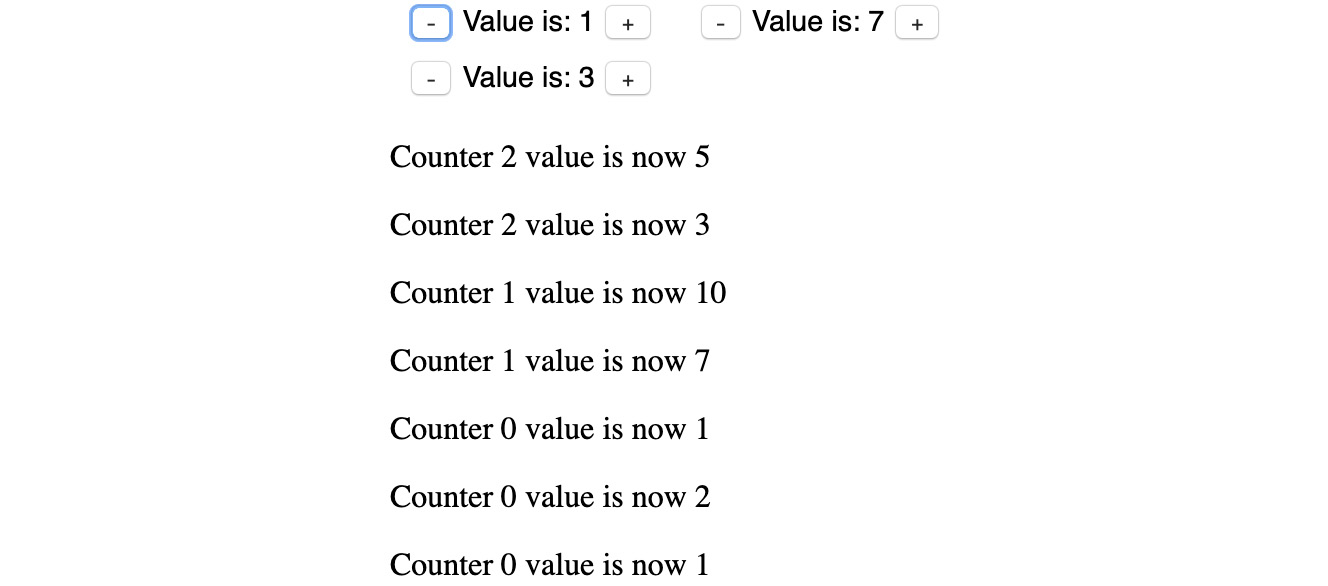
Figure 1.60: Paragraphs added to the page showing that the counters were clicked
Exercise 7: Replacing a Search Box with a Web Component
To fully understand the concept of web components, you need to see how an application can be decomposed into encapsulated, reusable components. The storefront page that we built in the previous exercise is a great place for us to start.
In this exercise, we'll write a web component to replace the search box at the top right-hand side of the page. This is the component we're talking about:

Figure 1.61: Search box that will be transformed into a web component
The idea is that the component will handle its looks, rendering, and state, and it will emit events when the state changes. In this case, the search box only has one state: the search text.
Perform the following steps to complete the exercise:
- Copy the code from
Exercise 6into a new folder so that we can change it without affecting the existing storefront. - Let's start by creating a web component. Create a file called
search_box.js, add a new class calledSearchBox, and define a new component using this class:class SearchBox extends HTMLElement { } customElements.define('search-box', SearchBox); - In the class, add a constructor, call
super, and attach the component to a shadow root. The constructor will also initialize the state by setting a variable called_searchText to:constructor() { super(); this.attachShadow({ mode: 'open' }); this._searchText = ''; } - To expose the current state, we'll add a getter to the
_searchTextfield:get searchText() { return this._searchText; - Still in the class, create a method called
render, which will setshadowRoot.innerHTMLto the template component we want. In this case, it will be the existing HTML for the search box plus a link to the semantic UI styles, so that we can reuse them:render() { this.shadowRoot.innerHTML = ' <link rel="stylesheet" type="text/css" href="../css/semantic.min.css" /> <div class="ui icon input"> <input type="text" placeholder="Search..." /> <i class="search icon"></i> </div> '; } - Create another method called
triggerTextChanged, which will trigger an event to notify listeners that the search text changed. It receives the new text value and passes it to the listeners:triggerTextChanged(text) { const event = new CustomEvent('changed', { bubbles: true, detail: { text }, }); this.dispatchEvent(event); } - In the constructor, after attaching the shadow root, call the
rendermethod and register a listener to the input box so that we can trigger the changed event for our component. The constructor should now look like this:constructor() { super(); this.attachShadow({ mode: 'open' }); this._searchText = ''; this.render(); this.shadowRoot.querySelector('input').addEventListener('keyup', (e) => { this._searchText = e.target.value; this.triggerTextChanged(this._searchText); }); } - With our web component ready, we can replace the old search box with it. In the
dynamic_storefront.htmlHTML, replace thedivtag with theui,icon, andinputclasses, and all their content, with the new component we created:search-box. Also, add the new JavaScript file to the HTML, before all other scripts. You can see the final HTML on GitHub at https://github.com/TrainingByPackt/Professional-JavaScript/blob/master/Lesson01/Exercise07/dynamic_storefront.html. - Save a reference to the
search-boxcomponent by using thequerySelectormethod from the document:const searchBoxElement = document.querySelector('search-box'); - Register an event listener for the changed event so that we know when a new value is available and call
applyFilters:searchBoxElement.addEventListener('changed', (e) => applyFilters()); - Now we can clean the
filter_and_search.jsJavaScript since part of the logic was moved to the new component. We'll do the following cleanup:Remove the
textToSearchvariable (line 2) and replace it withsearchBoxElement.searchText(line 40).Remove the
addTextSearchFilterfunction (lines 16-22) and the call to it at the end of the script (line 70).If everything went fine, opening the file in Chrome will result in the exact same storefront, which is exactly what we wanted.
Now the logic to handle the search box and the search text is encapsulated, which means if we need to change it, we won't need to go around looking for pieces of code spread all around. And when we need to know the value of the search text, we can query the component that holds it for us.
Activity 2: Replacing the Tag Filter with a Web Component
Now that we've replaced the search box with a web component, let's replace the tag filter using the same technique. The idea is that we'll have a component that will store a list of selected tags.
This component will encapsulate the list of selected tags that can be modified by using mutator methods (addTag and removeTag). When the internal state mutates, a changed event gets triggered. Also, when a tag in the list is clicked, a tag-clicked event will be triggered.
Steps:
- Start by copying the code from Exercise 7 into a new folder.
- Create a new file called
tags_holder.jsand in it add a class calledTagsHolderthat extendsHTMLElement, then define a new custom component calledtags-holder. - Create two
rendermethods: one to render the base state and one to render the tags or some text indicating that no tags are selected for filtering. - In the constructor, call
super, attach the component to the shadow root, initialize the list of selected tags, and call bothrendermethods. - Create a getter to expose the list of selected tags.
- Create two trigger methods: one to trigger the
changedevent and one to trigger thetag-clickedevent. - Create two
mutatormethods:addTagandremoveTag. These methods receive the tag name and add tag if not present, or remove the tag if present, in the list of selected tags. If the list was modified, trigger thechangedevent and call the method to re-render the list of tags. - In the HTML, replace the existing code with the new component and add the new script file to it.
- In
filter_and_search.js, remove thetagsToFilterByvariable and replace it with the newmutatormethods and events in the newly created component.Note
The solution for this activity can be found on page 584.
Summary
In this chapter, we explored the DOM specification by learning about its base interfaces, its properties, and its methods. We learned about the relationship between the HTML you write and the tree the browser generates from it. We queried the DOM and navigated the DOM tree. We learned how to create new elements, add them to the tree, and manipulate existing elements. Lastly, we learned how to use Shadow DOM to create isolated DOM trees and custom components that can be easily reused in HTML pages.
In the next chapter, we'll switch gears to the backend world. We'll start learning about Node.js and the basic concepts around it. We'll go through how to install and manage multiple versions of Node.js using nvm, and last but not least, we'll also learn about npm and how to find and use external modules.