


Robots and performing arts share a long history. In fact, the word "Robot" was first coined in 1920 for a play by the Czech author Karel Čapek named "Rossum's Universal Robots". The play featured six robots, but since nobody was able to build a talking Robot at that time, humans had to play them. Times have changed a lot and we don't need humans to disguise themselves as robots anymore. For this project, we will do it the other way round and make some robots who play the humans. Unfortunately, "Rossum's Universal Robots" would require nine humans and six robots, so I chose a scene that's simpler to perform. We are going to build a pair of robots who play the humans in the famous balcony scene from Romeo and Juliet.
To create the Processing sketches for this project, we will need to install the Processing library ttslib. This library is a wrapper around the FreeTTS Java library that helps us to write a sketch that reads out text. We will learn how to change the voice parameters of the kevin16 voice of the FreeTTS package to make our robot's voices distinguishable. We will also create a parser that is able to read the Shakespeare script and which generates text-line objects that allow our script to know which line is read by which robot.
A Drama thread will be used to control the text-to-speech objects, and the draw() method of our sketch will print the script on the screen while our robots perform it, just in case one of them forgets a line. Finally, we will use some cardboard boxes and a pair of cheap speakers to create the robots and their stage. The following figure shows how the robots work:

Since the 18th century, inventors have tried to build talking machines (with varying success). Talking toys swamped the market in the 1980s and 90s. In every decent Sci-Fi novel, computers and robots are capable of speaking. So how could building talking robots not be awesome? And what could be more appropriate to put these speaking capabilities to test than performing a Shakespeare play? So as you see, building actor robots is officially awesome, just in case your non-geek family members should ask.
Since Processing has no speaking capabilities out of the box, our first task is adding an external library using the new Processing Library Manager. We will use the ttslib package, which is a wrapper library around the FreeTTS library.
We will also create a short, speaking Processing sketch to check the installation.
Processing can be extended by contributed libraries. Most of these additional libraries can be installed by navigating to Sketch | Import Library… | Add Library..., as shown in the following screenshot:

In the Library Manager dialog, enter
ttslibin the search field to filter the list of libraries.Click on the ttslib entry and then on the Install button, as shown in the following screenshot, to download and install the library:

To use the new library, we need to import it to our sketch. We do this by clicking on the Sketch menu and choosing Import Library... and then ttslib.
We will now add the
setup()anddraw()methods to our sketch. We will leave thedraw()method empty for now and instantiate aTTSobject in thesetup()method. Your sketch should look like the following code snippet:import guru.ttslib.*; TTS tts; void setup() { tts = new TTS(); } void draw() { }Tip
Downloading the example code
You can download the example code files for all Packt books you have purchased from your account at http://www.packtpub.com. If you purchased this book elsewhere, you can visit http://www.packtpub.com/support and register to have the files e-mailed directly to you.
Now we will add a
mousePressed()method to our sketch, which will get called if someone clicks on our sketch window. In this method, we are calling thespeak()method of theTTSobject we created in thesetup()method.void mousePressed() { tts.speak("Hello, I am a Computer"); }Click on the Run button to start the Processing sketch. A little gray window should appear.
Turn on your speakers or put on your headphones, and click on the gray window. If nothing went wrong, a friendly male computer voice named
kevin16should greet you now.
In steps 1 to 3, we installed an additional library to Processing. The ttslib is a wrapper library around the FreeTTS text-to-speech engine.
Then we created a simple Processing sketch that imports the installed library and creates an instance of the TTS class. The TTS objects match the speakers we need in our sketches. In this case, we created only one speaker and added a mousePressed() method that calls the speak() method of our tts object.
In this part of the project, we are going to create a Drama thread and teach Processing how to read a Shakespeare script. This thread runs in the background and is controlling the performance. We focus on reading and executing the play in this task, and add the speakers in the next one.
Our sketch needs to know which line of the script is read by which robot. So we need to convert the Shakespeare script into a more machine-readable format. For every line of text, we need to know which speaker should read the line. So we take the script and add the letter J and a separation character that is used nowhere else in the script, in front of every line our Juliet-Robot should speak, and we add R and the separation letter for every line our Romeo-Robot should speak. After all these steps, our text file looks something like the following:
R# Lady, by yonder blessed moon I vow,
R# That tips with silver all these fruit-tree tops --

J# O, swear not by the moon, the inconstant moon,
J# That monthly changes in her circled orb,
J# Lest that thy love prove likewise variable.

R# What shall I swear by?

J# Do not swear at all.
J# Or if thou wilt, swear by thy gracious self,
J# Which is the god of my idolatry,
J# And I'll believe thee.
I have already converted the script of the play into this format, and it can be downloaded from the book's support page at http://www.packtpub.com/support.
Let's write our parser:
Let's start a new sketch by navigating to File | New.
Add a
setup()and adraw()method.Now add the prepared script to the Processing sketch by navigating to Sketch | Add File and selecting the file you just downloaded.
Add the following line to your
setup()method:void setup() { String[] rawLines = loadStrings( "romeo_and_juliet.txt" ); }If you renamed your text file, change the filename accordingly.
Create a new tab by clicking on the little arrow icon on the right and choosing New Tab.

Name the class
Line. This class will hold our text lines and the speaker.Add the following code to the tab we just created:
public class Line {
  String speaker;
  String text;

  public Line( String speaker, String text ) {
    this.speaker = speaker;
    this.text = text;
  }
}
Switch back to our main tab and add the following highlighted lines of code to the
setup()method:void setup() { String[] rawLines = loadStrings( "romeo_and_juliet.txt" ); ArrayList lines = new ArrayList(); for ( int i=0; i<rawLines.length; i++) { if (!"".equals(rawLines[i])) { String[] tmp = rawLines[i].split("#"); lines.add( new Line( tmp[0], tmp[1].trim() )); } } }We have read our text lines and parsed them into the
linesarray list, but we still need a class that does something with our text lines. So create another tab by clicking on the arrow icon and choosing New Tab from the menu; name itDrama.Our
Dramaclass will be a thread that runs in the background and tells each of the speaker objects to read one line of text. Add the following lines of code to yourDramaclass:public class Drama extends Thread { int current; ArrayList lines; boolean running; public Drama( ArrayList lines ) { this.lines = lines; current = 0; running = false; } public int getCurrent() { return current; } public Line getLine( int num ) { if ( num >=0 && num < lines.size()) { return (Line)lines.get( num ); } else { return null; } } public boolean isRunning() { return running; } }Now we add a
run()method that gets executed in the background if we start our thread. Since we have no speaker objects yet, we will print the lines on the console and include a little pause after each line.public void run() { running = true; for ( int i =0; i < lines.size(); i++) { current = i; Line l = (Line)lines.get(i); System.out.println( l.text ); delay( 1 ); } running = false; }Switch back to the main sketch tab and add the highlighted code to the
setup()method to create adramathread object, and then feed it the parsed text-lines.Drama drama; void setup() { String[] rawLines = loadStrings( "romeo_and_juliet.txt" ); ArrayList lines = new ArrayList(); for ( int i=0; i<rawLines.length; i++) { if (!"".equals(rawLines[i])) { String[] tmp = rawLines[i].split("#"); lines.add( new Line( tmp[0], tmp[1].trim() )); } } drama = new Drama( lines ); }
So far our sketch parses the text lines and creates a
Dramathread object. What we need next is a method to start it. So add amousePressed()method to start thedramathread.void mousePressed() { if ( !drama.isRunning()) { drama.start(); } }Now add a little bit of text to the
draw()method to tell the user what to do. Add the following code to thedraw()method:void draw() { background(255); textAlign(CENTER); fill(0); text( "Click here for Drama", width/2, height/2 ); }Currently, our sketch window is way too small to contain the text, and we also want to use a bigger font. To change the window size, we simply add the following line to the
setup()method:void setup() { size( 800, 400 ); String[] rawLines = loadStrings( "romeo_and_juliet.txt" ); ArrayList lines = new ArrayList(); for ( int i=0; i<rawLines.length; i++) { if (!"".equals(rawLines[i])) { String[] tmp = rawLines[i].split("#"); lines.add( new Line( tmp[0], tmp[1].trim() )); } } drama = new Drama( lines ); }To change the used font, we need to tell Processing which font to use. The easiest way to find out the names of the fonts that are currently installed on the computer is to create a new sketch, type the following line, and run the sketch:
println(PFont.list());
Copy one of the font names you like and add the following line to the Romeo and Juliet sketch:
  void setup() {

    size( 800, 400 );
    textFont( createFont( "Georgia", 24 ));

...
Replace the font name in the code lines with one of the fonts on your computer.
In this section, we wrote the code that parses a text file and generates a list of Line objects. These objects are then used by a Drama thread that runs in the background as soon as anyone clicks on the sketch window. Currently, the Drama thread prints out the text line on the console.
In steps 6 to 8, we created the Line class. This class is a very simple, so-called Plain Old Java Object (POJO) that holds our text lines, but it doesn't add any functionality.
The code that is controlling the performance of our play was created in steps 10 to 12. We created a thread that is able to run in the background, since in the next step we want to be able to use the draw() method and some TTS objects simultaneously.
The code block in step 12 defines a Boolean variable named running, which we used in the mousePressed() method to check if the sketch is already running or should be started.
In this task, we will combine the things we did in the previous two tasks and add some TTS objects to our Drama thread. We will need two robot actors for this scene speaking with different voices, and since we want to build robots containing a speaker each, we need one of our TTS objects to speak on the left speaker and the other one on the right.
Unfortunately, FreeTTS only comes with one male voice, so we will have to increase the pitch of the voice for our Juliet-Robot.
First, we open the sketch from the previous task and start by creating two
TTSobjects, one for each of our robot actors. Both use the default voice namedkevin16, but we change the pitch for our Juliet-Robot.void setup() { size( 800, 400 ); textFont( createFont( "Georgia", 24 )); String[] rawLines = loadStrings( "romeo_and_juliet.txt" ); ArrayList lines = new ArrayList(); for ( int i=0; i<rawLines.length; i++) { if (!"".equals(rawLines[i])) { String[] tmp = rawLines[i].split("#"); lines.add( new Line( tmp[0], tmp[1].trim() )); } } TTS romeo = new TTS(); TTS juliet = new TTS(); juliet.setPitchShift( 2.4 ); drama = new Drama( lines, romeo, juliet ); }Switch to the
Dramathread and add two variables to our actors.public class Drama extends Thread { TTS romeo; TTS juliet; int current; ArrayList lines; boolean running; …We also need to extend the constructor of our
Dramaclass to enable us to add the actors.public Drama( ArrayList lines, TTS romeo, TTS juliet ) { this.lines = lines; this.romeo = romeo; this.juliet = juliet; current = 0; running = false; }
In the
run()method, we take the current line and choose the actor object depending on the actor variable we added to each line. We also don't need thedelay()and theprintln()methods anymore.public void run() { running = true; for ( int i =0; i < lines.size(); i++) { current = i; Line l = (Line)lines.get(i); if ( "J".equals( l.speaker )) { juliet.speak( l.text ); } if ( "R".equals( l.speaker )) { romeo.speak( l.text ); } } running = false; }Since each of our robots gets his own speaker, we don't want to hear the text on both speakers. We want one robot to use the right one and the other robot, the left one. Fortunately, ttslib provides a
speakLeft()and aspeakRight()method, which do exactly what we need. So change the twospeak()methods to look like the following:... if ( "J".equals( l.speaker )) { juliet.speakLeft( l.text ); } if ( "R".equals( l.speaker )) { romeo.speakRight( l.text ); } ...Currently, our
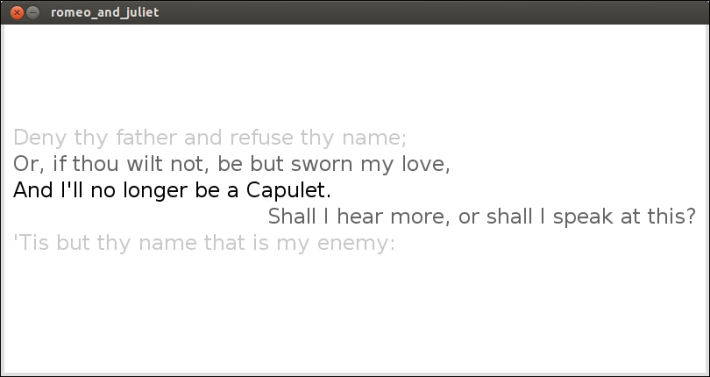
draw()method is somewhat boring and also somewhat misleading if thedramathread is already running. So we will change it to display five lines of the currently read script. Add anifstatement to thedraw()method that checks the state of therunningvariable we added to ourDramathread earlier.void draw() { background(255); textAlign(CENTER); fill(0); if ( !drama.isRunning() ) { text( "Click here for Drama", width/2, height/2 ); } else { } }Now we add a
forloop that displays the previous two lines, the line that's currently being read, and the next two lines of text in our sketch window. We will now change the text alignment so that it matches the speaker of our robot actors. The text will be aligned to the right if our robot usesspeakRight(), and it will be aligned to the left if our robot usesspeakLeft().void draw() { background(255); textAlign(CENTER); fill(0); if ( !drama.isRunning() ) { text( "Click here for Drama", width/2, height/2 ); } else { int current = drama.getCurrent(); for ( int i = -2; i < 3; i ++) { Line l = drama.getLine(i + current); if ( l != null) { if ( "J".equals( l.speaker )) { textAlign( LEFT ); text( l.text, 10, height/2 + i * 30 ); } else { textAlign( RIGHT ); text( l.text, width - 10, height/2 + i * 30 ); } } } } }To show the current line more prominently, we will change the color of the text. We set the color of the current line to black and all other lines to a lighter gray by adding a
fill()statement to theforloop.for ( int i = -2; i < 3; i ++) { fill( abs(i) * 100 ); Line l = drama.getLine(i + current); if ( l != null) { if ( "J".equals( l.speaker )) { textAlign( LEFT ); text( l.text, 10, height/2 + i * 30 ); } else { textAlign( RIGHT ); text( l.text, width - 10, height/2 + i * 30 ); } } }Now run your code and click on the sketch window to start the
dramathread.
In this task of our current mission, we added two TTS objects and changed the voice parameters to make them sound different in step 1. Then we extended our Drama thread and added TTS objects for the voices of our robot actors. In steps 4 and 5, we modified the run method to use the voices we just created instead of just printing the text lines.
In steps 6 to 9, we made changes to the draw() method and made it display five lines of text. The line that's currently spoken is black, and the two lines before and after it fade to a light gray.
The fill() method is used to change not only the fill color of an object, but also the text color. Because the index of our for loop runs from -2 to 2, we can simply take the absolute value and multiply it with 100 to get the gray level. The following is a screenshot of the running sketch:
FreeTTS and ttslib also allow you to use a binary TTS engine named MBROLA. Unfortunately, it's only distributed in binary form, and at the time of writing, it only works on Linux. So if you are using Linux and want to give it a try, you can make the following changes to our Romeo and Juliet sketch:
Open http://tcts.fpms.ac.be/synthesis/mbrola.html in your browser and click on Download. Download the MBROLA binary for your platform.
Download the
female_us1voice from the MBROLA site.Create a folder for the MBROLA binary and unzip the two packages you just downloaded. Make sure that the path to the MBROLA binary contains no blanks, since FreeTTS can't deal with it.
Rename the MBROLA binary to
mbrola.Now go back to your Romeo and Juliet sketch and add the following highlighted line to your
setup()method:void setup() { System.setProperty("mbrola.base", "/path/to/mbrola/"); size( 800, 400 ); textFont( createFont( "Georgia", 24 )); String[] rawLines = loadStrings( "romeo_and_juliet.txt" ); ArrayList lines = new ArrayList(); for ( int i=0; i<rawLines.length; i++) { if (!"".equals(rawLines[i])) { String[] tmp = rawLines[i].split("#"); lines.add( new Line( tmp[0], tmp[1].trim() )); } } drama = new Drama( lines ); TTS romeo = new TTS(); TTS juliet = new TTS(); juliet.setPitchShift( 2.4 ); drama = new Drama( lines, romeo, juliet ); }Make the path of the system property point to the folder where your
mbrolabinary and theus1voice are located.Now you can change the Juliet
TTSobject to the following:TTS juliet = new TTS( "mbrola_us1" );
You will also need to change the pitch of the voice as
mbrola_us1is already a female voice and we don't need to simulate it anymore.
MBROLA is a text-to-speech engine developed at the Faculte Polytechnique de Mons in Belgium. The author requires every publication that mentions their work to mention their book, An Introduction To Text-To-Speech Synthesis, Thierry Dutoit, Kluwer Academic Publishers, Dordrecht, Hardbound, ISBN 1-4020-0369-2, April 1997, 312 pp.
Now we are ready for the final task of our Romeo and Juliet project. We will take some cardboard boxes, Styrofoam spheres, and a pair of cheap speakers or headphones and turn them into our robot-actors.
The robots described in this section are just my version. If you like, you can build them to be completely different and as complex or as simple as you want.
To build our robots, we need some materials and tools, which should not be too hard to find. I used the following for my robot-actors:
Two cardboard boxes for the bodies
Two Styrofoam spheres for the heads
A pair of cheap speakers or headphones
Googly eyes
Acrylic paint
Marker pens
Needles
A hot glue gun
The following picture shows the main materials I used for my robots:

Disassemble your speakers and try to get rid of the body. We only need the speakers, but make sure you don't remove or destroy the cables.
Cut a hole into your cardboard boxes where the speakers should go. Make the holes a bit smaller than the speakers, as shown in the following picture, because we need to glue them to the box later:

Paint your cardboard boxes. I made one white and the other green.
While the boxes are drying, paint some hair on the heads like in the following picture. I made Romeo-Robot's hair black and Juliet-Robot's hair brown.

After the paint has dried, fix the speakers to the cardboard box using some hot glue, as shown in the following picture. Make sure you don't get any glue on the membrane of your speakers.

Now use some markers to draw a face for the robots. You can see the faces of my robots in the following picture:

Use a needle to attach the heads to the bodies of the robots.
Now connect your robot-actors to your sound card and place Juliet on a balcony (for example an empty shoe-box) and make them act.
In this task, we completed our robot-actors by building bodies for them. We used some cardboard boxes, painted them, and added a cheap pair of speakers by gluing them into the boxes. Each robot got a head made of a painted Styrofoam sphere.
As I already said in the introduction to this task, there is no right or wrong way to build your robots. Build them as small or as big as you like. Add some hair, make them a nose, sew a dress for Juliet, draw Romeo a mustache, and so on.
In this mission, we added speaking capabilities to Processing by installing the ttslib library. We learned how to simulate multiple speakers by changing the pitch of voice or installing an additional TTS engine on Linux.
We also defined a speak text format for the Shakespeare script to make parsing easier and created a Drama thread that manages our text lines and controls our robots.
We completed our robot-actors, and they are eagerly waiting to perform in front of an audience. So gather your friends and family and make your robots a stage. They will love it, trust me. Well, at least your robots will love it, as you can see in the following picture:

Now that you have completed building your robot-actors, why don't you try to take them to the next level?
Make them perform different plays. There are plenty of famous dialogs out there that could be performed by your robot-actors.
Currently your robot-actors are stationary. Try to add some servo motors and make them move their heads using an Arduino.
Connect some webcams to your computer and use Processing to record some videos of the performances from different angles.
Make your robot-actors perform a play with a real actor.
Make your robots read live input from the Web such as Twitter feeds or the news.
Your robots don't have to look like humans; make them look like zombies, aliens, animals, and so on.

