


In this chapter you will get acquainted with openFrameworks, learn its specifics and cases when you should use it. Also you will study how to install openFrameworks, run its examples, and make your first openFrameworks project:
Installing openFrameworks and running your first example
File structure of a project
Code structure of a project
Creating a first project – the Pendulum example
Running the book's examples
openFrameworks is an open source C++ toolkit for creative coding. It was initially released by Zachary Lieberman in 2005. Today openFrameworks is one of the main creative coding platforms, which is actively developed by Zachary Lieberman, Theodore Watson, and Arturo Castro with help from the openFrameworks community.
The toolkit is indebted to two significant precursors: the Processing development environment, created by Casey Reas, Ben Fry, and the Processing community; and the ACU Toolkit, a privately distributed C++ library developed by Ben Fry and others in the MIT Media Lab's Aesthetics and Computation Group.
openFrameworks' website is http://openframeworks.cc. It contains latest downloads, documentation, tutorials, and forums.
The main purpose of openFrameworks is to provide users with an easy access to multimedia, computer vision, networking, and other capabilities in C++ by gluing many open libraries into one package. Namely, it acts as a wrapper for libraries such as OpenGL, FreeImage, and OpenCV. The term wrapper means that openFrameworks provides you with new functions and classes, and gives hints on a project structure, but does not limit you. Namely, you can still use all of the C++ capabilities, and directly call functions from all of the linked libraries without using the wrapper's classes.
openFrameworks is cross-platform compatible with Windows, Mac OS X, Linux, iOS, and Android as the supported platforms. It means that if you develop a project for one of the platforms, you can copy the source files and compile the project for any other platform from the list. In the book we will cover developing a project for Windows, Mac OS X, and Linux only. Though many of the examples considered will work on mobile platforms too.
There are many great projects made with openFrameworks. Here are a few "classical" ones:
Funky Forest by Emily Gobeille and Theodore Watson, 2007 – the interactive forest installation
Body Paint by Mehmet Akten, 2009 – drawing on the wall by moving the user's body
Hand from Above by Chris O'Shea, 2009 – outdoor installation working on a big billboard and interacting with pedestrians
openFrameworks has the following architectural specifics:
Its core is based around multimedia, including 2D and 3D graphics, images, video, and sound. So openFrameworks is especially appropriate for developing multimedia projects working in real-time environments.
It works using C++ language, which implies that the code is compiled into native machine instructions and hence works very fast. So it lets you create computing-intensive, ground-breaking projects, using the top capabilities of modern computing technologies.
Such specifics determine cases when you should and should not use openFrameworks for a project development.
You definitely can employ openFrameworks when:
You need to make a creative coding project, such as an interactive audio-visual installation or performance, which works with multimedia in a nontrivial and custom way. Namely, such a project would render a custom particle system, apply effects such as video morphing and slit-scan, or even perform data transcoding.
You need to create a project, which performs intensive data analysis, for example, analyzing data from depth cameras.
Maybe you should not use openFrameworks when:
The project is centered on working with visual controls such as buttons, checkboxes, lists, and sliders. In this case the better option is in using developing platforms like QT, Cocoa, or .Net.
The project does not use multimedia or intensive computations a lot. For example, if you just want to send simple commands to a robot, it is definitely simpler to use Processing.
Tip
Though openFrameworks is an open source project, currently you can use it for developing commercial projects (see details in the openFrameworks license at http://www.openframeworks.cc/about/license.html). To protect the project's content, to add licensing, and to create an installer, you should use special additional software. Note that all of this software is included in iOS and Android development kits, so commercial developing for mobile platforms is quite easy.
Now we will consider how to install openFrameworks in Windows, Mac OS X, and Linux, and execute one of the openFrameworks' examples.
Note
Historically (and currently) openFrameworks works best in Mac OS X. So when we use openFrameworks in interactive performances, we often do it in Mac OS X. Because performance is a short event (5 to 30 minutes), it is highly critical the software works as maximally fast and stable as it can.
For interactive installations, which are exhibited for a longer time (hours to months), and rare interruption in work is not so critical, we use any OS, depending on the available hardware.
The installation files and setup guides for all supported operating systems are located at http://www.openframeworks.cc/download/. Let's consider them in detail.
Within Windows 7 and 8 there are two choices of programming environments: Microsoft Visual Studio and Code::Blocks. Microsoft Visual Studio is one of the most popular environments in the world. It is very mature and stable. Many libraries (included and not included in openFrameworks) are adopted for Visual Studio. So if you are a novice in C++ programming, but you know that you need to link additional libraries in your project, Visual Studio is the best option for you.
Code::Blocks is a more lightweight environment and some developers prefer to use it. If you are a novice and just want to play with openFrameworks in simple projects, you should probably to do it with Code::Blocks.
The current version of Microsoft Visual Studio is 2012. In general Microsoft Visual Studio 2012 is a commercial software. But it has a lightweight free version, Microsoft Visual Studio Express, which is full enough for developing projects with openFrameworks.
The installation steps are as follows:
Install Microsoft Visual Studio Express 2012 for Windows Desktop. Navigate to http://microsoft.com, enter
Visual Studio Express 2012 for Windows Desktop downloadin the search line, and press Enter to start searching. Click the Download button. When downloading page opens, press the Install now button. Then you will go through the process of installation. When installation is finished, run Visual Studio and register it (registration is free).Download the openFrameworks' archive. Go to http://www.openframeworks.cc/download/ and download the version for Visual Studio. The downloaded ZIP file should be named like
of_v0.8.0_vs_release.zip. Unzip the downloaded file; it will be a folder containing openFrameworks. Move the folder to any location on your computer, for example,C:\openFrameworks.Let's compile and run some example to verify openFrameworks is working correctly. Navigate to the
examples/3d/pointCloudExampleopenFrameworks folder and openpointCloudExample.slnin Visual Studio.You will see an application window with a boy's face made from 3D points as shown in the following screenshot:

Press the left mouse button and move the mouse to rotate the face, or press the right mouse button and move the mouse to scale the face.
Note
To understand the code of the example you need to learn how to work with images and 3D graphics, see Chapter 4, Images and Textures, and Chapter 7, Drawing in 3D. For creating your own point cloud, for example, from your own face, you need to learn how to work with depth cameras, see Chapter 10, Using Depth Cameras. Also check out the description of the project's files in the File structure of a project section.
Also, note the second window associated with the running application. It is colored in black and possibly contains some text. This is a console window, where openFrameworks writes various information, warnings, and errors. When you have some problems, check the contents of this window.
Now press Esc for closing the application.
You have successfully run the openFrameworks example and now can develop your own projects.
Tip
If you try to run a project made with Visual Studio on some other computer, it will probably not start, and show an error message. The possible reason is that you need to install Visual Studio redistributables. To download it, go to http://microsoft.com, enter Visual C++ Redistributable for Visual Studio in the search line, and press Enter to start searching. Click on the first search result and download the installation file.
Before installing the redistributables, try to run your project. Maybe it will work.
Code::Blocks is an open source development environment for Windows. The current version is 12.11. The installation steps are as follows:
Install Code::Blocks. Go to http://www.codeblocks.org, click on the Downloads menu item, and click on Download the binary release. Then select the file to download, which includes mingw. For example,
codeblocks-12.11mingw-setup.exe.Install additions for Code::Blocks, which are needed for openFrameworks working. Go to http://www.openframeworks.cc/setup/codeblocks/ and see instructions in the Add files to MinGW section.
Download the openFrameworks archive. Go to http://www.openframeworks.cc/download/ and download openFrameworks for Code::Blocks (Windows). The downloaded ZIP file should be named like
of_v0.8.0_win_cb_release. Unzip the downloaded file; it will be a folder containing openFrameworks. Move the folder to any location on your computer, for example,C:\openFrameworks.Let's compile and run an example to verify openFrameworks is working correctly. Navigate to the
examples/3d/pointCloudExampleopenFrameworks folder and openpointCloudExample.workspacein Code::Blocks.The first time you open Code::Blocks it will ask you which compiler you want to use. Be sure GNU GCC Compiler is selected and continue.
Press the Build button and then the Run button:

Follow the steps 6, 7, 8, and 9 from the Microsoft Visual Studio section.
We will be using Mac OS X 10.8.4 and Xcode 4.6.3. The installation steps are as follows:
Download the openFrameworks archive. Go to http://www.openframeworks.cc/download/ and download openFrameworks for Xcode. The downloaded ZIP file should be named like
of_v0.8.0_osx_release. Unzip the downloaded file; it will be a folder containing openFrameworks. Move the folder to any location on your computer, for example, on the desktop.Let's compile and run some examples to verify openFrameworks is working correctly. Navigate to the
examples/3d/pointCloudExampleopenFrameworks folder and openpointCloudExample.xcodeprojin Xcode.The project in Xcode contains several schemes for building openFrameworks and the example itself. For compiling your project, you need to select the example's scheme. Check it out. If the current scheme is openFrameworks, you will see the following button:

Click on it on the left-hand side and select the example project,
pointCloudExample:
Press Command + B to compile the project.

Follow the steps 6, 8, and 9 from the Microsoft Visual Studio section. (Considering step 7, describing console window, the separate console window does not appear in Mac OS X, and all such information is printed in the Xcode console.)
Tip
Downloading the color graphics PDF
For downloading the colored graphics of this book visit:
http://www.packtpub.com/sites/default/files/downloads/8048OS_ColoredImages.pdf
This section will guide you in installing openFrameworks for Code::Block on the Ubuntu version of Linux. The current version is 12.11.
Note
You can install openFrameworks not only on Ubuntu, but also on Debian and Fedora versions of Linux. See installation guides at http://www.openframeworks.cc/setup/linux-codeblocks/.
Also, you can use Eclipse development environment instead of Code::Blocks. See http://www.openframeworks.cc/setup/linux-eclipse/.
The installation steps are as follows:
Install Code::Blocks. In the main menu in Ubuntu, click on the Dash home icon, search for Ubuntu Software Center, and open it by selecting the Ubuntu Software Center icon. Search for Code Blocks here. The Code::Blocks program should be the first item listed. Click on the Install button and follow the instructions.
Download the openFrameworks archive. Go to http://www.openframeworks.cc/download/ and download openFrameworks for Code::Blocks (Linux), for a 32- or 64-bit operating system. The downloaded ZIP file should be named like
of_v0.8.0_linux_release.tarorof_v0.8.0_linux64_release.tar. Unzip the downloaded file; it will be a folder containing openFrameworks. Move the folder to any location on your computer.Now you should install openFrameworks by running some scripts from Terminal. Please refer to http://www.openframeworks.cc/setup/linux-codeblocks/ for detailed instructions.
Follow the steps 4, 5, 6, and 7 from the Code::Blocks (Windows) section for installation steps on running an openFrameworks example.
Till now we have installed openFrameworks and checked its working. Let's explore the contents of its folder. It consists of a number of folders, including addons, apps, examples, libs, projectGenerator, and text files such as license.md and readme.txt.
Let's consider some of the most important folders in detail.
This folder contains simple examples covering almost all the aspects of openFrameworks, sorted by the following topics:
3d: This folder demonstrates the basics of 3D graphics and 3D math (see Chapter 7, Drawing in 3D, for more information on the topic)addons: This folder contains examples of using various addons, which are extensions of openFrameworks' core (see Appendix A, Working with Addons, for more information on the topic)communication: This folder contains examples of communicating with peripherals using serial port (most often via USB), for example, for connecting with Arduinoempty: This folder containsemptyExample, the simplest project for openFrameworks, which we will use as a starting point for developing most of the examples across the bookevents: This folder demonstrates built-in openFrameworks' event system usage, like key pressing and timing, and also working with custom event objectsgl: This folder contains advanced examples on 2D and 3D graphics, including FBO, VBO, and shaders (see Chapter 2, Drawing in 2D, Chapter 7, Drawing in 3D, and Chapter 8, Using Shaders, for detailed information on these topics)graphics: This folder demonstrates basic 2D graphics capabilities and working with images (see Chapter 2, Drawing in 2D, and Chapter 4, Images and Textures, for more information on these topics)gui: This folder exposes how to add graphical user interface, containing buttons, sliders, and checkboxes to an openFrameworks projectmath: This folder has examples on working with Perlin noise, simple particle system, and also with vector mathematics (see Appendix B, Perlin noise, and Chapter 3, Building a Simple Particle System, for more information on these topics)sound: This folder contains examples that demonstrate how to play, generate at low-level, and record sounds (see Chapter 6, Working with Sounds, for more information on the topic)utils: This folder demonstrates working with small but important topics such as converting values between different types (for example, converting int to string), working with directories, and using threadsvideo: This folder demonstrates how to play videos, process video frames, and grab live video from camera (see Chapter 5, Working with Videos, for more information on the topic)
Though most of the topics will be covered in this book, we highly recommend that you run and see as many examples of the code as you can. It is very helpful for dipping into the openFrameworks world.
This is a folder, in which all your projects should live. More specifically, you should place the projects inside some subfolder of the apps folder. By now this folder contains the myApps folder, and you can use it for your projects. Also you can create new folders, like Performances2014, and place corresponding projects there.
Note, if you will try to compile a project placed outside a subfolder of the apps folder, the compiler can give an error that it can not find the openFrameworks library.
This folder contains addons. These are the extensions of the basic openFrameworks capabilities. When you need to add some extension to openFrameworks, you will install it into this folder. We discuss the addons in detail in Appendix A, Working with Addons.
All openFrameworks projects have a similar structure of folders and files. Let's consider this in detail by looking at the openFrameworks' pointCloudExample project.
Open the examples/3d/pointCloudExample folder. It consists of the following files and folders:
The
binfolder contains an executable file of the project (maybe also a number of libraries in the.dllfiles will be there—it depends on your operating system). If you compile the project, as it is described in the Installing openFrameworks and running your first example section, most probably you will find there is an executable file namedpointCloudExample_debug.The
_debugsuffix means that the project was compiled in the Debug mode of compilation. This mode lets you debug the project by using breakpoints and other debugging tools.Note
Breakpoint is a debugging tool, which pauses execution of the project in a specified line of code and lets you inspect the current values of the project's variables.
Projects compiled in the Debug mode can work very slowly. So when your project is working properly, always compile it in the Release mode of the compilation. Many examples in the book should be compiled in the Release mode for good performance. In this case, the executable file will be called without the
_debugsuffix, such aspointCloudExample.Also, inside the
binfolder you will find thedatasubfolder. This is a folder where all your contents should be located: images, videos, sounds, XML, and text files. openFrameworks projects use this folder as a default place for loading and saving the data.In the considered project, this folder contains one image file named
linzer.png.Note
This image consists of pixels, which hold red, green, blue, and alpha color components (
red,green,blue,alpha). Each image's pixel (x,y) is transformed into a 3D point (x,y,z) with color (r,g,b,a), so that the point's third coordinatezis calculated from thealphavalue. As a result we obtain the resultant 3D point cloud, which is drawn on the screen. (See Chapter 4, Images and Textures, for details on getting the pixels' colors from the images.)The
srcfolder contains C++ source codes for your project. Often, source codes are represented in just three files:main.cpp,testApp.h, andtestApp.cpp. We will consider these files a bit later, in the Code structure of a project section. Note that this folder can contain other.hand.cppfiles of your project.
Also the project's folder contains a special project file for your development environment. It has extension .sln (Visual Studio), .xcodeproj (Xcode), or .workspace (Code::Blocks). This is the file which you should open in your development environment in order to edit, compile, and run the project. (In the considered example it has the name pointCloudExample.sln, pointCloudExample.xcodeproj, or pointCloudExample.workspace.)
Additionally, the project's folder can contain some other files, for example, the current project settings (the set of files depend on the development environment).
Source codes of an openFrameworks' project are placed in the project's src folder and consist of at least three files: main.cpp, testApp.h, and testApp.cpp.
Note
Remember the following convention: if some function or class name begins with of, it means that it belongs to openFrameworks. Examples are ofPoint, ofImage, and ofSetColor(). (If some name begins with ofx, it means that it is part of some openFrameworks addon, for example, ofxXmlSettings.)
In C++ language specification each project must have a .cpp file with the defined main() function. This function is an entry point for an operating system to start the application. In openFrameworks, the main() function is contained in the main.cpp file. The most important line of the function is the following:
ofSetupOpenGL( &window, 1024, 768, OF_WINDOW );
This ofSetupOpenGL() function calling instructs openFrameworks that you need to create a window for visual output with the width 1024 and height 768 pixels. The last parameter OF_WINDOW means that you need to create a window, which the user can move and resize on the desktop screen. If you specify the last parameters as OF_FULLSCREEN, the project will run at full screen—such a mode is important for many projects.
For example, if you need to show your project on the full screen with dimensions 1920 x 1024 pixels, you can do it by replacing the ofSetupOpenGL() call with the following line:
ofSetupOpenGL( &window, 1920, 1024, OF_FULLSCREEN );
Normally you need not change the main.cpp file at all, because the settings of screen size can be done in the testApp.cpp text, which we consider now.
This file begins with #pragma once. This is a compiler directive, which should be present at the beginning of all the .h files. The next line is #include "ofMain.h". It includes openFrameworks' core classes and functions. After this, the code contains declaration of the testApp class, which is inherited from the openFrameworks' ofBaseApp class:
#pragma once

#include "ofMain.h"

class testApp : public ofBaseApp{
public:
  //openFrameworks' standard functions declarations
  void setup();
  void update();
  void draw();

  //...

  //Declarations of custom objects for the project
  ofEasyCam cam;
  ofMesh mesh;
  ofImage img;
};
The testApp class contains a number of functions, setup(), update(), draw(), and some others. These are the functions required for your project to work. They are defined in the ofBaseApp class and called by openFrameworks. (The linking of the testApp class to the openFrameworks engine is done within the main() function. Its last line creates an object of this class and links it to the window, controlled by openFrameworks.) We will describe the meaning of the functions in the next section.
In the end of the class definition you will see declarations of the cam, mesh, and img objects. These are custom objects defined just in this example. In your own projects, you should add declarations of your objects here too.
Note
For simplicity you can declare objects right in the testApp.cpp file, but be careful, objects of some classes like ofEasyCam, ofThread, and ofxTCPServer will not work properly and can cause the application to crash if defined as static variables not belonging to the testApp class. The reason is that openFrameworks performs some actions before the testApp class' object is created, and such classes rely on this. Note that in some examples of the book we sometimes use such declarations for simple types (float, int, ofPoint, ofImage, and others).
Let's sum up: when creating your own project you should keep declarations of the setup(), update(), draw() functions, and others untouched, and also add your objects' and functions' declarations, which are needed for your project.
The testApp.cpp file contains definitions of all functions, declared in testApp.h. Let's explain the standard functions of the testApp class.
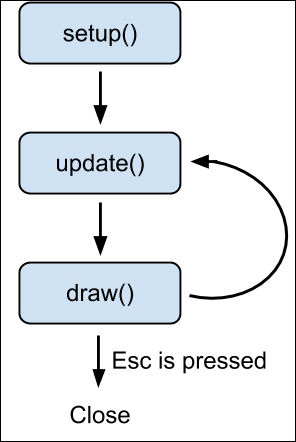
The most important functions are setup(), update(), and draw(). setup() is called first, and then update() and draw() are called in an infinite cycle, until the user presses the Esc key to close the project:
Note
Besides pressing Esc, to finish the projects' execution, the user can just close the projects' window.
If you need the project to terminate itself, call the OF_EXIT_APP( val ) function with some integer value val.
Let's consider these functions in detail.
The setup() function is called by openFrameworks just once, at the start of the project. This is the best place for setting screen parameters such as refresh rate, load images and videos, and start processes like camera grabbing.
The typical functions for controlling screen parameters are the following:
ofSetFrameRate( rate ): This parameter sets the frame rate of screen refresh equal to the valuerateof typeint. Also, it controls the rate of callingupdate()anddraw(). The typical value is 60, which corresponds to the frame rate of most TVs and projectors. The default value is zero, which means that the frame rate is as large as possible (in some cases it is unwanted).ofSetVerticalSync( v ): This parameter enables or disables synchronization of screen refresh with the video card's physical refresh, withvof typebool. Enabling this mode improves the quality of a fast-moving object's rendering, but slightly decreases the performance. By default the synchronization is enabled.ofSetFullscreen( v ): This parameter enables or disables full screen mode, withvof typebool.ofSetWindowShape( w, h ): This parameter sets the size of the output window so that the drawing area will have size widthwand heighthpixels.
Note that you can call these functions from other functions of the testApp class too.
This function is called by openFrameworks right after the setup() call. This is the place where all computations should be performed, like changing positions of objects, analyzing data from cameras, and network exchange.
This function is called by openFrameworks after update(). All drawing functions should be placed here. After draw(), openFrameworks again calls update(), so we obtain a cycle of the update() and draw() methods.
The typical drawing functions are as follows:
ofSetBackground( r, g, b ), wherer,g, andbare integer values from0to255, specifying red, green, and blue components of screen backgroundofSetColor( r, g, b )sets the drawing colorofLine( x1, y1, x2, y2 )draws a line segment connecting points (x1,y1) and (x2,y2)
The testApp.cpp file contains definitions of other functions, declared in testApp.h. These are event-driven functions; openFrameworks calls them when some event occurs, like mouse moving or keyboard pressing. Some of the most important functions are the following:
The
keyPressed( key )andkeyReleased( key )functions are called by openFrameworks when some key is pressed or released. Herekeyis anintvalue, which can be compared with char values like'a', and with constants denoting special keys likeOF_KEY_RETURNfor the Return (Enter) key,OF_KEY_LEFTfor the left cursor key, and so on. See the full list of special keys constants in thelibs/openFrameworks/utils/ofConstants.hfile.The
mouseMoved( x, y )function is called when the mouse is moved over the project's window without pressing any keys. Herexandyare the mouse pointer coordinates in pixels, with the center of the coordinates in the top-left corner of the window.The
mouseReleased( x, y, button ),mouseDragged( x, y, button ), andmousePressed( x, y, button )functions are called when a mouse button is pressed, when the mouse is moving, and when the mouse button is released, respectively. Herebuttonequals to0,1, and2for left, center, and right mouse buttons respectively.The
windowResized( w, h )function is called when the size of the window is changed by the user or by calling theofSetWindowShape()function. Herewandhare equal to the current width and height of the window.
Now we will discuss the ways for creating a new openFrameworks project.
For developing your projects you have two possibilities: start it from an existing example or create it using the Project Generator wizard. Let's discuss both in detail.
The easiest way to start your own project is to just copy some existing examples (or your own project) into the apps/myApps folder, or any other subfolder of the apps folder. Then rename the folder as you want (for example, to myInteractiveWall), and open the project using your developing environment. Now you can change the code, and run the project.
This way, almost all the examples in the book are made from the emptyExample project, located in the examples/empty folder.
Such an approach is indeed very easy. Also, it is especially useful for working with some complicated addons such as ofxOpenNI (see Chapter 10, Using Depth Cameras, for more information on this addon). Namely, you can have difficulties with linking such addons by yourself or with projectGenerator. In this case, just start your project from the existing working addon's example.
You can create a new project using the Project Generator wizard, located in the projectGenerator folder. It lets you specify the project's name, its folder, and the list of addons needed in the project.
Such a way is simple too, and it is especially useful when you start a new project, which needs to use many addons. Manual linking of addons can take much time, and Project Generator does it automatically for you. For further details see the Using Project Generator section in Appendix A, Working with Addons.
In our opinion, using Project Generator just for creating projects with proper names is not so important, because you can rename the project by yourself using the development environment. So, we use this wizard just for linking addons to new projects.
Now we are ready to create our first project with openFrameworks.
Let's create an openFrameworks project, which draws a moving pendulum in 2D, consisting of a ball dangled on a rubber segment. The example is based on the emptyExample project in openFrameworks. Perform the following steps to create the project:
Copy the
emptyExampleproject's folder into the folder intended for holding your applications (likeapps/myApps), and rename it toPendulum.Go inside the
Pendulumfolder and open this project in your development environment (emptyExample.slnfor Visual Studio,emptyExample.xcodeprojfor Xcode, oremptyExample.workspacefor Code::Blocks).Open the file
testApp.hin the development environment, and in thetestAppclass declaration add the declarations for the pendulum's center of suspension and the ball's position and velocity:ofPoint pos0; //Center of suspension ofPoint pos; //Ball's position ofPoint velocity; //Ball's velocity
Here
ofPointis the openFrameworks' class for holding point coordinates, it has x and y members (we will study it in Chapter 2, Drawing in 2D).Open the file
testApp.cpp, and fill the body of thetestApp::setup()function definition:void testApp::setup(){ //Set screen frame rate ofSetFrameRate( 60 ); //Set initial values pos0 = ofPoint( 512, 300 ); pos = ofPoint( 600, 200 ); velocity = ofPoint( 100, 0 ); }In this function we set the frame rate to
60frames per second, and we also set initial values for all three points.Now fill the body of the
testApp::update()function definition:void testApp::update(){ //Constants float dt = 1.0 / 60.0; //Time step float mass = 0.1; //Mass of a ball float rubberLen = 200.0; //Segment's length float k = 0.5; //Segment's stiffness ofPoint g( 0.0, 9.8 ); //Gravity force //Compute Hooke's force ofPoint delta = pos - pos0; float len = delta.length(); //Vector's length float hookeValue = k * (len - rubberLen); delta.normalize(); //Normalize vector's length ofPoint hookeForce = delta * (-hookeValue); //Update velocity and pos ofPoint force = hookeForce + g; //Resulted force ofPoint a = force / mass; //Second Newton's law velocity += a * dt; //Euler method pos += velocity * dt; //Euler method }This function updates
velocityandpos, using Newton's second law and the Euler method. For such a purpose, we compute the force acting on a ball as a sum of Hooke's force between the ball, suspension point, and gravity force.Tip
The details on the Euler method can be seen in the Defining the particle functions section in Chapter 3, Building a Simple Particle System. The information on the Newton's second law, Hooke's force, and gravity force can be seen at the following links:
Finally, fill the body of the
testApp::draw()function definition:void testApp::draw(){ //Set white background ofBackground( 255, 255, 255 ); //Draw rubber as a blue line ofSetColor( 0, 0, 255 ); //Set blue color ofLine( pos0.x, pos0.y, pos.x, pos.y ); //Draw line //Draw ball as a red circle ofSetColor( 255, 0, 0 ); //Set red color ofFill(); //Enable filling ofCircle( pos.x, pos.y, 20 ); //Draw circle }Here we set a white background, draw a rubber as a blue line from
pos0topos, and also draw a ball as a red circle. Note that we use theofFill()function, which enables openFrameworks' mode to draw filled primitives (circles, rectangles, and triangles). See more details on these drawing functions in Chapter 2, Drawing in 2D.Run the project. You will see the animation of a moving ball:

Play with numerical values in the setup() and update() functions and see how it affects the dynamics of the pendulum.
We just saw the first of the book's examples. You will see there are many other examples in the book. Some examples require additional content files, and also the code of some of the examples is given in shortened form. So for efficient work with the book, please download the book's example source codes and its content files from the Support tab of the book's page available at the following link:
http://www.packtpub.com/mastering-openframeworks-creative-coding-demystified/book
Note all the example projects are presented just as source files (.h and .cpp). The content files such as images, videos, and sounds are located in separate folders. For running an example, you need to create a new openFrameworks project, copy the .h and .cpp source files of the downloaded example to the src folder of this project (with replacing files), and copy the needed content files into the bin/data folder of the project.
We will always specify which project should be taken as a base for the example project, and which content files are required for running the example. Also, for convenience, we will place the name of the folder with the example's codes in an information box, like this:
The last section of the chapter mentions some utility functions, which will be used in examples across the book, or just can be useful in your projects.
ofMap( v, v0, v1, out0, out1 ): This function performs linear interpolation of a float valuevfrom the segment[v0, v1]to the segment[out0, out1]. Note, it does not control boundaries ofv, and just uses the formula (v-v0)/(v1-v0)*(out1-out0) + out0. For controlling boundaries, call this function with the last optional parameter set totrue:ofMap( v, v0, v1, out0, out1, true ). Then the result will be clamped to[out0, out1].ofClamp( v, v0, v1 ): This function clamps the float valuevto the segment[v0, v1]that is returnsmin( max( v, v0 ), v1 ).ofRandom( a, b ): This function generates a pseudo-random number in the segment[a, b]. (Actually, it returns a value always less than that ofb).ofNoise ( x ),ofNoise( x, y ),ofNoise( x, y, z ), andofNoise( x, y, z, w ):These functions return Perlin noise value, see the details in Appendix B, Perlin Noise.ofToString( v ): This function converts theintorfloatvaluevinto string-returning valueofToInt( s )andofToFloat( s ): These functions convert the stringsintointorfloatreturning values respectively.ofGetWidth()andofGetHeight(): These functions return the current width and height of the project's screen, in pixels.ofGetElapsedTimef(): This function returns the value of seconds lapsed from the project's start. This is afloatvalue, measured with millisecond accuracy. For example, returned value 123.4 means 123 seconds and 400 milliseconds.ofShowCursor()andofHideCursor(): These functions show and hide the mouse cursor.
For printing information into a console window, you can use the standard cout stream. For example, for printing time from the project's start, use the following code:
cout << "Time: " << ofGetElapsedTimef() << endl;
Here, endl is a standard constant, which means starting a new line in the console.
In this chapter we learned what is openFrameworks and when it should be used, how to install it, and run its examples. Also, we explored the project's folder and code structure, and finally made the first project with pendulum simulation.
In the next chapter we learn how to work with 2D graphics using openFrameworks.