


NetBeans IDE 8 is the official IDE for Java 8, and the only IDE that can be downloaded with official distributions of Java 8.
The latest version, NetBeans IDE 8.0.2, provides tools to allow developers to create desktop, mobile, and web applications using all of the latest Java specifications such as Java SE 8, Java ME 8, and Java EE 7.
This chapter will cover the following topics:
Choosing a download bundle of NetBeans
Downloading and installing NetBeans
Updating NetBeans to the latest version
Downloading NetBeans source code from Mercurial
Building NetBeans
NetBeans configuration
There are three different installation bundles of NetBeans (which can be downloaded from the NetBeans site) that are relevant to Java developers:
Java SE
Java EE
All
In addition to these three bundles, C/C++ and HTML5 & PHP bundles are also available for download. These bundles are not targeted at Java developers though, so they will not be discussed further in this book.
The Java SE bundle provides the standard NetBeans Platform SDK along with support for Java SE and Java FX developers.
The Java EE bundle contains everything that the SE bundle includes, but adds support for Java EE and HTML5 developers. GlassFish Server Open Source Edition 4.1 and Apache Tomcat 8.0.15 are also included with the Java EE bundle.
The All bundle contains everything that the EE bundle includes, but adds support for C/C++, Groovy, and PHP developers.

Downloading an installation of NetBeans (Java SE, Java EE, or All) is achieved by selecting the bundle to download and then clicking on the Download button for that bundle, as shown in the preceding screenshot.
All of the examples and screenshots in this book have been created with the Java EE bundle of NetBeans. It is recommended that you use the Java EE download bundle of NetBeans to adhere as closely as possible to the examples in this book.
Note
To install any version of NetBeans 8, the Java JDK Version 7 Update 10 or later, or Java JDK 8 or later, is required. These can be downloaded, if not already installed on your target system, from http://www.oracle.com/technetwork/java/javase/downloads.
Having downloaded the appropriate NetBeans bundle installer for your operating system, you can install NetBeans on your development system. The installation procedure differs slightly for the three main operating systems NetBeans is available for.
For Windows, simply launch the NetBeans installer by double-clicking on the file, netbeans-<xxx>-windows.exe (the exact filename differs depending upon the version and bundle downloaded).
For Mac OS X, double-click on the downloaded file, netbeans-<xxx>-macosx.dmg, to mount the installation device. From there, double-click on the included NetBeans xxx.mpkg file to start the installation (the exact names of the .dmg and .mpkg files vary, depending upon the version and bundle downloaded).
For Linux, NetBeans is installed via a command-line script, so first we must change the permissions of the downloaded file to be executable. From a terminal window, execute the following command:
chmod +x netbeans-<xxx>-linux.sh
Tip
Downloading the example code
You can download the example code files from your account at http://www.packtpub.com for all the Packt Publishing books you have purchased. If you purchased this book elsewhere, you can visit http://www.packtpub.com/support and register to have the files e-mailed directly to you. You can also download the code samples from https://github.com/doobrie/masteringnb.
To continue with the installation on Linux, we must now execute the downloaded installer. From a terminal window, execute the following command:
./netbeans-xxx-linux.sh
Tip
The installation of the JDK can sometimes be complex on some Linux distributions. Fortunately, NetBeans can be easily executed with an unpacked JDK. If installation of the JDK is complex, simply unpack the JDK files into a <jdk_folder> folder and then execute the installer with the –javahome argument passing in the JDK folder, for example, /netbeans-xxx-linux.sh –javahome <jdk_folder>.
On all of the major operating systems (Windows, Mac OS X, and Linux), the procedure for installing NetBeans is now very similar. After launching the setup procedure, the installer takes you through the several steps in a wizard style to install NetBeans.
Having agreed to the NetBeans license and selected a folder for installation, the installer displays the Installation Type window:
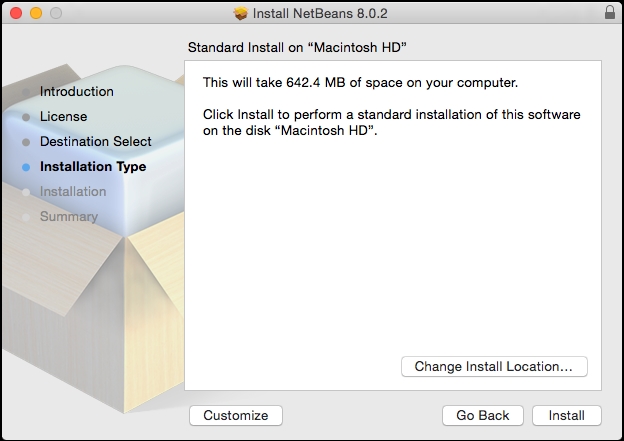
From here, we can customize NetBeans by clicking on the Customize button.
Note
On Windows and Linux, the preceding screenshot will differ slightly, showing the different application servers that can be installed with NetBeans.
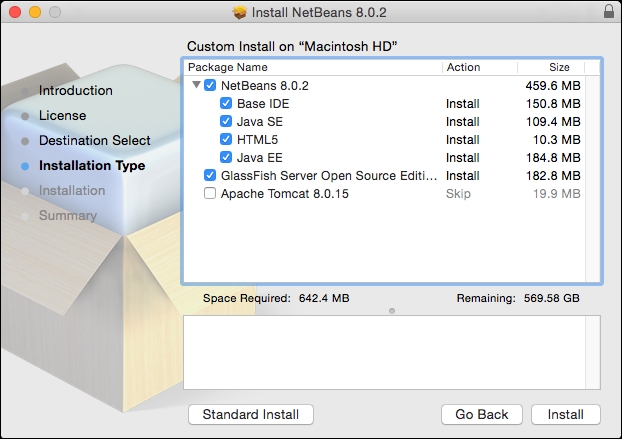
The next screenshot shows the customization options for the Java EE bundle. The options may differ depending upon which bundle you choose to download. For the Java EE bundle, different base components of the NetBeans Platform can be installed, namely Base IDE, Java SE, HTML5, and Java EE.
The Java EE bundle (and also the All bundle) gives the option of installing GlassFish Open Source Edition and Tomcat 8. If either GlassFish or Tomcat is chosen for installation, NetBeans will automatically configure them as servers within the IDE.
Usually, installing the latest released version of NetBeans is the best course of action. With NetBeans, however, it is possible to download and install the previous versions or even daily builds.
Tip
Be careful with daily builds; they have not been through the rigorous testing procedure that the full release builds had, and may contain bugs!
To download the previous released versions of NetBeans, browse to the NetBeans download page at http://www.netbeans.org/downloads and click on the Archive link in the top-right corner of the page, as shown in the following screenshot:

Tip
For easy access, the previous version of NetBeans is available for downloading by clicking on the appropriate link at the top of the page (version 8.0.1 in the preceding screenshot) rather than clicking on the Archive link and manually selecting a version to install.
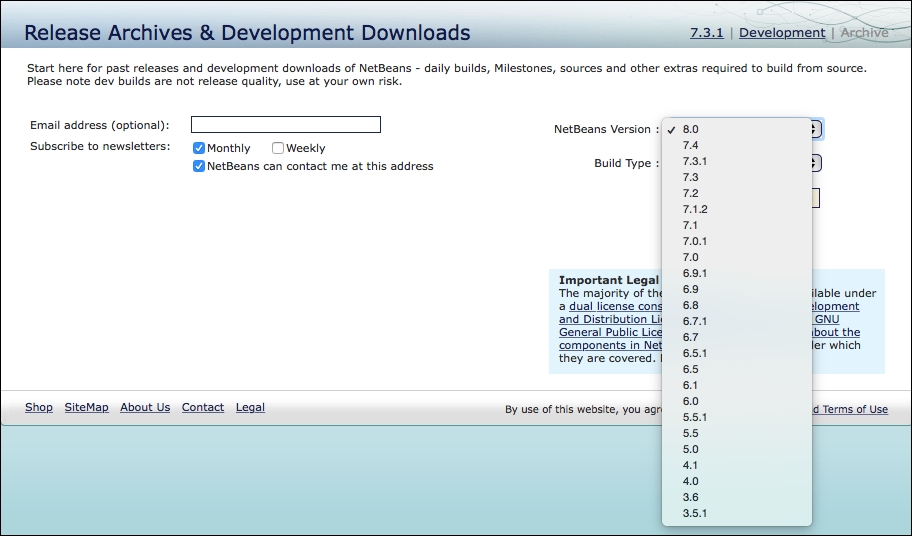
From the resultant page, select the previous release you wish to download (for example, NetBeans 7.3) and then click on the Continue button. From here, you can choose whether to download the Java SE, Java EE, or All distributions of NetBeans. The following screenshot shows the previous versions of NetBeans that are currently available for download:
To download the latest daily build of NetBeans, simply click on the Development link in the top-right corner of the NetBeans download page. Again, from the resulting page, select the download bundle (Java SE, Java EE, or All) you require and follow the standard NetBeans installation procedure for your operating system, as outlined previously.
When installing NetBeans, a special directory is created on your computer that stores all the user configuration data for NetBeans; this folder is referred to as a userdir or user directory. This folder contains information on what plugins you have activated in NetBeans, what editor settings you've configured, and much more data. In fact, everything that makes your instance of NetBeans unique to you is stored in this folder.
On Mac OS X, the user directory is located at ~/Library/Application Support/NetBeans.
On Windows, it is located at c:\Users\<user>\AppData\Roaming\NetBeans.
On Linux, the user directory is located at ~/.netbeans.
In the user directory are the separate directories for each different version of NetBeans that you have installed. With this technique, it is therefore possible to have different configurations for different versions of NetBeans that are installed.
In addition to a user directory, NetBeans also makes use of a hidden cache directory, often referred to as a cachedir. The cache directory contains large amount of cache data and thus, it can become a large directory. Due to the information that's written into the cache directory, it must be stored in a different location to the user directory. The contents of the cache directory can be deleted without any settings being lost; it will be recreated the next time NetBeans is executed.
On Mac OS X, the cache directory is located at ~/Library/Caches/NetBeans.
On Windows, the cache directory is located at c:\Users\<user>\AppData\Local\NetBeans\Cache.
On Linux, the cache directory is located at ~/.cache/netbeans.
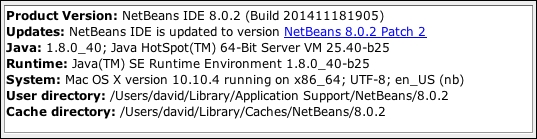
An easy way to find out the location of the user and cache directories is to display the NetBeans About dialog. In this dialog, the location of these directories is given along with the information about the version of NetBeans and Java that are in use:
When new versions of NetBeans are released, one simple way to upgrade to the latest version is to download the new version and install it, as shown previously.
When you install NetBeans this way and already have an installation of NetBeans on your computer, NetBeans will ask whether you wish to use the settings from the previous version:

Selecting Yes to this option will import all of the user directory settings from the previous version of NetBeans into the newly installed version. Selecting No will start NetBeans with a clean and empty user directory.
The source code for NetBeans itself is available under the Common Development and Distribution License (CDDL) v1.0 and GNU General Public License (GPL) v2.
It's possible to obtain the source for NetBeans either as a .zip file, containing the entire source for a specific release, by cloning the code from the NetBeans Mercurial repository or by viewing the files from within a browser.
If you just want to look at the NetBeans source code and aren't interested in making changes, you can download the source as a .zip archive from the relevant download page for any release. At the bottom of each download page, there is a link to download the source in the ZIP file format, as shown in the following screenshot:

The alternative to downloading a ZIP archive of the NetBeans source code is to clone the code from the NetBeans Mercurial repository. To perform this operation, you must have the Mercurial client installed on your computer. It can be downloaded for Windows and Mac OS X. For Linux and Mac OS X, it can be installed via the operating system's appropriate package manager, for example, apt-get on Ubuntu or yum install on Fedora. The Mercurial site at http://mercurial.selenic.com provides all the details on how to install Mercurial.
The NetBeans source code can be cloned from Mercurial from either the command line or from within NetBeans. Let's first look at how to achieve this using the command line.
Having installed Mercurial, we are in a good position to clone the NetBeans source code using the hg clone operation.
The NetBeans source code is stored within several branches and tags in the Mercurial repository. The main development for the next version of NetBeans is performed within the main-silver branch. This branch contains the latest development that has been picked up by the latest automatic stable build of NetBeans.
To check out this branch, execute the following command from within a terminal or command prompt:
hg clone http://hg.netbeans.org/main-silver
If this is your first check out of a branch, Mercurial may take a long time to clone the repository. Depending on your computer and network connection, this may take several hours.
Due to the way Mercurial works, hidden files are created on the local filesystem during the first phase of a Mercurial clone operation. No console output is provided during the checkout phase either, so it may appear that the clone operation is not working correctly as there is no visible feedback that the sources are being cloned.
It's possible to tell Mercurial to output status information so that you can see that all is working correctly. This can be especially useful on the first clone of a branch, which can be a lengthy operation. To clone a branch and get status updates output to the console, we must add the --debug parameter onto the clone operation:
hg --debug clone http://hg.netbeans.org/main-silver/

After cloning the NetBeans source files from the Mercurial repository, we have many subdirectories within the main-silver directory, as shown in the following screenshot:

In the previous section, we showed how to clone the main-silver branch from the NetBeans Mercurial repository. What if we don't want the latest cutting edge development, but want to look at the source code for a specific version of NetBeans?
Fortunately, each release of NetBeans has the source code tagged in the Mercurial repository, so it's possible to check out any older release going back to December 1999 (this is the first tagged release within Mercurial).
The complete list of tagged releases is available at http://hg.netbeans.org/releases/tags, as shown in the following screenshot:

To view any of these tagged releases, simply check out the releases branch and then change to the specified folder for the requested release.
To enable us to use Mercurial from within NetBeans, we must first ensure that NetBeans is configured with the location of the Mercurial executable—hg.exe on Windows and hg on Mac OS X and Linux.
To configure Mercurial within NetBeans, perform the following steps:
Open the NetBeans Options dialog. On Windows and Linux, this is achieved by selecting Tools and then Options from the main menu. On Mac OS X, clicking on NetBeans and then Preferences from the application menu opens the Options dialog.
In the Options dialog, click on the Team option and then choose the Versioning tab.

On the Versioning tab, ensure that the Mercurial Executable Path field is set as appropriate for your operating system. In the preceding screenshot, you can see that it is set to
/usr/local/bin, which is the folder that contains thehgexecutable on my computer.
Once we've configured the Mercurial support within NetBeans, we can clone the source code repository by performing the following steps:
Open the Clone External Repository wizard by clicking on Team and then Mercurial and eventually, Clone Other… from the application menu.
Enter the repository URL as
http://hg.netbeans.org/main-silver.
Continue on through the wizard until the Destination Directory stage is displayed. On this page, enter the parent directory into which the NetBeans source code will be cloned and ensure that the Scan for NetBeans Projects after Clone option is checked. With this option checked, NetBeans will automatically open the cloned project after the repository is cloned.

The NetBeans source code is available to browse online at http://hg.netbeans.org/main/file. Viewing the source code this way can be very useful for the casual observer who wants to see how something is done within the NetBeans source code, but does not want to download the entire source code to their computer.
The following screenshot shows the top level of the NetBeans source code in a browser window:

Once we've downloaded the source code for NetBeans, we can build it either using the command line or via NetBeans.
To build the NetBeans IDE from the source code, we need to have the following software installed first:
JDK 7
Apache Ant
Tip
NetBeans can be built with JDK 8, but additional steps are required for this; we'll see what these are shortly!
To build NetBeans via the command line, open up a terminal or command prompt and change the directory to the directory containing the source code. Executing the ant command will build the source code, downloading any external dependencies that are required:
[david:~/Develop/NetBeans/main-silver]$ ant
If you are running JDK 8 instead of 7, you will be presented with an error when attempting to build the source code stating that builds are forbidden when using JDK 8. This error is presented so as not to introduce any Java 8 features into the source code.

If you wish to use JDK 8 to build the code, you can set the permit.jdk8.builds property to true:
[david:~/Develop/NetBeans/main-silver]$ ant –Dpermit.jdk8.builds=true
Alternatively, if you have both JDK 7 and 8 installed, you can set the nbjdk.home property to point to a valid JDK 7 installation and the build will then complete using the specified JDK 7 instead of JDK 8.
Once you have successfully build NetBeans, you can execute the freshly built instance by executing the ant tryme task:
[david:~/Develop/NetBeans/main-silver]$ ant tryme
This will execute the instance of NetBeans that you have just built using <build-location>/nbbuild/testuserdir as the user directory. The actual instance of NetBeans is stored within the <build-location>/nbbuild/netbeans folder.

Alternatively, you can also start the freshly-built instance of NetBeans by executing the netbeans or netbeans.exe commands from within the <build-location>/nbbuild/netbeans/bin directory, either from the command line of Windows / Linux explorer or Mac OSX Finder.
Now that we've seen how to build NetBeans via the command line, let's see how we can build it from within NetBeans itself.
If you cloned the NetBeans source code via the team support in NetBeans, then the NetBeans Build System project will already be opened within NetBeans, ready for building, as shown in the following screenshot:

If you cloned NetBeans via the command line, you will need to open the NetBeans Build System project located within the main-silver/nbbuild directory.

After opening the project, you will see that there are error badges shown against the Ant Tasks and Tests for Ant Tasks project nodes within the Projects window. These errors simply indicate that artifacts needed for the build haven't been downloaded yet; the build process will download the necessary files, and once built, these error badges will no longer appear.
To start building NetBeans, we must first build the necessary Ant tasks that the full build process relies on. To perform this, right-click on the NetBeans Build System project and select the Build option:

Once the build system is completed with no errors (you will see several warnings displayed during the build process, but these can be safely ignored), you can build NetBeans by right-clicking on the NetBeans Build System project and selecting the Build IDE (No ZIP File) option:

If you are using JDK 7, you will see that NetBeans is built correctly after a few minutes of activity.
If you are using JDK 8, you will see a failure message in the NetBeans output window, indicating that the project cannot be built using JDK 8, as shown in the following screenshot:

Since NetBeans provides its own installation of Ant to build projects, if we wish to use JDK 8 to build NetBeans, we must configure the permit.jdk8.builds property before attempting to build.
To configure the Ant properties from within NetBeans, perform the following steps:
Open the NetBeans Options dialog. On Windows and Linux, this is achieved by selecting Tools and then Options from the main menu. On Mac OS X, clicking on NetBeans and then Preferences from the application menu opens the Options dialog.
In the Options dialog, click on the Java option and then choose the Ant tab.
Within the Ant tab, append the
permit.jdk8.builds=trueline into the Properties edit box:
Click on the OK button to save the configuration changes.
Now that we've configured the permit.jdk8.builds property for the internal instance of Ant, we can build the project successfully using JDK 8. This is achieved by right-clicking on the NetBeans Build System project within the Projects window and selecting the Build IDE (No ZIP File) option.
In the previous sections of this chapter, we saw how to choose an installation of NetBeans and install it. We also saw how to download and build NetBeans from its Java source code.
Let's now take a look at the different options that are used to start NetBeans and see how these can be configured.
The configuration options used to start NetBeans are defined as command-line arguments in the netbeans.conf file supplied with a NetBeans distribution.
On Windows and Linux, this file is located within the NetBeans installation directory at <NetBeans Install Dir>/etc/netbeans.conf.
On Mac OS X, this file is hidden due to the way Mac OS X packages are deployed. To view and edit the netbeans.conf file on OS X, right-click on the NetBeans.app executable file and select the Show Package Contents menu option:

The contents of the NetBeans.app package will then be displayed. The netbeans.conf file is located at Contents/Resources.NetBeans/etc/netbeans.conf within the package contents.
This configuration is a simple text file and can be opened with any text editor. In the file, we can see several configuration properties that can be modified to suit your requirements. Let's go through these now and see what options are available.
Earlier in this chapter, we discussed the NetBeans user and cache directories and what information is stored within them. If you wish to change the user directory for a specific instance of NetBeans (for example, you may want to use a completely fresh user directory or a user directory from a previous installation of NetBeans), this can be achieved by specifying the netbeans_default_userdir parameter. Similarly, the cache directory can be changed by specifying the netbeans_default_cachedir parameter:
netbeans_default_userdir="${DEFAULT_USERDIR_ROOT}/8.0.2"
netbeans_default_cachedir="${DEFAULT_CACHEDIR_ROOT}/8.0.2"
The NetBeans default startup options are probably the most likely of the command-line arguments that you'll need to change for NetBeans. These options are specified by the netbeans_default_options parameter:
netbeans_default_options="-J-client -J-Xss2m -J-Xms32m -J-XX:PermSize=32m -J-Dapple.laf.useScreenMenuBar=true -J-Dapple.awt.graphics.UseQuartz=true -J-Dsun.java2d.noddraw=true -J-Dsun.java2d.dpiaware=true -J-Dsun.zip.disableMemoryMapping=true""true"
The preceding example options are from a Mac OS X installation of NetBeans 8.0.2.
The first option (-J-client) specifies that the JVM for NetBeans will run as a client VM instead of server VM. The client VM is essentially useful for applications requiring fast startup or small footprints. The server VM is typically used where performance is more important.
Tip
For more information on client and server configurations, check out http://www.oracle.com/technetwork/java/hotspotfaq-138619.html#compiler_types.
The second set of options (-J-Xss2m -J–Xms32m –J-XX:PermSize=32m) define the default memory allocation sizes used by the JVM running NetBeans (the thread stack size, initial memory allocation pool size, and size of the permanent generation, respectively). These options are specific for different version of the JDK, and all of them may not apply to the version of the JDK you are using.
Tip
For more information on the Java 7 and Java 8 command-line parameters, refer to https://docs.oracle.com/javase/7/docs/technotes/tools/windows/java.html and https://docs.oracle.com/javase/8/docs/technotes/tools/windows/java.html.
The final parameters specified in the default options ensure that certain optimizations are performed on the JVM to make it more stable and perform better. Some of these parameters are operating system-specific and may not exist on configuration files for different operating system.
By default, NetBeans uses the system-defined JDK to run the IDE (you'll remember this can be overridden using the --javahome argument to the NetBeans installer, as discussed earlier in this chapter). This can be overridden in the netbeans.conf file by defining the netbeans_jdkhome property to specify the base directory of a different JDK installation:
netbeans_jdkhome="/path/to/jdk"
It's not usually necessary to change the JDK that NetBeans uses as this is set at the time of installation. However, if you wish to use a newer (or older) JDK than the one used when you installed NetBeans, it can be configured with this variable.
If you wish to run NetBeans as a one-off instance and do not wish to edit the netbeans.conf file, you can pass the --jdkhome <jdk_home> parameter on the command line instead when launching NetBeans.
A NetBeans cluster is a directory on disk that contains a set of modules such as the NetBeans Platform or the Java EE support within the NetBeans IDE. Additional clusters can be configured within NetBeans by adding the directory in which the cluster resides onto the netbeans_extraclusters parameter:
netbeans_extraclusters="/absolute/path/to/cluster1:/absolute/path/to/cluster2""cluster2"
It is most likely that you will not need to define the additional module clusters to be loaded at the startup unless you are developing NetBeans rich client platform (RCP) applications.
Several other NetBeans command-line arguments are available that provide more control over the NetBeans user experience.
To run NetBeans in a locale different from that of the operating system, the --locale option can be used. For example, --locale en:GB runs NetBeans with the en:GB locale.
If you wish to increase the base font size of NetBeans, the --fontsize option allows this to be achieved. For example, --fontsize 20 increases the base font size to 20px. This can be useful when demoing code or showing NetBeans to larger audiences.
The full list of different command-line options that are available within NetBeans is provided at http://wiki.netbeans.org/FaqStartupParameters.
In this chapter, we took a look at the different bundles of NetBeans that can be downloaded for Java developers. We saw that there are three main bundles for Java developers, namely the Java SE, Java EE, and All bundles. We looked at the differences between those bundles, and saw how to configure the installation of NetBeans for the Java EE and All bundles.
Having seen how to install NetBeans, we also learned how to upgrade an existing NetBeans installation keeping the user directory so that all the configuration data from previous versions of NetBeans is kept.
We then discussed the source code for NetBeans and saw how we can view it online, download zipped distributions of it, and even cloned it from the NetBeans Mercurial repository. We followed this up by learning how to build the NetBeans IDE, both from the command line and from within NetBeans itself.
Finally, we looked at the different command-line options available to NetBeans, and saw how we can change these to change how NetBeans operates.
In the next chapter, we'll look at creating projects and editing within NetBeans, and see how we can become more productive using the IDE.


