


In this chapter, we will cover:
Installing JIRA for production use
Upgrading JIRA with an installer
Upgrading JIRA manually
Migrating JIRA to another environment
Setting up the context path for JIRA
Setting up SSL
Installing SSL certificates from other applications
Resetting the JIRA administrator password
Importing data from CSV
Atlassian JIRA is a popular issue tracking system used by many companies across the world. One of its strengths, unlike most other enterprise software, is that it does not take days or weeks to install and implement, and it is very simple to upgrade and maintain.
We will assume that you already know how to install a brand new JIRA system. So, we will explore the common administration tasks, such as upgrading and migrating your JIRA, looking at different options, from using the new automated upgrade utility provided by Atlassian to doing everything from scratch.
We will also look at some other neat tricks for you as an administrator, such as resetting the admin password to get you out of sticky situations.
In this recipe, we will look at how to install and set up JIRA in a production environment. This includes setting up a dedicated user to run JIRA under and using an external database.
We will use the standalone archive distribution as the steps are consistent across both the Windows and Linux platforms.
The following things need to be checked before you start with this recipe:
Download the latest JIRA archive distribution from https://www.atlassian.com/software/jira/download and click on the All JIRA Download Options link.
Make sure your server environment meets JIRA's requirements by visiting https://confluence.atlassian.com/display/JIRA/Supported+Platforms.
Install Java on the system. At the time of writing, JIRA 7 requires Java 7. Make sure you get the latest update for Java, unless it is explicitly stated as unsupported by JIRA.
Make sure that the
JAVA_HOMEorJRE_HOMEenvironment variable is configured.Have a database system available, either on the server hosting JIRA or a different server accessible over the network. For this recipe, we will use MySQL; if you are using a different database, change the commands and queries accordingly.
Download the necessary database driver. For MySQL, you can download it from https://dev.mysql.com/downloads/connector/j.
We first need to create an empty MySQL database for JIRA:
Open up a new command prompt on the MySQL server.
Run the following command (you can also use another user instead of root as long as the user has permission to create new users and databases):
mysql -u root -pEnter the password for the user when prompted.
Create a new database for JIRA by running the following command:
create database jiradb character set utf8;Create a new user for JIRA in the database and grant the user access to the
jiradbdatabase we just created using the following command:grant all on jiradb.* to 'jirauser'@'localhost' identified by 'jirapassword';In the previous five steps, we created a new database named
jiradband a new database user namedjirauser. We will use these details later to connect JIRA with MySQL. The next step is to install JIRA.Create a dedicated user account to run JIRA under. If you're using Linux, run the following command as root or with sudo:
useradd --create-home --comment "Dedicated JIRA account" -- shell /bin/bash jiraCreate a new directory on the filesystem where JIRA will be installed. This directory will be referred to as
JIRA_INSTALL.Create another directory on the filesystem. This will be used for JIRA to store its attachments, search indexes, application data, and other information. You can create this directory on a different drive with more hard disk capacity, such as a network drive (this could slow down the performance). This directory will be referred to as
JIRA_HOME.Unzip the JIRA archive file in the
JIRA_INSTALLdirectory.Change both the
JIRA_INSTALLandJIRA_HOMEdirectories' owner to the new JIRA user.Open the
JIRA_INSTALL/atlassian-jira/WEB-INF/classes/jira-application.propertiesfile in a text editor.Locate the
jira.home=line in this file.Cut and paste this in the full path to the
JIRA_HOMEdirectory and remove the#symbol if present. Make sure you use the forward slash (/). The following line shows how it looks on a Linux system:jira.home=/opt/data/jira_home
Copy the database driver JAR file (obtained from the Getting ready section) to the
JIRA_INSTALL/libdirectory.Start up JIRA by running the
start-jira.sh(for Linux) orstart-jira.bat(for Windows) script from theJIRA_INSTALL/bindirectory as the JIRA user. You should see the outputTomcatstarted in your console; this means that JIRA is up and running.JIRA comes with a setup wizard that will help guide us through the final phase of the installation.
Open up a browser and go to
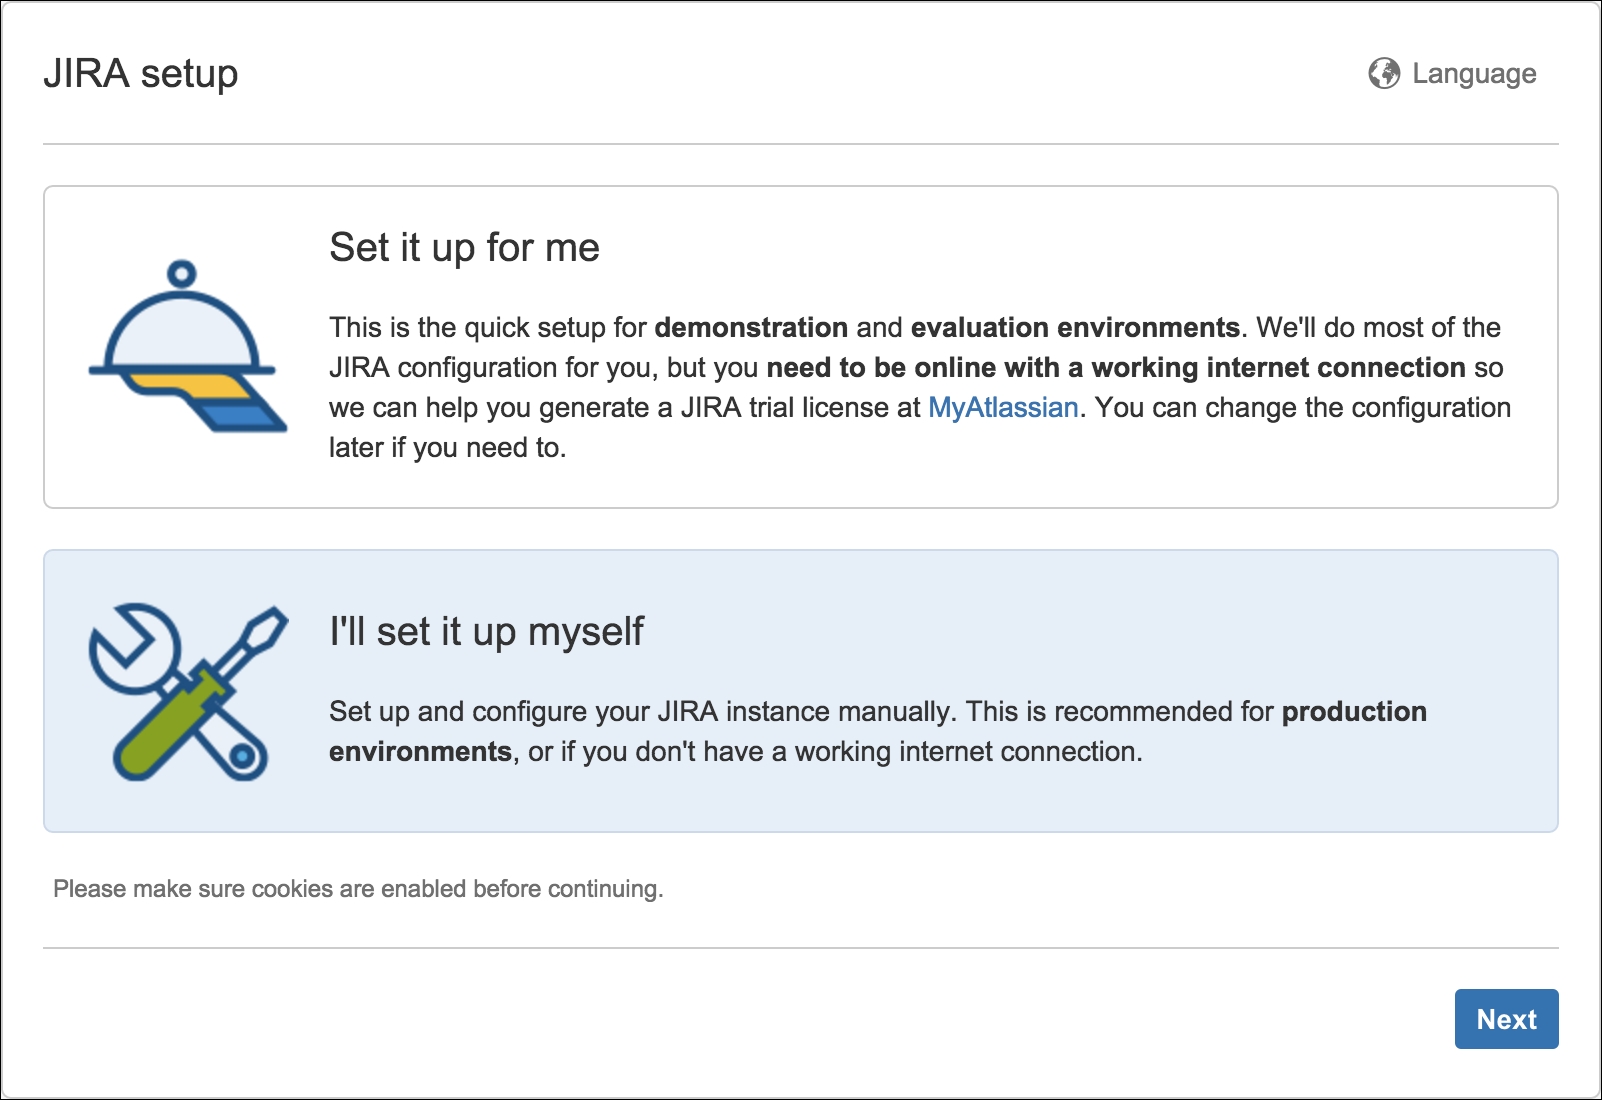
http://localhost:8080(replace localhost with the actual server name). By default, JIRA runs on port 8080. You can change this by changing the connector port value in theJIRA_INSTALL/conf/server.xmlfile.The first step is to select how you want JIRA to be set up. Select the I'll set it up myself option and click on the Next button.
The second step is to set up the database information. Select the My Own Database (recommended for production environments) option.
Select a value for the Database Type option. For this recipe, select the MySQL option.
Enter the details for our new
jiradbdatabase.
Click on Test Connection to check whether JIRA is able to connect to the database.
Click on the Next button to proceed if the database connection test is successful and move to the next step of the wizard.
Enter the Application title value for this JIRA instance.
Select Public if you would like to let people sign up for accounts or Private if you want only administrators to create accounts. For most organizations that use JIRA to track internal projects, this will be in Private mode.
Set the Base URL option. The base URL is the one that users will use to access JIRA. Usually, this should be a fully qualified domain name or the hostname—that is, not a localhost or an IP address.
Click on Next to go to the third step of the wizard, as shown in the following screenshot:

Enter your JIRA license key if you have one. If you do not have a license key, you can generate a temporary trial license by visiting https://my.atlassian.com and creating an account.
Click on Next to go to the next step of the wizard, as shown in the following screenshot:

Enter the details for the initial administrator account. The user account will have access to all the configuration options in JIRA, so make sure you do not lose its login credentials.
Click on Next to go to the fifth and final step of the wizard, as shown in the following screenshot:

Choose whether you want to set up an outgoing SMTP server Now or Later. If you do not have an SMTP server ready right now, you can always come back and configure it later.
Click on Finish to complete the setup process.
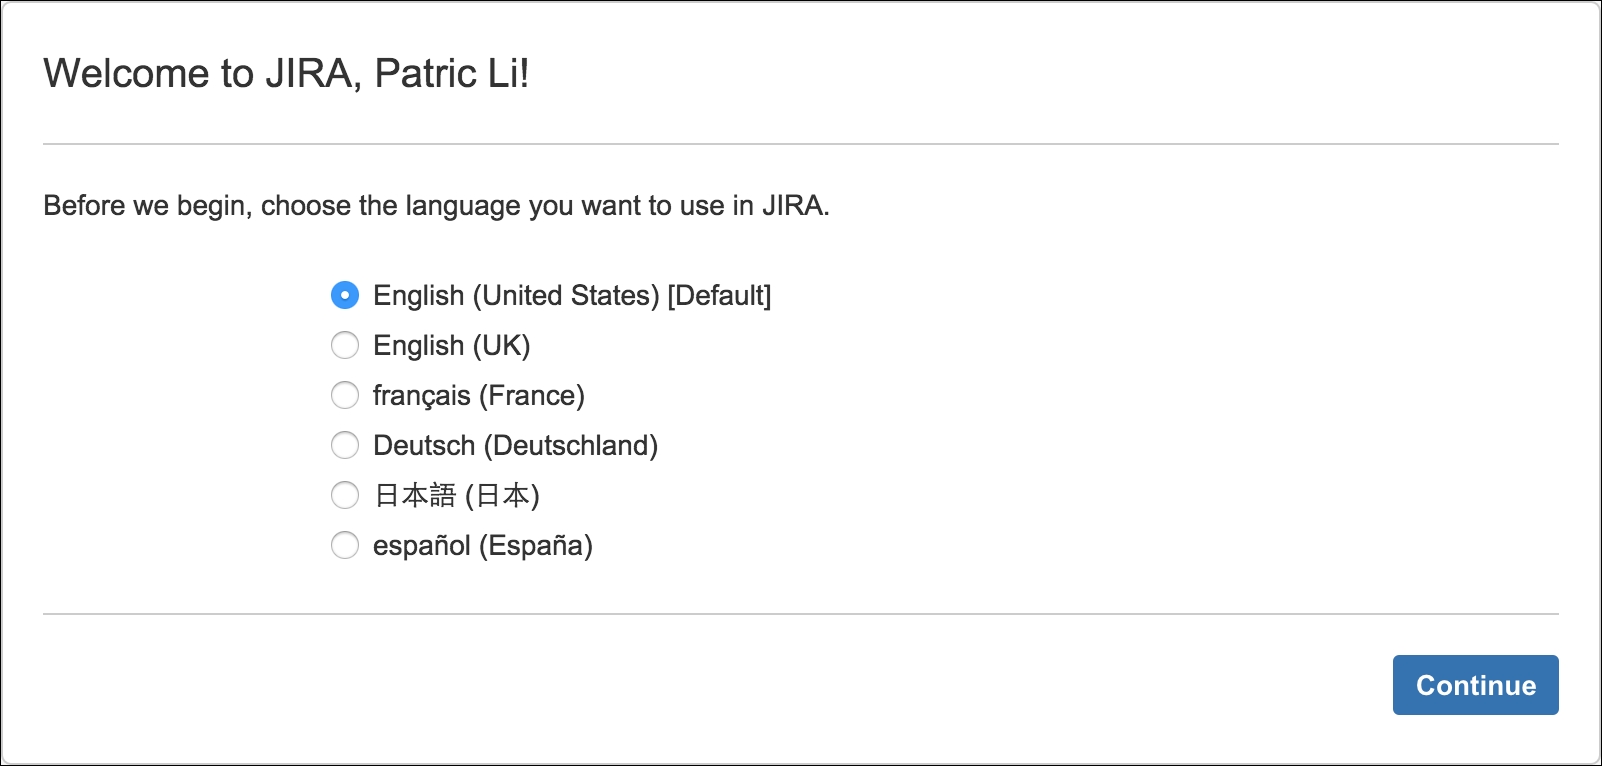
This ends the general configuration part of the setup process. Your JIRA system is up and running. Next, JIRA will walk you through its onboarding process as a first-time user. You will be asked to select the default language to use, upload a user avatar, and create your very first project.
By default, JIRA is set to use a maximum of 768 MB of memory. For a production deployment, you might need to increase the amount of memory allocated to JIRA. You can increase this by opening up the setenv.sh (on Linux) or setenv.bat (on Windows) file in the JIRA_INSTALL/bin directory and changing the value of the JVM_MAXIMUM_MEMORY parameter.
For example, if we want to set the maximum memory to 2 GB, we will change it to JVM_MAXIMUM_MEMORY="2048m". You will need to restart JIRA after performing this change. For production uses, it is recommended that you allocate at least 2 GB memory to the JIRA JVM.
If you are using LDAP for user management in your organization, refer to the Integrating with LDAP for authentication only recipe in Chapter 4, User Management.
Note
Detailed steps to download the code bundle are mentioned in the Preface of this book. Please have a look. The code bundle for the book is also hosted on GitHub at https://github.com/PacktPublishing/JIRA-7-Administration-Second-Edition. We also have other code bundles from our rich catalog of books and videos available at https://github.com/PacktPublishing/. Check them out!
In this recipe, we will show you how to upgrade your JIRA instance with the standard JIRA installer.
As the JIRA installer is only available for standalone installations on Windows and Linux, we will run you through the installer on Windows for this recipe:
Check the upgrade notes for any special instructions as well as the target JIRA version to make sure you can perform a direct upgrade.
Make sure you have a valid JIRA license.
Verify whether your current host environment is compatible with the target JIRA version. This includes the Java version, database, and operating system.
Verify whether your operating environment is compatible with the target's JIRA version, specifically the browser requirements.
Make sure that the add-ons you are using are compatible with the new version of JIRA.
Download the installer binary for your target JIRA version.
Upgrade your JIRA system with the installer using the following steps:
Take your current JIRA offline, for example, by running the
stop-jira.batscript.Back up the JIRA database with its native backup utility.
Launch the installer and select the Upgrade an existing JIRA installation option.
Now, select the directory where the current JIRA is installed:

Check the backup JIRA home directory option and click on the Next button.
Review the upgrade checklist and click on the Upgrade button.

Wait for the installer to complete the upgrade process. Once the upgrade is complete, the installer will automatically launch JIRA.
Update add-ons once JIRA successfully starts.
The installer will detect and provide you with a list of customized files in the JIRA_INSTALL directory, which you will need to manually copy after the upgrade.
If you find yourself in a situation where you cannot use the JIRA installer to upgrade JIRA—for example, if you are hosting JIRA on an OS that does not have an installer binary such as Solaris or are using the WAR distribution—then you need to manually upgrade your JIRA instance.
The general prerequisite tasks to upgrade JIRA manually will remain the same as that of the installer. Refer to the previous recipe for the common tasks involved. As the installer automates many of the backup tasks while upgrading JIRA manually, you will have to do the following:
Back up the JIRA database with its native backup utility
Back up the
JIRA_INSTALL directoryBack up the
JIRA_HOMEdirectoryGet a list of all the customized files in the
JIRA_INSTALLdirectory from the System Info page in JIRA
To manually upgrade your JIRA instance, perform the following steps:
Take your current JIRA offline.
Install the new version of JIRA into a different directory.
Edit the
jira-application.propertiesfile in the new version of JIRA, which is located in theJIRA_INSTALL/atlassian-jira/WEB-INF/classesdirectory.Update the value of
jira.hometo the currentJIRA_HOMEdirectory or to a copy of this directory.Copy any modified files from the old JIRA instance into the new one.
Start up the new JIRA instance.
Update the add-ons once JIRA starts successfully.
Remove the previous installation directory to avoid confusion.
What we did here is essentially set up a new instance of JIRA and point it to the old JIRA instance's data. When we start up the new JIRA instance, it will detect that the database it is connecting to contains data from an older version of JIRA by reading the dbconfig.xml file from the JIRA_HOME directory. It will also proceed to make all the necessary schema changes.
Now that we have gone through upgrading a JIRA instance, we will look at how to move a JIRA instance to another server environment. This is a common use case when you need to move an application to a virtualized environment or data warehouse.
The following things need to be checked before you start with this recipe:
Make sure you have a valid JIRA license.
Check whether your new environment is compatible with JIRA system requirements.
Ensure that both the old and new JIRA instances are of the same major or minor version. If you intend to run a newer version of JIRA in the new environment, it is recommended that you upgrade after the migration is successful.
To migrate an existing JIRA to another server, perform the following steps:
Download and install a brand new JIRA instance in your new environment with an empty database.
Take your current JIRA offline.
Back up your current JIRA database with its native backup utility.
Back up your current
JIRA_HOMEdirectory.Then, take your new JIRA offline.
Copy over your
JIRA_HOMEbackup and replace the newJIRA_HOMEdirectory with it.Update the
dbconfig.xmlfile with the new JIRA database details.Copy your database backup and restore the new JIRA database.
Start up the new JIRA instance.
Next, log in to JIRA as a JIRA administrator.
Select System info from the Administration panel.
Note down the files listed in the Modified Files and Removed Files sections.
Review and apply the same changes to the new JIRA instance.
The following screenshot shows how the output will look:

If you have multiple web applications running on the same domain, you might want to set up a context path for JIRA—for example, http://example.com/jira, where /jira is the context path.
Perform the following steps to set up a context path for JIRA:
Shut down JIRA if it is running.
Open up
JIRA_INSTALL/conf/server.xmlin a text editor.Locate the following line and enter the context path for the path attribute—for example,
path="/jira":<Contextpath="/jira"docBase="${catalina.home} /atlassian- jira" reloadable="false" useHttpOnly="true">Save the file and restart JIRA. If you are doing this after JIRA is installed, you will have to update JIRA's Base URL option so that its links will reflect the change.
Then, log into JIRA as an administrator.
Navigate to Administration | Systems | General Configuration.
Click on the Edit Settings button.
Enter the fully qualified URL into JIRA, including the context path in the Base URL field.
Click on Update to apply the change.
After you have all this set up, you will be able to access JIRA with the new context path and all the links, including the ones from JIRA's notification e-mails, will be the context path in the URL.
By default, JIRA runs with a standard nonencrypted HTTP protocol. This is acceptable if you are running JIRA in a secured environment, such as an internal network. However, if you plan to open up access to JIRA over the Internet, you need to tighten up the security by encrypting sensitive data, such as the usernames and passwords that are sent, by enabling HTTP over SSL (HTTPS).
This recipe describes how to install SSL on the JIRA Tomcat application server. If you have an HTTP web server such as Apache in front of JIRA, you can install the SSL certificate on the web server instead.
You need to have the following set up before you can step through this recipe:
Obtain a valid SSL certificate: You can either use a self-signed certificate or obtain one from a certificate authority (CA) such as Verisign. Using a self-signed certificate will display a warning message when users first visit the site, as shown in the following screenshot:

Ensure that the
JAVA_HOMEenvironment variable is set properly.Make sure you know which JDK/JRE JIRA is using. You can find this information from the System Info page in JIRA, where you need to look for the
java.homeproperty.Make sure your JRE/JDK's bin directory is added to your PATH environment variable, and the
keytoolcommand will output its usage, as shown in the following screenshot:
Perform the following steps to import an SSL certificate:
Open up a command window and go to the directory where the certificate file resides.
Generate a Java KeyStore (JKS) for JIRA by running the
keytool -genkey -alias jira -keyalg RSA -keystore JIRA_INSTALL/jira.jkscommand.Import the certificate into KeyStore repository by running the
keytool -import -alias jira -keystore JIRA_INSTALL/jira.jks -file file.crtcommand, wherefile.crtis the certificate file.Open the
server.xmlfile located in theJIRA_INSTALL/confdirectory in a text editor.Locate and uncomment the following XML configuration snippet:
        <Connector port=
        "8443" maxHttpHeaderSize=
        "8192"   SSLEnabled="true"
        maxThreads="150"
        minSpareThreads="25" maxSpareThreads="75"
        enableLookups="false"
        disableUploadTimeout="true"
        acceptCount="100" scheme="https" secure="true"
        clientAuth="false"
        sslProtocol="TLS" useBodyEncodingForURI="true"/>
Add a few new attributes to the
Connectortag and save the file, as follows:keystoreFile="PATH_TO_YOUR_KEYSTORE" keystorePass="PASSWORD_FOR_YOUR_KEYSTORE" keyAlias="jira" keystoreType="JKS"Restart JIRA to apply the changes.
We first created a new Java KeyStore repository for JIRA to store its own SSL certificate with Java's keytool utility. During this step, you are prompted to provide information about the certificate as well as a password to access the KeyStore repository.
After we created the KeyStore repository, we imported the certificate and then enabled an additional connector to listen for HTTPS connections by uncommenting the connector XML tag. We also added new attributes to the tag so that Tomcat knows where our new KeyStore repository is and how to access it to get to the certificate.
You can also change the port number for the connector if you want to run HTTPS on the more common port 443 instead of the default port 8443, and your final XML snippet will look something similar to the following:
<Connector port="443"
maxHttpHeaderSize="8192" SSLEnabled="true" maxThreads="150" minSpareThreads="25"
maxSpareThreads="75" enableLookups="false"
disableUploadTimeout="true" acceptCount="100"
scheme="https" secure="true" clientAuth="false"
sslProtocol="TLS" useBodyEncodingForURI="true"
keystoreFile="/opt/jira/jira.jks"
keystorePass="changeme"
keyAlias="jira" keystoreType="JKS"/>
At this point, users can access JIRA with both HTTP and HTTPS, and you need to configure JIRA so that it will automatically redirect all the HTTP traffic to HTTPS. JIRA comes with a handy configuration utility that can help you set up this configuration.
Note
You should first make sure your HTTPS configuration is working correctly before attempting this recipe.
Note that this utility is only available for standalone installations. If you are running a WAR installation, you can skip the following steps and move on to the manual setup section:
Open the command prompt and go to the
JIRA_INSTALL/bindirectory.Depending on your OS, run the
config.bat(Windows) orconfig.sh(Linux / OS X) file.Select the Web Server tab from the JIRA Configuration Tool window.
Select the HTTP and HTTPs (redirect HTTP to HTTPs) option for Profile.
Click on the Save button at the bottom of the window, as shown in the following screenshot.
Restart JIRA to apply the change.

If you cannot use JIRA Configuration Tool, you can perform the following steps to manually set up the configuration:
Open the
web.xmlfile located in theJIRA_INSTALL/atlassian-jira/WEB-INFdirectory.Add the following XML snippet at the end of the file just before the closing
</webapp>tag:<security-constraint> <display-name>HTTP to HTTPs Redirection</display-name> <web-resource-collection> <web-resource-name>all-except- attachments</web-resource-name> <url-pattern>*.jsp</url-pattern> <url-pattern>*.jspa</url-pattern> <url-pattern>/browse/*</url-pattern> </web-resource-collection> <user-data-constraint> <transport- guarantee>CONFIDENTIAL</transport- guarantee> </user-data-constraint> </security-constraint>Restart JIRA to apply the change.
You might need to connect JIRA to other services, such as LDAP, mail servers, and other websites. Often, these services make use of SSL. In such cases, the connection will fail, and you will see the following errors in your JIRA log file:
javax.net.ssl.SSLHandshakeException:
sun.security.validator.ValidatorException: PKIX path building failed:
sun.security.provider.certpath.SunCertPathBuilderException: unable to find valid certification
path to requested target
For this recipe, we will use the Java keytool utility, so make sure you have the following configuration set up:
Obtain the SSL certificate from the target system.
Ensure that the
JAVA_HOMEenvironment variable is set properly.Make sure you know which JDK/JRE JIRA is using. You can find this information on the System Info page, where you need to look for the
java.homeproperty.Make sure your JRE/JDK's bin directory is added to your PATH environment variable, and the
keytoolcommand will output its usage.Obtain the password for the Java trust store used by JIRA.
In this recipe, let's assume we want to connect JIRA to an LDAP server that is running on SSL. Perform the following steps to make it a trusted site inside JIRA:
Open up a command prompt and go to the directory where the certificate file resides.
Import the certificate into the trust store by running the
keytool -import -alias tomcat -file file.cer JAVA_HOME\jre\lib\security\cacertscommand, wherefile.ceris the certificate file.Restart JIRA to apply the changes.
When JIRA attempts to connect to an SSL-protected service, it will first check whether the target service's certificate can be trusted. This is done by checking to see whether the certificate is present in what is called the trust store. If the certificate is not present, the connection will fail.
The trust store is typically a KeyStore repository called cacerts and is located in the $JAVA_HOME/lib/security directory on the server.
We used the keytool utility to import the certificate to our local trust store, so the target service will be registered as a trusted service and allow JIRA to successfully connect to it.
Sometimes, you might forget or lose the password to the account with the JIRA Administrator or JIRA System Administrator permission, and you cannot retrieve it using the password reset option. For example, suppose JIRA does not have an SMTP server configured or you restore JIRA from a data dump and do not know the account and/or password. In these cases, you need to reset the administrator password directly in the database.
Note
This recipe only applies to the JIRA instances that use the default internal user directory option. External user management, such as LDAP, will not work with this recipe.
As we will reset the password in JIRA's database, make sure you do the following:
Connect to the JIRA database either via the command line or a
Update the JIRA database
Let's assume we use the default mysql command-line tool and MySQL as the backend database for JIRA. If you are using a different database, you may need to change the following SQL statements accordingly:
Connect to the JIRA database with a client tool by running the
mysql -u jirauser -pcommand, wherejirauseris the username used by JIRA to access the JIRA database.You can find JIRA's database details from the
dbconfig.xmlfile located inJIRA_HOME.Change to the JIRA database by running the
use jiradbcommand, wherejiradbis the name of JIRA's database.Determine the groups that have the JIRA System Administrators global permission with the following SQL statement:
        select perm_parameter from
        schemepermissions where PERMISSION=44;
Find users that belong to the groups returned in STEP 4 by running the following SQL statement, where
jira-administratorsis a group returned from STEP 4:select child_name, directory_id from cwd_membership where parent_name='jira- administrators';Reset the user's password in the database with the following SQL statement, where admin is a user returned in STEP 5:
        update cwd_user set
        credential='uQieO/1CGMUIXXftw3ynrsaYLShI+
        GTcPS4LdUGWbIusFvHPfUzD7
        CZvms6yMMvA8I7FViHVEqr6Mj4pCLKAFQ==' where
        user_name='admin';
Restart JIRA to apply the change.
With JIRA's internal user directory, all the user and group data is stored in the JIRA database. The value 44 is the ID of the JIRA System Administrators global permission.
If you do not know which groups or users are granted the JIRA System Administrators global permission, we will first have to find this information using STEP 4 and STEP 5. Otherwise, you can skip to STEP 6 in order to reset the password.
JIRA's user password information is stored in the cwd_user table. As JIRA only stores the hash value of the password, we changed the user's admin password to uQieO/1CGMUIXXftw3ynrsaYLShI+GTcPS4LdUGWbIusFvHPfUzD7CZvms6yMMvA8I7FViHVEqr6Mj4pCLKAFQ==, which is the UTF-8-encoded hash value of sphere.
Often you will need to import data from other systems into JIRA. For example, you might want to migrate data from an older bug tracking system, or if you have data coming out of other systems, you may want to use this output to populate your project.
As systems often have their own data structure, it is often not this straightforward to do a data migration. However, the good news is that most systems can export data in the CSV format (or Excel, which can be easily transformed into CSV); we will look at using CSV as a way to import data into JIRA in this recipe.
When importing data into JIRA, the most important thing is to prepare your input data file and make sure it is formatted correctly and contains all the necessary information. To help the importer, keep the following in mind:
Remove any non-data-related content, especially if you created your CSV file from a spreadsheet.
If your file contains users that need to be imported into fields such as Assignee, make sure you use either their usernames or e-mail addresses for JIRA to match them up with the actual users in the system.
If your file contains dates that need to be imported into fields, such as
Due date, make sure they are all formatted with a single date format. This is so that JIRA can process the date values consistently.
To import data from other systems:
Log into JIRA as an administrator.
Select the Projects menu from the top and select the Import External Project option.
Then, select the system from the list that comes out of the box with JIRA. If your system is not listed, select the CSV option.
Select the CSV file for the CSV Source File field. If you are performing an import for the first time, do not select the Use an existing configuration option. We will generate the configuration at the end of the import, and you will be able to use this to fast-track future imports.
Expand the Advanced option if your file uses a different file encoding or uses a character other than comma (
,) as its separators. Click on the Next button to go to Step 2 of the wizard.
Select the project to import your data into. If you do not have the project, you can select the Select New option and create a project on the spot.
Varify the E-mail Suffix for New Users and Date format values used in your CSV file. This will ensure that data such as dates will be correctly parsed during import and saved in JIRA's date fields, such as
Due dates.
Select and map the CSV columns to JIRA fields. Certain fields, such as the Summary field, must have a corresponding column in the file. Otherwise, JIRA will not allow you to proceed. If you do not want to map a column, you can select the Don't map this field option.
Select the Map field value option for any columns mapping to a select list style field. This will allow you to map individual values from the CSV file column to the options available in JIRA. Unless you are sure that your file contents can be mapped to the JIRA field options exactly, it is best to manually verify this; otherwise, you would end up with duplicated values due to things such as case sensitivity.

If you select to map field values, review each of the listed values and map them to their corresponding field options in JIRA. If a value does not have an option, you can type in the desired option for JIRA to create.
Click on the Begin Import button to start importing your data into JIRA.

After the import process is completed, review the import result. You can click on the download a detailed log link to get a full log of the process if the import fails. You can also click on the save the configuration link to get a copy of the mapping files so that next time, you do not have to remap everything from scratch.
Using the CSV file to import custom data into JIRA is the most versatile approach as many systems can export its data into CSV. However, as you would have noted already, JIRA comes with a number of specialized importers for various systems. These importers often have additional features to help with data import. The Atlassian Marketplace website https://marketplace.atlassian.com also has a number of importers created by third parties. If you do not see your system listed in the out-of-the-box importers, make sure you do a search in the marketplace and check whether someone has already created an importer for it.


