


Welcome to Instant Windows PowerShell Guide. This book will take you through various enhancements that have emerged with the release of Windows PowerShell v3.0 and v4.0. We will explore many CMDLETs and parameters introduced in these latest versions of Windows PowerShell, categorized in a bunch of recipes. Later in the book, we will also cover the configuration mechanism as a feature of PowerShell v4.0 called Desired State Configuration (DSC).
In the last few years, the scripting world has witnessed a number of changes. We can hardly recall the time when people used ancient mainframe machines with green-colored text and a black screen background. But now, times have changed and we are, in fact, living in a world where technology adoption is quicker than ever.
Now, an ample number of scripting languages exist that can fulfill the needs of an administrator. One of the questions that arise in one's mind is: Why should I go with Windows PowerShell?
There are certain reasons why we prefer Windows PowerShell over other scripting languages. I have intentionally included this short note at the beginning of this book to give you a clear understanding of this scripting language.
For example, there are strong scripting languages, such as VBScript, Ruby, Python, and Perl, which administrators have adopted as well. VBScript became popular because of the automation of routine local administrator tasks, but the code was a bit complex and hard to understand for novice users. Looking at Windows PowerShell, I feel the Microsoft team has worked hard and gifted us a powerful, interactive scripting shell with an object-driven approach.
The important and exciting thing about this language is its object-based output, which can be easily reused. It has "pipeline" and "PSRemoting" as its crucial features, which puts this language as the first priority in comparison with other scripting languages.
So far, we have had four stable versions available for Windows PowerShell. Windows PowerShell v1.0 was an extension of the command prompt, but with a limited number of commands. In Version 2, the team introduced the pipeline and PSRemoting concepts, which made Windows PowerShell a popular scripting shell. Furthermore, with the release of Windows Server 2012 and Windows 8, they have drastically improved with Windows PowerShell Version 3.0 in terms of the number of CMDLETs and built-in modules. They have also introduced Windows PowerShell Web Access (PWA), PowerShell workflows, and Scheduled Jobs concepts in this version. The exciting part is that, while we are in the process of publishing this book, the Microsoft team is working on the next release of its operating systems named Windows Server 2012 R2 and Windows 8.1. In the next release, they have Windows PowerShell v4.0 embedded with extensive functionality, for example, Desired State Configuration (DSC) and so on.
In this book, we have mostly covered new CMDLETs, which were introduced in v3.0 and v4.0. Also, we will draft some functionality changes that exist in the latest versions of Windows PowerShell.
Let us see what Windows Management Framework 3.0 requires.
By default, Windows PowerShell 3.0 comes with Windows Server 2012 and Windows 8. There are a number of default modules present in this version. If you are running an operating system lower than the one specified, you need to manually install Windows Management Framework 3.0 (WMF 3.0). If you have installed any previous releases of Windows Management Framework, you must uninstall them before installing Windows Management Framework 3.0.
Windows Management Framework 3.0 can be installed only on the following operating system versions:
Windows 7 SP1
Windows Server 2008 R2 SP1 (It also works with the server core installation)
Windows Server 2008 SP2
Windows Management Framework 3.0 requires the following software to be installed prior to installing WMF 3.0:
Microsoft .Net Framework 4.0
You can install Microsoft .Net Framework 4.0 at http://go.microsoft.com/fwlink/?LinkID=212547
Windows 7 Service Pack 1 on computers running Windows 7
To install SP1, go to http://www.microsoft.com/en-in/download/details.aspx?id=5842
Windows Server 2008 R2 Service Pack 1 on computers running Windows Server 2008 R2
To install SP1, go to http://www.microsoft.com/en-in/download/details.aspx?id=5842
Windows Server 2008 Service Pack 2 on computers running Windows Server 2008
To install SP2, go to http://www.microsoft.com/en-in/download/details.aspx?id=16468
Now, let us see what Windows Management Framework 4.0 requires.
By default, Windows PowerShell 4.0 comes up with Windows Server 2012 R2 and Windows 8.1. If you are running an operating system lower than the one specified earlier, you need to manually install Windows Management Framework 4.0 (WMF 4.0). If you have installed any previous releases of Windows Management Framework, you must uninstall them before installing Windows Management Framework 4.0.
Windows Management Framework 4.0 can be installed only on the following operating system versions:
Windows 7 SP1
Windows Server 2012
Windows Server 2008 R2 SP1 (It also works with the Server Core installation)
Windows Management Framework 4.0 requires the following software to be installed prior to installing WMF 4.0:
Microsoft .Net Framework 4.5
You can install Microsoft .Net Framework at http://www.microsoft.com/en-us/download/details.aspx?id=30653
Windows 7 Service Pack 1 on computers running Windows 7
To install SP1, go to http://www.microsoft.com/en-in/download/details.aspx?id=5842
Windows Server 2008 R2 Service Pack 1 on computers running Windows Server 2008 R2
To install SP1, go to http://www.microsoft.com/en-in/download/details.aspx?id=5842
The following is information about the contents of WMF 3.0 and WMF 4.0.
Windows Management Framework 3.0: It is available for all supported versions of Windows for the following languages: English, Chinese (simplified), Chinese (traditional), French, German, Italian, Japanese, Korean, Portuguese (Brazil), Russian, and Spanish. Windows Management Framework 3.0 contains:
Windows PowerShell 3.0
Windows Remote Management (WinRM) 3.0
Windows Management Instrumentation (WMI)
Management OData IIS Extensions
Server Manager CIM Provider
Windows Management Framework 4.0: It contains:
Windows PowerShell
Windows PowerShell ISE
Windows PowerShell web services (Management OData IIS Extensions)
Windows Remote Management (WinRM)
Windows Management Instrumentation (WMI)
WMF 4.0 includes a new feature—Windows PowerShell Desired State Configuration (DSC)
Additionally, the following requirements should also be met:
To install Windows PowerShell Integrated Scripting Environment (ISE) for Windows PowerShell 3.0 on computers running Windows Server 2008 R2 with Service Pack 1, before installing WMF 3.0, use Server Manager to add the optional Windows PowerShell ISE feature to Windows PowerShell
Install the latest updates before installing WMF 3.0 or WMF 4.0
In Windows PowerShell – prerequisites, we have gone through different facets that we can use in Windows PowerShell. There are a few features, such as discoverability, object orientation, and easy transition to scripting, that make this language incomparable and make it stand out from others.
One of the best and crucial functions of Windows PowerShell is its discoverability. The Windows PowerShell engine itself holds a strongly embedded help system that provides precise information to the users regarding various aspects such as getting the CMDLET description, syntax, and examples.
The help system is enabled with the dynamic search capability; you can use any random keyword to surf any CMDLETs (commands are known as CMDLETs—pronounced as commandlets). It is not limited to CMDLETs; it also avails "about help system" and help information of functions and modules. In Version 3.0, there has been a lot of enhancements in the help system structure.
In the previous versions, if we install WMF in our machine, it will install the help system available with that WMF package at the time of installation. We do not have any way to update our help system later; the only way is to reinstall the WMF package with the latest updates.
To overcome this issue, the Windows PowerShell team has introduced two new CMDLETs in Version 3.0 to update the help system: Update-Help and Save-Help.
If you are installing WMF 3.0 on your operating system for the first time or running fresh operating system as Windows Server 2012 or Windows 8, by default, Windows PowerShell v3.0 will not have any help system embedded into it. You need to manually update the help system to utilize the discoverability feature in the Windows PowerShell v3.0 console.
Use the
Update-HelpCMDLET, without any parameters, to update the help filesystem for all current sessions and all the modules installed in aPSModulePathlocation.To run the
Update-HelpCMDLET, you must be a member of the administrative group and start the PowerShell console using the Run as administrator option. Also, your computer should be able to connect to the Internet. If not, you can specify the filesystem directory by placing updated help files in it usingSave-Help. TheUpdate-HelpCMDLET downloads the latest help files for Windows PowerShell core modules and installs them on your local computer.You can use the
Get-HelpCMDLET immediately after theUpdate-HelpCMDLET to access the updated filesystem. You need not restart your machine to put these changes in effect.PS C :\> Update-HelpThe module parameter name is used to provide multiple module names in a comma-separated list for updating the help system; whereas
UICultureis used to specify the language in which you want your help files to be updated.PS C :\> Update-Help -Module Microsoft.PowerShell* -UICulture en-USThe preceding command statement updates help files for all module names starting with
Microsoft.PowerShellin the English language.Tip
If you want to update the help system automatically when you launch the console, specify the
Update-HelpCMDLET in your Windows PowerShell profile.The Windows PowerShell profile is a simple
profile.ps1script which runs at the start of each PowerShell console instance. By default, theUpdate-HelpCMDLET only runs once a day on a single computer. It is not necessary that all modules would support updatable help.The following command statement would list all the modules that support updatable help:
PS C :\> Get-Module -ListAvailable | Where HelpInfoUriUse the
Forceparameter name to override the once-per-day limitation of version checking and the 1 GB per module limit.PS C :\> Update-Help –Module * -ForceThe preceding command statement attempts to update help files unconditionally for all modules installed in your computer, including those that do not support updatable help systems.
PS C :\> Get-Module | Update-HelpYou can also pipe the
Get-ModuleCMDLET output toUpdate-Help. It updates the help files of all the modules in current sessions.
If your computer is not directly connected to the Internet and you want to update the help system, there is one CMDLET introduced in Version 3.0 called Save-Help.
The Save-Help CMDLET downloads and saves the latest help files to the specified filesystem directory. You can carry these help files into removable devices or copy them into the network file share location. This CMDLET will be useful in installing updated help files on multiple computers by downloading help files once on a single computer and storing them in a shared location.
Also, to run the Save-Help CMDLET, you must be a member of the administrative group and start the PowerShell console using the Run as administrator option. Save-Help saves the downloaded help files in cabinet (.cab) files in the destination directory. The saved help files consist of a help information (HelpInfo XML) file and a cabinet (.cab) file for each module installed in a PSModulePath location.
PS C :\> Save-Help -DestinationPath C:\UpdatedHelp
The preceding command statement downloads and saves updated help files for all the modules in the UpdatedHelp directory in a local computer's C:.
The DestinationPath parameter name needs to specify the destination directory in which we wish to place all the downloaded help files.
PS C :\> Save-Help -Module Microsoft.PowerShell* -DestinationPath \\FileSrv001\UpdatedHelp
The preceding command statement downloads updated help files for module names that start with Microsoft.PowerShell and stores them in the \\FileSrv001\UpdatedHelp directory.
PS C :\> Update-Help -SourcePath \\FileSrv001\UpdatedHelp -Credential PSDomain\PSAdmin
The preceding command statement updates the help system from the specified shared location and domain administrator credential. It prompts for the administrator password and updates the help system offline.
If you want to update the help system for multiple computers in a single click, use the following command:
PS C :\> Invoke-Command -ComputerName (Get-Content Servers.txt) -ScriptBlock {Update-Help -SourcePath \\FileSrv001\UpdatedHelp -Credential PSDomain\PSAdmin}
Using the preceding command statement, Invoke-Command runs the given ScriptBlock parameter on all the remote computers specified in Servers.txt. The remote computers must be able to access the file share instead of using the Internet.
With the beginning of Windows PowerShell 4.0, Save-Help can also save help files for the modules that are installed on remote computers. It works as described:
PS C :\> $session = New-PSSession -ComputerName PSTest
The preceding command statement creates a remote PowerShell session on the PSTest remote computer.
PS C :\> $modlist = Get-Module -PSSession $session –ListAvailable
Then, using the session object created by running the previous command statement, it retrieves the list of modules that are installed on the PSTest remote computer.
PS C :\> Save-Help -Module $modlist -DestinationPath \\FileSrv001\UpdatedHelp
Finally, it downloads and saves the help files for the modules that are fetched in the previous command statement. We can use the Update-Help CMDLET again to install help files on multiple computers from a centralized file share.
There are a few tricks using which we can effectively leverage the discoverability feature within the Windows PowerShell console. This section discusses a few among those.
Once your help system is updated, you can choose any dumb keyword and start demanding to the Windows PowerShell console. Let's say I want to know all the information about the log keyword.
PS C :\> Get-Help *log*
The following screenshot describes search results for the log keyword:
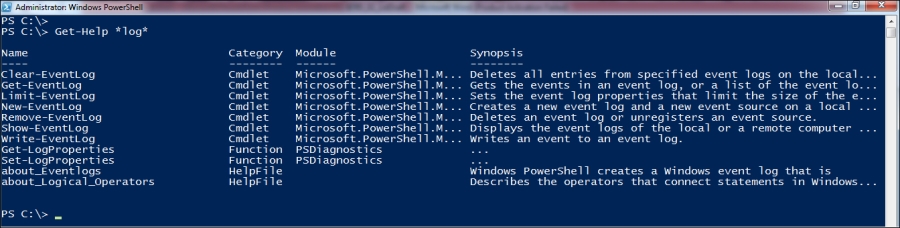
It will list out all the CMDLETs, functions, and help files that contain the log keyword. You can pick any one of them and start discovering further help. For example, I want to check the help of Get-EventLog.
PS C :\> Get-Help Get-EventLog
It throws an output listing information specific to the Get-EventLog CMDLET, such as Name, Synopsis, Syntax, Description, and Related links.
There are a number of tricks by which you can surf through the help content in a short time.
PS C :\> Get-Help about*
The preceding command will list out all the about help topics covering aliases operators, arrays, functions, methods, remote, scripts, variables, and many more.
For example, the following command gives all the detailed information about new features included in Windows PowerShell Version 3.0:
PS C :\> Get-Help about_Windows_PowerShell_3.0
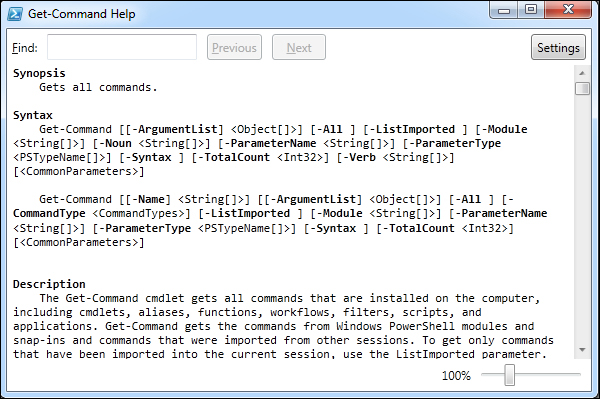
Sometimes, it could be boring to refer help files into the blue Windows PowerShell console for a long time. To overcome this, we have the –ShowWindow parameter that comes with the Get-Help CMDLET supported in Version 3.
PS C :\> Get-Help Get-Command –ShowWindow
It provides a graphical view of the help files and opens in another window with search capabilities.
In the previous recipe, we covered techniques to update help and utilize it in a fair manner. This is a short recipe on how we can utilize the Windows PowerShell console as a calculator as well as an editor.
Most of the functionalities are inherited from Version 2, but there are some enhancements in terms of methods and properties.
Let's start playing with the Windows PowerShell console:
PS C :\> "Windows PowerShell"
"Windows PowerShell"
If you type any string in quotes into the PowerShell console, it throws a string object as output to the console. It displays the same string that you have quoted.
Now, try converting your console into a calculator:
PS C :\> 2+3
5
The console itself can perform basic calculations, such as addition, subtraction, multiplication, and division.
PS C :\> 8%7
1
It can also perform the modulo operations listed earlier.
Let's go one step forward:
PS C :\> "Windows PowerShell" | Get-Member
The previous command displays all the methods and properties available with the string object we have piped earlier.
If you compare the execution of the same command statement between both the Windows PowerShell Versions (2.0 and 3.0), you will get additional methods and properties listed as follows:
TypeName: System.String
Name          MemberType     Definition
ToBoolean     Method         bool IConvertible.ToBoolean(System.IFormatProvider provider)
ToByte        Method         byte IConvertible.ToByte(System.IFormatProvider provider)
ToChar        Method         char IConvertible.ToChar(System.IFormatProvider provider)
ToDateTime    Method         datetime IConvertible.ToDateTime(System.IFormatProvider provider)
ToDecimal     Method         decimal IConvertible.ToDecimal(System.IFormatProvider provider)
ToDouble      Method         double IConvertible.ToDouble(System.IFormatProvider provider)
ToInt16       Method         int16 IConvertible.ToInt16(System.IFormatProvider provider)
ToInt32       Method         int IConvertible.ToInt32(System.IFormatProvider provider)
ToInt64       Method         long IConvertible.ToInt64(System.IFormatProvider provider)
ToSByte       Method         sbyte IConvertible.ToSByte(System.IFormatProvider provider)
ToSingle      Method         float IConvertible.ToSingle(System.IFormatProvider provider)
ToType        Method         System.Object IConvertible.ToType(type conversionType, System.IFormatProvider provider)
ToUInt16      Method         uint16 IConvertible.ToUInt16(System.IFormatProvider provider)
ToUInt32      Method         uint32 IConvertible.ToUInt32(System.IFormatProvider provider)
ToUInt64      Method         uint64 IConvertible.ToUInt64(System.IFormatProvider provider)
Now, retrieve methods and properties for Integer objects:
PS C :\> 2+3 | Get-Member
It displays all the methods and properties available with the integer object we have piped earlier.
If you compare the execution of the same command statement between both the Windows PowerShell Versions (2.0 and 3.0), you will get additional methods and properties listed as follows:
TypeName: System.Int32
Name          MemberType     Definition
ToBoolean     Method         bool IConvertible.ToBoolean(System.IFormatProvider provider)
ToByte        Method         byte IConvertible.ToByte(System.IFormatProvider provider)
ToChar        Method         char IConvertible.ToChar(System.IFormatProvider provider)
ToDateTime    Method         datetime IConvertible.ToDateTime(System.IFormatProvider provider)
ToDecimal     Method         decimal IConvertible.ToDecimal(System.IFormatProvider provider)
ToDouble      Method         double IConvertible.ToDouble(System.IFormatProvider provider)
ToInt16       Method         int16 IConvertible.ToInt16(System.IFormatProvider provider)
ToInt32       Method         int IConvertible.ToInt32(System.IFormatProvider provider)
ToInt64       Method         long IConvertible.ToInt64(System.IFormatProvider provider)
ToSByte       Method         sbyte IConvertible.ToSByte(System.IFormatProvider provider)
ToSingle      Method         float IConvertible.ToSingle(System.IFormatProvider provider)
ToType        Method         System.Object IConvertible.ToType(type conversionType, System.IFormatProvider provider)
ToUInt16      Method         uint16 IConvertible.ToUInt16(System.IFormatProvider provider)
ToUInt32      Method         uint32 IConvertible.ToUInt32(System.IFormatProvider provider)
ToUInt64      Method         uint64 IConvertible.ToUInt64(System.IFormatProvider provider)
The same mechanism is applicable to all the other objects, such as double and so on. For example, take a real-time scenario:
As an administrator, you are dealing with server memory configurations in units such as MB, GB, TB, and so on.
Let's utilize the Windows PowerShell console for such calculations:
PS C :\> 1024MB/1GB
1
PS C :\> 1000MB/1GB
0.9765625
Say you have 2 TB of external storage and you need to create a data drive of 4 GB for each user. How many users can you accommodate in this requirement?
PS C :\> 2TB/4GB
512
Isn't it tricky?
In such scenarios, we can easily utilize the built-in calculation functionality of the Windows PowerShell console.
A few changes have been introduced with respect to files and drives in Windows PowerShell Version 3.0. Windows PowerShell has a built-in drive mechanism for things such as registry, certificate, alias, function, variable, and so on. You can treat these drives as filesystems.
There are some functionality changes when we create a new custom PSDrive using PowerShell Version 3.0. Let's walk through them.
New-PSDrive
This CMDLET creates a new temporary or persistent drive with various Windows PowerShell provider types.
You can get the list of default Windows PowerShell providers by executing the following CMDLET:
PS C :\> Get-PSProvider
Name         Capabilities                         Drives
----         ------------                         ------
Alias        ShouldProcess                        {Alias}
Environment  ShouldProcess                        {Env}
FileSystem   Filter, ShouldProcess, Credentials   {C, D, E, F}
Function     ShouldProcess                        {Function}
Registry     ShouldProcess, Transactions          {HKLM, HKCU}
Variable     ShouldProcess                        {Variable}
Certificate  ShouldProcess                        {Cert}
WSMan        Credentials                          {WSMan}
The following command statement creates a new persistent PSDrive named
Tfrom the location\\FileSrv\Temp; it uses the credentialPSDomain\PSAdminand it prompts for a password:PS C :\> New-PSDrive -Name T -PSProvider FileSystem -Root \\FileSrv\Temp -Credential PSDomain\PSAdmin -PersistThe
Credentialparameter is generally used to provide explicit user credentials that have the privilege to create new PSDrives. By default, it takes the current user session credential.Using the
Persistparameter name, we ensure that the new PSDrive acts as a normal filesystem drive with a new drive letter, for example,T. You can further use theTdrive using file explorer or thenet useutility.
Let's get the full information of the PowerShell drive named T earlier:
PS C :\> Get-PSDrive -Name T
Name         Provider        Root
----         --------        ----
T            FileSystem      T:\
In Version 3.0, the following are a few functionality changes with respect to the New-PSDrive CMDLET.
-Persist: Using the
–Persistparameter name with theNew-PSDriveCMDLET, you can create mapped network drives that are not limited to the current Windows PowerShell sessions. They are stored in the Windows configuration and, moreover, you can open them using file explorer or thenet useutility.-Credential: If you are using the UNC path to create
New-PSDrive, you can leverage theCredentialparameter name that is introduced in Windows PowerShell v3.0 along with theNew-PSDriveCMDLET. Apart from the UNC path, theCredentialparameter name is not mandatory with all the other possible scenarios.External drives: If you attach any external drive to your local computer, it automatically creates a new PSDrive that represents your external drive. We need not restart our machine to see these changes in effect. Likewise, if you remove the drive, Windows PowerShell automatically deletes the PSDrive that was mapped with your external drive earlier.
There are couple of more parameters that are introduced with various CMDLETs in Version 3. The information is as described in this section.
In Version 3.0, the Get-Credential CMDLET has one additional parameter name called the Message parameter. Using the Message parameter, you can specify customized messages to the users on prompted credential windows.
For example:
PS C :\> Get-Credential -Message "Enter your valid Username and Password" -UserName PSDomain\PSAdmin

The Select-Object CMDLET is generally used to select objects or object properties. In Version 3.0, it is known by a new parameter name called Wait, which is used to turn off the object optimization.
Usually, Windows PowerShell has the behavior to generate all objects and throw them to the pipeline flawlessly. If you use Select-Object with either the First or Index parameter and proceed with the Wait parameter, the console will stop creating further objects after the specified value.
PS C :\> Get-Process | Select-Object Name -First 5 –Wait
The previous command statement retrieves the first five process objects instead of generating all the process objects for running processes.
In the previous versions of Windows PowerShell, if you have the header row value as a null value, the Import-Csv CMDLET fails. But, in Version 3.0, the Import-Csv CMDLET has the Header parameter name, which helps to overcome this error.
The Header parameter name manually adds the header row to the CSV file before importing it to the console. It gives a warning message with the output displayed.
For example, assume there is a CSV file named Services.csv placed in a present directory with all the information about the running services stored in it with a null header row value:
PS C :\> $header = "Current State", "Service Name", "Description"
The $header variable contains manually defined header row values.
PS C :\> Import-Csv –Path .\Services.csv -Header $header
The preceding command statement manually attaches header row values and imports the specified CSV file to the console.
In PowerShell v3.0, the Import-Csv CMDLETs don't work well if your CSV file has any blank lines; the output spits empty objects. But, in PowerShell v4.0, blank lines are ignored and the Import-Csv CMDLET works as expected.
In Version 3.0, the team has extended covert CMDLET's chains to ConvertTo-Json and ConvertFrom-Json. In previous versions, we had similar CMDLETs, for example, ConvertTo-Csv, ConvertFrom-Csv, ConvertTo-Html, ConvertFrom-Html, and so on.
The ConvertTo-Json CMDLET converts Windows PowerShell objects to JSON-formatted string objects.
PS C :\> Get-Process | ConvertTo-Json
The preceding command statement returns JSON-formatted process string objects. The ConvertTo-Json CMDLET converts all process objects into JSON-formatted string objects.
The ConvertFrom-Json CMDLET behaves exactly opposite to the ConvertTo-Json CMDLET. It converts JSON-formatted string objects to custom Windows PowerShell objects.
PS C :\> Get-Process | ConvertTo-Json | ConvertFrom-Json
The preceding command statement returns custom process objects. The ConvertTo-Json CMDLET converts all process objects into JSON-formatted string objects. Again, the ConvertFrom-Json CMDLET converts all JSON-formatted string objects into custom Windows PowerShell objects.
In Version 2.0, we have the New-Object CMDLET to create Windows PowerShell objects as syntaxes:
PS C :\> $Objv2 = New-Object –TypeName PSObject -Property @{x=1; y=2; z=3}
This creates a new Windows PowerShell object with three mapped property values.
PS C :\> $Objv2 | Format-List
y: 2
z: 3
x: 1
In Version 3.0, we have the PSCustomObject type to create Windows PowerShell custom object as syntaxes:
PS C :\> $Objv3 = [PSCustomObject]@{x=1; y=2; z=3}
This also creates a custom Windows PowerShell object with three mapped values.
PS C :\> $Objv3 | Format-List
x: 1
y: 2
z: 3
In both the cases, it creates PSCustomObject using NoteProperties.
PS C :\> $Objv3 | Get-Member
It lists out all the methods and node properties with respect to PSCustomObject.
TypeName: System.Management.Automation.PSCustomObject
Name            MemberType     Definition
----            ----------     ----------
Equals          Method         bool Equals(System.Object obj)
GetHashCode     Method         int GetHashCode()
GetType         Method         type GetType()
ToString        Method         string ToString()
x               NoteProperty   System.Int32 x=1
y               NoteProperty   System.Int32 y=2
z               NoteProperty   System.Int32 z=3
The only benefit we get out of this is that it maintains the property order, rendering it to be utilized reliably.
So far, we have covered changes to the settings in Windows PowerShell Version 3.0 in a general way. Now, let's try to capture how Version 3.0 is useful to the system administrator regarding the ease of working with the console. This recipe consists of multiple subrecipes.
Try executing the following code sequence:
The following command statement adds the
Member01server toPSDomainusing thePSDomain\PSAdmincredential and restarts the machine once added. It also uses theForceparameter, so it doesn't ask for confirmation.PS C:\>Add-Computer -ComputerName Member01 -LocalCredential Member01\Admin01 -DomainName PSDomain -Credential PSDomain\PSAdmin -Restart –ForceThe following command statement adds the
Member01andMember02servers toPSDomainusing thePSDomain\PSAdmincredential and restarts the machines once added:PS C:\>Add-Computer -ComputerName Member01, Member02 -Domain PSDomain -LocalCredential TestDomain\User01 -UnjoinDomainCredential TestDomain\Admin01 -Credential PSDomain\PSAdmin –RestartThe following command statement adds the
Member01server toPSDomainusing thePSDomain\PSAdmincredential, changes its name toNewMember01, and restarts the machine once added:PS C:\>Add-Computer -ComputerName Member01 -Domain PSDomain -NewName NewMember01 -Credential PSDomain\PSAdmin –RestartThe following command statement adds the
Member02server toPSDomainusing thePSDomain\PSAdmincredential and moves it to thePSOUorganizational unit after adding to the domain:PS C:\>Add-Computer -ComputerName Member02 -Domain PSDomain –OUPath "OU=PSOU,DC=PSDomain,DC=com" -Credential PSDomain\PSAdminThe following command statement adds the
Member01server to a workgroup namedTestWorkgroup:PS C:\>Add-Computer -ComputerName Member01 -WorkgroupName TestWorkgroup
Given below are the additional parameter names introduced with Add-Computer in Version 3.0:
-ComputerName: It specifies the names of the computers, separated by commas, to add them into a domain or workgroup. By default, it takes the local computer name.-Force: It avoids prompt confirmation. By default, it asks for confirmation for each server that we add to the domain or workgroup. We can use theForceparameter name to overcome that.-LocalCredential: It is not a mandatory parameter, but it explicitly provides credentials to connect to the servers specified by theComputerNameparameter. Likewise, theCredentialparameter is used to provide valid credentials to join to the domain.-NewName: This parameter provides a new name to a computer in the new domain. It only works when one computer name is supplied to be added or removed.-Restart: It restarts the computers that have been added to the domain or workgroup. Generally, it requires a restart once after joining into a domain and theRestartparameter does this job well.-UnjoinDomainCredential: It passes the credentials of the user account that has permission to unjoin the computer from the current domain. This parameter is useful when we are moving from one domain to another. Likewise, use theCredentialandLocalCredentialparameters to provide credentials to join the domain and connect to other computers, respectively.-WorkgroupName: This parameter has been introduced with the release of Windows PowerShell 4.0. It specifies the name of the workgroup to which the computers are added. This parameter is only important while adding the computers to a workgroup. Its default value isWORKGROUP.
The Remove-Computer CMDLET has the same set of enhancements as Add-Computer. The changes are identical with respect to both the CMDLETs.
The Rename-Computer CMDLET is introduced in Windows PowerShell v3.0. It requires the NewName parameter of the server and the DomainCredential parameter to put these changes in effect.
For example:
PS C:\>Rename-Computer -NewName NewMember01 -DomainCredential PSDomain\PSAdmin –Restart
The preceding command statement changes the name of the local computer to NewMember01 using the domain admin credentials PSDomain\PSAdmin. It prompts for the password, changes the name of the local computer, and restarts it to put the changes in effect.
The Rename-Computer CMDLET also supports parameters such as ComputerName, Force, LocalCredential, and Passthru.
Two handy CMDLETs introduced with Windows PowerShell version 3.0 are: Get-ControlPanelItem and Show-ControlPanelItem.
PS C :\> Get-ControlPanelItem -Name *Device* | Format-List
The previous command displays all the control panel items containing the Device keyword. Format-List shows information in a list format. The output is shown as follows:
Name          : Device Manager
CanonicalName : Microsoft.DeviceManager
Category      : {All Control Panel Items}
Description   : View and update your hardware's settings and driver software.
Name          : Devices and Printers
CanonicalName : Microsoft.DevicesAndPrinters
Category      : {Hardware and Sound}
Description   : View and manage devices, printers, and print jobs
PS C :\> Get-ControlPanelItem -Name *Printers* | Show-ControlPanelItem
The preceding command statement gets the control panel items that are related to printers and, further, Show-ControlPanelItem opens the Device and Printers window.
In Version 3, a new parameter name Source is introduced with the Test-Connection CMDLET. If there is a need to check the connectivity of a single machine from multiple locations, the Source parameter is very handy to use.
PS C:\>Test-Connection –Source Member01, Member02 -ComputerName DC01 -Credential PSDomain\PSAdmin
The preceding command statement checks the connectivity for the server DC01 from two servers named Member01 and Member02.
The Test-NetConnection CMDLET is introduced in Windows PowerShell 4.0. It shows the diagnostic information of a connection. It shows various results in the output, for example, the DNS lookup, traceroute information, and so on.
The following are the various parameters that come along with this CMDLET:
-CommonTCPPort <String>: It defines the common service TCP port number. The values are: HTTP, PING, RDP, and SMB.-ComputerName <String>: It specifies the DNS name or IP address of the target machine.-Hops <Int32>: It defines the number of hops of traceroute.-InformationLevel <String>: It provides the level of information. The values are:DetailedandQuiet. TheQuietvalue returns a Boolean value, whereasDetailedgives you in-depth information about a connection.-Port <Int32>: It specifies the TCP port number of a target machine.-TraceRoute: It tests the connectivity of the machine to a remote machine.
For example:
PS C :\> Test-NetConnection –ComputerName PSTest.PSLab.com -Port 8080 -InformationLevel Detailed
The preceding command statement checks the connectivity of PSTest.PSLab.com with respect to the port number 8080 and shows detailed information about the established connection.
In this recipe, we will learn how to import modules to the console.
In previous versions, we used to run the Import-Module CMDLET to load specific modules onto a console, but now, in Version 3, there is no need to explicitly import modules that are specified in $env:PSModulePath. There are a few more modules that come along with the Version 3 consoles.
Let's try to put it in an example:
Have a look at the following command:
PS C:\ > Get-ModuleCheck the following list of loaded modules in the console at present:
Module type
Name
Exported commands
Manifest
Microsoft.PowerShell.ManagementAdd-Computer,Add-Content,Checkpoint-Computer,Clear-Content, and so onThe preceding command lists out all the modules loaded in the current session.
By default, the
Microsoft.PowerShell.Mangementmodule is preloaded onto the console, even if you are opening it for the first time.Now, try to use following code:
PS C :\> Get-JobIt retrieves the Windows PowerShell background jobs that are running in the current session.
Now, execute
Get-Moduleagain, using the following code:PS C :\> Get-ModuleCheck the following list of loaded modules in the console at present:
Module type
Name
Exported commands
Manifest
Microsoft.PowerShell.ManagementAdd-Computer,Add-Content,Checkpoint-Computer,Clear-Content, and so onManifest
Microsoft.PowerShell.UtilityAdd-Member,Add-Type,Clear-Variable,Compare-Object, and so onIf you are trying to execute CMDLETs apart from the loaded modules, the Version 3 console automatically loads modules from the
PSModulePathlocation onto a current session. In the preceding example, theMicrosoft.PowerShell.Utilitymodule is loaded once we have executed theGet-JobCMDLET onto the console.Going further:
PS C :\> Get-CimSessionThe preceding command retrieves the CIM session objects from the current session.
Have a look at the following command:
PS C :\> Get-ModuleCheck the following list of loaded modules in the console at present:
Module type
Name
Exported commands
Binary
CimCmdletsGet-CimAssociatedInstance,Get-CimClass,Get-CimInstance,Get-CimSession, and so onManifest
Microsoft.PowerShell.ManagementAdd-Computer,Add-Content,Checkpoint-Computer,Clear-Content, and so onManifest
Microsoft.PowerShell.UtilityAdd-Member,Add-Type,Clear-Variable,Compare-Object, and so onNow, the
CimCmdletsmodule is also loaded onto the console because you are trying to execute the CMDLETs of that module file.
For better understanding, let's get the list of the newly introduced modules in version 3.0. Have a look at the following command:
PS C :\> Get-Module -ListAvailable | where PowerShellVersion -eq '3.0'
Directory: C:\Windows\system32\WindowsPowerShell\v1.0\Modules
Check the following list of available modules with PowerShell v3.0:
|
Module type |
Name |
Exported commands |
|---|---|---|
|
Manifest |
|
|
|
Script |
|
|
|
Manifest |
|
|
|
Manifest |
|
|
|
Manifest |
|
|
|
Manifest |
|
|
|
Manifest |
|
|
|
Manifest |
|
|
|
Binary |
|
|
|
Manifest |
|
|
|
Manifest |
|
|
Sometimes, you have many modules placed in your PSModulePath location and they will be loaded onto your current session eventually, one-by-one, based on your CMDLET interaction. It will overhead for the current session to load all available modules. There is a way to restrict such behavior. In Version 3, a new preference variable has been introduced, named $PSModuleAutoloadingPreference.
It enables or disables autoloading behavior in modules. The default value is All. So, by default, it loads all the modules onto the console from the PSModulePath location, when and where required. Irrespective of the value of $PSModuleAutoloadingPreference, you can leverage the Import-Module CMDLET to load the required modules at any time.
$PSModuleAutoloadingPreference has three values listed as follows:
All: The modules are autoloaded if you are using their CMDLETs for the first time.
Module Qualified: With this value, you need to explicitly provide the module name with the CMDLET like
TestModule\TestCmdlet. For example,PSScheduledJob\New-JobTrigger.None: It disables auto importing behavior in modules. You need to manually import the module using the
Import-ModuleCMDLET. To restrict autoloading behavior in modules, run the following code:PS C :\> $global:PSModuleAutoloadingPreference="None"
With Windows PowerShell v3.0, you can log execution events for Windows PowerShell modules.
In previous versions, this feature was supported by snap-ins alone. If the LogPipelineExecutionDetails property value is set to $True, it writes execution events from a current session into the Windows PowerShell log, which is in the event viewer. This setting is limited to the current session; if you re-open the session, you need to manually set the property value again.
Use the following code to enable logging and set the property value to $True for the PSScheduledJob module:
PS C :\> Import-Module -Name PSScheduledJob
PS C :\> $Temp = Get-Module -Name PSScheduledJob
PS C :\> $Temp.LogPipelineExecutionDetails = $True
To disable module logging, you can use the same code sequence using the property value $False.
You can explicitly perform this property value setting using the Group Policy setting. This setting will be applicable to all the sessions for a specified module. "Turn on Module Logging" is available at the following paths:
Computer Configuration\Administrative Templates\Windows Components\Windows PowerShellUser Configuration\Administrative Templates\Windows Components\Windows PowerShell
The policy defined for the user takes precedence over the computer policy and both the policies take precedence over the property value of the LogPipelineExecutionDetails parameter.
For example, you can find the event log entries for Windows PowerShell using the following code:
PS C:\> Get-EventLog -LogName "Windows PowerShell" | Format-Table -AutoSize –Wrap
There is one more parameter introduced with the Get-Module CMDLET with the release of Windows Powershell 4.0: -FullyQualifiedName <String[]>. It accepts parameter values as ModuleSpecification objects. The FullyQualifiedName parameter has a specified format as shown:
@{ModuleName = "modulename"; ModuleVersion = "version_number"}
We can use either Name or FullyQualifiedName with the Get-Module CMDLET. We cannot use both together as they are mutually exclusive.
In the previous recipes, we have covered the basic changes that took place with the release of Windows PowerShell v3.0. Let's have a look at typing enhancements in the Version 3 console.
We have tab completion for CMDLETs in each version of Windows PowerShell, especially in Version 3.0 where we have tab completion for parameter values as well.
We have some simplified syntax introduced in the latest version of Windows PowerShell with respect to the Where-Object and ForEach-Object CMDLETs.
In Version 2.0, the following command retrieves a list of running processes, which have a handles count greater than 1000 from the local machine:
PS C :\> Get-Process | Where-Object {$_.Handles -gt 1000}In Version 3.0, the following command does the same operation as the previous command statement:
PS C :\> Get-Process | Where-Object Handles -gt 1000Let's check use of
ForEach-ObjectandWhere-Objectby using the following points:The following command statement lists down only files and directory names from the
C:\Scriptslocation:PS C :\> Get-ChildItem C:\Scripts | ForEach-Object NameThe following command retrieves the list of running services on the local computer which have the
winkeyword in their names:PS C :\> Get-Service | Where-Object {$PSItem.Status -eq "Running" -and $PSItem.Name -like "*win*"}
If we compare the preceding two different version's outputs, it is evident that PowerShell v3.0 has simplified syntax. Moreover, we do not need to use curly braces anymore to run a command statement.
Also, it automatically gets the previous command pipeline output as input for the Where clause. We don't need to explicitly provide the parameter value with the $_ syntax.
Novice users would find the $_ syntax a bit strange; now, in PowerShell v3.0, we can use $PSItem instead of $_.
The same is the case with Where-Object; we don't need to use curly braces and the $_ syntax if we are dealing with ForEach-Object in PowerShell v3.0.
We will learn about the parameters of Get-Command in different versions of PowerShell.
In PowerShell v2.0, Get-Command only retrieves the CMDLETs available in the present session whereas, in v3.0, it retrieves all the CMDLETs that are installed on the local computer, including modules, functions, workflows, scripts, and so on. It also includes the application in the output available at the $env:Path location.
Execute the following commands:
The following command statements retrieve a list of the workflow CMDLETs and general functions available in the current session:
PS C :\> Get-Command -Module PSWorkflow
PS C :\> Get-Command -CommandType Function
The following command statement retrieves all the CMDLETs that have the
ComputerNameparameter:PS C :\> Get-Command -ParameterName ComputerNameThe following command statement retrieves all the CMDLETs that accept the
PSCredentialparameter type.PS C :\> Get-Command -ParameterType PSCredential
The following are the newly introduced parameters in PowerShell v3.0 with Get-Command:
-All: This parameter helps us retrieve all the CMDLETs, irrespective of conflicting names.-CommandType<CommandTypes>: With this parameter, we can now get the command list by mentioningCommandTypeexplicitly. We can have otherCommandTypes, such asExternalScript,Application, and so on.-ListImported [<SwitchParameter>]:Get-Command, along with the–ListImportedparameter, gets the list of CMDLETs available in the current console session. By default,Get-Commandretrieves the CMDLETs from all the sessions that are present on the local computer.-ParameterName <String[]>: This parameter helps us retrieve a list of CMDLETs with the specified parameter name in their syntax.-ParameterType <PSTypeName[]>: This parameter helps us retrieve the list of CMDLETs that have the specified parameter type in their syntax.
Tip
For fast typing you can use the # tag to refer to a CMDLET in the command history. For example:
PS C :\> Get-Process
PS C :\> #Get <Tab>
The preceding command statement searches for the Get keyword in the console command history and refers to the matching CMDLET for tab completion. In this case, the Get keyword matches Get-Process and, hence, upon execution, retrieves a list of the running processes.
As stated in earlier recipes, Windows PowerShell 4.0 has a new feature called Desired State Configuration (DSC).
There are a few CMDLETs with the Configuration command types. To retrieve the Configuration command type CMDLETs, run the following command:
PS C :\> Get-Command -CommandType Configuration
Prior to using the preceding command, the DSC feature should be installed in your local server.
We will learn to set the default parameter values.
$PSDefaultParameterValues is a default preference variable introduced in PowerShell v3.0. This variable sets the custom parameter values to specified CMDLETs and functions. It maintains a hash table to store all of the defined values.
Try the following test code to set the default parameter values:
The following command statement sets the
localhostvalue to the parameter nameComputerNamefor all CMDLETs that haveInvokeas a verb:PS C :\> $PSDefaultParameterValues=@{"Invoke-*:ComputerName"="localhost"}The following command provides the computer name, specified as
C:\Servers.txt, to theComputerNameparameter for all CMDLETs that haveInvokeas a verb:$PSDefaultParameterValues=@{"Invoke-*:ComputerName"={Get-Content C:\Servers.txt} }
The following are the syntaxes to define the $PSDefaultParameterValues preference variable:
$PSDefaultParameterValues=@{"<CmdletName>:<ParameterName>"="<DefaultValue>"}: This syntax maps default values to the combination of the specified CMDLET andParameterName.$PSDefaultParameterValues=@{"<CmdletName>:<ParameterName>"={<ScriptBlock>}}: This syntax provides the facility to passScriptBlockas the default value to the combination of the specified CMDLET andParameterName.$PSDefaultParameterValues["Disabled"]=$true | $false: This syntax enables/disables the behavior of the$PSDefaultParameterValuesvariable.$PSDefaultParameterValues[Disabled]=$true: This command statement maintains the list of values in$PSDefaultParameterValues, but it disables its behavior in the current session. You can reset its behavior by using the following syntax:$PSDefaultParameterValues[Disabled]=$false. There is also an alternative to control the behavior of$PSDefaultParameterValues.To disable the behavior, use
$PSDefaultParameterValues.Add("Disabled", $true).To enable the behavior use
$PSDefaultParameterValues.Remove("Disabled").The previous value of this variable will again be in effect in the current PowerShell console.
The following are a couple of functionality changes with respect to Windows PowerShell v4.0.
This common parameter allows us to store the current pipeline object in the specified variable. This technique is very useful when dealing with multiple commands in a pipeline with transformative information. In such cases, we will sometimes lose context and be unable to retrieve the data as and when required. We can use the pipeline variable to save the result and that can be passed through the remainder of the pipeline.
For example, in the case of System Center Orchestrator, this parameter helps to extend the context of iterative pipelines.
With the beginning of Windows PowerShell v4.0, we can now filter a collection of objects using a simplified where syntax when a method calls.
PS C :\> (Get-Command).where("Name -like *log")
The preceding command statement retrieves all the CMDLETs ending with the log keyword.
Prior to using this, we need to import the PSDesiredStateConfiguration module as collection filtering is a part of it.
PS C :\> Import-Module PSDesiredStateConfiguration
PS C :\> (Get-Command).where
Script              : $prop, $psop, $val = [string] $args[0] -split
                      '(-eq|-ne|-gt|-ge|-lt|-le|-like|-notlike|-match|-notmatch)'
                      $operation = @{ Prop = $prop.Trim(); Value = $val.Trim(); $psop = $true }
                      $this | where @operation
OverloadDefinitions : {System.Object where();}
MemberType          : ScriptMethod
TypeNameOfValue     : System.Object
Value               : System.Object where();
Name                : where
IsInstance          : False
The where() method is not limited to PowerShell 4.0 only. The following syntax can be used to enable this on systems with PowerShell v3.0 as well:
PS C :\> Update-TypeData -Force -MemberType ScriptMethod -MemberName where -TypeName System.Array -Value { $prop, $psop, $val = [string] $args[0] -split '(-eq|-ne|-gt|-ge|-lt|-le|-like|-notlike|-match|-notmatch)' $operation = @{ Prop = $prop.Trim(); Value = $val.Trim(); $psop = $true } $this | where @operation}
Run the preceding command statement, which enables the where method signature into your PowerShell 3.0 console, and execute commands as follows:
PS C :\> (Get-Command).where("Name -like *log")
This solution can be leveraged if you don't want to import the PSDesireStateConfiguration module explicitly.
Everyone seeks to type less and perform more. To serve this purpose, we have aliases in Windows PowerShell.
In PowerShell Version 3.0, many parameters have been introduced for Get-ChildItem that are very efficient with filesystem drives.
The following command retrieves only system files from the
C:\Windowslocation:PS C :\> Get-Childitem –Path C:\Windows -File –SystemUse its abbreviated form as follows:
PS C :\> dir -pa C:\Windows -af -as
The following are the parameters newly introduced with the Get-ChildItem CMDLET.
-Attributes <FileAttributes]>: This parameter retrieves files and folders with the supplied attribute. There are many attributes accepted, such asArchive,Compressed,Device,Directory,Encrypted,Hidden,Normal,NotContentIndexed,Offline,ReadOnly,ReparsePoint,SparseFile,System, andTemporary. We can also use abbreviated forms for the following attributes:DforDirectoryHforHiddenRforRead-onlySforSystem
We can use NOT (
!), AND (+), and OR (,) operators to combine multiple attributes.-Directory [<SwitchParameter>]: This parameter lists only directories, not files.-File [<SwitchParameter>]: This parameter lists only files, not directories.-Hidden [<SwitchParameter>]: By default,Get-ChildItemretrieves non-hidden files and folders from the specified path. Use theHiddenparameter to only retrieve hidden files in the CMDLET output.-ReadOnly [<SwitchParameter>]: This parameter retrieves files and folders with the read-only attribute.-System [<SwitchParameter>]: This parameter retrieves only system files from the specified path/directory.
There are few aliases available with respect to the Get-ChildItem CMDLET, specified as follows:
dirforGet-ChildItemd,adforDirectoryafforFileh,ahforHiddenarforReadOnlyasforSystem
There are a few minor enhancements in Version 3.0 for alias mechanisms with respect to the following CMDLETs.
Until PowerShell Version 2.0, the Get-Alias CMDLET gave output in a hyphenated form. Now, in PowerShell v3.0, Get-Alias displays nonhyphenated lists of alias names. This simplified output is easy to refer to and interpret.
The following is a sample output:
PS C:\> Get-Alias ps, cls
CommandType         Name
-----------         ----
Alias               ps -> Get-Process
Alias               cls -> Clear-Host
PS C:\> Get-Alias | Select-Object Name,DisplayName,Options
The preceding command retrieves a list of aliases available in the current session with three properties: Name, DisplayName, and Options.
By referring to the Option property, you can list out Alias with read-only options.
By default, for security reasons, Import-Alias does not overwrite existing aliases. In other words, it doesn't modify read-only alias names by importing aliases from other sessions. To forcefully overwrite the existing aliases in the current session, use the –Force parameter with the Import-Alias CMDLET.
There are a few parameters introduced in Windows PowerShell Version 3.0:
-AllCentralAccessPolicies [<SwitchParameter>]: This parameter retrieves information about all the central access policies present on the local computer. In Windows Server 2012, administrators have the facility to set up central access policies for users and groups using Active Directory and Group Policy.-InputObject <PSObject>: This parameter helps us get the security descriptor for those objects that do not have a defined path. It accepts thePSObjecttype.-LiteralPath <String[]>: This parameter is useful when we need to explicitly provide the true path for the objects to retrieve security descriptors for them. It doesn't accept wildcard characters.
Data Operations are critical routine administrative tasks and, with the release of Windows PowerShell Version 3.0, we have made some improvements regarding the handling of data in the console.
There are a few new operators introduced in PowerShell Version 3.0. For example, the In and NotIn operators.
Try executing the following code:
The following command checks the availability of
1in the reference set and returnsTruein this case:PS C :\> 1 -In (1,2,3) True
The following command checks for an exact counter match for the
Adminkeyword in the reference set and returnsTruein this case:PS C :\> "Admin" -NotIn "Administrator" True
The following table mentions the syntaxes for these operators:
|
Operator |
Syntax |
Description |
|---|---|---|
|
|
|
This operator returns a Boolean value as output. If any test value is present in the reference values set, it returns |
|
|
|
This operator also returns a Boolean value as output. If any test value is not present in the reference values set, it returns |
There are a few new parameters introduced with the following CMDLETs:
The Get-Content CMDLET retrieves content from a specified file.
-Tail <Int32>: To retrieve the number of lines from the file, use theTailparameter with theGet-ContentCMDLET. It retrieves the number of lines supplied to this parameter. For example:PS C :\> Get-Content -Path C:\PSTest.txt -Tail 10The preceding command statement retrieves the last 10 lines from
C:\PSTest.txt.
The Tee-Object CMDLET stores output in a file or variable and throws to the pipeline.
-Append [<SwitchParameter>]: If any file already exists and you try to supply it withTee-Object, it overrides the content by default. To avoid this, you can use the–Appendparameter with theTee-ObjectCMDLET. For example:PS C:\>Get-ChildItem -Path C:\PSBooks -Recurse | Tee-Object -File C:\BookList.txt –AppendThe preceding command statement gets the list of PowerShell books and appends it to
BookList.txt.
Here, we would be learning about the different parameters of the Out-GridView CMDLET.
The Out-GridView CMDLET gets the output in a graphical form. It leverages the .NET Framework to construct an output window, so the .NET Framework is mandatorily required to deal with the Out-GridView CMDLET.
Try executing the following lines of code.
The following command statement generates the output window along with all the services that are running, and we can select multiple service instances to stop them from having further pipeline executions:
PS C :\> Get-Service | Out-GridView –PassThru | Stop-ServiceThe following command creates an output window popup with
"Process List"as the header:PS C :\> Get-Process | Out-GridView -Title "Process List"
A few more parameters are introduced with the popular Out-GridView CMDLET.
-OutputMode <OutputModeOption>: By default, theOut-GridViewCMDLET doesn't generate output objects except for an interactive console. Using theOutputModeparameter, you can explicitly define that you need to generate a specific number of objects as the output. It has three acceptable values as follows:None: This is the default option and it doesn't generate any objects.Single: This option provides only one input object to the next relevant CMDLET and passes it into the pipeline.Multiple: This option can generate multiple input objects that can be used by the next relevant CMDLET and pass them into the pipeline. This option behaves in a way that is identical to thePassThruparameter.
-PassThru [<SwitchParameter>]: This parameter acts like theOutputModeparameter with theMultipleoption. It generates multiple input objects based on what the user selects in the interactive window. These objects would be passed to the subsequent CMDLET in the pipeline.-Title <String>: By default, theOut-GridViewCMDLET generates an interactive window with a complete command statement as the title of the window. We can set the title manually using theTitleparameter along with theOut-GridViewCMDLET.-Wait [<SwitchParameter>]: By default, with the execution of theOut-GridViewCMDLET, the console prompt returns immediately. You can explicitly prevent the command prompt to return immediately with theWaitparameter along with theOut-GridViewCMDLET.
There are a few more CMDLETs that can be useful to operate the data in an efficient way. Some are listed as follows:
The Export-Csv CMDLET exports the output data into a CSV file.
-Append [<SwitchParameter>]: By default, theExport-CsvCMDLET overwrites the output to the specified file if it is already available in the defined location. Using theAppendparameter, you can restrict that behavior and allow the CSV file to append further with the output content.
This parameter adds custom methods and properties to an object.
-
NotePropertyMembers <IDictionary>: With this parameter, we can explicitly provide the list of custom property names and values to be added in a hash-table format using theAdd-MemberCMDLET.-NotePropertyName <String>: This parameter passes property names to theAdd-MemberCMDLET.-NotePropertyValue <Object>: This parameter passes a value object to property names that are defined with theNotePropertyNameparameter.-TypeName <String>: This parameter provides the name of the type. The type can be a class from the system namespace, and using this, you can also provide a short name for the type, for example:PS C:\>$P = Get-ProcessPS C:\>$Job = Add-Member –InputObject $P -NotePropertyName CurrentStatus -NotePropertyValue Completed PS C:\>$Job = Add-Member CurrentStatus Completed
These command statements add the
CurrentStatusproperty along with the valueCompletedto the$Jobvariable object.PS C:\>$Job.CurrentStatus Completed
You can get the value of
CurrentStatususing the preceding syntax.
There is one parameter named IncludeUserName introduced with the Get-Process CMDLET in Windows PowerShell 4.0:
-IncludeUserName: This parameter includes a new column asUserNamein the standard process object output.
There is one limitation to this parameter; you can't use this along with the
ComputerNameparameter. If you want to do so, you need to use the following approach:PS C:\> Invoke-Command -ScriptBlock { Get-Process -IncludeUserName } -ComputerName PSTest
The Get-FileHash CMDLET has been newly introduced in Windows PowerShell 4.0. It gets a hash code for your specified file. This CMDLET comes very handy while comparing same files at different locations using hash tags. If you are copying large files such as ISO files from one location to other, you can verify the consistency with which this happens, whether the files are copied successfully or not, using this CMDLET. We have the freedom to use various algorithms to calculate the hash. The following command statement calculates the hash using the MD5 algorithm for one PowerShell script:
PS C :\> Get-FileHash -FilePath D:\SpaceAnalyser.ps1 -Algorithm MD5 | Format-List
Path : D:\SpaceAnalyser.ps1
Type : System.Security.Cryptography.MD5CryptoServiceProvider
Hash : h9uUHj8CGtGnV35reUkehw==
There are numerous changes in PowerShell Version 3.0 with respect to PowerShell remote sessions. Previously, in Version 2.0, all remote PSSessions were dependent on the current console session. Now, in Version 3.0, PowerShell maintains the remote PSSession on the remote computer itself, and it is totally independent on the current console session. So, even though you close the current local session, you can continue and resume the session, and reconnect them.
There are a few recently introduced parameters for Get-PSSession and New-PSSession CMDLETs. Also, there are some newly introduced CMDLETs such as Connect-PSSession, Disconnect-PSSession, and New-PSTransportOption.
Try executing the following lines of code by performing the following steps:
The following command statement creates a new remote PowerShell session with a count of 100 concurrent connections to computers mentioned in
servers.txtusing the PSDomain/PSAdmin privilege, and it is stored in a variable named$session.PS C :\> $session = New-PSSession -ComputerName (Get-Content C:\servers.txt) -Credential PSDomain\PSAdmin -ThrottleLimit 100The following command statement disconnects the session that is stored in the
$sessionvariable:PS C :\> Disconnect-PSSession -Session $sessionFinally, the following command statement will reconnect to a session that is stored in the
$sessionvariable and will reduce the concurrent connection count to50:PS C :\> Connect-PSSession -Session $session -ThrottleLimit 50
As discussed earlier in this chapter, with PowerShell Version 3.0, we have the facility to reconnect to the remote session that is disconnected due to certain reasons such as network interruption, remote server unavailability, and so on. In such cases, we can use a couple of commands to handle the sessions; they are Connect-PSSession and Disconnect-PSSession.
The Connect-PSSession CMDLET connects to the disconnected session again and enables us to resume our work in the same session. It has certain parameters such as Authentication, CertificateThumbPrint, ComputerName, Credential, Id, Name, Port, ThrottleLimit, UseSSL, AllowRedirection, ConnectionUri, and so on, which have been discussed earlier in this book. The following are two parameters specific to sessions:
-Session <PSSession[]>: This parameter accepts a value from a variable that hasPSSessionstored in it.-SessionOption <PSSessionOption>: This passes advanced configurations toPSSessionby providing thePSSessionOptionobject to it. This parameter takes default values from the$PSSessionOptionpreference variable.
The Disconnect-PSSession CMDLET disconnects the specified session from the current session. You can provide a reference to the session by having parameters such as Name, Session, Id, and so on. There are a few other parameters that are specified as follows:
-IdleTimeoutSec <Int32>: This parameter confirms for how long would a disconnected session be maintained at the remote computer's end. By default, the value is set to 7,200,000 milliseconds (two hours). The minimum and maximum values are 60 sec (one min) and 12 hours respectively.-OutputBufferingMode <OutputBufferingMode>: This parameter specifies how the output is stored in the buffer. The accepted values and actions are as follows:Block: If the buffer is full, the execution will be suspended until the buffer cleaning process is initiatedDrop: If the buffer is full, it overwrites the data; new data takes precedence over the older oneNone: It takes the value from the propertyOutputBufferingModethat is provided with the session configuration for a disconnected session
A few parameters are also introduced with respect to PowerShell sessions in Version 3.0. The following are some of these parameters.
-Authentication <AuthenticationMechanism>: This parameter explicitly providesAuthenticationMechanismfor passed user credentials. The accepted values areDefault,Basic,Credssp,Digest,Kerberos,Negotiate, andNegotiateWithImplicitCredential. The parameter holds the default value asDefault.-CertificateThumbprint <String>: This parameter's role is to supply the digital public key certificate of a user who has permission to create a session over the network. It creates a temporary connection using certificate-based authentication.-Credential <PSCredential>: This parameter provides an explicit credential that has permission to the console for getting session information from the remote computer. It accepts thePSCredentialobject type.-Port <Int32>: This parameter specifies the port number with the accepted integer data type. By default, CMDLET uses the5985port for HTTP and5986for HTTPS communications.-State <SessionFilterState>: This parameter is to retrieve the session information of the specific session state. The accepted values for a session state areAll,Opened,Disconnected,Closed, andBroken. By default, CMDLET retrieves information for all the sessions.-ThrottleLimit <Int32>: This parameter provides the maximum concurrent connection count for the specified computers. By default, the maximum concurrent connection count is32.-UseSSL [<SwitchParameter>]: Using this parameter, we can create a connection using the Secure Socket Layer (SSL) protocol. By default, SSL does not enable to create connections.-ConnectionUri <Uri[]>: This parameter is to explicitly provide a Uniform Resource Identifier that defines the connection configuration options. The syntax is as follows:<Transport>://<ComputerName>:<Port>/<ApplicationName>. By default, it passeshttp://localhost:5985/WSMAN.-AllowRedirection [<SwitchParameter>]: If we use theConnectionUriparameter and the specified URI for redirecting to some other link, PowerShell won't support this. For that to happen, you need to use theAllowRedirectionparameter which allows redirecting from a specified URI.
We have one more CMDLET named New-PSTransportOption that can be leveraged to configure the advanced session configuration options. This CMDLET has properties such as IdleTimeoutSec, MaxConcurrentCommandsPerSession, MaxConcurrentUsers, MaxIdleTimeoutSec, MaxMemoryPerSessionMB, MaxProcessesPerSession, MaxSessions, MaxSessiconsPerUser, OutputBufferingMode, and ProcessIdleTimeoutSec.
There are some other session configurations CMDLETs also introduced with the release of PowerShell Version 3.0. We can check for more information using the following help topics:
PS C :\> help about_Session_Configurations
PS C :\> help about_Session_Configuration_Files
There have been multiple modifications to PSRemoting with the release of Windows PowerShell Version 3.0. To perform remoting activities with PowerShell, we need to execute the Enable-PSRemoting CMDLET on remote computers.
Enable-PSRemoting: This CMDLET in fact starts the WinRM service, sets it to the type automatic, creates a firewall exception, and prepares a session environment to perform remote tasks.-SkipNetworkProfileCheck [<SwitchParameter>]: Server versions of Windows have remote access from the local subnet by default, but if we are working with a client version and the computer is in the public network, we won't have remote access from the local subnet. In such cases, we need to either use theSkipNetworkProfileCheckparameter, or we need to create a firewall rule manually by using theSet-NetFilewallRuleCMDLET of theNetSecuritydefault module.Disable-PSRemoting: This CMDLET only prevents remote access to the computers. You need to manually stop and disable the WinRM service and also need to disable firewall exceptions for remote communications.
Execute the following command statement, by performing the step:
The following command statement executes DiskInventory.ps1 scripts on computers specified in servers.txt, and it maintains the disconnected session named DiskInventory within the scope of the current console:
PS C:\>Invoke-Command -ComputerName (Get-Content C:\servers.txt) –SessionName DiskInventory –InDisconnectedSession -FilePath \\Scripts\DiskInventory.ps1 -NoNewScope
There are a few new parameters introduced with the Invoke-Command CMDLET.
-EnableNetworkAccess [<SwitchParameter>]: This parameter supplies a security token to loopback sessions. This token allows you to run commands in a loopback session from a local computer and get data from remote computers. This parameter only works with loopback sessions.-InDisconnectedSession [<SwitchParameter>]: This parameter facilitates us to run a command statement or a script in the disconnected session. With this parameter,Invoke-Commandcreates a newPSSessionon remote computers and starts the execution ofScriptBlockor a script specified with theFilePathparameter. Then, it disconnects the session, and the execution happens in the disconnected session in the background.-NoNewScope [<SwitchParameter>]: By default,Invoke-Commandis executed in the command's scope. Using this parameter, we makeInvoke-Commandexecute in the current console's scope instead of the command's own scope.-SessionName <String[]>: This parameter is only applicable while using theInDisconnectedSessionparameter. We can explicitly provide a name to the disconnected session by using this parameter.
You can learn to use a local variable in the remote PowerShell session by going through the following explanation.
We can leverage local variables into remote sessions by the Using keyword with variable names that are introduced with Windows PowerShell v3.0. Refer to the following example:
PS C:\> $PSCred = Get-Credential PSDomain\PSAdmin
PS C:\> Invoke-Command -ComputerName DC01,Member01,Member02 -ScriptBlock {Restart-Computer -Credential $Using:PSCred}
The preceding command statements create the PSCred local variable containing the PSDomain\PSAdmin credential along with Password. The second line of the command statement utilizes the PSCred variable and the Using keyword in remote sessions to reboot machines.
Windows PowerShell 3.0 has the capability to maintain workflows and execute them in the environment. It is built on Windows Workflow Foundation, which is written in XAML.
WorkFlow is an enhanced version of a function where you can create an execution sequence by using various command statements. It maintains a reliable session throughout the execution, which serves the reboot and disconnection of network problems in between the execution.
There are two ways to execute a workflow in the console:
Using
Invoke-AsWorkFlowUsing
New-PSWorkflowSession
The following command statement creates a new PowerShell workflow session named
PSTestWorkFlowon the computer namedPSTestusing thePSDomain\PSAdminprivilege with the concurrent connection count as100:PS C :\> New-PSWorkflowSession -ComputerName PSTest -Name PSTestWorkflow -Credential PSDomain\PSAdmin -ThrottleLimit 100The following command statement creates a new session configuration object with defined values for these parameters:
MaxPersistenceStoreSizeGB,MaxRunningWorkflows,MaxDisconnectedSessions,MaxConnectedSessions, andWorkflowShutdownTimeoutMSec:PS C:\ > New-PSWorkflowExecutionOption -MaxPersistenceStoreSizeGB 20 -MaxRunningWorkflows 10 -MaxDisconnectedSessions 50 -MaxConnectedSessions 20 -WorkflowShutdownTimeoutMSec 1000 SessionThrottleLimit : 100 PersistencePath : C:\Users\Harshul\AppData\Local\Microsoft\Windows\PowerShell\WF\PS MaxPersistenceStoreSizeGB : 20 PersistWithEncryption : False MaxRunningWorkflows : 10 AllowedActivity : {PSDefaultActivities} OutOfProcessActivity : {InlineScript} EnableValidation : True MaxDisconnectedSessions : 50 MaxConnectedSessions : 20 MaxSessionsPerWorkflow : 5 MaxSessionsPerRemoteNode : 5 MaxActivityProcesses : 5 ActivityProcessIdleTimeoutSec : 60 RemoteNodeSessionIdleTimeoutSec : 60 WorkflowShutdownTimeoutMSec : 1000
The following are the CMDLETs that are responsible for executing the PowerShell Workflow.
The New-PSWorkflowSession CMDLET creates a PowerShell session to dedicatedly run workflows. This CMDLET provides all the parameters that come with the New-PSSession CMDLET. This CMDLET uses the Microsoft.PowerShell.Workflow session configuration that has all the relevant information to run PowerShell workflows.
The following are a few more workflow enhancements.
The Invoke-AsWorkflow CMDLET executes commands or expressions as a workflow in the console. The following are its parameters:
-CommandName <String>: This parameter specifies the CMDLET name or the function name that executes as the workflow-Expression <String>: This parameter specifies the utility name or the expression that executes as the workflow-Parameter <Hashtable>: This parameter passes parameter names and values (defined in the hash table) to CMDLET or the function that is specified with theCommandNameparameter
Common parameters of WorkFlow provide an extension to default parameters that cover almost all the necessary activities within a workflow execution. These common parameters are availed by the Windows PowerShell WorkFlow Engine. The following are a few samples of these common parameters:
-AsJob <SwitchParameter>: This parameter creates a workflow job and returns to the command prompt immediately after the execution. In the background, it creates a parent job and child jobs for the respective targeted computers.-PSComputerName <String[]>: This parameter specifies the list of computers running the workflow. By default, it takes the name of the local computer as its input.-PSCredential <PSCredential>: This parameter represents the credential that has the privilege to run the workflow. By default, it takes the current user's credential. This parameter only works when thePSComputerNameparameter is used.-PSPersist <Boolean>: This parameter saves the state of the workflow for each activity defined in the workflow. The PowerShell Workflow uses this latest saved state in case there is an interruption. This parameter accepts the following three values:Default: By default, it only saves the state at the beginning and the end of the workflow$True: It saves the state at the beginning, at the end, and after each activity is performed$False: It only saves the state if it is specified in the workflow
-PSSessionOption <PSSessionOption>: It passes advanced configurations toPSSessionby providing thePSSessionOptionobject to it. This parameter takes default values from the$PSSessionOptionpreference variable.
We can now debug Windows PowerShell workflows and scripts that are running on remote computers.
In case there is a server failure, Windows PowerShell Workflow would again reconnect based on the server's uptime.
We can now limit the connection for the
Forech –Parellelcommand statement by using theThrottleLimitproperty.Windows PowerShell Workflows has a new valid value,
Suspend, for theErrorActioncommon parameter.A workflow endpoint now automatically closes if there are no active sessions or jobs. This mechanism prevents unnecessary resource consumptions of the workflow server.
This recipe elaborates CMDLETs and the parameters that are introduced in Version 3 and can be useful to write efficient scripts with optimized efforts.
The following command statements create an ISE snippet that is reusable in any script. The
Textparameter carries the actual string that is supplied as the snippet. We can also specify theDescription,Title, andAuthorparameters if required.PS C:\ > $Script = @' Hello Everyone Snippet is awesome '@ PS C:\ > New-IseSnippet -Description TestSnippet -Text $Script -Title TestSnippet –Author "Harshul"
The following command statement imports snippets from the shared path,
\\Share\Snippets, recursively:PS C :\> Import-IseSnippet -Path \\Share\Snippets -Recurse
The New-IseSnippet CMDLET creates a code snippet that can be re-used in the Windows PowerShell ISE environment. The snippet can be a frequently used command, a small portion of text that you can define as a string. This CMDLET indeed creates a PS1XML file that contains the snippet data. Snippet files will be created in the form of <SnippetTitle>.Snippets.ps1xml.
The following are a few more CMDLETs that can be helpful for writing a script quickly.
The Get-IseSnippet CMDLET returns PS1XML file objects that contain snippets defined in the console. This parameter doesn't have any parameters except for common parameters; for example:
PS C:\> Get-IseSnippet
    Directory: C:\Users\Harshul\Documents\WindowsPowerShell\Snippets
Mode      LastWriteTime     Length Name
----        -------------   ------ ----
-a---       8/29/2013 6:34 PM 1071 TestSnippet.snippets.ps1xml
The Import-IseSnippet CMDLET imports snippets from the specified module of the directory path.
The Show-Command CMDLET is very useful to newbies who need some assistance to construct a command statement. Show-Command provides a graphical input window where you can put all your input in Graphical User Interface, and PowerShell will construct a command statement for you based on your inputs. There are options to Run or Copy your code into the script from the graphical window itself. Try to execute the following command:
PS C :\> Show-Command Invoke-Command
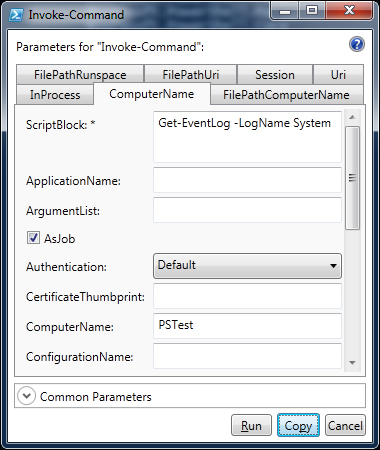
If you use the Copy button to copy the code to the clipboard, it appears as follows:
PS C :\> Invoke-Command -ScriptBlock {Get-EventLog -LogName System} -AsJob -Authentication Default -ComputerName PSTest
By default, if we download any script from the Internet, it is treated as an unreliable file, and we can't run it with the RemoteSigned execution policy. The Unblock-File CMDLET validates the script downloaded from the Internet and lets us open and execute the script under the RemoteSigned execution policy.
The following command statement retrieves the list of scripts available in C:\PSScripts, and it unblocks all the files:
PS C :\> Get-ChildItem -Path C:\PSScripts | Unblock-File
In PowerShell v3.0, the Restart-Computer CMDLET maintains a persistent connection throughout the execution, which serves the reboot problem in between the execution.
Refer to the following code:
PS C :\> Restart-Computer -ComputerName PSTest –Credential PSDomain\PSAdmin -WSManAuthentication Basic -Protocol WSMan
The preceding command statement restarts the PSTest computer using the WSMan protocol with the PSDomain\PSAdmin privilege.
The following command statement restarts PSTest and waits for 500 seconds for the WinRM service to be up on the PSTest computer. It also uses the Delay parameter to specify the duration between queries to identify the status of the PSTest computer, whether it is restarted or not.
PS C :\> Restart-Computer -ComputerName PSTest -Wait -For WinRM -Timeout 500 -Delay 3
A number of parameters have been newly introduced with the Restart-Computer CMDLET. The following is the list of parameters:
-Delay <Int16>: This parameter only works with theWaitandForparameters. It defines the duration to wait for the service to be started (specified with theForparameter). The default value for this parameter is5(seconds).-For <WaitForServiceTypes>: This parameter specifies the service type to wait for after the computer is restarted. The accepted values are as follows:Default: This waits until PowerShell restartsPowerShell: This continues to work with the remote sessionWMI: This queries the WMI classWin32_ComputerSystemfor the computerWinRM: This can create a remote PowerShell session
-Timeout <Int32>: This parameter provides the time-out duration after which it returns to the command prompt even though the computer is not restarted. The default value is-1; this states that the time-out duration is infinitely long.-Wait [<SwitchParameter>]: This parameter is used when we need to restart in the middle of a script or a workflow execution. Using this parameter, a script or a workflow will resume execution after the computer is restarted.-DcomAuthentication <AuthenticationLevel>: This parameter explicitly provides the authentication level to restart the computer using WMI. The accepted values for this parameter are as follows:Call: This is for the Call-level COM authenticationConnect: This is for the Connect-level COM authenticationDefault: This is for Windows authenticationNone: This signifies that there is no COM authenticationPacket: This is for the Packet-level COM authenticationPacketIntegrity: This is for the Packet-Integrity-level COM authenticationPacketPrivacy: This is for the Packet-Privacy-level COM authenticationUnchanged: The authentication level is the same as the previous command
-Protocol <String>: This parameter provides a protocol for restarting computers. The parameter-accepted values are WSMan and DCOM. By default, it uses the DCOM protocol to restart the computer.-WsmanAuthentication <String>: This parameter provides an authentication mechanism to verify the supplied credentials using the WSMan protocol. The accepted values areBasic,CredSSP,Default,Digest,Kerberos, andNegotiate. The default value for this parameter isDefault.
In earlier versions, Windows PowerShell's inventory mechanism was strongly dependent on Windows Management Instrumentation (WMI). With the release of PowerShell Version 3.0, we have Common Information Model known as CIM. PowerShell Version 3.0 has ample number of CMDLETs under the default module named CimCmdlets.
Moreover, CIM CMDLETs work with WSMan to manage Windows as well as other operating systems. To ensure all the CMDLETs are available with CimCmdlets, use the following code:
PS C :\> Get-Comman d -Module CimCmdlets
CommandType     Name                          ModuleName
-----------     ----                          ----------
Cmdlet          Get-CimAssociatedInstance     CimCmdlets
Cmdlet          Get-CimClass                  CimCmdlets
Cmdlet          Get-CimInstance               CimCmdlets
Cmdlet          Get-CimSession                CimCmdlets
Cmdlet          Invoke-CimMethod              CimCmdlets
Cmdlet          New-CimInstance               CimCmdlets
Cmdlet          New-CimSession                CimCmdlets
Cmdlet          New-CimSessionOption          CimCmdlets
Cmdlet          Register-CimIndicationEvent   CimCmdlets
Cmdlet          Remove-CimInstance            CimCmdlets
Cmdlet          Remove-CimSession             CimCmdlets
Cmdlet          Set-CimInstance               CimCmdlets
Execute the following lines of code, by performing the following steps:
The following command statement retrieves CIM instances from the
Win32_ComputerSystemCIM class.PS C:\> Get-CimInstance -ClassName Win32_ComputerSystemThe following command statement executes a query for services starting with the
winkeyword.PS C:\> Get-CimInstance -Query "SELECT * from Win32_Service WHERE name LIKE 'win%'"The following two command statements subsequently create a remote
CimSessionon thePSTestcomputer and retrieves CIM instances for all the processes from the PSTest CIM server.PS C:\> $S = New-CimSession -ComputerName PSTest PS C:\> Get-CimInstance -ClassName Win32_Process -CimSession $S
The Get-CimInstance CMDLET retrieves CIM instances from the specified computer and the CIM class name. This CMDLET omits one or more output instance object, providing information from the specified class. The following are the parameters available with this CMDLET:
-CimSession <CimSession[]>: This parameter suppliesCimSessionthat can be retrieved in a variable by using theNew-CimSessionorGet-CimSessionCMDLET.-ClassName <String>: This parameter provides the CIM class name for which we need to retrieve CIM instances.-ComputerName <String[]>: This parameter supplies a list of computer names to retrieve the respective CIM instances for them. This CMDLET creates a temporary session on specified computers using the WSMan protocol to retrieve the information.-Filter <String>: This parameter specifies a condition to filter the output data.-InputObject <CimInstance>: You can also specify theCimInstanceobject asInputObjectfor this CMDLET using this parameter.-KeyOnly [<SwitchParameter>]: This parameter helps to get the output object with only the key properties, which in fact reduces the load over the network.-Namespace <String>: This parameter specifies the namespace on which the CIM class resides. The default namespace value is defined asroot/cimv2.-OperationTimeoutSec <UInt32>: This parameter explicitly specifies the time during which CMDLET can wait for the output from the computer.-Property <String[]>: This parameter gives us a choice to select the required properties from the property set. It reduces the output data size.-Query <String>: This parameter allows us to supply theSELECTquery to the CMDLET. It accepts all the operators supported by WMI Query Language (WQL).-QueryDialect <String>: This parameter provides information on the query language that is used with theQueryparameter. By default, it takes WQL as the query language.-ResourceUri <Uri>: This parameter allows us to provide an external Uri to getCimInstanceobjects. By default, the CMDLET searches for the specified class name at http://schemas.dmtf.org/wbem/wscim/1/cim-schema/2/.-Shallow [<SwitchParameter>]: This parameter, if supplied, avoids retrieving information of a child class. By default, CMDLET retrieves information from both the class and child classes.
With the release of Windows PowerShell Version 3.0, there is one dedicated module introduced for PowerShell job scheduling named PSScheduledJob.
With the concept of scheduled jobs, we have the freedom to operate the data and operations as and when required. We don't need manual interaction too. PSScheduledJob refers to an instance of a scheduled job that is started by a job trigger. There are a bunch of CMDLETs available with this module as shown:
PS C :\> Get-Command -Module PSScheduledJob
CommandType   Name                       ModuleName
-----------   ----                       ----------
Cmdlet        Add-JobTrigger             PSScheduledJob
Cmdlet        Disable-JobTrigger         PSScheduledJob
Cmdlet        Disable-ScheduledJob       PSScheduledJob
Cmdlet        Enable-JobTrigger          PSScheduledJob
Cmdlet        Enable-ScheduledJob        PSScheduledJob
Cmdlet        Get-JobTrigger             PSScheduledJob
Cmdlet        Get-ScheduledJob           PSScheduledJob
Cmdlet        Get-ScheduledJobOption     PSScheduledJob
Cmdlet        New-JobTrigger             PSScheduledJob
Cmdlet        New-ScheduledJobOption     PSScheduledJob
Cmdlet        Register-ScheduledJob      PSScheduledJob
Cmdlet        Remove-JobTrigger          PSScheduledJob
Cmdlet        Set-JobTrigger             PSScheduledJob
Cmdlet        Set-ScheduledJob           PSScheduledJob
Cmdlet        Set-ScheduledJobOption     PSScheduledJob
Cmdlet        Unregister-ScheduledJob    PSScheduledJob
Execute the following lines of code.
The following command statement is a bunch of small subcommand statements that registers a scheduled job named
EventLogBackup. This job executes with an elevated privilege and gets the list ofApplicationandSecurityevent logs with the latest100entries. Moreover, this job triggers every day at 7 p.m.:PS C :\> Register-ScheduledJob -Name EventLogBackup -ScriptBlock {Get-EventLog -LogName Application, Security -Newest 100 –EntryType Error, Warning} -Trigger (New-JobTrigger -Daily -At 7pm) -ScheduledJobOption (New-ScheduledJobOption -RunElevated)The following command statement gets
Job EventLogBackupand clears the execution history immediately:PS C:\> Get-ScheduledJob EventLogBackup | Set-ScheduledJob –ClearExecutionHistory –RunNowBy default, the scheduled job execution history and results are stored in the following path along with the scheduled jobs:
$home\AppData\Local\Microsoft\Windows\PowerShell\ScheduledJobs
A PowerShell scheduled job is a background job that triggers at a specific time or during a recurring schedule. The Register-ScheduledJob CMDLET creates a new scheduled job, while the Set-ScheduledJob CMDLET changes the properties of jobs that were scheduled earlier. The following are the various parameters available with these CMDLET:
-ArgumentList <Object[]>: This defines the values for the parameters of the script that are supplied by theFilePathorScriptBlockparameter.-Authentication <AuthenticationMechanism>: This parameter explicitly providesAuthenticationMechanismfor passed user credentials. The accepted values areDefault,Basic,Credssp,Digest,Kerberos,Negotiate, andNegotiateWithImplicitCredential. This parameter holds the default value asDefault.-Credential <PSCredential>: This parameter is to explicitly provide a credential that has permission to access the console for getting session information from the remote computer. It accepts thePSCredentialobject type.-FilePath <String>: This parameter provides the script path to the scheduled job. It uses theArgumentListparameter to specify the parameter values to the script.-ScriptBlock <ScriptBlock>: This provides the list of commands that a scheduled job has to run. It also uses theArgumentListparameter to specify the parameter values to the commands.-Trigger <ScheduledJobTrigger[]>: This parameter specifies the trigger objects to the scheduled job. The trigger objects can be retrieved using theNew-JobTriggerCMDLET.-RunNow: This parameter starts the execution of the scheduled job if specified. It prevents the need to create a separate trigger object and then supply it to the scheduled job explicitly. This parameter is introduced in Windows PowerShell v4.0.
With the beginning of PowerShell 4.0, if you execute the Get-Job CMDLET, you will get the list of all the jobs, including scheduled jobs.
The RepeatIndefinitely parameter has been added to New-JobTrigger and Set-JobTrigger that avoids the TimeSpan.MaxValue value for the RepetitionDuration parameter to run a scheduled job repeatedly for an indefinite period.
A Passthru parameter has been added to the Enable-JobTrigger and Disable-JobTrigger CMDLETs that displays any objects that are created or modified by CMDLETs.
There is another module that is available and that can be leveraged for managing the Web, that is, the WebAdministration module. Invoke-RestMethod and Invoke-WebRequest are CMDLETs that are used here.
For example, have a look at the following command:
PS C:\ > $url=http://blogs.msdn.com/b/powershell/rss.aspx
The preceding command statement stores the PowerShell rss link in a variable named $url.
PS C:\ > Invoke-RestMethod -Uri $url | Select-Object Title
By using Invoke-RestMethod, we can retrieve information from the $url variable and further filter the output as the title list.
With the release of Windows PowerShell v4.0, one new feature is introduced: Desired State Configuration. In fact, it is available as a feature in Windows Server 2012 R2 Preview OS. Windows PowerShell Desired State Configuration is a set of extensions and providers that enable to declare, repeatedly deploy, and configure data center resources. DSC enables us to define the configuration of the target nodes (computers or devices) and prevent configuration inconsistencies.
We are living in a world where device adoption is quicker than ever. Hence, we must ensure that all the devices are in a desired state. DSC allows us to manage all the devices using Windows PowerShell.
The DSC flow can be categorized into two different models: Push and Pull. The DSC process could be divided in to three phases as follows:
The Authoring phase: In this phase, we need to declare the DSC configuration. The outcome of this phase would be of one or more Management Object Format (MOF) files, a format that is consumable by DSC. MOF files can be created in multiple ways; the simpler one is that of using Windows PowerShell ISE. Using PowerShell v4, we can add declarative syntax extensions and IntelliSense for making it easier to create an MOF file. It handles schema validations as well.
The Staging phase: In this phase, actions are carried out based on the model that we are using either Push or Pull. In case of adopting the Pull Model, DSC data and custom providers are kept on the Pull server. A Pull server is an IIS web server with a well-defined OData interface. The target system contacts the Pull Server by passing a URI and a unique identifier to retrieve its configuration and verifies whether all the custom providers are available. If not, they are downloaded to the target system. If we're using the Push Model, DSC data is being pushed to the target system.
One catch though is that you need to make sure your custom provider exists on the target system. You need to place them at
"%SYSTEMROOT%\System32\WindowsPowerShell\v1.0\Modules\PSDesiredStateConfiguration\PSProviders".The "Make it so" phase: The final phase is to apply the configuration to "make it so". The DSC data is either pulled or pushed to the Local Configuration Store and contains the current, previous, and the desired state configuration (DSC). The configuration then gets parsed and the relevant provider (WMI) implements the change and "makes it so".
The following is a sample configuration block to declare configuration for one or more nodes under the name MyWebConf:
configuration MyWebConf
{  # Parameters are optional
   param ($MachineName, $WebsitePath)
   # A Configuration block can have one or more Node blocks
   node $MachineName
   {  # Next, specify one or more resource provider blocks
      # WindowsFeature is one of the providers you can use in a Node block
      # This example ensures the Web Server (IIS) role is installed
      WindowsFeature IIS
      {   Name  = "Web-Server" # Use the Name property from Get-WindowsFeature
          Ensure= "Present" # To uninstall the role, set Ensure to "Absent" }
      # You can use the File provider to create files and folders
      # "File" is the name of the resource provider to use
      # "WebDirectory" is the name you want to use to refer to this instance
      File WebDirectory
      {  SourcePath      = $WebsiteFilePath
         DestinationPath = "C:\inetpub\wwwroot"
         Requires     = "[WindowsFeature] IIS" # Use Requires for dependencies
         Ensure       = "Present" # You can also set Ensure to "Absent" }
   }
}The DSC feature consists of multiple subcomponents. The information is as follows:
Local Configuration Manager (LCM): This is a part of the DSC system that implements configuration data on the target nodes.
Windows PowerShell language extensions: DSC extends the Windows PowerShell language to support importing the MOF schema files that are converted to Windows PowerShell keywords. The keywords are used to describe the desired configuration of resources in the data center. The following are the two keywords:
Configuration: This defines the desired configuration
Node: This defines the desired configuration for one or more nodes
File share pull provider: The file share pull provider is an auxiliary module that is used by LCM to retrieve the configuration of MOF files and providers from a file share or a local folder.
DSC approaches declarative syntax that describes what needs to be done rather than covering imperative syntax that specifies how a task can be performed.
To use DSC, first define a desired configuration. Like functions, configurations in DSC can be defined in the Windows PowerShell language by using the Configuration keyword and stored in script (.ps1) or module (.psm1) files. Also, similar to functions, configurations need to be defined and then run.
To use a configuration, invoke the
Configurationblock the same way you would invoke a Windows PowerShell function, passing in any expected parameters you have defined (two in the preceding sample). For example, in this case, theMyWebConfigconfiguration can be invoked as follows:PS C :\>MyWebConf -MachineName $env:COMPUTERNAME –WebsitePath \\PSShare\MyWebSitesThis will create a folder with the same name as your configuration name and will contain our MOF output file.
The following command creates an MOF file known as the configuration instance document.
Pathrepresents the target directory where your MOF files are located.Waitcauses the execution of the DSC resources to run in the background, that is, an interactive process.PS C :\>Start-DscConfiguration -Path .\ MyWebConf –Wait –Verbose
Each Configuration block must have at least one Node block. Each Node block can have one or more resource provider blocks. You can use the same role provider more than once in the same Node block.
In addition to new language keywords, DSC includes the following set of CMDLETs for managing configurations:
Start-DscConfiguration: This CMDLET deploys a configuration to one or more target nodes and applies the configuration on those nodes by using the local configuration managerGet-DscConfiguration: This CMDLET returns the current configuration from one or more target machines:PS C :\>$Sess = New-CimSession -ComputerName localhost PS C :\>Get-DscConfiguration –CimSession $Sess
Restore-DscConfiguration: This CMDLET restores the current configuration from one or more target machines:PS C :\>$Sess = New-CimSession -ComputerName localhost PS C :\>Restore-DscConfiguration –CimSession $Sess
There is one more CMDLET that helps to detect the configuration drift:
Test-DscConfiguration: This CMDLET checks for one or more target nodes and returns a Boolean value indicating whether the current desired state matches the actual state. Have a look at the following command:PS C :\>$session = New-CimSession -ComputerName localhost PS C :\>Test-DscConfiguration –CimSession $session
This will either return
Truewhen the current and actual configuration matches orFalseif there's a mismatch
A collection of configuration providers, which are known as resources, is a part of the core DSC system. These providers enable you to configure roles and features, copy files, create a registry entry, manage services, create local users and groups, and so on.
Each resource is technically represented by a DSC provider. The default location for these DSC providers is at C:\Windows\System32\WindowsPowerShell\v1.0\Modules\PSDesiredStateConfiguration\PSProviders.
There are various DSC providers available. The following is the syntax for a few of them:
The following example uses the
Environmentresource to define or confirm the value of the specified environment variable:Environment MyEnv { Ensure ="Present" # You can also set Ensure to "Absent" Name ="MyEnvVariable" Value ="MyValue" }The following example installs or verifies the installation of the specified feature:
WindowsFeature MyFeature
        {   Ensure  = "Present"
            Name    = "MyFeatureName" }
You can get the list of DSC providers by using following command:
PS C:\> Get-DscResource
As stated earlier, there are multiple resources available. I've provided information on some of these resources here.
The Archive resource unpacks archive (.zip) files at the given path.
Archive MyArchive
{  Ensure      ="Present" # You can also set Ensure to "Absent"
   Path        ="C:\PS\MyScripts.zip"
Destination ="C:\PS\MyScripts" }The Group resource manages local groups on the target machine.
Group MyGroup
{     Ensure   ="Absent" # This will remove MyGroup, if present
GroupName="MyGroup" }The Package resource installs and manages packages such as MSIs on the target machine.
Package MyPackage
{  Ensure ="Present"# You can also set Ensure to "Absent"
   Path   ="$FilePath\MySoftware.msi"
Name ="MyPackage" }The Registry resource manages registry keys and values.
Registry MyRegistry
{  Ensure    ="Present" # You can also set Ensure to "Absent"
   Key       ="HKEY_LOCAL_MACHINE\SYSTEM\MyHiveKey"
   ValueName ="RegName"
ValueData ="RegData" }The Script resource defines ScriptBlock that runs on target nodes. The TestScript block runs first. If it returns False, the SetScript block starts running.
Script MyScript
{
   SetScript  = { # This block will run if TestScript returns False }
   TestScript = { # This block runs first }
   GetScript  = { # This must return a hash table }
}The Service resource manages services on the target machine.
Service MyService
{  Name       ="MyService"
StartupType="Automatic" }We can integrate any solution with DSC, and the minimal requirement is that you should be able to run the PowerShell script in such environments. You can create your own custom resources; we'll discuss this now.
To implement a DSC custom resource, create a new folder directly under \Windows\System32\WindowsPowerShell\v1.0\Modules\PSDesiredStateConfiguration\PSProviders. Rename the folder as your custom resource, and you need to declare the following three files into it:
MOF schema: The MOF schema defines the properties of the resource. To use your custom resource in a DSC configuration script, you assign values to these properties to indicate the configuration options. Then, save the MOF schema to a file called
CustomResourceName.schema.mof.Script module: This defines the logical aspect of your resource. It consists of three functions:
Get-TargetResource,Set-TargetResource, andTest-TargetResource. These functions take parameter sets as per the definition of the MOF schema file. Declare these three functions in a file calledCustomResourceName.psm1. TheGet-TargetResourcefunction returns a hash table that lists all the resource properties as keys and the actual values of these properties as the corresponding values. Depending on the values that are specified for the resource properties in the configuration script,Set-TargetResourcemust perform appropriate actions. Finally,Test-TargetResourcematches the status of the resource instance that is specified in the key parameters. It shows the Boolean output as eitherTrueorFalsebased on the matching of key parameters.Module manifest: Finally, use the
New-ModuleManifestCMDLET to declare aCustomResourceName.psd1file for your new custom resource. DefineGet-TargetResource,Set-TargetResource, andTest-TargetResourceas a list of functions.