When we develop software, we write code, compile code, test our code, package our code, and finally, distribute the code. We can automate these steps by using a build system. The big advantage is that we have a repeatable sequence of steps. Each time, the build system will follow the steps we have defined, so we can concentrate on writing the actual code and not worry about the other steps.
Gradle is such a build system. In this chapter, we will explain what Gradle is and how to use it in our development projects.
Gradle is a tool for build automation. With Gradle, we can automate the compiling, testing, packaging, and deployment of our software or other types of projects. Gradle is flexible but has sensible defaults for most projects. This means we can rely on the defaults, if we don't want something special, but can still use the flexibility to adapt a build to certain custom needs.
Gradle is already used by big open source projects, such as Spring, Hibernate, and Grails. Enterprise companies such as LinkedIn also use Gradle.
Let's take a look at some of Gradle's features.
Gradle uses a Domain Specific Language (DSL) based on Groovy to declare builds. The DSL provides a flexible language that can be extended by us. Because the DSL is based on Groovy, we can write Groovy code to describe a build and use the power and expressiveness of the Groovy language. Groovy is a language for the Java Virtual Machine (JVM), such as Java and Scala. Groovy makes it easy to work with collections, has closures, and has a lot of useful features. The syntax is closely related to the Java syntax. In fact, we could write a Groovy class file with Java syntax and it would compile. But, using the Groovy syntax makes it easier to express the code intent, and we need less boilerplate code than with Java. To get the most out of Gradle, it is best to learn the basics of the Groovy language, but it is not necessary to start writing Gradle scripts.
Gradle is designed to be a build language and not a rigid framework. The Gradle core itself is written in Java and Groovy. To extend Gradle we can use Java and Groovy to write our custom code. We can even write our custom code in Scala if we want to.
Gradle provides support for Java, Groovy, Scala, Web, and OSGi projects, out of the box. These projects have sensible convention over configuration settings that we probably already use ourselves. But we have the flexibility to change these configuration settings, if needed, in our projects.
Gradle supports Ant tasks and projects. We can import an Ant build and re-use all the tasks. But we can also write Gradle tasks dependent on Ant tasks. The integration also applies to properties, paths, and so on.
Maven and Ivy repositories are supported to publish or fetch dependencies. So, we can continue to use any repository infrastructure we already have.
With Gradle we have incremental builds. This means tasks in a build are only executed if necessary. For example, a task to compile source code will first check whether the sources since the last execution of the task have changed. If the sources have changed, the task is executed, but if the sources haven't changed, the execution of the task is skipped and the task is marked as being up to date.
Gradle supports this mechanism for a lot of the provided tasks. But we can also use this for tasks we write ourselves.
Gradle has great support for multi-project builds. A project can simply be dependent on other projects or be a dependency for other projects. We can define a graph of dependencies between projects, and Gradle can resolve those dependencies for us. We have the flexibility to define our project layout as we want.
Gradle has support for partial builds. This means Gradle will figure out if a project that our project depends on needs to be rebuilt or not. And if the project needs rebuilding, Gradle will do this before building our own project.
The Gradle wrapper allows us to execute Gradle builds, even though Gradle is not installed on a computer. This is a great way to distribute source code and provide the build system with it, so that the source code can be built.
Also, in an enterprise environment, we can have a zero administration way for client computers to build the software. We can use the wrapper to enforce a certain Gradle version to be used, so the whole team is using the same version.
In this section, we will download and install Gradle before writing our first Gradle build script.
Before we get and install Gradle, we must make sure we have a Java Development Kit(JDK) installed on our computer. Gradle requires JDK 5 or higher. Gradle will use the JDK found at the path set on our computer. We can check this by running the following command on the command line:
java -version
Although Gradle uses Groovy, we don't have to install Groovy ourselves. Gradle bundles the Groovy libraries with the distribution and will ignore a Groovy installation already available on our computer.
Gradle is available on the Gradle website, at http://www.gradle.org/downloads. From this page we can download the latest release of Gradle. Or, we can download a previous version if we want to. We can choose among three different distributions to download. We can download either the complete Gradle distribution, with binaries, sources, and documentation, or only the binaries, or only the sources.
To get started with Gradle, we download the standard distribution with the binaries, sources, and documentation. At the time of writing this book, the current release is 1.1. On computers with a Debian Linux operation sytem, we can install Gradle as a Debian package. On computers with Mac OS X, we can use MacPorts or Homebrow to install Gradle.
Gradle is packaged as a ZIP file for one of the three distributions. So, when we have downloaded the Gradle full distribution ZIP file, we must unzip the file. After unpacking the ZIP file we have the following:
Binaries in the
bindirectoryDocumentation with the user guide, Groovy DSL, and the API documentation in the
docsdirectoryA lot of samples in the
samplesdirectorySource code for Gradle in the
srcdirectorySupporting libraries for Gradle in the
libdirectoryA directory named
init.dwhere we can store Gradle scripts that need to be executed each time we run Gradle
Once we have unpacked the Gradle distribution to a directory, we can open a command prompt. We change the directory to bin, which we extracted from the ZIP file. To check our installation, we run gradle -v and we get output, listing the JDK used and the library versions of Gradle:
$ gradle -v

------------------------------------------------------------
Gradle 1.1
------------------------------------------------------------

Gradle build time: Tuesday, July 31, 2012 1:24:32 PM UTC
Groovy: 1.8.6
Ant: Apache Ant(TM) version 1.8.4 compiled on May 22 2012
Ivy: 2.2.0
JVM: 1.6.0_33 (Apple Inc. 20.8-b03-424)
OS: Mac OS X 10.7.4 x86_64
Here we can check whether the displayed version is the same as the distribution version we have downloaded from the Gradle website.
To run Gradle on our computer we only have to add $GRADLE_HOME/bin to our PATH environment variable. Once we have done that, we can run the gradle command from every directory on our computer.
If we want to add JVM options to Gradle, we can use the environment variables JAVA_OPTS and GRADLE_OPTS. The former is a commonly used environment variable name to pass extra parameters to a Java application. Similarly, Gradle uses the GRADLE_OPTS environment variable to pass extra arguments to Gradle. Both environment variables are used so we can set them both with different values. This is mostly used to set, for example, an HTTP proxy or extra memory options.
We now have a running Gradle installation. It is time to create our first Gradle build script. Gradle uses the concept of projects to define a related set of tasks. A Gradle build can have one or more projects. A project is a very broad concept in Gradle, but it is mostly a set of components we want to build for our application.
A project has one or more tasks. Tasks are a unit of work that need to be executed by the build. Examples of tasks are compiling source code, packaging class files into a JAR file, running tests, or deploying the application.
We now know that a task is part of a project, so to create our first task we also create our first Gradle project. We use the gradle command to run a build. Gradle will look for a file named build.gradle in the current directory. This file is the build script for our project. We define those of our tasks that need to be executed in this build script file.
We create a new file, build.gradle, and open it in a text editor. We type the following code to define our first Gradle task:
task helloWorld << {
  println 'Hello world.'
}
With this code we define a helloWorld task. The task will print the words "Hello world." to the console. println is a Groovy method to print text to the console and is basically a shorthand version of the Java method System.out.println.
The code between the brackets is a closure. A closure is a code block that can be assigned to a variable or passed to a method. Java doesn't support closures, but Groovy does. And because Gradle uses Groovy to define the build scripts, we can use closures in our build scripts.
The << syntax is, technically speaking, operator shorthand for the method leftShift(), which actually means "add to". So, we are defining here that we want to add the closure (with the statement println 'Hello world.') to our task with the name helloWorld.
First we save build.gradle, and then with the command gradle helloWorld, we execute our build:
hello-world $ gradle helloWorld
:helloWorld
Hello world.

BUILD SUCCESSFUL

Total time: 2.047 secs
The first line of output shows our line Hello world. Gradle adds some more output, such as the fact that the build was successful and the total time of the build. Because Gradle runs in the JVM, it must be started each time we run a Gradle build.
We can run the same build again, but with only the output of our task, by using the Gradle command-line option --quiet (or -q). Gradle will suppress all messages except error messages. When we use --quiet (or -q), we get the following output:
hello-world $ gradle --quiet helloWorld
Hello world.
We created our simple build script with one task. We can ask Gradle to show us the available tasks for our project. Gradle has several built-in tasks we can execute. We type gradle -q tasks to see the tasks for our project:
hello-world $gradle -q tasks

-----------------------------------------------------
All tasks runnable from root project
-----------------------------------------------------

Help tasks
----------
dependencies - Displays the dependencies of root project 'hello-world'.
help - Displays a help message
projects - Displays the sub-projects of root project 'hello-world'.
properties - Displays the properties of root project 'hello-world'.
tasks - Displays the tasks runnable from root project 'hello-world' (some of the displayed tasks may belong to subprojects).

Other tasks
-----------
helloWorld

To see all tasks and more detail, run with --all.
Here, we see our task helloWorld in the Other tasks section. The Gradle built-in tasks are displayed in the Help tasks section. For example, to see some general help information, we execute the help task:
hello-world $ gradle -q help

Welcome to Gradle 1.1.

To run a build, run gradle <task> ...

To see a list of available tasks, run gradle tasks

To see a list of command-line options, run gradle --help
The properties task is very useful to see the properties available to our project. We haven't defined any property ourselves in the build script, but Gradle provides a lot of built-in properties. The following output shows some of the properties:
hello-world $ gradle -q properties

-----------------------------------------------------
Root project
-----------------------------------------------------

additionalProperties: {}
allprojects: [root project 'hello-world']
ant: org.gradle.api.internal.project.DefaultAntBuilder@6af37a62
antBuilderFactory: org.gradle.api.internal.project.DefaultAntBuilderFactory@16e7eec9
artifacts: org.gradle.api.internal.artifacts.dsl.DefaultArtifactHandler@54edd9de
asDynamicObject: org.gradle.api.internal.DynamicObjectHelper@4b7aa961
buildDir: /Users/mrhaki/Projects/gradle-book/samples/chapter1/hello-world/build
buildDirName: build
buildFile: /Users/mrhaki/Projects/gradle-book/samples/chapter1/hello-world/build.gradle
...
The dependencies task will show dependencies (if any) for our project. Our first project doesn't have any dependencies when we run the task, as the output shows:
hello-world $ gradle -q dependencies

-----------------------------------------------------
Root project
-----------------------------------------------------

No configurations
The projects task will display sub-projects (if any) for a root project. Our project doesn't have any sub-projects. So when we run the task projects, the output shows us that our project has no sub-projects.
hello-world $ gradle -q projects

-----------------------------------------------------
Root project
-----------------------------------------------------

Root project 'hello-world'
No sub-projects

To see a list of the tasks of a project, run gradle <project-path>:tasks
For example, try running gradle :tasks
Before we look at more Gradle command-line options, it is good to learn about a real timesaving feature of Gradle: task name abbreviation. With task name abbreviation, we don't have to type the complete task name on the command line. We only have to type enough of the name to make it unique within the build.
In our first build we only have one task, so the command gradle h should work just fine. But then, we didn't take into account the built-in task help. So, to uniquely identify our helloWorld task, we use the abbreviation hello:
hello-world $ gradle -q hello
Hello world.
We can also abbreviate each word in a camel case task name. For example, our task name helloWorld can be abbreviated to hW:
hello-world $gradle -q hW
HelloWorld
This feature saves us the time spent in typing the complete task name and can speed up the execution of our tasks.
With just a simple build script, we already learned that we have a couple of default tasks besides our own task that we can execute. To execute multiple tasks we only have to add each task name to the command line. Let's execute our custom task helloWorld and the built-in task tasks, as follows:
hello-world $ gradle helloWorld tasks
:helloWorld
Hello world.
:tasks

-----------------------------------------------------
All tasks runnable from root project
-----------------------------------------------------

Help tasks
----------
dependencies - Displays the dependencies of root project 'hello-world'.
help - Displays a help message
projects - Displays the sub-projects of root project 'hello-world'.
properties - Displays the properties of root project 'hello-world'.
tasks - Displays the tasks runnable from root project 'hello-world' (some of the displayed tasks may belong to subprojects).

Other tasks
-----------
helloWorld

To see all tasks and more detail, run with --all.

BUILD SUCCESSFUL

Total time: 1.718 secs
We see the output of both the tasks. First, helloWorld is executed, followed by tasks. When executed, we see the task names prepended with a colon (:) and the output on the following lines.
Gradle executes the tasks in the same order as they are defined on the command line. Gradle will execute a task only once during the build. So even if we define the same task multiple times, it will be executed only once. This rule also applies when tasks have dependencies on other tasks. Gradle will optimize the task execution for us, and we don't have to worry about that.
The gradle command is used to execute a build. This command accepts several command-line options. We know the option --quiet (or -q) to reduce the output of a build. If we use the option --help (or -h or -?), we see the complete list of options:
hello-world $ gradle --help

USAGE: gradle [option...] [task...]

-?, -h, --help          Shows this help message.
-a, --no-rebuild        Do not rebuild project dependencies.
-b, --build-file        Specifies the build file.
-C, --cache             Specifies how compiled build scripts should be cached. Possible values are: 'rebuild' and 'on'. Default value is 'on' [deprecated - Use '--rerun-tasks' or '--recompile-scripts' instead]
-c, --settings-file     Specifies the settings file.
--continue              Continues task execution after a task failure. [experimental]
-D, --system-prop       Set system property of the JVM (e.g. -Dmyprop=myvalue).
-d, --debug             Log in debug mode (includes normal stacktrace).
--daemon                Uses the Gradle daemon to run the build. Starts the daemon if not running.
--foreground            Starts the Gradle daemon in the foreground. [experimental]
-g, --gradle-user-home  Specifies the gradle user home directory.
--gui                   Launches the Gradle GUI.
-I, --init-script       Specifies an initialization script.
-i, --info              Set log level to info.
-m, --dry-run           Runs the builds with all task actions disabled.
--no-color              Do not use color in the console output.
--no-daemon             Do not use the Gradle daemon to run the build.
--no-opt                Ignore any task optimization. [deprecated - Use '--rerun-tasks' instead]
--offline               The build should operate without accessing network resources.
-P, --project-prop      Set project property for the build script (e.g. -Pmyprop=myvalue).
-p, --project-dir       Specifies the start directory for Gradle. Defaults to current directory.
--profile               Profiles build execution time and generates a report in the <build_dir>/reports/profile directory.
--project-cache-dir     Specifies the project-specific cache directory. Defaults to .gradle in the root project directory.
-q, --quiet             Log errors only.
--recompile-scripts     Force build script recompiling.
--refresh               Refresh the state of resources of the type(s) specified. Currently only 'dependencies' is supported. [deprecated - Use '--refresh-dependencies' instead.]
--refresh-dependencies  Refresh the state of dependencies.
--rerun-tasks           Ignore previously cached task results.
-S, --full-stacktrace   Print out the full (very verbose) stacktrace for all exceptions.
-s, --stacktrace        Print out the stacktrace for all exceptions.
--stop                  Stops the Gradle daemon if it is running.
-u, --no-search-upward  Don't search in parent folders for a settings.gradle file.
-v, --version           Print version info.
-x, --exclude-task      Specify a task to be excluded from execution.
Let's look at some of the options in more detail. The options --quiet (or -q), --debug (or -d), --info (or -i), --stacktrace (or -s), and --full-stacktrace (or -S) control the amount of output we see when we execute tasks. To get the most detailed output we use the option --debug (or -d). This option provides a lot of output with information about the steps and
classes used to run the build. The output is very verbose, therefore we will not use it much.
To get a better insight into the steps that are executed for our task, we can use the --info (or -i) option. The output is not as verbose as with --debug, but it can give a better understanding of the build steps:
hello-world $ gradle --info helloWorld
Starting Build
Settings evaluated using empty settings file.
Projects loaded. Root project using build file '/Users/gradle/hello-world/build.gradle'.
Included projects: [root project 'hello-world']
Evaluating root project 'hello-world' using build file '/Users/gradle/hello-world/build.gradle'.
All projects evaluated.
Selected primary task 'helloWorld'
Tasks to be executed: [task ':helloWorld']
:helloWorld
Task ':helloWorld' has not declared any outputs, assuming that it is out-of-date.
Hello world.

BUILD SUCCESSFUL

Total time: 1.535 secs
If our build throws exceptions, we can see the stack trace information with the options --stacktrace (or -s) and --full-stacktrace (or -S). The latter option will output the most information and is the most verbose. The options
--stacktrace and --full-stracktrace
can be combined with the other logging options.
We created our build file with the name build.gradle. This is the default name for a build file. Gradle will
look for a file with this name in the current directory, to execute the build. But we can change this with the command-line options --build-file (or -b) and --project-dir (or -p).
Let's run the Gradle command from the parent directory of our current directory:
hello-world $ cd ..
$ gradle --project-dir hello-world -q helloWorld
Hello world.
And we can also rename build.gradle to, for example, hello.build and still execute our build:
hello-world $ mv build.gradle hello.build
hello-world $ gradle --build-file -q helloWorld
Hello world.
With the option --dry-run (or -m), we can run all the tasks without really executing them. When we use the dry run option, we can see which tasks are executed, so we get an insight into which tasks are involved in a certain build scenario. And we don't have to worry if the tasks are actually executed. Gradle builds up a Directed Acyclic Graph
(DAG) with all the tasks before any task is executed. The DAG is built so that tasks will be executed in order of dependencies and so that a task is executed only once.
hello-world $ gradle --dry-run helloWorld
:helloWorld SKIPPED

BUILD SUCCESSFUL

Total time: 1.437 secs
We already learned that Gradle is executed in a Java Virtual Machine, and each time we invoke the gradle command, a new Java Virtual Machine is started, the Gradle classes and libraries are loaded, and the build is executed. We can reduce the build execution time if we don't have to load a JVM, Gradle classes, and libraries, each time we execute a build. The command-line option, --daemon, starts a new Java process that will have all Gradle classes and libraries already loaded, and then we execute the build. The next time when we run Gradle with the --daemon option, only the build is executed, because the JVM, with the required Gradle classes and libraries, is already running.
The first time we execute gradle with the --daemon option, the execution speed will not improve, because the Java background process has not started as yet. But the next time around, we will see a major improvement:
hello-world $ gradle --daemon helloWorld
:helloWorld
Hello world.

BUILD SUCCESSFUL

Total time: 0.59 secs
Even though the daemon process has started, we can still run Gradle tasks without using the daemon. We use the command-line option --no-daemon to run a Gradle build without utilizing the daemon:
hello-world $ gradle --no-daemon helloWorld
:helloWorld
Hello world.

BUILD SUCCESSFUL

Total time: 1.496 secs
To stop the daemon process, we use the command-line option --stop:
$ gradle --stop
Stopping daemon.
Gradle daemon stopped.
This will stop the Java background process completely.
To always use the --daemon command-line option, without typing it every time we run the gradle command, we can create an alias—if our operating system supports aliases. For example, on a Unix-based system we can create an alias and then use the alias to run the Gradle build:
hello-world $ alias gradled='gradle --daemon'
hello-world $ gradled helloWorld
:helloWorld
Hello world.

BUILD SUCCESSFUL

Total time: 0.59 secs Instead
Instead of using the --daemon command-line option, we can use the Java system property org.gradle.daemon to enable the daemon. We can add this property to environment variable GRADLE_OPTS, so that it is always used when we run a Gradle build.
hello-world $ export GRADLE_OPTS="-Dorg.gradle.daemon=true"
hello-world $ gradle helloWorld
:helloWorld
Hello world.

BUILD SUCCESSFUL

Total time: 0.707 secs
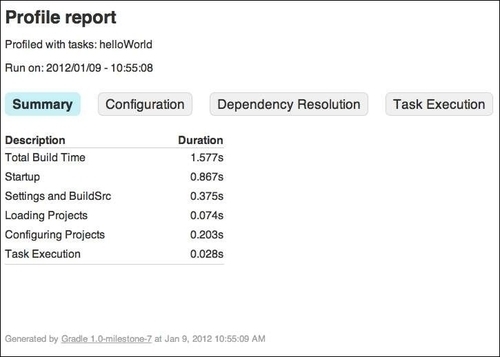
Gradle also provides the command-line option --profile
. This option records the time that certain tasks take to complete. The data is saved in an HTML file in the directory build/reports/profile. We can open this file in a web browser and see the time taken for several phases in the build process. The following image shows the HTML contents of the profile report:
Finally, we take a look at the --gui command-line option. With this option, we start a graphical shell for our Gradle builds. Until now, we have used the command line to start a task. With the Gradle GUI, we have a graphical overview of the tasks in a project, and we can execute them by simply double-clicking on them.
To start the GUI, we invoke the following command:
hello-world $ gradle --gui
A window is opened with a graphical overview of our task tree. We have only one task, which is listed in the task tree, as shown in the following screenshot:
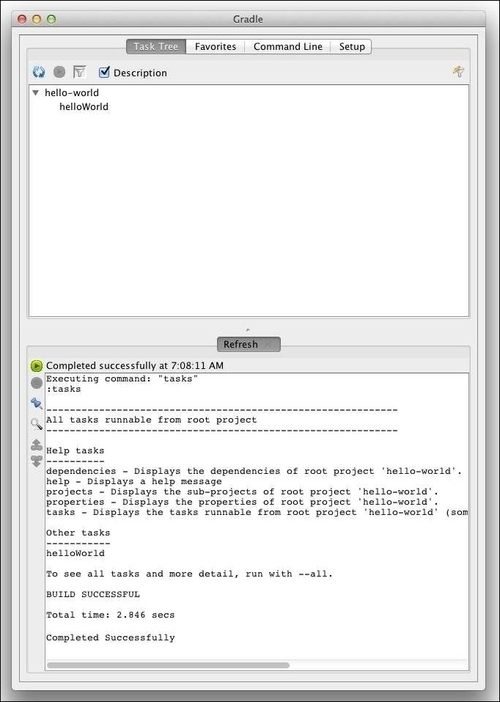
The output of a running task is shown in the bottom part of the window. When we start the GUI for the first time, the tasks task is executed and we see the output in the window.
The Task Tree tab shows projects and tasks found in our build project. We can execute a task by double-clicking on the task name.
By default all tasks are shown, but we can apply a filter to show or hide certain projects and tasks. The Filter button opens a new dialog window where we can define which tasks and properties are part of the filter. The Toggle filter button makes the filter active or inactive.
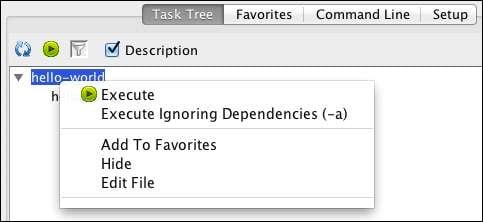
We can also right-click on the project and task names. This opens a context menu where we can choose whether to execute the task, add it to the favorites, hide it (adds it to the filter), or edit the build file. If we click on Edit File, and if the .gradle extension is associated with a text editor in our operating system, the editor is opened with the content of the build script. These options can be seen in the following screenshot:
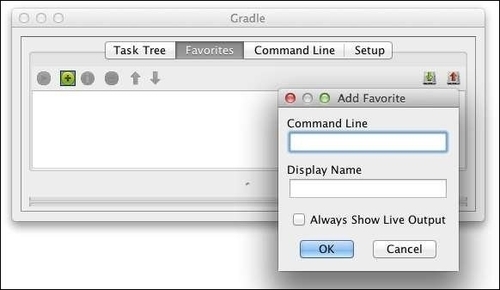
The Favorites tab stores tasks we want to execute regularly. We can add a task by right-clicking on the task in the Task Tree tab and selecting the Add To Favorites menu option. Alternatively, we can open the Favorites tab, click on the Add button and manually enter the project and task name we want to add to our favorites list. We can see the Add Favorite dialog window in the following screenshot:
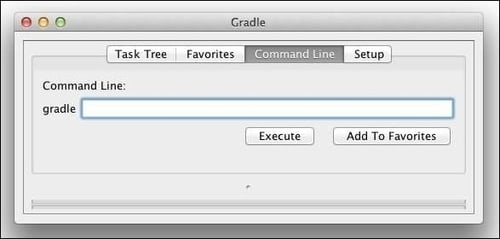
On the Command Line tab, we can enter any Gradle command we normally would enter on the command prompt. The command can be added to Favorites as well. We can see the Command Line tab contents in the following screenshot:
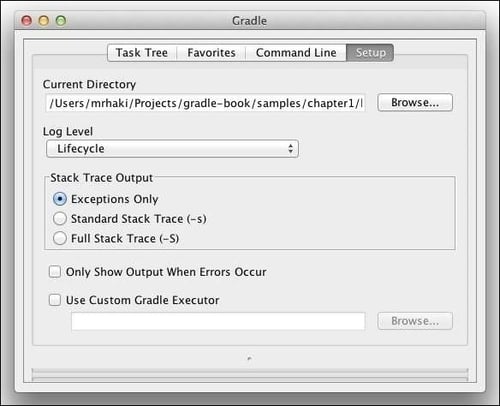
The last tab is the Setup tab. Here, we can change the project directory, which is set by default to the current directory.
We learned about the different logging levels as command-line options previously in this chapter. In the GUI, we can select the logging level from the Log Level drop-down box with the different log levels. We can choose one of Debug, Info, Lifecyle, and Error as the log levels. The Error log level only shows errors and is the least verbose, while Debug is the most verbose log level. The Lifecyle log level is the default log level.
Here we can also set how detailed the exception stack trace information should be. In the section Stack Trace Output we can choose between the following three options:
Exceptions only: For showing only exceptions when they occur; this is the default value
Standard Stack Trace: For showing more stack trace information for the exceptions
Full Stack Trace: For the most verbose stack trace information for exceptions
If we enable the option Only Show Output When Errors Occur, we get output from the build process only if the build fails; otherwise we don't get any output.
Finally, we can define a different way to start Gradle for the build, with the option Use Custom Gradle Executor . For example, we can define a different batch or script file with extra setup information to run the build process. The following screenshot shows the Setup tab page along with all the options we can set:
So now, we have learned how to install Gradle on our computers. We have written our first Gradle build script with a simple task.
We have seen how to use the tasks built-in to Gradle to get more information about a project. We learned how to use the command-line options to help us run the build scripts. And, we have looked at the Gradle graphical user interface and how we can use it to run Gradle build scripts.
In the next chapter we will take a further look at tasks. We will learn how to add actions to a task. We will write more complex tasks where tasks will depend on other tasks. And we will learn how Gradle builds up a task graph internally and how we can use this in our projects.


