Download code from GitHub
In this chapter we will cover the following recipes:
Installing NAV Development Environment
Application object triggers
NAV Development environment - C/SIDE
Compiling objects and error handling
Importing and exporting application objects
Basic C/AL programming
Accessing the database
Configuring NAV Server
Configuring Web Server
Microsoft Dynamics NAV 2016 has a rich toolset for extending functionality. Additionally, a wide number of external tools can be connected to the NAV database to enrich data processing and analysis experience. But C/AL, the internal NAV application language, is still the primary means of enhancing user experience when it comes to developing new functionality.
This chapter will introduce you to the basics of NAV Client Application Language development, from installing the development environment and configuring the server to the fundamentals of data manipulation with C/AL.
C/AL Development is framed around objects representing different kinds of functionality and designers associated with each object type. While the details of design for each type of objects will be covered in the next chapter, this chapter will introduce readers to the concept of objects and triggers and present the integrated development environment.
In the last recipe we will concentrate on secure access to the NAV server from the web and mobile client.
This introductory recipe describes the basic steps of installing the C/SIDE - NAV development environment. This is the initial requirement for all recipes involving the development of NAV objects.
Microsoft Dynamics NAV 2016 server and development environment can be installed on a computer running Windows 7 Home edition or higher versions. But the recommended minimum requirement is Windows 7 Service Pack 1 Professional edition. Some of the features described in this book are supported only on Windows 7.1 Professional or higher versions.
If you need detailed instructions on system requirements, refer to the MSDN article System Requirements for Microsoft Dynamics NAV 2016. Further in this book, we will assume that the minimum requirements described in this article are satisfied.
Run
setup.exefrom the installation media.After accepting the licensing terms, you will have two setup modes to choose from:
Install Demo: This installs a preconfigured set of components for the demonstration environment without manual configuration.
Choose an installation option: You can choose which components to install and manually configure setup options.
Click the Choose an installation option. Install Demo mode is convenient for a quick unattended setup, but it won't install all components required for the recipes in this book.
In the list of installation options, choose Developer and click Customize. Options that should be installed include:
Client
Development Environment (C/SIDE)
Microsoft Office Excel Add-in
Administration Tool
Server
Microsoft Office Outlook Integration
SQL Server Database Components
Demo Database
Microsoft Office Outlook Add-in
Web Server Components

Click Next and review the installation parameters.
If you have the Microsoft SQL Server installed on your development computer, all parameters can be left with their default values. Otherwise specify the SQL Server name and SQL Server instance name.
Click Apply to run the installation.
After installation completes, run the Dynamics NAV 2016 Development Environment from the Start menu. C/SIDE client will connect to the SQL Server database created during the installation process.
The following is the Object Designer window that opens when you connect to the database in the NAV Development Environment:

We chose to install Dynamics NAV 2016 components required for the recipes in this book. Extended testability options, automated data capture system, and click Once installation are not covered in the book and remain optional.
The help server must be installed if you intend to use local help files. If you prefer looking for information on MSDN or online communities, it can be skipped. All reference documents installed along with the help server are available online.
Installation will create and start a service named DynamicsNAV90. You can find it in your computer's services list as Microsoft Dynamics NAV Server [DynamicsNAV90].
To verify the service installation, run the Dynamics NAV 2016 Client from the Start menu, click Select Server in the application menu, and enter the server address:
localhost:7046/DynamicsNAV90
The web server components installation creates a web site called DynamicsNAV90 in the Internet Information Services.
Dynamics NAV can now be accessed in a web browser on the following address:
http://localhost:8080/DynamicsNAV90
Trigger is a piece of code that is executed in response to some external action. All objects in NAV, except Menu Suite, have a set of triggers that can be programmed to respond to certain user's or system actions. For example, when a page with data is displayed on the screen, a sequence of triggers are fired in the application.
OnInit: Page object is initializedOnOpenPage: Page is displayedOnAfterGetRecord: Table record displayed on the page is read from the databaseOnAfterGetCurrRecord: Table record currently selected is read from the database
There are other triggers reacting to UI elements, data modifications or to external events from .NET components. We will delve deeper into different types of objects and corresponding triggers later in the book. Now let's create a code module (called a codeunit in NAV) with a single trigger that fires when the object is executed.
In the left column of the object designer, click on the codeunit object.
Click the New button in the bottom part of the Object Designer form. A new codeunit object is created.
Each object in NAV must have a unique name and number that are assigned to the object when it is saved in the database. Click File | Save and fill in the ID and Name fields in the Save As dialog. Leave the Compiled option checked:
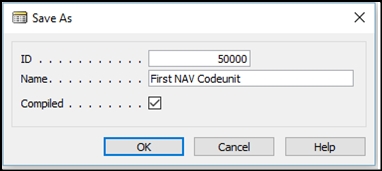
The new codeunit has two system-created triggers. Position the cursor in the empty line below Documentation and write a short description of your new codeunit. For example,
This is my first NAV codeunit: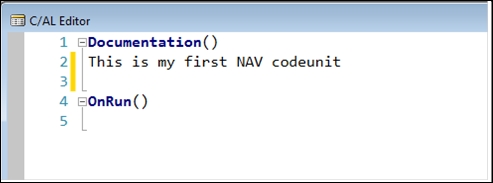
Move the cursor to the
OnRuntrigger and enter a line of code that will be executed when the trigger fires:MESSAGE('Codeunit OnRun trigger');Save the codeunit and close the editor window.
In the object designer, select the codeunit
50000and click the Run button located under the list objects. This action will start the role-tailored client and execute the codeunit. Execution of the codeunit fires itsOnRuntrigger. When run, it will show a message box with the codeunit OnRun trigger in it.In the Object Designer window, create another codeunit, save it with ID
50001and name itNAV Codeunit Runner.Write a line of code in the
OnRuntrigger that will invoke the first codeunit:CODEUNIT.RUN(CODEUNIT::"First NAV Codeunit");
Close the code editor and run codeunit
50001from the object designer. The same message box with the codeunit OnRun trigger will be shown.
In most cases all triggers supported by an object are available in the C/AL code editor as soon as the new object is created. There are several exceptions when a trigger must be explicitly declared as a function having specific signature, but these triggers are outside the material covered in this chapter. All application triggers we are going to work with will be created by the C/SIDE without developer's intervention.
All NAV objects that can execute C/AL code (that is, all objects except Menu Suite), have the Documentation section. This object section is often referred to as a trigger, and looks like a function in the code editor, although it is never executed. Documentation is used to comment the object - usually comments applicable to the object in general are placed here.
Codeunit objects support only one trigger OnRun that is called when the object is executed. In Step 7 we run the codeunit manually from the object designer. In the steps, Step 8 to Step 10, the same trigger fires when execution of the codeunit is initiated from another codeunit's OnRun trigger. This way, triggers can be chained, when the execution of an object can cause another trigger to fire.
To run the codeunit we use the system function CODEUNIT.RUN which takes the codeunit ID as the parameter. It can simply be a number (50000). Or we can refer to the codeunit by its name, making the code more human-readable.
C/SIDE is the NAV integrated development environment where we create application objects, design the user interface, and write code. The next recipe gives an overview of the environment and presents some new features introduced to the IDE in NAV 2016.
Open NAV Object Designer and create a new codeunit.
In the C/AL Code Editor window, click C/AL Globals in the View menu to access the list of global variables, text constants, and functions.
Select the Functions tab in the C/AL Globals window and type the function name. Name the new function
Multiply. By default, a new function is created with theLocalattribute. Local functions are visible only inside the object where they are declared and cannot be called from other objects.Close the declarations window. Now you can see the new function
Multiplyin the C/AL editor.Position the cursor on an empty line inside the function and open the C/AL Locals window. Here you can declare local variables available inside the function, as well as the function's parameters and return type.
In the Parameters tab, enter the name and the type of a new function parameter you want to declare. Create a parameter
Xof typeInteger. To do this, enterXin the Name field and chooseIntegerfrom the drop-down list in the DataType field.Add one more integer variable,
Y: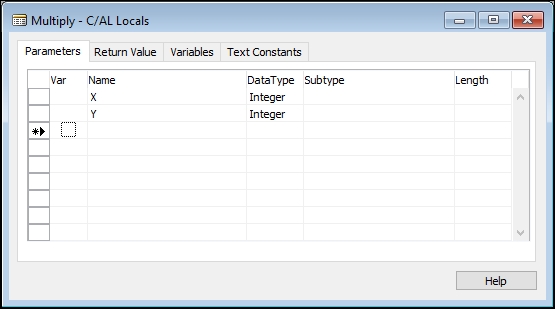
Switch to the Return Value tab and fill the Return Type field. Select Integer in the list of types. Close the window and review the changes to the function in the code editor. Now you have declared a function that takes two Integer parameters and returns an Integer result.
We want this function to return the result of the multiplication of two parameters
XandY.EXITstatement serves this purpose, so the function's code should consist of one line:EXIT(X * Y). Start typing the first statementEXIT. As you type, IntelliSense will suggest possible language structures:
When you see the function EXIT in the suggested autocompletion list, select it by pressing the up and down keys on the keyboard and press Enter to confirm the selection.
Complete the function. Enter the line
EXIT(X * Y);.Move to the
OnRuntrigger, declare a local Integer variableZand start typing the invocation of the functionMultiply: Z := Multiply(5,8). As you type the first symbols of the function name, IntelliSense will show a list of suggestions. After you type the opening bracket before entering the function arguments, IntelliSense will show the parameter names and types along with the function return type: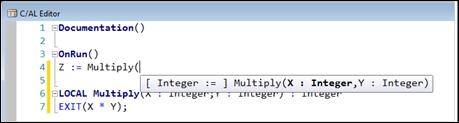
Unlike many other programming languages, like C++, C# or Java, variables and functions declaration in C/SIDE are separated from the program text. All global and local declarations are accessed in the code editor via the main menu.
Variables and text constants declared in the C/AL Locals can be used only in the function where they are created. C/AL Globals declarations are accessible from any function in the same object.
Functions can only be created in the C/AL Globals and can be accessed from anywhere in the same object. Function do not have to return a value and can be declared without any return type. If you want the function to return a result, you must assign a return type to it and use the EXIT statement to return a value to the caller function.
In the steps from Step 7 to Step 11 we demonstrate how IntelliSence integrates with the NAV development environment. IntelliSense is a Microsoft code completion feature widely used in Visual Studio. It aides a developer in coding by suggesting possible variable and function names, function parameters, and many other things. Such code hints speed up coding and reduce the risk of typos, and many plain coding mistakes.
The C/AL code in NAV objects is not executable itself. Before a C/AL object can be used in the application, it must be compiled into binary code that can be run.
The C/AL compiler is a part of the C/SIDE development environment, and can be run either from the object designer or in the code editor while writing the application code.
Open NAV object designer and create a new codeunit.
In the
OnRuntrigger, declare a local variableCurrDateof type Integer:Name
DataType
CurrDateInteger
Add two code lines in the
OnRuntrigger:CurrDate := TODAY; MESSAGE('Today is %1,CurrDate);The preceding code contains two errors. Let's try to compile it. Press F11 or click Compile in the Tools menu to compile the code. A message will inform you about an incorrect type conversion and position the cursor in the line containing the first error.
Click Save in the File menu, assign an ID and name to the new codeunit, uncheck the Compiled checkmark in the dialog box, and click OK:

The object is saved without compiling. The Compiled column in object designer does not have a checkmark, which indicates that the object is uncompiled:

Select the codeunit
50002and click Run in the object designer. An error message will inform you that the object must be saved in the compiled form before it can be run.Close the message dialog and click Design.
To fix the first error in the code, open C/AL Locals in the
OnRuntrigger and change the data type of theCurrDatevariable. Replace Integer with Date.After fixing the error, Click Compile. This time, compilation will stop on the second line informing you about a syntax error.
Insert the missing apostrophe to close the text constant and fix the erroneous line. The following is the correct function code:
        CurrDate := TODAY;
        MESSAGE('Today is %1',CurrDate);
Save the object, this time with the Compiled option, and run it from the object designer.
Each of the two lines at the beginning of this exercise contains an error. In the first line we are assigning a date to an integer variable, and the second line is missing an apostrophe closing the text constant. When an object is compiled, only the first error is shown if the compilation breaks. Errors must be fixed one by one.
In Step 5 we are saving the object without compiling. This option is often used in the middle of the development process, when the object is incomplete and not syntactically correct yet.
It is not necessary to open objects in the code editor to compile them one at a time. It is possible to compile multiple objects in one batch. Select all objects you want to compile in the object designer and press F11 - it will run compilation for all selected objects. If several objects are selected and there are compilation errors in any of them, the list of errors will be displayed in a summary table.
Dynamics NAV application objects can be exported in plain text format and edited with external tools. Although editing code outside C/SIDE is not as convenient as doing it in the C/SIDE code editor, this may be useful when, for example, you need to compare different versions of the same object with a file comparison program or export the source file into a code repository.
Objects can also be exported and imported in binary format as .fob files. Binary files cannot be edited directly, so the format is convenient when you do not want to disclose the internal application code. Besides, .fob files do not require a developer's license to be imported, and therefore are used to deploy objects on the customer's site.
First let us export an object into a text file and edit it outside C/SIDE editor.
Open NAV object designer and create a new codeunit.
In the
OnRuntrigger, add a single line of code:MESSAGE('Hello World');Click Save, fill in the ID and Name fields: 50003 HelloWorld, close the code editor.
Select the codeunit
50003in the object designer and click Export in the File menu.Choose the folder where you want to export the codeunit to and name the file
COD50003.txt.Select Text Format (
*.txt) in the File Type drop-down list and click Save.In a file manager, locate the file
COD50003.txtand open it in a text editor. This is how the exported object looks in a text editor:OBJECT Codeunit 50003 Hello World { OBJECT-PROPERTIES { Date=22.07.16; Time=23:44:09; Modified=Yes; Version List=; } PROPERTIES { OnRun=BEGIN MESSAGE('Hello World'); END; } CODE { BEGIN END. } }In the object text locate the line
MESSAGE('Hello World');and replace the message text,MESSAGE('Exported NAV object');.Save the object and close the editor.
Return to NAV object designer, click Import from the File menu, select Text Files in the file type filter, and choose the file
COD50003.txt.Click Design in the object editor window and review the object code. It contains code modified outside of the C/AL editor.
In the object designer, select the codeunit
50003we created in the previous step and click Export in the File menu.Select Dynamics NAV Object Format (*.fob) in the File Type drop-down list.
Choose the folder where you want to export the codeunit to and name the file
COD50003. It will be automatically assigned an extension.fob. Save the file.Back in the object designer click Design to edit the codeunit and replace the message text with the empty string:
MESSAGE(''). Then save the codeunit and close the code editor.In the object designer, click Import from the File menu. In the Import Objects dialog, select Dynamics NAV Object Files in the file type filter, locate the file
COD50003.fob, and click Open.C/SIDE will warn you that there is an object with conflicting versions in the database. Click OK to switch to Import Worksheet:

Click OK to import the object replacing the codeunit existing in the database.
When importing application objects in plain text format, C/SIDE does not check objects for possible conflicts. Merging code must be done manually by the developer.
Binary files are automatically checked for conflicts during the import if there are objects with the same ID in the database and in the file being imported. If both files have the Modified flag checked, this is considered as a conflict that must be resolved in the Import Worksheet dialog. In the Action field, you can choose how to handle conflicting objects. Possible options are:
Replace to replace the object in the database with the new one.
Skip to leave the existing object unchanged and ignore the new object.
Merge to automatically merge changes from both objects (only applicable for tables)
As an example, let's create a simple function that receives a checksum as a parameter and verifies if a check sum satisfies given criteria.
It is a typical task for a developer working on an ERP system to implement verification such as the Luhn algorithm that is widely used to validate identification numbers, such as a credit card number.
In the Object Designer window, create a new codeunit. Assign a number and name (for example,
50000,Luhn Verification).Click View, then C/AL Globals; in the Globals window open the Functions tab.
In the first line of the table enter the function name,
SplitNumber.The verification function receives a BigInteger number as an input parameter, but the algorithm works with separate digits. Therefore, before starting the validation we need to convert the number into an array of digits.
Position into the
Splitfunction, the number you just declared, and click View, then C/AL Locals. First tab in the Locals window is Parameters. Enter the first parameter of the function:Name: DigitsDataType: ByteVar: Set the checkmark in this field
Still in the C/AL Locals window, click View, Properties to open the variable properties and set Dimensions = 11.
Close the variable properties window and add the second function parameter AccountNumber with type BigInteger.
The Parameters window with the list of properties for the variable Digits is shown in the following screenshot:

Next, navigate to the Variables tab. Insert a variable i of Integer type.
Close the local declarations window to return to the code editor and type the function code:
        FOR i := 11 DOWNTO 1 DO BEGIN
          Digits[i] := AccountNumber MOD 10;
          ccountNumber := AccountNumber DIV 10;
        END;
Open the C/AL Globals window again and insert the second function
VerifyCheckSum. This is the main function that implements the verification algorithm.In the C/AL Locals window, insert a single parameter of this function
AccountNumberof typeBigInteger.Navigate to the Return Value tab and fill in the Return Type field. In this case, the type should be Boolean.
In the C/AL Locals window, declare three local variables as follows:
Name
Data Type
DigitsByte
CheckSumInteger
iInteger
Select the Digits variable, open its properties, and set Dimensions to 11.
Type the following function code:
        SplitNumber(Digits,AccountNumber);
        FOR i := 1 TO 10 DO BEGIN
          IF i MOD 2 = 1 THEN
            CheckSum += (Digits[i] * 2) DIV 10 +
              (Digits[i] * 2) MOD 10;
        END;
        CheckSum := 10 - (CheckSum * 9) MOD 10;
        EXIT(CheckSum = Digits[11]);
In the
OnRuntrigger, place the code that will call the verification function:IF VerifyCheckSum(79927398712) THEN MESSAGE(CorrectCheckSumMsg) ELSE MESSAGE(WrongCheckSumMsg);To present the execution result to the user,
OnRunuses two text constants that we have not declared yet. To do it, open the C/AL Globals window in the View menu. In the Text Constants tab, enter the values as in the following table:Name
Value
CorrectCheckSumMsgAccount number has correct checksum
WrongCheckSumMsgAccount number has wrong checksum
The SplitNumber function, described in Step 1 through Step 8, uses a FOR...DOWNTO loop with a loop control variable to iterate on all digits in the BigInteger number, starting from the last digit. In each step the number is divided by 10 using the integer division function DIV. The modulus division function MOD returns the remainder of this division that is placed in the corresponding element of an array.
The Dimensions property of the parameter Digits tells that this variable is an array consisting of 11 elements (value of Dimensions is the number of elements. A variable with undefined dimensions is a scalar).
When a function is called, it can receive arguments either by value or by reference. Var checkmark in the parameter declaration means that the argument will be passed to the function by reference, and all changes made to the Digits array in the function SplitNumber will be reflected in the function VerifyCheckSum that calls SplitNumber. Arrays cannot be function return values in C/AL, so passing an array variable by reference is the only way to send arrays between functions.
The VerifyCheckSum function defined in Step 9 to Step 13 calls the helper function SplitNumber and then uses the same loop type, but iterates from the first digit to the last (FOR 1 TO 10). This loop computes the checksum, which is compared to the last digit of the account number. If the two values match, the checksum is correct. Finally, the function returns the Boolean value conveying the verification result, TRUE or FALSE.
Based on this result, the OnRun function in the codeunit will display one of the two text constants in a message. In the given example, the checksum is incorrect, so the message will look like this:

To see the message for the correct result, replace the last digit in the account number with 3. The correct number is 79927398713.
Messages shown in the dialog box are declared as text constants in Step 16. The same text can be written within C/AL code without declaring constants, but in general, it is recommended to use named constants, because they allow to store text values in different languages and easily switch to any available language layer. Hardcoded text values in the C/AL code cannot provide such flexibility.
Microsoft Dynamics NAV is an information system, and its primary purpose is to collect, store, organize, and present data. Therefore C/AL has a rich set of functions for data access and manipulation.
The next example will present a set of basic functions to read data from the NAV database, filter and search records in a table, and calculate aggregated values based on database records.
In this example, suppose we want to calculate the total amount in all open sales orders and invoices for a certain customer in a specified period.
In the NAV Object Designer, create a new codeunit object.
Open the codeunit you just created in code designer, position it in the
OnRuntrigger, and open the local declarations window (C/AL Locals). Declare the following local variables:Name
DataType
Subtype
SalesLineRecord
Sales Line
StartingDateDate
EndingDateDate
Close the local variables window and declare a global text constant in the C/AL Globals window:
Name
ConstValue
SalesAmountMsgTotal amount in sales documents: %1
Return to the code editor and type the function code:
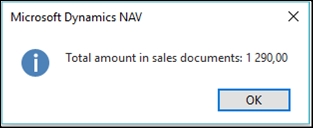
       StartingDate := CALCDATE('<-1M>',WORKDATE);
       EndingDate := WORKDATE;

       SalesLine.SETRANGE("Sell-to Customer No.",'10000');
       SalesLine.SETFILTER(
         "Document Type",'%1|%2',
         SalesLine."Document Type"::Order,
         SalesLine."Document Type"::Invoice);
       SalesLine.SETRANGE(
         "Posting Date",StartingDate,EndingDate);
       SalesLine.CALCSUMS("Line Amount");
       MESSAGE(SalesAmountMsg,SalesLine."Line Amount");
Save the changes, then close the code editor and run the codeunit.
A record is a complex data type. Variable declared as record refers to a table in the database. A variable contains a single table record and can move forward and backward through the recordset. A C/AL record resembles an object in object-oriented languages, although they are not exactly the same. You can call record methods and read fields using dot notation.
For example below are valid statements with the Customer record variable:
Customer.Name := 'New Customer';
IF Customer.Balance <= 0 THEN
  MESSAGE
The variable we just declared refers to the table Sales Line, which stores all open sales documents lines.
Since we want to calculate the sales amount in a certain period, first of all we need to define the date range for the calculation.
The first line in the code example finds the starting date of the period. In this calculation we refer to the system-defined global variable WORKDATE. If you are an experienced NAV user, you know what a workdate is; this is the default date for all documents created in the system. It does not always match the calendar date, so in the application code we use WORKDATE as the pivot date. Another system variable TODAY stores the actual calendar date, but it is used much less frequently than workdate.
Workdate is the last date of the period we want to analyze. To find the first date, use the CALCDATE function. It calculates a date based on the formula and the reference date. CALCDATE('<-1M>',WORKDATE) means that the resulting date will be one month earlier than the workdate. In the NAV 9.0 demo database workdate is 25.01.2017, so the result of this CALCDATE will be 25.12.2016.
The next line sets a filter on the SalesLine table. Filtering is used in C/AL to search for records corresponding to given criteria. There are two functions to apply filters to a table: SETFILTER and SETRANGE. Both take the field name to which the filter is applied, as the first parameter.
SETRANGE can filter all values within a given range or a single value. In the code example we use it to filter sales lines where the customer code is '10000'. Then we apply one more filter on the Posting Date field to filter out all dates less than StartingDate and greater than EndingDate.
Another filter is applied on the Document Type field:
SalesLine.SETFILTER(
  "Document Type",'%1|%2',
  SalesLine."Document Type"::Order,
  SalesLine."Document Type"::Invoice);
We want to see only invoices and orders in the final result, and we can combine these two values in a filter with the SETFILTER function. '%1|%2' is a combination of two placeholders that will be replaced with actual filter values in the runtime.
The last database statement in this example is the CALCSUMS function. SETRANGE itself does not change the state of the record variable - it only prepares filters for the following records search or calculation. Now CALCSUMS will calculate the result based on the record filters. It will find the sum of the Line Amount field in all records within the filtered range.
Only sales lines in which all filtering conditions are satisfied will be taken into account:
Customer No is '10000'
Document Type is Order or Invoice
Posting Date is between 25.12.2016 and 25.01.2017
Finally, we will show the result as a message with the MESSAGE function. Placeholders "%1" in the message text will be replaced with the second parameter of the function (SalesLine."Line Amount"):
After installing the demonstration or development configuration, you can access the NAV database without any additional setup - just run the Role-Tailored Client. Now let's see how to change default settings and connect to NAV Server with NAV user credentials instead of Windows domain authentication.
The NAV User Password authentication method requires an SSL certificate that must be installed on both server and client computers. For testing purposes, you can generate a self-signed certificate with the New-SelfSignedCertificateEx PowerShell cmdlet that can be downloaded from Microsoft TechNet.
Run Role-Tailored Client and connect to your NAV Server instance.
In the main application menu, navigate to Administration | IT Administration | General | Users to open the list of user accounts and click New.
Fill in the user card. The first field to enter is User Name. Enter here the login name the user will enter when connecting to the server.
Leave Windows User Name blank and move to the Microsoft Dynamics NAV Password Authentication tab, click on the assist edit button in the Password field, and enter a new user password.
Move to User Permission Sets tab and assign one or more permission sets to the user account.
From the Start menu, run the Windows PowerShell console with administrator credentials. To do this, open the start menu, type
PowerShell, right-click on the application name, and choose the command Run as administrator.Change the current directory to the folder where you saved the
New-SelfSignedCertificateEx.ps1cmdlet.Load the contents of the
New-SelfSignedCertificateEx.ps1file into the shell:. .\New-SelfSignedCertificateEx.ps1
Run the function
New-SelfSignedCertificateExwith the following parameters, replacing"<Server Name>"with the name of your computer hosting the web server:New-SelfSignedCertificateEx -Subject "CN=<Server Name>" -IsCA $true -Exportable -StoreLocation LocalMachineThe following screenshot shows the output generated:

Run Microsoft Management Console: open the Application menu and type
mmc.Click Add/Remove Snap-in in the File menu.
Select Certificates in the list of available snap-ins, click Add, then choose Computer Account, and then Local Computer.
Unfold the Personal | Certificates folder under the Console Root and locate the certificate you just created. You can easily identify it by the Issued To and Issued By fields. They both will have the name of your computer.
Right-click on the certificate, select All Tasks | Manage Private Keys. Add Read permission for NETWORK SERVICE account.
Copy the certificate from Personal | Certificates to Trusted Root Certification Authorities | Certificates.
Double-click on the certificate name or choose Open from the drop-down menu. Open the Details tab and scroll to the Thumbprint field:

Copy it to a text editor and remove all white spaces from it. The correct certificate thumbprint must be a 40-digit hexadecimal number. For example,
0d64836e14b528488bcc64853088553705078969.Keep the value, it will be required in the next step.
From the Start menu, run Dynamics NAV 2016 Administration.
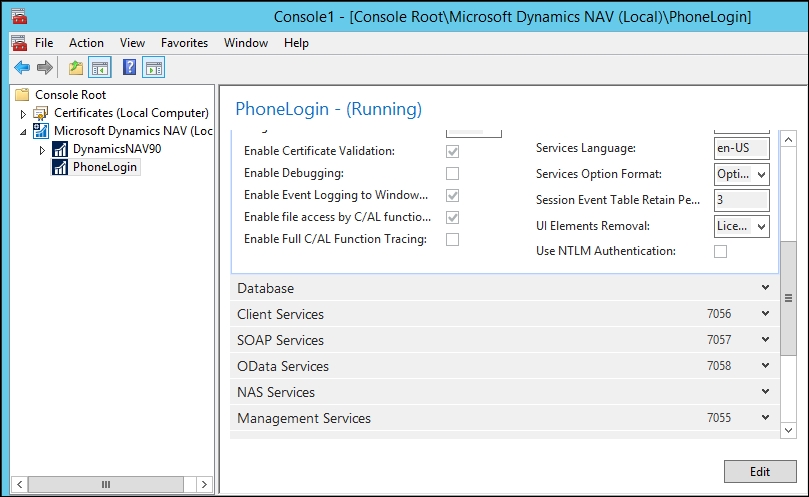
Unfold the Microsoft Dynamics NAV (local) snap-in under the console root and choose your server instance name. If you accepted the default name when installing the server, it should be DynamicsNAV90.
Click Edit in the configuration pane. Change the value of the Credential Type field from Windows to NAVUserPassword.
Fill the Certificate Thumbprint field. Copy the value you received from the self-signed certificate. Make sure you delete all spaces between digit groups. The certificate thumbprint must be exactly 40 characters long.
Click Save - you will be warned that the service must restart before the new settings will be activated.
To restart the service, click on the snap-in name (Microsoft Dynamics NAV), then choose the service instance in the middle pane of the management console. After that, the Restart button will be available in the Actions pane on the right. Click Restart and wait for the action to complete:

Open the
ClientUserSettings.configfile located in theAppDatadirectory. Its default location isC:\Users\<UserName>\AppData\Roaming\Microsoft\Microsoft Dynamics NAV\90\ClientUserSettings.config.Change the value of the
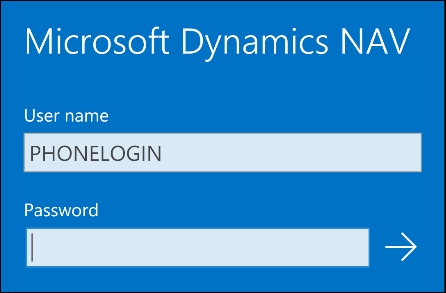
ClientServicesCredentialTypekey fromWindowstoNavUserPassword:<add key="ClientServicesCredentialType" value="NavUserPassword" />Run the Role Tailored Client. You will be requested to enter a user name and password. Enter a user name and password of the user you created earlier. You will be connected to NAV with the NAV user credentials instead of your domain account.
Changing the authentication method requires a number of changes in configuration on both the server and client side.
Since we want to change the server authentication type, first of all we need to create a user account that will be able to connect to the server after the new configuration takes effect. Step 1 to Step 5 create a new user that will connect with new credentials.
When a NAV client connects to a server with Windows authentication, Windows hides all security details inside the Kerberos protocol. If we want to connect without Windows authentication, we must provide a digital certificate that will ensure security of communication between client and server. Real-life certificates are issued by a trusted certification authority, but for development and testing purposes you can create your own certificate.
Step 6 and Step 7 will create such a self-signed certificate. When generating a certificate, make sure that the server name passed to the cmdlet exactly matches the computer's full name, as shown in its properties. If you don't know the server's full name, open the Windows File Explorer, right-click on Computer, and select Properties. If your computer is connected to a domain, its full name should include the domain name. For example: mycomputer.domain.com.
After running the New-SelfSignedCertificateEx cmdlet, your new certificate is created in the LocalMachine certificate store. Each SSL certificate has a so-called thumbprint, a hexadecimal number generated by a hash algorithm from the certificate content. This number must be provided to both the NAV server and client to establish a secure connection.
Step 15 to Step 20 modify the server instance configuration. We simply change two keys in the server setup, but this would not work without long preparation work made in previous steps.
A final modification in the client configuration file is required to ensure that client and server will use the same authentication protocol.
Web server configuration requires proper attention, because the setup must ensure security of the data sent over the Internet. This recipe will explain how to access your NAV Server from a web browser using a secure connection with the HTTPS protocol. In conclusion, we will see how to connect to NAV from a mobile device will simple additional steps.
Several prerequisites must be met before you can connect to your NAV server over the Web.
Microsoft Dynamics NAV Web Server must be installed and connected to the NAV Server instance which you want to be accessible from the phone client. Web server and NAV Server can be running on separate computers, but the web server must have access to the NAV instance.
To generate a self-signed security certificate you will need the
New-SelfSignedCertificateExPowerShell cmdlet that can be downloaded from Microsoft TechNet.To connect to the NAV server from a mobile device, as per the There's more section, NAV Phone Client must be installed on your device. The installation path depends on the OS version of your mobile device. For example, on an Android device, tap the Google Play icon and type Dynamics NAV in the Search window. Then choose the Dynamics NAV application from the search result and follow the on-screen installation instructions.
From the Start menu, run the Dynamics NAV Administration Shell or Windows Powershell and change the active directory to the folder where you saved the
New-SelfSignedCertificateEx.ps1cmdlet.Run the cmdlet with the following parameters, replacing
"<Server Name>"with the name of your computer hosting the web server:.\New-SelfSignedCertificateEx.ps1 -Subject "CN=<Server Name>" -IsCA $true -Exportable -StoreLocation LocalMachine -StoreName MyRun Microsoft Management Console. Open the Application menu and type
mmc.Click Add/Remove Snap -in in the File menu.
Select Certificates in the list of available snap-ins, click Add, then choose Computer Account, and then Local Computer.
Unfold the
Personal / Certificatesfolder under the Console Root and locate the certificate you just created. You can easily identify it by the Issued To and Issued By fields. They both will have the name of your computer.Right-click on the certificate, select All Tasks | Manage Private Keys. Add Read permission for NETWORK SERVICE account.
Copy the certificate from Personal | Certificates to Trusted Root Certification Authorities | Certificates.
Double-click on the certificate name or choose Open from the drop-down menu. Open the Details tab and scroll to the Thumbprint field.
Copy it to a text editor and remove all white spaces from it. The correct certificate thumbprint must be a 40-digit hexadecimal number. For example:
0d64836e14b528488bcc64853088553705078969.Right-click on the certificate name and choose All Tasks | Export. Accept the default values for all options in the certificate export master: do not export the private key, choose the X.509 in DER encoding as the certificate format. Specify the file's location and name; this is the file you will need to copy to the client connecting to NAV.
In the Microsoft Management Console, click Add/Remove Snap-ins , choose Microsoft Dynamics NAV in the snap-ins list, and add it to the console root.
Right-click on the Microsoft Dynamics NAV snap-in and choose Add Instance.
In the Server Instance window, specify the new instance name and services ports. For this demo, we will name the instance
WebLogin. When setting ports for services, make sure they are not used by other NAV instances.Select Network Service as the service account:
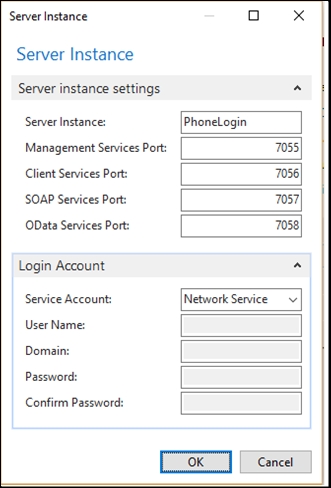
Click OK to accept the settings and create the service instance. Still in the management console, click the Edit button in the right pane to change the configuration setting of the new service:
The first parameter that should be changed is Credential Type. The default value is Windows; select NavUserPassword in the dropdown list.
You also need to provide the certificate thumbprint in the Certificate Thumbprint field. To obtain the thumbprint value, return to your certificate created in the first step and double-click on the certificate name or choose Open from the drop-down menu. Open the Details tab and scroll to the Thumbprint field.
Copy the thumbprint to the NAV service setup. Don't forget to remove all white spaces from it, or the value will not be accepted.
Add the Internet Information Services snap-in to the Microsoft Management Console. Click Add / Remove Snap-in and select Internet Information Services.
In the
Sitesfolder locateMicrosoft Dynamics NAV 2016 Web Client. Select the site root and click on Bindings in the Actions pane.Add site binding for HTTPS protocol: choose https for Type and leave the default port as
443for HTTPS connections. In the SSL certificate option choose the certificate you created in the first step, from the drop-down list.In the IIS management console, select the
DynamicsNAVfolder under theMicrosoft Dynamics NAV 2016 Web Clientsite and then click on Explore action in the Actions pane. This action will open the folder in which web site files are located. Alternatively, you can open this folder in a file manager. The default files location isC:\inetpub\wwwroot\DynamicsNAV90.Open the
web.configfile in a text editor, change the following three configuration keys, and save the file:ServerInstance. New value: WebLoginClientServicesCredentialType. New value: NavUserPasswordClientServicesPort. New value: 7056
Connect to the NAV server with the role-tailored client and open users setup:
Administration | IT Administration | General | Users.Create a new user. Enter a user name and set the password in the Microsoft Dynamics NAV Password Authentication tab. Leave the Windows User Name field blank.
Assign permission sets of your choice to the user. At least one user in the database must have the SUPER permission set.
Install the certificate on the client computer.
Run the web browser and open the page by typing this URL,
https://localhost:8080/DynamicsNAV90/.You will required to enter the user name and password:
After successful authentication, you will be redirected to the default role center:

In Step 1 through Step 8 we generate a self-signed SSL certificate the same way we did in the previous recipe of this chapter, Configuring NAV Server. The certificate is required whenever we need to establish a secure connection with authentication type other than Windows.
After running the New-SelfSignedCertificateEx cmdlet, your new certificate is created in the LocalMachine certificate store. A client computer connecting to the server must hold a copy of this certificate. To copy it to the client PC or mobile device, you need to export the certificate file. Step 9 exports the security certificate into a file that will be installed on client. A new NAV Server instance is created and configured in Step 10 to Step 17. We need two service instances here to redirect web requests to a separate service and leave Windows users unaffected. The user login type in NAV is defined by the server-side setup, and once a service is configured for NAVUserPassword credential type, it cannot authenticate users with the Windows credential type; they will receive a "Protocol mismatch" error. Since web users are outside of the corporate domain and cannot access the server with Windows credentials, we must change the authentication type they use. But we still want domain users to be able to login with their Windows domain account. And this is why we need the second service instance. Users within domain will be connecting to the service DynamicsNAV90, nothing will change for them. On the other hand, web requests will be redirected to the WebLogin service. Since both services point to the same database, all users will work with the same data and application.
Our front-end is the web server published by the Internet Information Services (IIS), and the IIS service must forward all incoming requests to the correct back-end service. Now let us configure the web service.
The final setup on the web server side is to configure authorization requests from IIS to the NAV instance that will serve them.
With the web server configuration complete, you can connect to the same service from a mobile device running NAV Tablet Client or Phone Client.
Your mobile device must have the SSL certificate registered, same as the Windows Role-Tailored Client. To install the certificate on the mobile device:
Copy the exported certificate file to the mobile device, locate it, and click on the file.
Give a name to the certificate when asked. This name is independent of the server or client name and can be any text as shown in the following screenshot:

After the certificate is successfully installed, you will see a confirmation. Then locate the Dynamics NAV phone client shortcut in your applications and click it. You will be prompted to enter the service name:
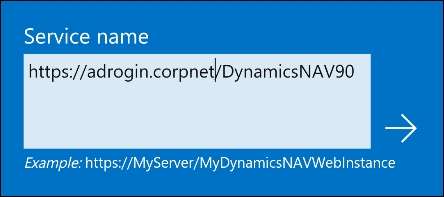
Enter the server name and the web instance name and connect to the server. You will be asked to enter a user name and password. These are the name and the password of the user created in the previous step.
Now you are connected to the NAV server:

Note
If you are configuring a web server inside your corporate network, it is possible that you won't be able to perform this step and connect to the server from a mobile phone. Corporate security policies often block connections to internal resources from outside. In this case, discuss possible solutions with your company's system administrators.