


When Google announced Android Wear at their Google I/O conference back in March 2014, developers were excited and started embracing this technology to see what types of applications they could create to communicate between the Android handheld device and Android wearable, while making our day-to-day lives a lot easier.
Android wearables bring a personal touch by allowing consumers to interact with their devices on a different level, and are aimed at reducing people's interaction with their mobile phones. This could include receiving a simple notification message reminding you to pick up something on your way home from work, or that you have an upcoming appointment. There is even an ability to receive messages from your favorite social networking application, for example, Facebook.
This chapter provides you with a theoretical background of Android, and how to develop applications for the Android Wear platform from Google. This platform allows your Android wearable device to communicate with your phone wirelessly over Bluetooth, and many manufactures like Samsung and LG have embraced this technology and created wearable devices, such as the Samsung Gear Live and the LG G Watch R smartwatches.
In later chapters, we will be working with some of these APIs and seeing how we can incorporate these in our applications to communicate between our Android phone and Android Wear devices.
This chapter includes the following topics:
Introducing Android wearables
Understanding the Android Wear architecture
Building a simple Android wearable application
Android Wear is a special version of the core Android OS that has been tailored for wearable computing devices such as smartwatches. These wearable devices come with a brand new user interface, which is a result of Google working with their customers to understand how they use their phones today and can be more in touch with their environment.
Android Wear provides consumers with a more personal interaction with their devices. These tiny supercomputers can show you information and suggestions when you need them. Given the wide variety of Android applications currently on the market, you'll receive the latest posts and updates from your favorite social apps and notifications from shopping apps.
Android wearables are great for fitness fanatics too. They allow you to better monitor your health and fitness by showing your fitness summary in terms of real-time speed, distance, and time information right on your wrist for your run, cycle, or walk.
Android Wear also lets you access and control other devices from your wrist by simply saying OK Google to fire up a music playlist on your phone or cast your favorite movie directly onto your TV. You can also receive instant messages from your favorite social networking app, for example, Facebook. With Android wearables, there's a lot of possibilities, and developers are jumping right in and creating some stunning apps already.
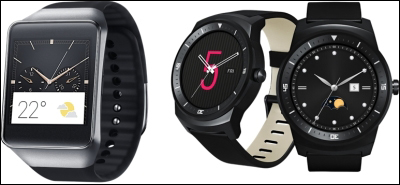
An example of an Android wearable device can be seen in the following screenshot:
Android Wear works by communicating wirelessly over Bluetooth between the wearable and a handheld device (typically a smartphone) running Android 4.3 or higher. When the handheld device has been paired with the wearable device, the operating system begins sending a series of notification messages automatically to the watch, along with any wearable-specific rich notification parameters, such as voice input for actions and any specific pieces that provide additional information.
When a connection has been established between the Android device and the wearable, over Google Play service, notification messages can be then exchanged between the handheld device and the wearable to trigger appropriate actions on each device.
The architecture of any typical wearable application has been set out by Google in their design guideline documents that focus primarily on the new Material design theme for Android 5.0 applications. This design document provides the developer with a comprehensive framework to create visual, motion, and interaction design across each of the various Android platforms and devices.
Since Android Wear runs as a Bluetooth Low Energy (BLE) device, developers need to ensure that they design their applications to run efficiently so that they don't impact the device's battery. This is very important when designing the custom watch faces or apps that use location service functionality.
The following image describes the architecture between the handheld device and the wearable device. In the next section, we will take a look into some of the wearable APIs that come as part of Google Play services, and explain their purpose when it comes to communicating between the mobile device and the wearable:

Once the connection is established, you can then start looking at sending and synching data between the two devices. When a connection between two devices has been established, each node can handle any given number of different functions. For example, one node can handle the camera part on the mobile, while another node could keep track of a user's GPS coordinates on the wearable device.
In the following list, we will explain each of the APIs, which are presented in the preceding screenshot. In later chapters, we will be using these in more depth, so at this stage, I will just be providing a brief introduction:
Node API: The
NodeApiclass is responsible for keeping track of all connected or disconnected nodes that have been established within the wearable network by using theNodeListenerinterface method. When a node establishes a connection between the handheld and the wearable,MessageApiquietly begins to send a message from the wearable device to the handheld device that it is paired with, which the user is signed in to with their Google account. This sends a notification to theNodeListenermethod that then begins to get information about each node.Message API: The
MessageApiclass is responsible for sending across short messages to each of the connected network nodes between the wearable and the handheld device. Once a message has been received, a background listener service on the receiving side (MessageListener) will be called so that it can get the message.Data API: The
DataApiclass is responsible for synching data between the connected Android wearable and the handheld device, and takes care of providing the synching mechanism on both sides. In addition to synching data, the big appeal of the data API is that when a user's connection gets disconnected from the paired smartphone, the data will be automatically transferred when the connection is restored, without the user needing to worry about handling data issues. When the data API receives messages fromMessageApi, a background listening service on the receiving side (addListener) will be called as part of theDataListenerinterface method. Once theaddListenermethod determines that a change has occurred, a call is made to theonDataChangedmethod.Note
It is extremely important that you remember to implement
WearableListenerServiceon both the Android wearable and the handheld device in order to listen for the events received byWearableListenerService.It is worthwhile to mention that all of the Android Wear APIs are included in Google Play services 5.0. It's important to note that wear itself supports only 4.3 devices and above. This is basically due to the fact that Android Wear requires Bluetooth LE, which is only available in 4.3 and above versions.
In the following chapters of this book, we will be taking a look at how to implement some of these APIs to communicate between our Android device and our wearable device, so stay tuned.
In this section, we are going to look at the key concepts to get you started with Android Wear development. Google recommends using Android Studio for development, because of the tight integration it has with the Wear development APIs, as well as the streamlined build cycle with Gradle, that helps minimize a lot of the manual configuration that the developer would need to do in other IDEs.
Before you begin, and as a prerequisite to starting to work with Android Studio, you will need to ensure that your system has the latest version of the Java Runtime Environment (JRE) installed for the version of the operating system that you are using.
Note
To determine if your system has the JRE or the Java Development Kit (JDK) installed, open a new terminal window and issue the following command from the command line:
java –version
Once you have determined if you have Java installed, you can proceed to download Android Studio for your version of the operating system. The Android Studio package can be downloaded from the Android developer tools web page at http://developer.android.com/sdk/installing/studio.html.
Android Studio for Windows systems can be downloaded from https://dl.google.com/dl/android/studio/install/1.2.2.0/android-studio-bundle-141.1980579-windows.exe.
Android Studio for Mac OS X systems can be downloaded from https://dl.google.com/dl/android/studio/install/1.2.2.0/android-studio-ide-141.1980579-mac.dmg.
Android Studio for Linux systems can be downloaded from https://dl.google.com/dl/android/studio/ide-zips/1.2.2.0/android-studio-ide-141.1980579-linux.zip.
Now that you have downloaded and installed Android Studio, you can begin installing the Android 4.4W (API 20) for your system:
Launch Android SDK Manager by using the SDK Manager in Android to download API level 20 (4.4 KitKat Wear).
Select and click on the Android 4.4W.2 (API 20) package:

You will notice that we have chosen to install the Android Wear system images for both ARM and Intel. Intel delivers greater performance while running your app using the Android Emulator, but you can select the appropriate one for your chipset. If you decide to install both, the Android Studio IDE at design time will inform you which one is supported.
In the next section, we will need to install the Android Wear support libraries for our Android Wear application that will allow your Android wearable app to target a specific version of the Android SDK APIs.
The Android Wear support library contains a set of numerous code libraries that allow you to target a specific version of the Android SDK APIs. Each library contains a different set of features that can help to improve the look of your application, and with the release of Android 5.0 you can incorporate Material design as well as add support for rich notification features.
The benefit of using the latest Android Wear support libraries is that it allows your applications to take advantage of the new and improved features for devices that are running Android 5.0 and above. However, while your app can still run on devices running Android 1.6 and above, some features will not be available:
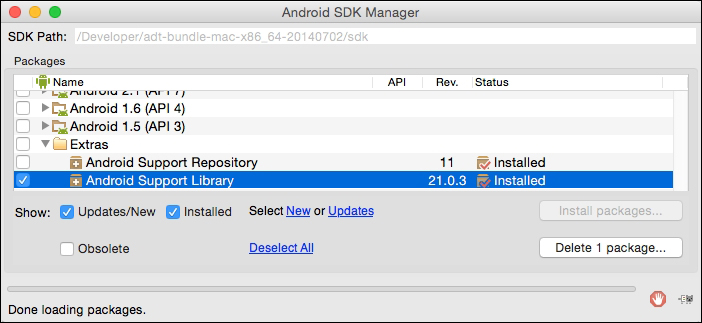
Scroll down to the Extras folder, and select the Android Support Library, as shown in the preceding screenshot. Next, click on the Install packages button as shown in the preceding screenshot.
If you are using Android Studio for your Android Wear development, this can provide you with a much easier and more convenient way of adding the Android Wear support library to your existing applications. Android Studio uses a module model, where the mobile and wear modules are part of a single project.
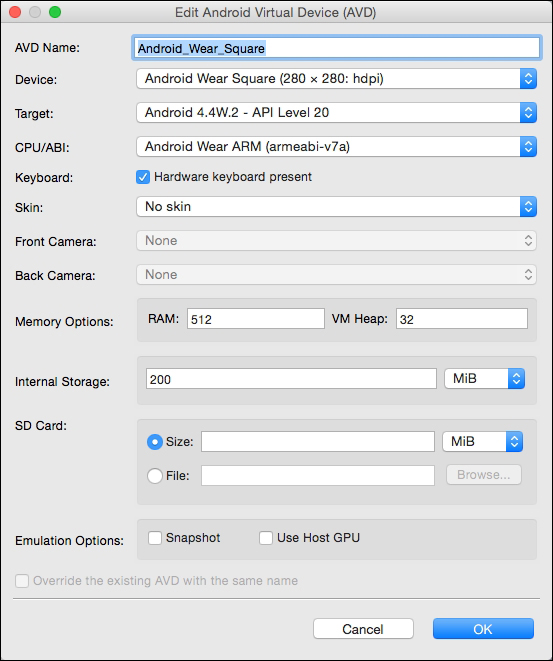
In our next step, we will need to set up and configure our Android Wear Emulator. This will allow us to test our Android Wear apps that we will be developing throughout this book.
Open your Android Virtual Device (AVD) manager and create a new virtual device for your Android Wear, as shown in the following screenshot:
Before we end this section, it is worth mentioning that while Android Emulator is the most powerful and convenient tool that you will use throughout your development of Android apps, it is important for developers to understand the types of limitations it comes with, which are explained in the following points:
The Android Emulator simulates real handheld device behavior, but not specific hardware implementations
Sensor information, such as satellite location, battery, and power settings, as well as network connectivity, is all simulated using your computer
Access to the camera hardware is not fully functional
There is no ability to place or receive phone calls, or send SMS messages, as these are all simulated
There is no support for USB available
As you can see, using the Android emulator is not recommended as a substitute for testing your apps on a true handset or device. Now that we have set up all of the preliminary configurations, we can start to build our Android Wear application.
In this section, we will take a look at how to create a simple Hello World Android Wear application by performing the following steps:
Launch Android Studio, and then navigate to the File | New Project option.
Next, enter in
HelloAndroidWearfor the Application name field.Then provide a name for the Company Domain field.
Next, choose Project location where you would like to save your application code:

Finally, click on the Next button to proceed to the next step. On the second wizard screen, we need to specify the form factors using which our application will run. On this screen, we choose the Minimum SDK versions for phone and tablet, Android TV, and Android Wear.
Click the Phone and Tablet option and choose the API 19: Android 4.4 (KitKat) option for Minimum SDK. Choosing this option allows your application to target more devices that are active on the Google Play Store, with the added cost of having fewer features available for these devices.
Next, click on the Wear option and choose the API 20: Android 4.4 (KitKat Wear) option for Minimum SDK:

Next, click on the Next button to proceed to the next step in the wizard.
In our next step, we will be taking a look at how to add a blank activity to our application for its mobile section.
Note
An activity is basically an application component that provides a screen with which users can interact in order to do something, such as dial the phone, take a photo, send an e-mail, or view a map.
Each activity is given a container to draw its user interface. The container typically fills the screen, but may be smaller than the screen and float on top of other windows.
Android Wear applications are actually built with two modules: mobile and wear. In this section, we will take a look at how to add a blank activity for the mobile portion of our Android Wear application. Although in this chapter we won't be using this to communicate with our Android wearable device, in later chapters, when we learn about notifications and how to send these between the mobile device and the wearable, we will be using this component in more detail.
To add an activity for mobile, perform the following steps:
From the Add an activity to Mobile screen, choose the Blank Activity option from the list of activities:

Now, click on the Next button to proceed to the next step in the wizard.
In our next step, we need to set up and customize our Blank Activity properties that can be used by our application. Here, we specify the name of the activity, layouts, and title, as well as its menu resource name that it will be using (if it contains a menu bar).
From the Customize the Activity screen, accept the default properties that have been created for you by the wizard:
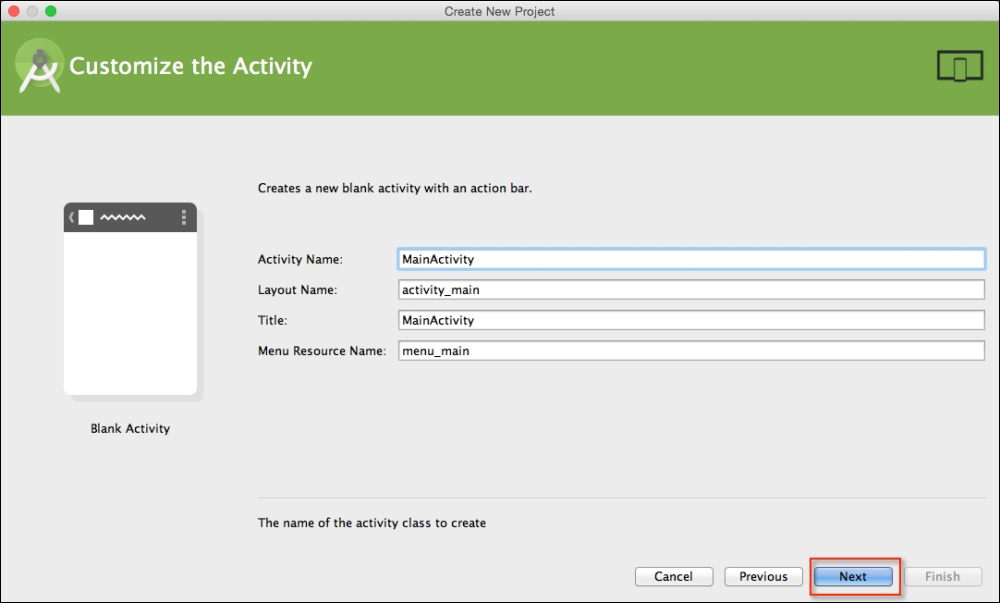
Click on the Next button to proceed to the next step in the wizard.
In this section, we will take a look at how to add a blank activity for the wearable portion of our Android Wear application. This will be used to determine how our Android wearable behaves. Once added, this will contain two different watch views: one containing round watch faces and the other containing a square watch look.
To add an activity for Wear, follow these steps:
From the Add an activity to Wear screen, choose the Blank Wear Activity option:
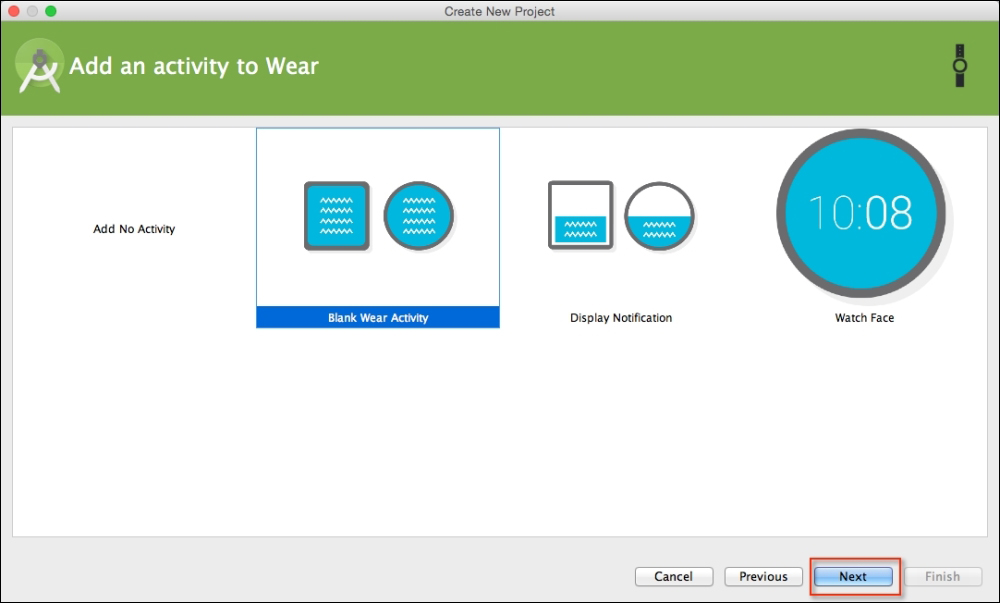
Click on the Next button to proceed to the final step in the wizard.
In our final step, we need to customize our
Blank Wear Activityproperties that can be used by our Android wearable. Here, we specify the name of the activity as well as the layouts for the watch faces for round and rectangle.From the Customize the Activity screen, accept the default properties that have been created for you by the wizard:

Next, click on the Finish button to proceed, and your Android wearable project will be generated for you. After a few moments, the Android Studio window will be displayed with your project loaded.
When you take a look at the project that the wizard created for you, the first thing you will notice is that it contains two modules: mobile and wear. The mobile portion of our project is the application that will run on a phone device that will be used to communicate with our wearable device. The wear portion is the application that will be installed on the Android wearable device.
Note
When developing Android wearable applications, these cannot simply be packaged separately and uploaded to the Google Play Store. You must package both your mobile and wearable app into a single APK application. This is so that when a user installs your application on their Android device, the wear app will automatically be transferred to the paired wear device.
As you can see in the following screenshot, the default project structure that our wizard created for us doesn't seem to do anything special—it simply contains the skeleton structure of any Android wearable app. In our next step, we will look at how we can write our own code for the Wear module of our application:
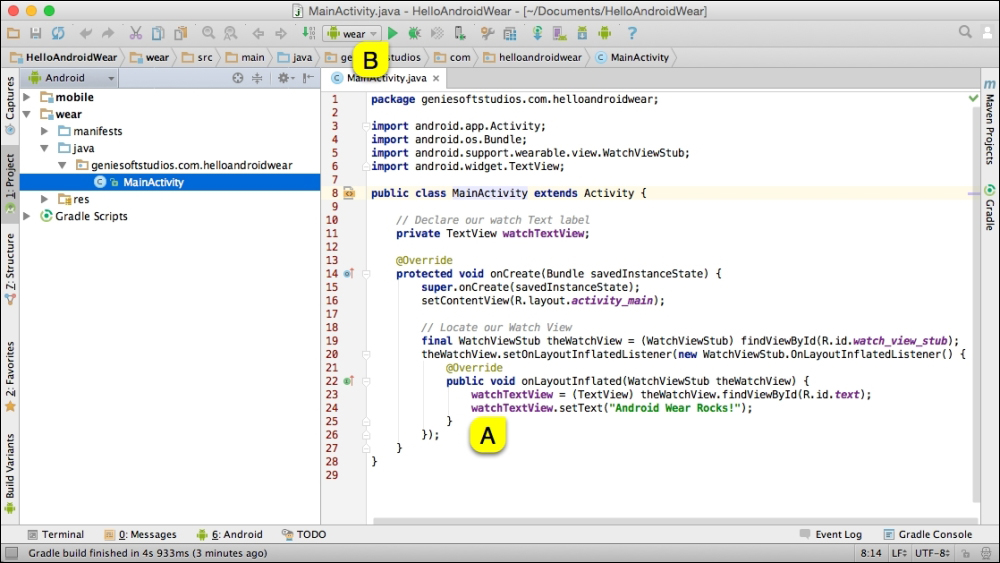
In our next step, we will begin modifying our MainActivity class file to display our custom Android wearable welcome message to the user within the wearable watch face :
Open the HelloAndroidWear project from within our Project Navigator window.
From the Project Navigator window, expand the Wear section, select, and expand the java section.
Modify the following code in the
MainActivity.javafile of the project:private TextView watchTextView; @Override protected void onCreate(Bundle savedInstanceState) { super.onCreate(savedInstanceState); setContentView(R.layout.activity_main); final WatchViewStub theWatchView = (WatchViewStub) theWatchView.setOnLayoutInflatedListener(new WatchViewStub.OnLayoutInflatedListener() { @Override public void onLayoutInflated(WatchViewStub theWatchView) { watchTextView = (TextView) theWatchView.findViewById(R.id.text); watchTextView.setText("Android Wear Rocks!"); } }); }Tip
Downloading the example code
You can download the example code files for all Packt books you have purchased from your account at http://www.packtpub.com. If you purchased this book elsewhere, you can visit http://www.packtpub.com/support and register to have the files e-mailed directly to you.
In the preceding code snippet, we start by creating a new activity, which is handled by the onCreate method. This method is responsible for starting the activity when the application is launched and the emulator sets up the content, prior to displaying the watch layouts on the screen using the setContentView method.
Next, we declare an instance of WatchViewStub, which is used to detect the specific watch type being used at runtime and allows you to inflate a rectangular or round layout. Since we cannot access these child views until inflation has completed, we implement the OnLayoutInflatedListener interface to handle this, which allows us to get a reference to the child views by using the findViewById class. Once we have established this reference, we can then proceed to update the watchTextView with our Android Wear Rocks! text.
Note
When we make a call to invoke the onLayoutInflated method from inside our WatchViewStub class, this will begin to load the corresponding layout resource for either the rect_activity_main.xml file for our square view or the round_activity_main.xml file for our round watch views. Once the view has inflated within its parent view, this will then get added to the view hierarchy chain of your application prior to making it visible.
If you would like to learn more about the activity lifecycle and the different states that it takes on, you can refer to the documentation at http://developer.android.com/reference/android/app/Activity.html#ActivityLifecycle.
Now, we can finally compile, build, and run our application. Click on the green button labeled B in the preceding screenshot or simply press CMD + F9, and choose Android Virtual Device from the list of Android Emulators:
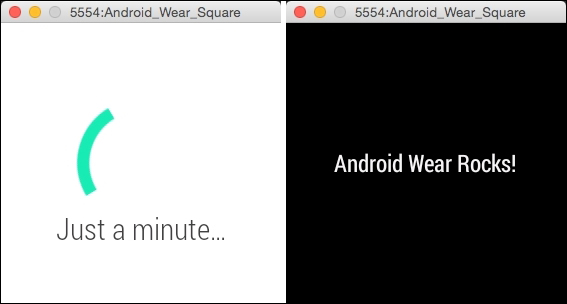
Once the emulator has launched and after a few moments, you should see your app displayed, as shown in the preceding screenshot.
In this chapter, we explored the features and key concepts of the Android Wear platform; we discussed about the Android Wear architecture; and then we moved on to look at how to configure our Android environment, setting up the Android SDK and AVD, before finally taking a look at how to build our simple Android wearable app.
In the next chapter, we will cover the features of Android notifications and explore the different ways that we can send notifications between the handheld device and the Android wearable to create basic and custom notifications. We will learn how we can use the Android voice capabilities to allow the user to respond to notification messages by using just their voice, and how we can use a method called page stacking to receive multiple notifications.

