If you use Plone for your school's public web presence or intranet, it might also make sense to use it for your courses:
Courses can interact naturally with other Plone content. For example, an event listing can combine exams and athletics.
Plone is more customizable than commercial offerings like WebCT or Blackboard, and there's no worry about another company swallowing it.
Plone can save hundreds of thousands of dollars per year over a commercial course management system.
Consistent navigation and one-stop search come for free, avoiding the need to cobble together disparate systems with arcane web server rewrite rules.
Plone brings flexible access control and workflow, freedom from the webmaster bottleneck, and the other general advantages listed in the Preface.
There isn't a lot of support specifically for doing course management in Plone. However, there is plenty of overlap between course management and the more general content management at which Plone excels. With creative application of content types, Plone can make a respectable showing against some of the most popular course management packages: you get events, discussion forums, custom forms for online testing, assignment submission, and a flexible permission system for enabling collaboration, along with the integration and consistency advantages of a single system.
This chapter suggests a flexible strategy for representing courses using Plone's built-in content types — news items, collections, and events — all without a single line of code. We'll put course materials online, publish assignments and announcements, and lay the groundwork for add-ons like blogs, forums, and other third-party products covered in later chapters. Following the iterative philosophy of beginning with the simplest approach that adds value, we'll keep away from markup and stylesheet tweaks for now; what we build will be functional and reasonably attractive, so you can put the basics into production fast, returning later to sand off the rough edges with a third-party theme or a bit of custom coding.
Finally, while the following strategies are one set of working practices, don't be afraid to mold them to your school's needs. Customization is Plone's strong suit!
Our first order of business is deciding where to store courses. Instructors using Plone on their own sometimes create an entire Plone site for each course. While this lets them choose add-on products on a per-course basis and offers some isolation should a catastrophe occur, it carries two important disadvantages:
A maintenance burden. Unless you are adept at writing scripts to automate it, upgrading and editing redundant settings on several Plone sites takes time and invites error.
An integration challenge. Sharing information among Plone sites is tricky. By using a single site, you get integrated navigation and search without having to cobble together bridging solutions using XML—RPC or RSS.
Thus, we recommend keeping all your courses (and whatever else you can get away with politically) in a single Plone site. We will keep the courses in a special kind of folder called a large folder.
Note
Folders versus Large Folders
In Plone 3, there are two main types of folders— folders and large folders— each with its own advantages.
Folders are best for holding less than about fifty items. Their contents can be manually ordered through drag-and-drop and appear beneath their enclosing folder in Navigation portlets. However, whenever a folder is loaded into memory (unpickled, in Python parlance), all its contents are loaded as well. This takes up a lot of RAM and causes slowdowns if folders are overpopulated. In addition, since folders store all their contents in a single Python "tuple", they are a prime source of conflict errors in Zope's database: temporary errors which happen whenever two transactions try to write to the same object at once. In addition to adding noise to your error logs, these hurt performance, since they require the entire transaction — everything done in response to the HTTP request — to be redone.
Large folders, on the other hand, are optimized to hold thousands of items, storing their contents in a B-tree, a data structure that supports incremental loading and therefore needs less RAM and disk access. B-trees also provide finer-grained locking, making for fewer conflict errors. The downside is that their contents cannot be manually ordered. Also, for cosmetic reasons, their contents aren't listed in Navigation portlets (though this can be changed in the portal_types tool in the ZMI).
A note about the future
In Plone 4, both folder types will be subsumed by a hybrid that combines the best attributes of each. Called plone.folder, this package is, as of October 2009, available separately for Plone 3 at beta quality. If you choose to use it now, migration to the Plone 4 version will likely be smooth.
Large folders are not available from the Add new menu (addable) out of the box. To enable them...
1. Go to Site Setup → Zope Management Interface, colloquially known as "the ZMI." This is an under-the-hood view for tweaking infrequently used settings and performing advanced tasks.
2. Go to portal_types → Large Plone Folder, where you can control the behavior of the Large Folder type within the Plone site.
3. Turn on Implicitly addable, and save. Large folders are can now be added throughout the site.
Once you are finished adding large folders, it's a good idea to revoke their addability to prevent user confusion. Otherwise, users will see them in their Add menus.
Next, create a top-level large folder for holding courses:
1. Navigate back to the top level of your Plone site (no longer in the ZMI), and choose Add new → Large Folder. Title it "Courses," and save. (Now is a great time to return to
portal_typesand turn off large folder addability.)Although large folders are supposedly designed to hold thousands of items,their views are unpaginated: they are happy to display all those thousands of items on one gigantic page. Improving this behavior is on the docket for a future version of Plone: http://dev.plone.org/plone/ticket/9544. In the meantime, we can take advantage of a little trick using collections to add pagination to the folder:
2. Inside the Courses folder, choose Add new → Collection. Title it "Courses" like its surrounding folder, so the name of the folder and the title on its default page are consistent. Save it.
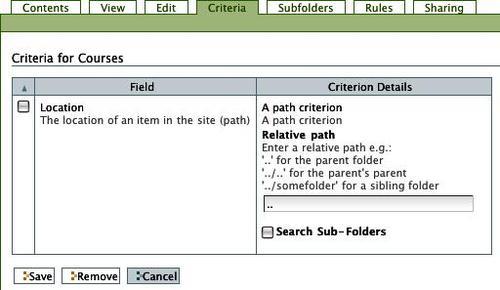
3. On the collection's Criteria tab, add a relative Location criterion, and leave.. (the default) as its Relative path. Search Sub-Folders should remain unchecked; we want to pull in only the direct contents of the Courses folder.
4. Under Set Sort Order, select Title to make courses appear in alphabetical order.
5. Go back to the collection's View tab, and choose Display → Summary view. This keeps users from seeing distracting author information and modification dates.
6. On the collection's Edit → Dates tab, set the Publishing Date far in the future. This ugly but effective trick keeps the collection from showing up in the folder listing for students. You will still see it, however, since you created it.
7. Finally, navigate back to the Courses folder, and set the collection as its default view: choose Display → Select a content item as default view, and choose the Courses collection.
Congratulations! Perhaps that seemed a lot of work for an empty folder, but pagination and efficient storage are insurance against being woken in the middle of the night when your server chokes trying to render too many 1,000-course pages. (It also means fewer servers to buy, a significant monetary saving for your institution.)
Incidentally, you can feel free to add additional levels of organization within your Courses folder at this point: for example, grouping courses by subject or level. Just remember to revoke large folder addability when you're done.
Our first order of business is deciding where to store courses. Instructors using Plone on their own sometimes create an entire Plone site for each course. While this lets them choose add-on products on a per-course basis and offers some isolation should a catastrophe occur, it carries two important disadvantages:
A maintenance burden. Unless you are adept at writing scripts to automate it, upgrading and editing redundant settings on several Plone sites takes time and invites error.
An integration challenge. Sharing information among Plone sites is tricky. By using a single site, you get integrated navigation and search without having to cobble together bridging solutions using XML—RPC or RSS.
Thus, we recommend keeping all your courses (and whatever else you can get away with politically) in a single Plone site. We will keep the courses in a special kind of folder called a large folder.
Note
Folders versus Large Folders
In Plone 3, there are two main types of folders— folders and large folders— each with its own advantages.
Folders are best for holding less than about fifty items. Their contents can be manually ordered through drag-and-drop and appear beneath their enclosing folder in Navigation portlets. However, whenever a folder is loaded into memory (unpickled, in Python parlance), all its contents are loaded as well. This takes up a lot of RAM and causes slowdowns if folders are overpopulated. In addition, since folders store all their contents in a single Python "tuple", they are a prime source of conflict errors in Zope's database: temporary errors which happen whenever two transactions try to write to the same object at once. In addition to adding noise to your error logs, these hurt performance, since they require the entire transaction — everything done in response to the HTTP request — to be redone.
Large folders, on the other hand, are optimized to hold thousands of items, storing their contents in a B-tree, a data structure that supports incremental loading and therefore needs less RAM and disk access. B-trees also provide finer-grained locking, making for fewer conflict errors. The downside is that their contents cannot be manually ordered. Also, for cosmetic reasons, their contents aren't listed in Navigation portlets (though this can be changed in the portal_types tool in the ZMI).
A note about the future
In Plone 4, both folder types will be subsumed by a hybrid that combines the best attributes of each. Called plone.folder, this package is, as of October 2009, available separately for Plone 3 at beta quality. If you choose to use it now, migration to the Plone 4 version will likely be smooth.
Large folders are not available from the Add new menu (addable) out of the box. To enable them...
1. Go to Site Setup → Zope Management Interface, colloquially known as "the ZMI." This is an under-the-hood view for tweaking infrequently used settings and performing advanced tasks.
2. Go to portal_types → Large Plone Folder, where you can control the behavior of the Large Folder type within the Plone site.
3. Turn on Implicitly addable, and save. Large folders are can now be added throughout the site.
Once you are finished adding large folders, it's a good idea to revoke their addability to prevent user confusion. Otherwise, users will see them in their Add menus.
Next, create a top-level large folder for holding courses:
1. Navigate back to the top level of your Plone site (no longer in the ZMI), and choose Add new → Large Folder. Title it "Courses," and save. (Now is a great time to return to
portal_typesand turn off large folder addability.)Although large folders are supposedly designed to hold thousands of items,their views are unpaginated: they are happy to display all those thousands of items on one gigantic page. Improving this behavior is on the docket for a future version of Plone: http://dev.plone.org/plone/ticket/9544. In the meantime, we can take advantage of a little trick using collections to add pagination to the folder:
2. Inside the Courses folder, choose Add new → Collection. Title it "Courses" like its surrounding folder, so the name of the folder and the title on its default page are consistent. Save it.
3. On the collection's Criteria tab, add a relative Location criterion, and leave.. (the default) as its Relative path. Search Sub-Folders should remain unchecked; we want to pull in only the direct contents of the Courses folder.
4. Under Set Sort Order, select Title to make courses appear in alphabetical order.
5. Go back to the collection's View tab, and choose Display → Summary view. This keeps users from seeing distracting author information and modification dates.
6. On the collection's Edit → Dates tab, set the Publishing Date far in the future. This ugly but effective trick keeps the collection from showing up in the folder listing for students. You will still see it, however, since you created it.
7. Finally, navigate back to the Courses folder, and set the collection as its default view: choose Display → Select a content item as default view, and choose the Courses collection.
Congratulations! Perhaps that seemed a lot of work for an empty folder, but pagination and efficient storage are insurance against being woken in the middle of the night when your server chokes trying to render too many 1,000-course pages. (It also means fewer servers to buy, a significant monetary saving for your institution.)
Incidentally, you can feel free to add additional levels of organization within your Courses folder at this point: for example, grouping courses by subject or level. Just remember to revoke large folder addability when you're done.
Now that we have a full-featured container, let's add an example course.
A simple folder is the root of our course:
1. Add a folder within the Courses folder. Set its title to the name of our example course, "Internet-based media in education."
Several folders within provide spots for other content:
2. Create a Lessons folder within your course. Set its Display to Summary view to hide distracting authorship information and modification dates.
3. Head back to the "Internet-based media in education" folder that represents your course, and make an Exams folder. The "Exams" categorization won't necessarily make sense for every course, but it is an example of where to put calendar events unassociated with any specific lesson.
4. Ascend back to the "Internet-based media in education" folder, and make a News folder, a home for announcements that should not appear on the site's calendars and other by-date listings.
Now that we have a skeleton of a course, we can flesh out the component folders with example content.
The Lessons folder we created above holds lectures, chapters, units—any divisions of course material that have associated assignments. Here we'll create a sample lesson about blogs in the "Internet-based media in education" course:
1. Create a folder inside the Lessons folder to represent the lesson. Title it "Blogs".
2. Create a Page called "Blogs" inside the Blogs folder. It will act as the front page of the lesson and hold most of the instructional content.
3. On that Page's Edit → Settings tab, turn on Table of contents and Allow comments.
4. Returning to the Blogs folder, use the Display menu to make the Blogs page its default view.
It's just one checkbox, but allowing comments on a lesson can be a great help to students and teachers alike.
Comments invite feedback from students while they are using the material, capturing reactions that might be lost if left until the next class meeting. Instructors can use this information to better adjust the pace and content of courses.
Comments provide a more permanent record of trends than fleeting verbal inquiries, which is helpful when revising a course between semesters.
Written comments are more accessible to students who are uncomfortable asking questions aloud, such as non-native English speakers.
Comments increase student-to-student interaction. Some classes even become self-supporting, with students answering each other's questions. If this becomes popular in your classes, you may want to explore a more full-featured solution; see the discussion of Ploneboard in the Blogs and Forums chapter.
Finally, a word about comment abuse: there doesn't tend to be much, at least among college-age students. Since only logged-in users can add comments by default, "social access control" kicks in: students are reticent to dole out abuse when identified by name to their peers and professors.
In this example lesson, most of the instructional material lives on a single page (set as the lesson folder's default view), with a dynamically generated table of contents supporting in-page navigation. Consider breaking it into multiple pages if...
...a lesson is so large that navigating within a single page becomes clumsy.
...there are smaller concepts within the lesson that would be useful for other pages to link to.
...you anticipate a clean division of comment topics. For example, if your lesson is about matrix mathematics and covers both Eigenvalues and the use of MATLAB to compute them, you might expect comments to divide into questions about the math and questions about MATLAB. Splitting the lesson into separate pages along those lines will help keep comments naturally divided as well, improving organization and navigation.

Remember that Plone can generate next/previous links automatically: just find the folder representing the lesson, and check the Enable next previous navigation box on its Edit → Settings tab.
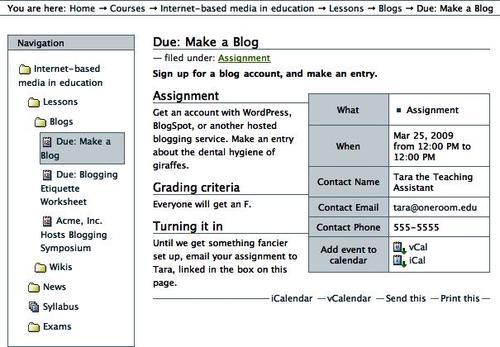
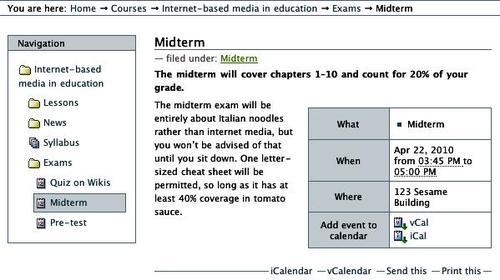
Plone's Event type is a good choice for almost anything associated with a date and time. With a little ingenuity, we can repurpose it to represent assignments with due dates. Here's how to add an assignment represented by an event:
1. Add an event inside the Blogs folder.
2. Title it something like "Due: Make a Blog". Beginning assignment events with "Due: " lets them coexist in listings with other types of events without being confused with non-assignments, like group work sessions on similar topics. "Due" is also easy to visually scan for, since it is always in the same place in an assignment's title; while "Blogging Assignment Due" would also be semantically correct, it would be trickier to pick out of a list.
3. Set both Event Starts and Event Ends to the time and date the assignment is due. This will position it properly on calendars and lists without any question of which end of the span represents the due time.
4. Set the Event Type(s) to "Assignment" so something other than a blank table cell shows up opposite the "What" label on the assignment's page. This also gives us a handy keyword to search against later. Experience has shown this step is the easiest to forget, so be sure to stress it when training content contributors.
5. The Event body text is a perfect place for the assignment details.
6. As with lessons, above, turning on Settings → Allow comments is a fantastic way to encourage student interaction with instructors and each other. Instructors will appreciate the emergence of student-to-student support here, as it lets them concentrate more time on the difficult questions.
In the Blogs and Forums chapter, we'll take commenting to the next level by adding a full-fledged discussion forum to each assignment.
7. The Contact Name and Contact Phone fields are convenient places to delegate support duties to a teaching assistant, if needed.
8. As a simple hand-in mechanism, specify a Contact E-mail, and direct assignment submissions there. This field provides spam armoring that is quite effective in practice:
mailto:tara@oneroom.edubecomesmailto:tara@oneroom.edu, which has so far been enough to make the spam spiders move along to easier targets. Note that simply embedding amailtolink in the event's body text doesn't take advantage of the armoring.For a more sophisticated turn-in form, see the Creating Forms Fast chapter, where you'll find everything you need to construct a full-fledged submission form.
Most courses include some events that aren't associated with any specific lesson: for example, exams. We created an Exams folder earlier, and we'll now flesh it out with a collection that orders and displays its contents:
1. Add a collection to the Exams folder. Title it "Exams" so it appears consistent when used as the folder's default view.
2. On the Criteria tab, add a Location criterion, and choose Criteria type → Location in site relative to the current location.
3. Leave Relative path as its default two dots. This makes the collection return everything in the Exams folder.
4. Turn Search Sub-Folders on so that, if an instructor accumulates enough exams to warrant the use of subfolders, the main Exams folder will still act as a flattened chronological listing. This saves students from having to dig through the folder hierarchy.
5. Click the first Save button on the page (not the second).
6. On the collection's View tab, choose Display → Summary view to hide the unnecessary authorship information.
7. Return to the Exams folder, and use the Display menu to make your new collection the default view.
Feel free to make additional folders that hold non-lesson-specific events. In our example, you might have a folder listing local speaking engagements by prominent bloggers.
Note
Creating collections can be confusing
As you may now appreciate, the user interface for editing collections is a bit hard to follow. When delegating privileges to content contributors, you may wish to withhold the ability to create collections from all but the most proficient users. This can cut down on visitors being frustrated by collections that don't do quite what they expect.
The course-wide News folder behaves similarly to the Exams folder, the main difference being that its contents should not appear on calendars. This folder is a fine place for non-date-sensitive announcements such as "The grading curve has been adjusted" or "Found: one blue vinyl purse".
To set up the News folder, follow a similar recipe as for the Exams folder:
1. Add a collection to the News folder. Call it "News."
2. On the Criteria tab, add a Location criterion, and choose Criteria type → Location in site relative to the current location.
3. Set Relative path to "../.." (without the quotation marks). This makes the collection start its search at the root of the course.
4. Turn Search Sub-Folders on so the collection will return all the news items in the entire course, not just at its top level.
5. Click the first Save button on the page (not the second).
6. On the collection's View tab, choose Display → Summary view to hide the authorship information.
7. Return to the News folder, and use the Display menu to set your new collection as the default view.
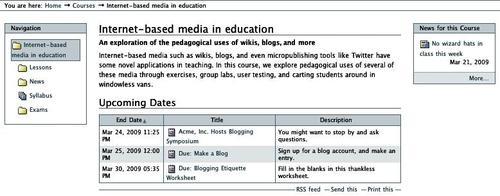
The main attraction on the front page will be a list of assignment due dates, but announcements are in second place. Since Plone cannot include two collections in the main content area without custom templating and our goal is to perform this task entirely code-free, we list the news in a portlet.
The News portlet that ships with Plone searches the entire site, which makes it not ideal when storing multiple courses per site. Fortunately, it's straightforward to make a Collection portlet do the same job with a tighter scope. In fact, we can re-use the collection we defined above:
1. Navigate to the folder that represents your course, and click Manage portlets.
2. Choose Add portlet... → Collection portlet.
3. Set the Portlet header to "News for this Course," which makes its scope clear.
4. Set the Target collection to the News collection within the course's News folder.
5. Set Limit to about 5, depending on the course's expected rate of news flow.
6. Turn on Show dates to add a little context to each item.
Most visitors to a course come looking for homework assignments, so we place them front and center. We can display them on the front page by the now-familiar trick of using a collection as a folder's default view:
1. Add a collection to the folder that represents your course. Give it the same title as the course itself.
2. Enter a short description of the course under Description.
3. If you like, put a slightly more lengthy summary of the course under Body Text. Experience indicates that the summary is often ignored, so make it expendable. Also, keep the summary short so the due dates aren't hidden at the bottom of the page, which could be scrolled out of view.
4. End the Body Text field with an "Upcoming Dates" heading, which will function as a heading for the collection results below.
5. Check Display as Table. Choose the table columns End Date, Description, and Title, and save.
6. Head over to the collection's Criteria tab. Add an End Date criterion that lists Which day as 2 weeks, In the past or future as in the future, and More or less as Less than. This cryptic piece of configuration should show events with end dates two or fewer weeks in the future.
7. Add an Item Type criterion set to Event.
8. Add a relative Location criterion with a Relative path of .. and Search Sub-Folders on.

9. Set the collection as the default view of the course.
Note
Keep students up to date with RSS
Students are not in the habit of visiting course web pages to check for updates. But, with a bit of prompting, they can be convinced to subscribe to their courses using RSS, a protocol for automatically retrieving site updates.
In Plone, all collections provide RSS feeds, and in our course framework, the course's front-page collection provides a particularly useful one. It collects items from the Exams folder, assignments from all lessons, and any other event the instructor sees fit to add within the course. Add to this the News collection, and you have a fairly comprehensive source of updates.
However, most students—even technically savvy ones—have no idea what RSS is, so a quick walkthrough of a web-based client like Google Reader can be a handy thing to add to your site and reference from syllabi.
A course's syllabus is important but not nearly as popular as the latest homework assignment, so we make it a top-level member of the course, though not its front page.
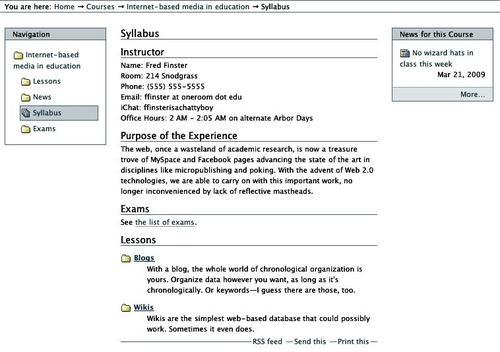
1. At the root of the course, add a collection titled "Syllabus".
2. In the Body Text field, enter the bulk of the course's syllabus: instructor contact information, the goals of the course, a link to the Exams folder, and, finally, a hanging "Lessons" heading. Links to the RSS feeds of the front-page collection and the News collection are also good additions. Once you are satisfied with your syllabus text, click Save.
If you set up a personnel directory as in the Showcasing Personnel with Faculty/Staff Directory chapter, replace the instructor contact info with a link to his or her directory entry so there is a single place to update it.
3. Head to the Criteria tab, and add a relative Location criterion with a Relative path of ../lessons. This will pull in all the top-level contents of the Lessons folder. Presto! Assuming you wrote good descriptions for your lessons, you have an instant course summary.
In this chapter, we have created a miniature course management framework scalable to thousands of courses. We have…
Places for lesson materials, assignments, and calendar events
A course front page that automatically displays the latest homework assignments and announcements
A syllabus that gathers a course summary from individual lesson descriptions
An easy way to keep students up to date with RSS
We've also touched on a few points of pedagogy and information architecture, like the impact of online comments on a class.
If you are in a hurry to get a course management solution up and running, you might want to skip ahead to…
The Styling Your Site chapter if you are satisfied with this functionality but want to improve the markup or CSS a bit
The Creating Forms Fast chapter if you would like to add more sophisticated turn-in capabilities
The Blogs and Forums chapter if you need those content types
The Calendaring chapter to explore more ways of displaying and filtering events