


Importing and organizing your photographs are probably the two tasks that you perform most often in Aperture. Organizing your images within the software is a fundamental aspect of what Aperture does and a vital part of any photographer's workflow. Yet, surprisingly, this is an area that is often overlooked by many people who use this software. Novices and amateurs, in particular, are keen to learn how to process their images, but don't think how a few careful decisions at the import stage can make a huge difference to their workflow. The goal of this chapter is to look beyond the basics of importing and organizing. Even if you think you understand how to keep your photographs in order within Aperture, think again. There are lots of tricks and tools that are hidden or not immediately obvious. I have been using the software for years and I'm always finding new ways to do things.
You probably think that you already know everything there is to know about importing images? Then you might be surprised to learn that there are actually lots of options in the import dialog, including many of which people are unaware of. In the following pages you will learn to use these hidden features of the import dialog and you will learn some tricks to speed up your workflow by automating certain tasks during the import stage. You will be shown ways to think about tagging at the import stage and how to make use of tethered shooting. We will also take a good look at Aperture's library structure and some of the ways to make better use of projects and albums. By the end of this chapter, you will be an importing and organizing expert, and hopefully you will save yourself lots of time in future projects. So let's dive right in.
In this chapter you will learn:
Details and options in the import dialog box
The difference between managed and referenced originals
How to add keywords while importing
How to import directly to an album
How to create import presets for your camera, and why you should
How to make Aperture's library work for you
Understanding Aperture's library structure
The difference between root-and-project level albums
How to create project templates
How to manage multiple libraries
How to export a project as a library
Managing RAW + JPEG image pairs
How to perform tethered shooting
When you open Aperture and proceed to import some images, you will get the standard import dialog box. If you've been using Aperture for a while, you've probably seen it hundreds of times by now. If your typical approach is to just import your photos straight to a project then your dialog probably looks a little something like the following screenshot:

Before we get to the less obvious settings, there is one thing that every photographer should do straight away, and that is to set up the metadata for incoming images. On the right-hand panel of the import dialog box you will see a heading called Metadata Presets and a corresponding drop-down menu. If you have already created a metadata preset then you can skip this part. Metadata presets lets you set up a template for inserting metadata into your images. These templates are most useful for information that will be the same in all your photographs. So, for example, things such as copyright information, website links, and so on.
If you click on the Metadata drop-down menu and choose the Edit option, you will see the Metadata dialog box. In this window you can create new presets that will contain the set of metadata you insert. This has another useful function too. It controls the fields you see in the import window. To change the fields that are displayed by default in the import dialog box, choose the Basic Info preset that should already be visible and take a look at the right-hand column. This column contains a list of metadata fields that you can display. If you want you can enter information in here. The most important thing to know is that, if you check one of the boxes, even if you don't enter any data into the corresponding field in the preset dialog, that will show up in the import dialog box.
What fields you choose to display are up to you. If you are a professional you may need certain fields depending on what you do with your images. Your publisher or editor may require certain information to be embedded in your images. We'll discuss metadata fully in one of the following chapters. But for now, just remember that this is how you turn on and off which fields are displayed in the import dialog box.

Once you have set your preset and decided which fields you want to be displayed by default, click on the OK button to save and exit the presets dialog.
Back in the main import window take a look at the little drop-down menu in the top right-hand corner that says Import Settings. This is a menu that allows you to turn on and off options for the import. From here you can toggle the following options:
File Info: This option lets you see information about image files that are displayed in the main portion of the IMPORT dialog. If you have turned this option on, clicking on an image will show you information about that image, such as the date it was taken, the image dimensions, its file size, and so on.
Rename Files: This option lets you rename files while importing. It uses the same template mechanism as exporting files does. There are a couple of preset templates that you are probably familiar with from exporting files (I'll cover this in one of the following chapters too). Templates you create for naming files when exporting will show up here as well.
Time Zone: This option lets you offset the time of the captured images to reflect an alternate time zone. You tell it where you were when the camera took the image, where you are now, and it will adjust the time stamp of the imported files accordingly.
Metadata Presets: These options are covered in the earlier section named A closer look at the import dialog.
Effects Presets: It used to be called Adjustment Presets in a previous version of Aperture. They are the preset recipes for your adjustments of which you may already be familiar with. This option lets you choose a preset to apply to all the images while importing. It's a good idea to set up a default preset for each camera you own and this will be discussed in more detail later in this chapter.
File Types: This option lets you turn on and off which file types are imported. This is extremely useful if you shoot video on your DSLR, for example, but don't want to import the video files into Aperture. Instead of going through the thumbnails of images and manually turning off video files, if you have the File Types option enabled, you can just turn them all off in one go. You can also use this option to exclude audio files, exclude audio attachments (some cameras allow you to record an audio note attached to an image), and exclude photos (which is useful if you had previously imported all the photos from a card and now wanted to find the missing video or audio files that you hadn't previously imported). This section also allows you to only include files that are flagged/locked in the camera.
RAW + JPEG Pairs: This option controls how Aperture handles images when you shoot RAW + JPEG in your camera. Personally, I always shoot RAW + JPEG. This section allows you to choose whether to import just the RAW or just the JPEG or both, with either format images as the master. Another really useful option here is Matching RAW Files, which allows you to import RAW files that match any JPEG images that you may have previously imported. This can be a very handy workflow if you are on the go and using a low-powered computer or a computer with limited space. What you would do in this situation is import only the JPEG files from your camera. Then you can do your initial culling and edits. Once you have a selection of images you want, you can then import the matching RAW files for just those images. Alternatively, you can transfer the project over to your main workstation and match the RAW files there, keeping all your metadata and editing choices but reapplying them to the RAW versions of your files. I'll show you how to do this in detail, later in this chapter.
Actions: This option lets you apply an AppleScript while importing.
Backup Locations: This option lets you automatically back up files to another location as you import. This is a good idea, especially if you are traveling. I always back up to a mobile drive when importing to my laptop while on the go.
As you may already know, Aperture lets you store your files in two different ways. When you import images into Aperture, you have the option to either have Aperture manage your files in its library (referred to as Managed), or you can have it import your files to a location that you specify on a hard drive (commonly referred to as Referenced). When you choose the latter method, Aperture just imports a reference to your image file rather than the whole file. The merits of both approaches are the cause of much debate among Aperture users. Both options have advantages and disadvantages.
On the one hand, if you store your images within the Aperture library, everything is contained in one handy location. A single file is all you need to worry about when it comes to storing, backing up, or moving a library.
Note
The library file is actually a special kind of folder called a package that behaves like a single file.
When you export a project in Aperture, it exports it as a library file and that file contain, all the image files within the library if you tell it to. This is exactly the same kind of file as the main library file and you can even switch the current library that Aperture is using to an exported library. You can have both managed and referenced files within your library, and you can choose the method on a project-by-project basis.
If you want to be able to access your files in another piece of software, however, then it makes sense to have your images stored in a folder and imported as references. That way you can go to the folder under the Finder and directly access the RAW or JPEG files from there. Otherwise, to access the RAW files you have to Export Originals to another location and you end up with lots of duplicates. Personally, I tend to use referenced when I'm working on my main workstation more often than managed, and I use managed when working on my laptop.
Tip
On my workstation all my photos are stored on a large external hardware RAID (Redundant Array of Inexpensive Drives), which is set up using the RAID 5 protocol, which means that the data is protected from a disk failure. When working on my laptop I prefer to have Aperture manage my images, because it means there are less files filling up my laptop's hard drive, and I can keep everything nice and neat in the Finder.
Which method you choose is up to you. If it's not something you've ever really thought about then you probably should stick with the managed method. However, if you're more comfortable managing files and folders by yourself, then there are some advantages to using referenced files, especially if you work with other software.
Switching between managed and referenced files is actually pretty easy. If you have files in the Aperture library, for example, and you would prefer to have them referenced to a location somewhere on your hard drive, you can carry out the following steps:
Select all the images from the File menu.
Choose Relocate Originals.
Or control + click, for a contextual menu.
This will give you the option to move the original files to a folder on your drive.
To do the opposite, carry out the following steps:
Select the images that are referenced.
Choose Consolidate Originals.
This will give you the option of moving or copying the image files into the Aperture library, where they will then become managed rather than referenced. If you move the files, they will no longer be in their original location, so you need to be careful with this option if you have other software that is also referencing them.
One of the options in the Metadata section—Keywords (if you have enabled it)—is to set what keywords will be applied to the images while importing. This is something that you should think about carefully. First of all, it's a good idea to add some keywords at this stage, but it's also important to realize that the keywords you add here will be added to all the images. You can't add keywords here for specific images. So here are a few tips for thinking about what to add during import. You generally want to be as generic as possible with the keywords you choose at this stage. You can be more specific when you are sorting and organizing.
If you are just importing images from a specific shoot, use the details of that shoot. So if it's a fashion shoot, for example, some good options might be
Fashion, Clothes, Clothing. If you have different models in the shoot, you want to avoid adding the models names or descriptions at this point.If you're on a travel shoot, and you're at a particular location such as a city or a country, you could put that in as a keyword, but if you have multiple locations in the images you are importing, choose something more generic such as
Travel. You could put in the continent as another option, so if you were in Europe, you could putEuropedown as a keyword.Seasons and weather are often good keywords to add. If it was in winter, put down
Winteras a keyword. You never know when you might need to look for winter images and this will help you find them.
Normally, when you import images into Aperture, you import them directly into a project, whether it is a new project or an existing one. However, you can actually import directly to an album too. Here's how to do it in the following:
With the import dialog box open, you will see your library on the left-hand side with all your existing projects and albums. If you want to import into an existing album, simply select the album in this pane. You will notice that the Destination on the right changes to the name of the album. If your album is a project album, the images will be imported into the parent project, and will automatically be added to that album.
If you select a root-level album, then the images will be imported to a new project with the date of the first image as its name, as well as being added to the album. This is because all images must belong to a project.
If you don't have an album but want to import to one, you will notice that the New button on Aperture's toolbar is still accessible when the import dialog is open, even though other options are grayed out. From here you can create a new album, and again, it can be a project album or a root-level album. I recommend you only use this method for project-level albums, because otherwise you end up with a bunch of oddly named projects.

If you're wondering why you would want to do this in the first place, there are plenty of scenarios for why it makes sense. Say, for example, you're doing a travel shoot and you have a project for the city you're in. You might want to break that project down by day or location. Rather than having individual projects, you can store them all in one project and separate them by album, while you could manually sort them into albums after importing this method. This procedure lets you save time and do it during the import session.
One of the things mentioned earlier is that it is a good idea to create presets for your cameras. You may often find that when you import a RAW file into Aperture it can look quite a bit different from the JPEG or what you saw on the back of the camera when you took the shot. This is because Aperture's interpretation of the RAW file may be different than your camera. Aperture has gotten a lot better at matching the colors of the camera's JPEG images lately though. It used to be that images in RAW could be a lot different from what you expect, but Apple's engineers have become really good at profiling various cameras. Unfortunately though, Aperture doesn't have profiles for individual shooting modes that a camera may support. So, for example, if you have shot using your camera's vivid setting, when you import using RAW, all that nice contrast and vibrancy is lost. If you find yourself making certain adjustments to an image over and over again every time you import, the best thing to do is to create an effect preset. Each camera's RAW files are different, so you should consider creating one for each camera you own and tweak the setting till they are just right. However, you want to be careful when creating effect presets for use during import. They need to be fairly generic and you should avoid using adjustments that need to vary from shot to shot. Here are some do's and don'ts for creating presets to be applied while importing:
|
Do's |
Don'ts |
|---|---|
|
Tweak things such as contrast, black level, definition, and vibrancy |
Use a white balance adjustment for an import preset |
|
Adjust Curves tool |
Adjust the RAW fine-tuning. These options aren't stored with effect presets. |
|
Tweak the tint, Highlight and Shadows if you need to | |
|
Use a color adjustment to get the colors right for your camera |
Let me give you a couple of examples. First, here is an effect for use on import, which was created for a Fuji X100 camera. The reason that this was created is that, while the RAW files in Aperture are pretty close to the camera's JPEG images, the RAW conversion doesn't support some of the camera's options such as its shadow and highlight tone curves, and also its extended dynamic range. As these options are regularly used when shooting with this camera, a preset was created that mimics these options. This is then selected when importing images from the X100.
The following screenshot shows the settings used in creating this preset:

What was done adds a tiny bit of contrast and a little bit of definition because it seemed that the RAW files were a little flat compared to the JPEG files. Some vibrancy was also added to boost the color. To simulate the camera's dynamic range optimization, some Highlight and Shadows adjustments, similar to the ones in the previous screenshot, were added.
For a more complicated example, here is an import effect that was created for the Canon 5D Mark II. In my opinion, Aperture's handling of the RAW files from the Canon is quite a bit off in terms of color. To create a preset, both RAW and JPEG versions of the same images were imported and, using a color adjustment, the settings were manually tweaked until it looked right. It required quite a bit of trial and error and several attempts to get it right. But persistence eventually paid off and the result was a preset that can be applied on import. Some other adjustments were also added, including some slight tint tweaks, very simple curves, and levels adjustment.
You will learn techniques for working with adjustments in a later chapter, but for now, here is a screenshot of the adjustments that were used in this preset:

As your Aperture library grows, keeping it organized as you go is the best way to stop it spiraling into chaos. If you're not careful you'll end up with a plethora of unconnected projects and albums and you'll have difficulty finding anything. I know this because I let it happen myself on more than one occasion. Having a good strategy is the key to keeping your library organized, but it's also important to have a good understanding of how Aperture's library is structured. This section is a bit on the technical side, so apologies in advance, but it really is worth knowing, so please bear with it.
Aperture's library is organized in a hierarchy, much like a file system on a computer. However, you can also store images in multiple albums, which work like playlists in iTunes. In some ways it's kind of an odd system, as it's neither fully metadata based like iTunes, nor fully file based like the Finder. In some respects, it's a hybrid of both. If this all sounds confusing, don't worry, it will become clearer as it is explained further.
Let's start with projects. Projects are the most important thing in Aperture. Images must be contained in a project (regardless of whether they are referenced or managed). All edits in Aperture are non-destructive because you are never working off the original files. Instead, what you see when you look at an image in Aperture is called a Version. Versions are a reference to an original, which is the actual RAW (or JPEG) file. Within a project, you can have multiple versions of an image. Because versions are just references back to the actual file, multiple versions don't mean that the image files are duplicated. They're not, you're just duplicating the reference. Think of it like an alias in the Finder. You've undoubtedly used this feature many times if you've been using Aperture for a while, but it's important to understand it from a structural perspective.
Within the Aperture library, you can have multiple projects. You can organize your projects into folders too. Folders are the highest level of organization and you can nest folders just like you can in Finder. It's important to understand the difference between folders and albums. Folders serve two purposes in Aperture:
At the root level they can store projects
At the project level they can store albums
However, you can never have images directly in a folder. Images must be in an album or a project, and always in a project at some stage.
Albums, unlike folders, can contain images. They can be at the root level of the library or at the project level. Albums are essentially playlists. You have undoubtedly made albums before so I won't go into that in too much detail, but it is important to understand the difference between root-level albums and project-level albums.
There are essentially two levels of hierarchy in the Aperture library: the root level and the project level. It was mentioned earlier that projects can be exported as libraries, and that's because inside of Aperture projects behave like mini libraries within the main library. There is one big difference though, which is that projects can't contain other projects, so you can't nest projects. When you create an album in Aperture you can create it at either the project level or the root level. You can create an album at the project level for referencing images within the project, although you can add images from other projects to an album. You can also create albums that aren't attached to any projects. These are root-level albums. When you create an album at the root level (that is not attached to any project) you can use it to reference images from any project.
Here's a quick example. Say you have a project full of images, and you select a bunch of them as your selected shots. You then create an album of these named selects. You would create this at the project level as it is referencing images within that project. However, if you wanted to keep a running album of all your landscape images, you could create a root-level album named Landscape and add images to it from multiple projects.
It used to be the case that if you create a smart album within a project, it will only search for its contents within that project, while a smart album created at the root level will search the entire library. However, in a previous update, Apple added the option to search the entire library within the smart album options. Personally, I never do this as I always create smart albums that reference the whole library at the root level (otherwise it just gets confusing).

When you create albums at the root level they go in the ALBUMS section at the bottom of the library pane of the Aperture window. This is a recent addition too. They used to be lumped in with projects in one big hierarchy whereas now they have their own section. To create an album at the root level, make sure that no projects are selected in the library and then click on the Add Album button. You can also drag albums into this section from a project and they become root level. You can organize this section with folders too.
You may be wondering about Books, Light Tables, Slide Shows and Web Journals. These all behave exactly like albums, because they're essentially just albums with special properties.
How you organize your library will depend greatly on the type of photography that you do. There are generally two ways photographers go about managing photos on their memory cards. Some will do a single shoot at a time and some who shoot more casually will gather a lot of different subjects on a memory card from various events before importing the photos. Presented in the following are a few ideas on how you might structure and organize your library. As with many things in Aperture, there are lots of different ways to approach a task, and organizing your library is no different. So the ideas that follow are just a few possible ways you might approach this task. You might have an equally valid approach that you feel more confident about using.
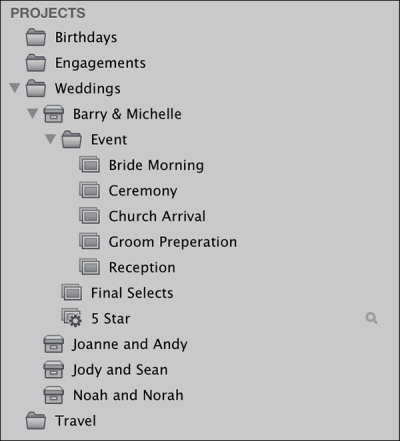
If you're working on a single shoot at a time, such as a wedding for example, then organizing your library becomes a lot easier. In this case, you could have folders for each type of shoot and within those folders, your individual projects for each shoot. Let's take the example of a wedding photographer. A typical wedding photographer also might shoot engagement sessions as well as anniversaries. So you would start with root-level folders for Weddings, Engagements, and Anniversaries, and so on for each of the other types of jobs that you do. Inside each of these folders you could have a project for each job, named after the couple. Inside each project you could then break the event down into albums for things such as the arrival at the church, the reception, the rehearsal dinner, and so on. You could then have separate albums or smart albums for your picks and selects.
An alternative method would be to have nested folders for each job. A particular wedding could be the name of the job and this would be a folder within the Weddings folder. Within that folder there are projects for each part of the day and there could also be more albums within the weddings folder to break the project down further.
If you are the other kind of more casually organized photographer, one that ends up with a lot of different events in the one memory card, then organizing can be a bit trickier. There are several approaches that can work. You can start by creating folders for each month of the year. Within those folders, import your shoots into individual projects with names for the most common type of shot on the card. So, for example, if you had been doing a photo walk you could name your project photo walk and append the date. You could also create a project called Misc and then when there are images from a session that aren't really appropriate for the project (some shots of your house, for example, which are on your photo walk card), you can copy them to the Misc project.
Outside these set of folders you can create a series of root-level albums for common themes in your photography. These can either be regular albums or smart albums, which you can tie to keywords. If you are doing some long-running photo projects then this can be the way you organize them. Say you are collecting shots of coffee cups, every time you import a shoot to a new project, you can copy any images you may have taken of coffee cups and put them into a coffee cups root-level album.
Tip
Using keywords and smart albums
An alternative method that some people prefer to use for sorting photos into albums is to use keywords. By adding keywords to your images that correspond to the ongoing projects or the subjects by which you wish to sort, you can use smart albums to curate these. The advantages of this method are that it is generally quicker to apply keywords to images than it is to drag them into an album in the sidebar. The disadvantage is that you have to be careful to use the exact same keyword each time otherwise your smart folder won't pick up the image. You can use the keyword bar to make this easier. I'll show you how to do this in Chapter 7, Making Metadata Work for you.
One of the things that you can do to ease your organizing chores is to create a project template. If you have created a whole set of albums and folders within a project that you find works for you, it can be useful to use this as a template for creating similar projects in the future. This is especially handy if you have created a whole set of smart folders with complex search setups that you really don't want to have to create manually again. Luckily there is a function in Aperture that makes this pretty easy. Here's what to do in the following steps:
Select an existing project that you want to duplicate.
From the File menu choose Duplicate Project Structure.
Rename the duplicated project.
What this does is duplicate the project, and all included albums, books, folders, smart albums, and so on, only without the images. What you get is a new and empty project with the structure you created, all in place, ready to go.
You can merge two projects into one if you need to. Simply select the two projects in the library view and from the menu choose File | Merge Projects.
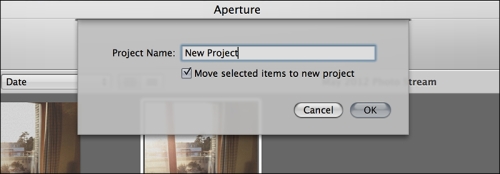
The process of splitting a project is a little more involved, but still fairly simple. In the project that you want to split, select the images you want to split into the new project. From the toolbar choose the New button and then select New Project. This will then pop up a dialog box asking whether you want to move the selected images to the new project. Tick this box, give the project a name and then click on the OK button.
So far in this chapter we have discussed the structure of Aperture's library in depth, but Aperture can also use and manage multiple libraries. There are many reasons as to why you might want to use multiple libraries. Some people like to start a new library every year. If you are a professional, you might want to keep separate libraries for your work and for your personal photography. If you have several clients for whom you do a lot of shoots, you might want to give those clients their own library. There's also the scenario where you export a project or group of projects as a library and you might need to switch to one of those. With Version 3.4 of Aperture you can now use your iPhoto library in Aperture too.
Switching libraries in Aperture is a simple technique. To switch between libraries or to create a new library, carry out the following steps:
With Aperture running, choose File | Switch to Library, and then select the name of the existing library.
If you don't see the library that you want to switch to, then choose File | Switch To Library | Other / New....
This will open the library chooser window. See the following screenshot:

If you still don't see the library you want to switch to, then press the Other Library… button.
To create a new library, choose the Create New button.
To export a project into a new library, start by selecting the project you want to export, and then choose File | Export | Project as new library.
To export several projects as a new library, select your projects and from the menu choose File | Export | Items as new library.
To export a folder as a new library, select the folder you want to export and from the menu choose File | Export | Export Folder.
Note that you can also use the contextual menu to get these options, so select the items you want to export, and right-click or control + click on them in the library view and select the relevant menu option.
You can also import the contents of a library into your current library. This will effectively merge the two libraries. To import a library from the menu choose File | Import | Library. This will import the entire library including all folders, albums, book layouts, slideshows, and so on into your current library. There are a few things you should know about this process though. If you have images or projects in your current library that are in the library you are importing, Aperture will ask you whether you want to Add or Merge the libraries.

If you click on the Add button, Aperture will duplicate any files in the new library that are in the current one. If you click on the Merge button, Aperture will update the metadata and adjustments for the items in the new library that match items in the current library. This is actually extremely useful as it allows you to work on part of your library on another computer and then import the changes back into your main library without having to copy all the image files across. It will simply update the metadata.
If you're having problems with your library, Aperture has some built-in tools to help address any issues that you might be having. Signs of a damaged or corrupt library include things such as thumbnails becoming corrupt, previews not loading properly, or loading for the wrong image, or images not loading at all, and of course, Aperture not loading itself. If you suspect that the library may have issues, you can activate the repair options by holding down command + option + shift as you launch Aperture. This will bring up the Photo Library First Aid dialog box as shown in the following screenshot:

In this dialog box you have three options. The first, Repair Permissions, is effective if there are minor issues such as images not loading. However, if you suspect that there is something more seriously wrong with your library, you should try either repairing or rebuilding the database. Choosing Repair Database will attempt to correct errors in the existing database file, while choosing Rebuild Database will recreate the database from the information contained in the library. But you only need to do this if all else fails.
If your camera supports shooting both RAW + JPEG simultaneously, and you shoot in this format, there are some considerations to take into account when importing and organizing RAW and JPEG pairs in Aperture. For the most part, Aperture handles this very well. The engineers really seem to have thought the process through when designing this functionality and it can be very useful once you know how it all works.
The first thing to take into consideration is making sure you have the correct settings when importing the RAW + JPEG pairs. As mentioned earlier in this chapter, there are several options that you can select when importing RAW + JPEG. You have the option to import only the RAW files and ignore the JPEG files, or vice versa. You can also choose to have Aperture import both files. When you do this, Aperture keeps them both bundled together, but you are only working off either the RAW file or the JPEG file.
Again, which you are working with is one of the options on import. You can set either RAW or JPEG as the master when choosing to import both. The following table breaks down the options for you:
|
Both (use JPEG as original) |
Imports both files, sets the JPEG file as the file that you are working off of |
|
Both (use RAW as original) |
Imports both files, sets the RAW file as the file that you are working off of |
|
Both (separate originals) |
Imports both files separately into your library. Be warned that if you do this there is no way to merge them back together |
|
JPEG files only |
Only imports the JPEG files. Ignores the RAW files |
|
RAW files only |
Only imports the RAW files. Ignores the JPEG files |
|
Matching RAW files |
If you had previously only imported the JPEG files, this option will import the corresponding RAW files and link them again |
When you have a RAW + JPEG pair in Aperture you can easily switch between them. To do this control + click (or right-click) on the image and choose Set RAW as original if your image is currently set as JPEG, or Set JPEG as Original if your image is currently set as a RAW file.
You can tell which format your image is currently set to by the little badge in the bottom right-hand corner of the image. If it is a little R it is set to RAW and if it is a little J it is set to JPEG.

If you have an image in one format and you want to create a new version in the other format you have to duplicate it first. So, for example, let's say you have an image that is a JPEG file and you want to have a RAW version to compare it to, but you also want to keep the JPEG version.
To do this carry out the following steps:
Select the image.
Then control + click (or right-click) on the image and choose new version from original.
This will create a new version without any adjustments.
Then control + click (or right-click) again and choose Set RAW as Original.
If your original is a JPEG just choose the other option.
Note that you can choose to duplicate the version rather than choosing to create a new version from the original. However, you should be aware that any adjustment would be applied to it. This can sometimes be a bad idea as some adjustments work slightly differently when applied to JPEG and RAW files. Also, if you have a preset set on import for your RAW file to better match it to the JPEG as discussed earlier, when you switch to a JPEG, those adjustments will be applied to the JPEG file as well. If you had a contrast adjustment, for example, so that your RAW file matched the contrast of your JPEG, then that contrast adjustment would be applied to the JPEG file, which was already rich in contrast, resulting in an image with too much contrast.
One example of when it might be useful to work with RAW + JPEG is if you are shooting black and white images. Often, when taking black and white photographs, a photographer will use the monochrome picture style in their camera. The problem is, when you import your RAW files back into Aperture, the picture styles are lost. If you shot everything in black and white then it's not really an issue, but if you had mixed black and white and color on the shoot, it becomes a problem when you import the files into Aperture. You will not be able to tell which ones where monochrome and which ones were in color. Luckily there is a fairly straightforward workflow to get around this problem.
It is important to note that for this workflow to work you must set your camera to shoot in RAW + JPEG. Whether you want to use the in-camera black and whites as the final version of your monochrome images, or you want to do your own black and white conversions is up to you. But for this workflow to work, you must start by shooting RAW + JPEG pairs. Once you have finished your shoots, carry out the following steps when working with Aperture:
Open the import dialog box and select your source. (Select the card containing your images. Make sure you are importing into a new project.)
Under the RAW + JPEG Pairs drop-down menu, set your images to import both with JPEG files as originals.
Once you have imported all your images go to the browser and make sure you're in grid view by pressing the V key to toggle through the view modes until you switch to the grid view.

Select all the images that are black and white and label them with a color label. (It doesn't matter which one; just make sure to use a color label and that you use the same one for every image.)
If you want to use the in-camera black and white conversion, you can skip this step and go straight to the next one. If you want to use your own black and white effect preset, with the images still selected, apply the effect. Now select all your images by pressing command + A. You can now skip ahead to step 8.
-
In the search bar at the top of the Aperture window, click on the magnifying glass icon
 and at the very bottom of the drop-down menu you will see a section for labels. Click on the first circle, which, when you hover over it, the tooltip tells you that it means no label. Choosing this will filter the browser so it only shows images without a label.

If you had correctly labeled all your black and white images, they should now disappear from the window. Now select all your images by pressing command + A.
From the photos menu choose Use RAW as original.
This should now convert all your color JPEG files to RAW.
In the search bar click on the X at the right-hand side of the search bar to de-select the filter.
You should now have a project with all your black and white images either set as JPEG files or black and white RAW files, and all your color images set as RAW files. You can also use this technique for other kinds of images too, which don't have to be just black and whites. If your camera supports a particular style that you like shooting with every now and then, but don't use it for every image, then you can use this workflow to isolate those images too.
One of the most useful features in Aperture for studio photographers is the ability to shoot tethered. Tethered shooting allows you to connect your camera via its USB cable directly to your computer, and when you begin shooting the resulting photos are immediately loaded into the Aperture library and displayed on your screen. There are a number of advantages to shooting tethered.
First of all, you get a nice big display to view your images on, while on a shoot. This can be invaluable when shooting in the studio as it makes it much easier to evaluate things such as critical focus and the tonality of your images. Secondly, if you have clients present during the shoot it allows them to see the images on a bigger screen rather than the LCD screen on the back of your camera. There's also the added bonus of having the images already captured on your computer, so you don't have to download them off the card later. In addition, you have an extra backup, as most cameras will record to the card at the same time.
Unfortunately not every camera can shoot tethered, and not every camera that can shoot tethered is supported by Aperture. The good news is that most cameras that can shoot tethered are supported. Apple maintains a list of supported cameras on its website. You can find it by going to the following address:
http://support.apple.com/kb/HT4176
You will also need a USB cable of a decent length, and an open USB port on your computer. I would also suggest going directly into your computer. If you connect to the USB port on an external keyboard, for example (if you're going into a desktop), there may be speed issues, and I've seen cases where hubs can cause problems too. Most people though will more than likely be shooting into a laptop when shooting tethered. The best thing to do is thoroughly test any setup you plan to use before you use it in a mission-critical situation. If possible, the photographer should also have backup equipment available. At least have an extra set of cables to be used if there are connection problems between camera and the computer.
You should also be careful when setting up your camera and laptop. It can be surprisingly easy to pull one or the other and damage them. If you're shooting handheld, you may want to secure your laptop somehow, or at the very least make sure you have a good length on your USB cable. A common setup is some kind of a T-bar mounted on a tripod with a laptop stand on one side and a tripod mount on the other side. These are available commercially from a number of different manufacturers.
To start a tethered shooting session go to the File menu and choose Tether | Start Session. This will bring up the Tether Settings panel:

You may notice that this is quite similar to the options in the import dialog, and that's because they are pretty much the same. At the top, you have the option of Store Files for where to store your files. If you don't have a project selected when you start a session, Aperture will create a new one and name it with the date and time when you started the session. The Store Files option is the same as when importing normally, and gives you the option to store the files in the Aperture library (managed) or in a location of your own choosing (referenced). You also have the option to rename the files on import and this might be something you want to consider when doing a studio shoot. The Metadata section is the same as the import dialog, and again you have the ability to apply presets and set information at this stage. You also have the option to back up files as they're imported and the ability to apply an effect. These options are all the same as the standard import dialog.
Note
A note on RAW + JPEGs
One thing that you might notice is missing though is the option for RAW + JPEG pairs. Unlike a standard import, when shooting tethered, RAW and JPEG pairs are not combined and are treated as separate files. If you have RAW + JPEG enabled on your camera, and start shooting tethered, you will get two images every time you press the shutter button.
Once you have your settings set in the Tether Settings panel, click on the Start Session button to begin your session. This will bring up the tethered shooting HUD. Pressing the Capture button on the HUD will cause your camera to take a picture and for it to be immediately imported into Aperture. You can also use the shutter button on your camera.

Note the small checkbox on the bottom left-hand side of the tether HUD that says Auto Select. With this checked, every time you take a picture it will automatically become the currently selected picture. So, for example, if you are viewing an image in the viewer, it will be loaded and displayed as soon as you take it. If it's unchecked, only the image you currently have selected will be displayed. If you're shooting and nothing is changing on screen, make sure that this hasn't been accidentally unchecked.
When shooting tethered, your display settings are persistent, so if you zoom in 1:1, for example, it will stay zoomed in when the next image loads. This makes it very handy for checking focus. You can also use the Loupe if you would prefer. When shooting tethered, all the other features of Aperture remain active, so you can make adjustments, enter metadata, and so on, all while in a tethered shooting session. This can be very useful if you need to check out potential adjustments and looks on the subject that you are shooting with, while still in the middle of the shoot. This avoids the problem of having models waiting around till afterwards while you test out ideas, in case you need to reshoot something.
Note that you can also close the HUD at any time and continue to shoot tethered, but you will have to use your camera's shutter button. To return to the HUD if you close it, choose File | Tether | Show Tether HUD.
Once you have finished your shoot, to end the session simply click on the Stop Session button on the HUD and your session will be finished. You can also finish a session by choosing File | Tether | Stop Session from the menu.
In this chapter we took a very detailed look at some advanced options for importing images into Aperture. We looked at both the technique and theory behind some of the things you can do at the import stage to help you better manage your sessions in Aperture. We also took a detailed look at Aperture's library and its structure as well as examining the difference between projects and albums, and how albums at the project level are different from albums at the root level. We also looked at managing the RAW + JPEG pairs, and you learned a workflow for handling black and white images you shoot in your camera. And finally we also covered how to shoot tethered.
You should now have a good understanding of organizing and importing in Aperture. This will lay the foundation for keeping your photos properly organized in Aperture, and it will make your life easier and keep on top of your growing library. In the next few chapters, we will take a detailed look at making adjustments in Aperture. We will cover all the advanced options for processing your images, and you'll learn lots of ways to do some creative and advanced editing right inside Aperture.