In this chapter, we'll create both a page and a block using the Views module. We'll install Views, and introduce the Basic Info, Page, Block, Fields, and Filters fieldsets. We'll have a chance to further observe every available Views UI fieldset in Recipe 9. The Views Worksheet in Recipe 10 summarizes the whole interface, and will help you track your learning throughout the book. While most chapters lend themselves to a pick-and-choose approach, I encourage you to complete each recipe in this chapter.
Let's Begin!
Note
Ingredients *
Drupal 5: http://drupal.org
Host login access
Views: http://drupal.org/project/views
Views UI: contained within the Views module
*These ingredients are prerequisite for all of the recipes that follow, and will not be listed in subsequent ingredient lists.
The Views module has a straightforward installation, much like other Drupal module installs. The following recipe instructions incorporate a mix of Windows tools and the command line for locating files, creating directories, downloading files, and unzipping them. Consider following the recipe, but feel free to substitute file management approaches specific to your operating system and preferences. This recipe is followed by a page listing helpful command line shortcuts that you should incorporate into your practice if they are available on your host.
Log in to your web server. You will need to know your host name, login name, and password.
Locate the Drupal root directory on your server (a common directory location is /
home/your_account/public_html).If this is the first contributed module in a brand new Drupal installation, you will need to create the
modulessubdirectory.From your Drupal root directory, type the following to change into the
<DRUPALROOT>/sites/alldirectory:cd sites/allMake a new modules directory:
mkdir modulesWhile you're there, you may as well create the
themedirectory, if it is not there already. We will use this directory in Chapter 7, Techniques for Theming Viewsmkdir themesNow change to the modules directory:
cd modules
Open the browser of your choice.
Note
Most of the screenshots in this book use the Firefox browser—a popular choice for many developers. Recipe 8 covers Firefox installation.
Go to http://drupal.org/project/views, and read the page. There are several different versions of Views available for download. We are looking for the Download link marked Recommended for 5.x.

Download the module from the Views project web page. Here is one way to do that:
Right-click in Firefox on Download.
Select Copy Link Location (in Internet Explorer, this link will be called Copy Shortcut). You now have text similar to the following in your clipboard:
http://ftp.drupal.org/files/projects/views-5.x-1.6.tar.gz
A file with the
.tar.gzextension is affectionately known as a "tarball", reflecting the days when files were backed up onto tape archives.Switch to your Drupal server window. Be sure you are still in your
<DRUPALROOT>/sites/all/modulesdirectory.Type:
wget <Paste><Enter>
The result on your screen, after pasting the download link, will be:
wget http://ftp.drupal.org/files/projects/views-5.x-1.6.tar.gz
After pressing Enter, the download begins. You are provided with a status report of the percent complete as shown in the following screenshot:

Uncompress the module to the
<DRUPALROOT>/sites/all/modules/viewsdirectory. Enter:Depending on your system setup, you may need syntax such as this:
tar -zxvf views-5.x-1.5.tar.gzYou may also use an alternative uncompression tool, such as 7-Zip or WinRAR. WinRAR offers a graphical interface in Windows, but is also available with a command line interface for Mac and Linux systems. The output of the tar xvf views-5.x-1.5.tar.gz command is seen in the following screenshot:

Return to your browser window. Go to the Module page at:
http://YOURSITE.com/admin/build/modules.If you are not already logged into your Drupal site as an administrator, you will need to do so. Scroll down to the Views fieldset and enable the Views and the Views UI modules by clicking the two associated checkboxes.

Click on the Save configuration button.

Congratulations! You will now see a message (similar to the screenshot that follows), signaling the successful installation of our module.

UI is an abbreviation for "User Interface". The Views UI module offers a point-and-click approach for selecting content and output types, controlling view sort order, and so on. The Views UI can even generate a views programming code for you, as we'll see in Chapter 2. If the Views UI module were not enabled, you could still see the existing views and create new views through code. However, the Views UI module is quite helpful: even "Ninja" Drupal programmers will typically enable it.
These shortcuts will assist you in your Drupal development (your host environment may, or may not, have all of these shortcuts enabled).
Press Ctrl+U in the command line to clear everything to the left of the cursor. For instance, if you paste something, and then realize the wrong text was in the clipboard, it may be easier to clear the whole line than to press backspace many times.
Press Ctrl+K on the command line to clear everything to the right of the cursor.
Press the up arrow to re-use a previous command line. You may also search your command history with Ctrl+R.
Type
!$on the command line to reuse the last argument of the previous command line. For example:more views_ui.module views.modulelets you page through the text of both modules. The last argument of that command was
views.module. If your next command is:less !$less views.module(This tip is difficult to find with a search engine. A Google search for
!$yields nothing.) Quit both the more and less commands by typing:QUse "man" pages. Man is shorthand for the manual.
man lessLess is a program similar to more but which allows backward movement in the file as well as forward movement.
Type
cdto go to your home directory.To return to the previous directory you were in, type:
cd -If you are not sure where you are in your directory structure, type:
pwdThis is the "print working directory" command, which provides the full path to your current directory. This is especially useful if your prompt is not set up to already display the full path.
Use the Tab key for command line completion. In step 6 of the recipe above, you could type:
tar xvf v<tab>
If there is only one file that begins with
vin the directory, the Tab key will conveniently complete the full name of the zipped.tarfile:tar xvf views-5.x-1.5.tar.gzPress Enter to run the command.
If you already had the
votingapimodule installed, for instance, you would need to enter:tar xvf vo<tab>
to distinguish voting from views.
This is a quick tour of Views-related URLs on your site. Make yourself at home. Feel free to click around and generally become familiar with the Views interface.
Administer Views:
http://YOURSITE.com/admin/build/viewsAdd a View:
http://YOURSITE.com/admin/build/views/add(This is where we'll be spending much of our time in this book.)
Views UI Help:
http://YOURSITE.com/admin/help/views_ui(While you are on this page, go ahead and print it. This is an easy page to miss, but quite informative.)
Views Permissions:
http://YOURSITE.com/admin/user/access#module-views(We will interact with this page in Recipe 7.)
Enable Views modules:
http://YOURSITE.com/admin/build/modules
You may think of the Views UI as a series of questions. Here are some sample questions to consider:
What do I want to name this view?
What do I want to display?
Who should be able to view this content?
In what format should the content appear?
Do I want the content to appear in a page, or in a block (or both)?
How many items to display?
Is there any particular order (By date? Alphabetically?)
We will first need to create the content for our view.
Go to Administer | Content management | Content Types. Select Add content type (
http://YOURSITE.com/admin/content/types/add).If you have the Content Construction Kit (CCK) module installed, you will see more than two tab options, but as seen in the following screenshot, we simply have the Drupal 5 core, plus the Views modules that we have installed.

Keep the Submission form fieldset at default settings.
In the Workflow fieldset, uncheck Promoted to front page and set the Default comment setting to Disabled.

Save your new content type. You will see a list of your Content types, and a message that your new content type has been added.

Go to Create Content | Swim Group, and add at least three content items (
http://YOURSITE.com/node/add/swim-group).
Go to Administer | Site Building | Views (
http://YOURSITE.com/admin/build/views), and select Add.
In the Basic Information fieldset, enter the following:
Name: swim_group
Description: List of swim groups

Sections of the main Views UI form are contained in HTML fieldsets. Click on Page to open that fieldset if it is not already expanded. Note that when a fieldset is closed, a triangle icon points to the fieldset name (as seen in the following image); when the fieldset is expanded, the triangle icon points down. This is a subtle clue (available in most themes) to help you navigate the page.

Enter the following values in their respective fields:
 Provide Page View
URL: swim-groups
View Type: Full Nodes
Title: Swim Groups
- Use Pager
Nodes per Page : 20

In this section, we are essentially creating a new URL on the site, and displaying full content items (nodes). We are specifying that up to 20 items will be displayed on the page, and if we have more, we will have the option to see additional items on subsequent pages.
The following figure offers a visual representation of Views filtering. We see the multiple content types available on the site symbolized on the left (for instance, Page, Story, Swim Group). The filter allows only one content type to be displayed. In our case, we just want the Swim Group.

Open the Filters fieldset. If you printed the Views UI Help, as suggested in Recipe 2, now is a good time to review the Filters options. There are many filter options available. We will select just two from the Add Filter drop-down list, Node: Type, and Node: Published. These are by far the two most commonly used filters. Select Node: Type from the drop-down, and click on Add Filter.

The filter is added "above" the drop-down list.
Select the Value as Swim Group and leave the Is One Of option of Operator, as shown in the following screenshot:

Return to the Add Filter dropdown, and add the Node: Published filter. (As you add filters in Views, you may find that the interface hops back to the top of the page. If this happens, dutifully scroll back down to the Filters fieldset.) By default, when you add this filter, Node: Published Equals Yes. Leave the default as-is.
Note
If this filter is not added, the view will display items that are marked unpublished. This is an easy filter to forget, but it is recommended.

-
You will now see a variety of Ops buttons. Note the Delete
 button. With a little imagination, you can see it looks like a trash can. Also, if you move the mouse over the button, the popup text, Delete this item appears. The delete button does not delete content from the site, it simply removes the filter. For instance, if you delete the Node: Published filter, the view would contain both published and unpublished content. The up and down buttons will prove most useful in the Sort and Field fieldsets, which we cover in Chapter 2. In Chapter 4, we will also cover exposed filters.
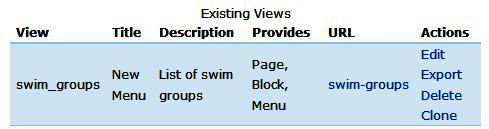
Click on Save. When you first create a view, you are brought back to the "Views" List page. If you Edit your view from the view itself, you will be brought back to the view itself after editing it. Notice that the full URL of your view is
http://YOURSITE.com/swim-groups. The message, View successfully saved, appears only the first time you view this. As an administrator, you will also see the Edit, Clone, and Export tabs. Those tabs are not displayed to site users who do not have Views administrative rights.
It is worth highlighting some subtle distinctions in naming conventions.
Name: This is the unique identifier for a view. Hyphens are not allowed: use an underscore to separate multiple words.
Compare the Name fields for adding content and adding a view. When creating a content type in Drupal 5 (Step 2, above), the first item on the page is the human-readable Name, while the machine-readable type appears second. The Views interface (Step 8) breaks this convention; the first item on the page is the machine-readable Name.
Example:
Machine-readable: swim_groups
Human-readable: Swim Groups
It is not a big problem if you misname a view (by including spaces, for instance). All of your careful settings will remain intact, and Drupal will simply issue the message: View name must be alphanumeric or underscores only, when you attempt to save your view. Edit the Name, and scroll back down to the bottom of the page to Save the Views form again. You are not required to use lower case in your Views Name, but it is a common and oft-preferred practice.
It is acceptable for a machine-readable view name to be the same as the machine-readable content type. More typically, however, the content type will be singular, and the Views name plural. In our case, the content type is swim_group, and the view name is swim_groups.
URL: If you would like to use more than one word in a URL, use hyphens to separate them. This enables Google (and possibly to other search engines as well) to index them as separate words. Many developers use underscores, but hyphens have the edge when it comes to search engine optimization.
Example:
View Name: swim_groups
View URL: swim-groups
You may include slashes in the URL field. For instance: groups/swim.
Title: The title displays at the top of each page in the view. You may use some HTML markup such as
<em>,<i>, and<b>to highlight phrases in the title. You may use a line break in a title<br />. You may also use HTML entities, such as→A helpful list of entity codes can be found at: http://www.w3schools.com/tags/ref_entities.asp. For the most part, however, formatting of the full title is handled in your theme (thus, you will not specify fonts or other styles on the Views page).Examples:
<em>Swim</em> Groups

Swim Groups: <br />Tadpoles, and Guppies, and Wrigglers, Oh My!

Voilà: Learn to swim at any age

Compare Views Titles with Node Titles. HTML markup is allowed in View Titles, but not in Node Titles.
You can easily add custom text or graphics above or below your view content, using the Header and Footer fieldsets. We will add a brief description at the top of the Swim Groups page.
Go to
http://YOURSITE.com/admin/build/views. Your swim_groups view is now included in the list of views.Click on swim-groups in the URL column.
Open the Page fieldset, and then open the Header fieldset contained within it.
Enter the following header text:
Swimming is a great sport which exercises the whole body. Swim lessons are available for all ages and ability levels. Note: A parent or guardian must accompany children under 5 when in the water.
Open the Input format fieldset contained within the Header fieldset. Note that Filtered HTML is selected. See the Recipe notes if you would like to expand the list of available HTML tags.
Scroll down to the bottom of the Edit view page, and click on Save.
Enjoy the view.

The Header fieldset (along with the Footer and Empty Text fieldsets) each contain Input format fieldsets. Input format filters will modify the display of text that has been entered by users (Input format filters are not connected to the filters fieldset that we described in Recipe 3). When a user enters text or code into a Drupal site, the text is saved in the database exactly as typed. Next time we view the text, however, it may not look exactly the same—some text and tags may not appear. To modify the list of allowed tags, visit the Site Configuration | Input Formats page, at:
http://YOURSITE.com/admin/settings/filters.The most common reason for using these filters is to protect your site from malicious users, or even from users who don't intend to be malicious but who exhibit bad form. The Input format ensures that scripts will not be run, and that badly formed HTML will not break your site's layout. Filtered HTML is the name of one of the default Input formats.
A terrific article by Robert Douglass offers helpful information on input filters at: http://www.lullabot.com/articles/drupal_input_formats_and_filters.
Edit the Swim Groups view, at:
http://YOURSITE.com/admin/build/views/swim_groups/edit.Open the Menu fieldset, found within the Page fieldset. Check the Provide Menu option, and add a Menu Title.

By default, the menu item appears in the Navigation menu. We don't want it here so we will move it in the next step.

Go to Administer | Site Building | Menus.
(
http://YOURSITE.com/admin/build/menus).Use your browser to do a Find (usually Ctrl+F) for the word Swim. The first result will likely be in the actual sidebar menu item (if the Navigation menu has been placed in a region on the page). The second find will be the Swim Group content type listing in the menu configuration. The third one, finally, is the menu listing for the Swim Groups view. Click on the Edit link.
The Path is already filled in, based on our settings from the Views UI (Step 2). Enter a Title, and change the Parent item to Primary Links. If you wish the menu items to appear in alphabetical order, you may leave the Weight for all items at 0. In our example, we'll set the weight to a negative number, ensuring that it appears early among the primary links.

Your view is added to your Primary Links menu.

In Recipe 3 , we created a page view, which is accessed via a URL. In this recipe, we are going to edit that view, adding a Block based on the same content. A view may provide both a Block and a Page view at the same time.

Blocks are placed inside regions made available by your theme. Sample regions that are common across most themes include the left sidebar, right sidebar, content top, and content bottom. A given block can appear on every page of the site, or just on pages that you designate. In the following steps you will create a Block for the Swim Groups view.
Go to Administer | Site Building | Views
http://YOURSITE.com/admin/build/views.Select the Edit link next to the swim_groups view.
Open the Block fieldset, if it is not already open, and enter the following:
- Provide Block
View Type: List View
Title: Swim Groups
Nodes per block: 10
- [More] Link?

Open the Fields fieldset, and add the Node:Title field. You may leave the various options at their default settings.

Go to the Blocks page via Administer | Site Building | Blocks:
http://YOURSITE.com/admin/build/block.Place the swim_groups block in the right sidebar (see the image below). Click on the Save blocks button at the bottom of the page.

View your Block on any page of the site. The Block configuration page itself provides special formatting to inform administrators about various regions, so you may wish to view your block from a different page. For instance, click on the site logo, to go to the home page.

It can sometimes be a bit disconcerting to have a single view create both a block and a page. The appearance may be different enough to be surprising. For instance, in our case, the block view contains a simple list of linked titles, while the page view contains the full text. The block had a maximum of 10 per page, while the page had a maximum of 20. You may optionally create separate views for blocks and pages. Consider naming the respective views block_swim_group, and page_swim_group, for instance. (Use separate views when filters, fields, or sort order differs between the page view and the block view. Otherwise, it's more maintainable to use one view for both blocks and pages.) Note that the Administer Views list keeps track for you, signaling that the swim_groups view has provided a Page, a Block, and a Menu item.
When you first installed Drupal, the first user you created was, naturally, user #1, also known as the "super-administrator". If others users need administrative access to the site (to administer Views, for instance), it is a good practice to create a distinct admin role. The Admin Role module will save you the trouble of having to manually set permissions each time you install a new module. All new permissions will automatically be enabled for the admin role.
Download the Drupal 5 Admin Role module to:
<DRUPALROOT>/sites/all/modules(Select the "tarball" marked Recommended for Drupal 5.)
Unzip the module.
In your browser, go to the Modules page at Administer | Site Building | Modules (
http://YOURSITE.com/admin/build/modules). Scroll down to the Other fieldset, and enable the Admin Role module.

Go to the User management | Admin Role page at (
http://YOURSITE.com/admin/user/adminrole) and select your newly created admin role from the drop-down list.
Go to the User Management | Access Control page, and note that the admin(first column) already has the permissions set. These permissions were enabled by the Admin Role module.

The rest of the recipes in this chapter are devoted to enabling you to see the full scope of the Views interface. This recipe is a prerequisite for Recipe 9, Revealing the full extent of Views. Firefox and Firebug are also useful in any web developer's toolkit.
Bring up your current browser, and go to http://www.mozilla.com/firefox. Click on the Free Download button. Follow the detailed directions for installing Firefox here:
From Firefox, you can install Firebug by visiting Tools | Add-ons.
You may also download the Firebug add-on from: https://addons.mozilla.org/en-US/firefox/addon/1843, or http://getfirebug.com/
Go to the Get Add-ons tab, and click on Browse All Add-ons.

Enter firebug in the search box. When the add-on description is returned, click on Add to Firefox.

Click on Install Now.

Restart Firefox to make the Firebug add-on available to the browser.

Note the new Firebug icon at the bottom-right corner of your browser. Congratulations! You now have Firebug installed.

Firefox Add-ons are also called "extensions". Many web developers say that if they could only install one Firefox extension, it would be Firebug. Consider spending some time at getfirebug.com to learn more about its features. For more in-depth discussion, join the Firebug discussion group at http://groups.google.com/group/firebug.
One reason that Views can feel a little bit mysterious, is that so much of it is concealed at first.
This recipe exposes all of the options on the main View's Edit screen by expanding all of the collapsed fieldsets on the page. This will save you the time it would take to manually open the nearly two-dozen fieldsets. The recipe uses a single line of jQuery. Please do not feel that you have to understand everything all at once when you see the full extent of Views! That's what the rest of this book is for. There is value, however, in the full array of options that will be available to you. A summary of the full screen can be found in Recipe 7. Note that fieldsets are nested within other fieldsets, up to three levels deep.
The list of all the fieldsets in the View's Edit screen is as follows:
Go to
admin/build/views/swim_groups/edit. If you have not yet created a view, go toadmin/build/views, and click on Add.-
Click on the firebug icon
 in the Firefox status bar, or press F12 (on Apple laptops, it may be necessary to hold down "Fn" while pressing F12). If you get a message regarding the need to enable Firebug for the site, go ahead and do that. Firebug opens at the bottom of the browser.
Click on the Console tab in Firebug. An understated JavaScript (and jQuery) command line appears in the lower left, after the >>> prompt. You may notice the blinking cursor.

How does this recipe work? If the jQuery command above were to be read as English, it would say: "Find all of the fieldsets on the page, and remove the collapsed CSS class from all of them". The effect is to open all the fieldsets (JavaScript must be enabled for this to work).
Let's elucidate this further:
The HTML fieldset tag in most Drupal themes (including the default Garland theme) looks like this, when collapsed:
<fieldset class="collapsible collapsed">
An expanded tag looks like this in HTML:
<fieldset class="collapsible">
The jQuery code removes all of the "collapsed" classes from the Views page. Thus, all the fieldsets are open, revealing their full contents.
Most of the time, you will not want to interact with Views in this expanded way, but it certainly is helpful, sometimes. It's nice to know that Firebug CSS edits are temporary. The next time you view the page, the fieldsets will refresh with their default open or closed appearance. Press F5 in Firefox to refresh the page you are on.
On the following page is worksheet that lists each element on the View's Add or Edit form. This worksheet will serve as your guide as you learn the features of Views.
You have permission to photocopy the Views Worksheet. Start with a dozen copies or so. You may choose to copy more or less depending on whether you think this resource suits your learning style.
Edit the Swim Groups view that you created in Recipe 3
http://YOURSITE.com/admin/build/views/swim_groups/edit.On a worksheet copy, mark each element used by the view (use a pen, or highlight markers according to your preference).
The worksheet divides elements into four categories: Text, Checkboxes, Dropdowns, and Radio Buttons.
Some text boxes expect numeric characters, as noted in parentheses.
Checkboxes can be considered as a yes or no question. For instance: Provide Page View is the Views shorthand for "Do you want to provide a page view?"
Some of the drop-down boxes allow you to select more than one element.
Radio buttons are mutually exclusive.

In Chapter 1, we installed Views, took a whirlwind tour of associated URLs, and then created our first view: a list of Swim Groups. We edited the page view to add header text and then created a menu link. We then produced a block that could be added to any page. We had a chance to see the full scope of the Views interface in two ways: first, using a jQuery command to expand all fieldsets, and second, using a summary worksheet of all the Views Edit options. Worksheet copies will continue to be a useful resource throughout the rest of the book.