


 Download code from GitHub
Getting Familiar with Blender
Once upon a time, 3D software was outrageously expensive. 3D artists had to choose between buying a house or buying a 3D app—and, well, you can’t blame them for choosing the house.
Then came Blender. Blender was special because it cost less than a thumbtack (it was open source, and the price tag was $0). It was new, free, and exciting—but it didn’t work so well. It had the potential to be great in 20 years or so—but who wants to wait that long?
That was 20 years ago. Now, Blender has reached incredible heights. For the last two decades, Blender has made 3D accessible to anyone with a laptop.
Ready to join the party?
In this chapter, we’ll dive right in and start learning Blender. You’ll download Blender and get it set up. You’ll learn how the UI works, how to navigate 3D space, and how 3D space works in Blender. Then, you’ll learn how simple it is to tweak the UI to fit your needs.
Here are the main topics we’ll be covering in this chapter:
- Installing Blender
- Anatomy of the UI
- Navigating the 3D Viewport
- Getting to know the UI shortcuts
- Understanding Workspaces
- Saving your own Startup file
Installing Blender
In this chapter, you’ll start by installing Blender. Then you’ll learn about the different areas of Blender’s interface. You’ll learn what each section of the interface is for, and to wrap it up, you’ll learn how it can be customized to fit your needs.
OK, let’s get started. Time to download Blender and set it all up:
- In a web browser, go to www.blender.org, the home of the Blender Foundation.
- Click the Download tab to see the latest release. You can download the latest release and everything in this book should work just fine.
- But if you want to work in the exact same Blender version as I am working in, click the Long-term Support tab at the top, between Release Notes and Requirements.
Long-term support (LTS) versions of Blender will be supported for a few years, so they’re very stable. Also, they still get bug fixes so they should be pretty bug-free.
- Scroll down to LTS Releases Currently Maintained to see a list of the currently supported LTS versions of Blender. I’m using Blender 3.3 LTS, so click that one (it’s a big aerial picture of a castle/city). You’ll end up on a new page.
- Scroll down to Versions and in the Download section, pick your operating system:
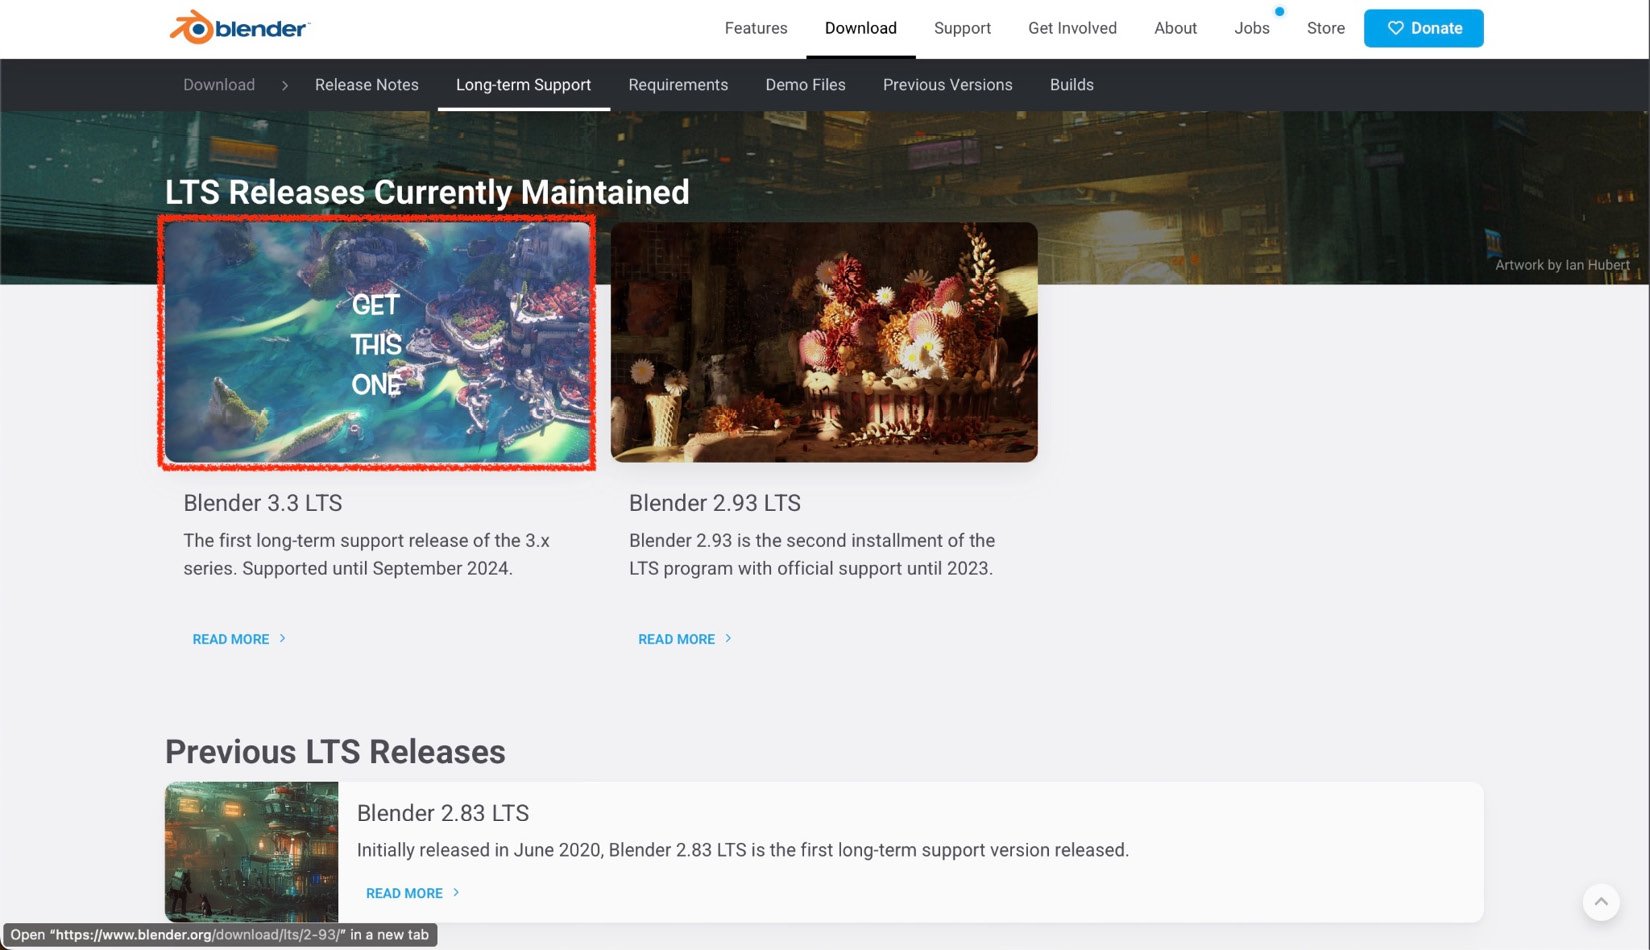
Figure 1.1 – The download page
Now, wait for Blender to download (this is the hardest part of the process). Once the download is complete, you’ll have an installer of some kind in your Downloads folder.
It’ll be slightly different depending on your operating system, but the installer should guide you through the installation process.
And that’s it! You’re done, great job. You’ve successfully installed Blender. In the next section, you’ll learn about the different parts of Blender’s user interface.
Anatomy of the UI
Now you’ll learn what’s what in Blender’s UI. There’s a lot to see when you first open Blender, but it’s simpler than it looks. Launch Blender and you’ll be greeted by a splash screen. Admire the cool artwork for a minute and then click anywhere to get rid of it. You’re in a new, empty Blender file.
Files in Blender are called Scenes. It’ll look extremely complex at first—but don’t worry. You get to ignore most of that for now.
Blender’s UI is broken down into simple sections. I’ll cover the basics, but don’t worry—I won’t go into agonizing detail. The thing about the UI is that you’ll pick up most of it on your own the more you use Blender.
I’m just here to get you started.
The 3D Viewport
The open area in the middle is called the 3D Viewport. In this book, I’ll eventually get tired of typing the 3D Viewport so I’ll just be calling it the viewport.
The 3D Viewport is where all the 3D work happens. It’s where you create, edit, and manipulate 3D models. Figure 1.2 shows how the 3D Viewport looks:
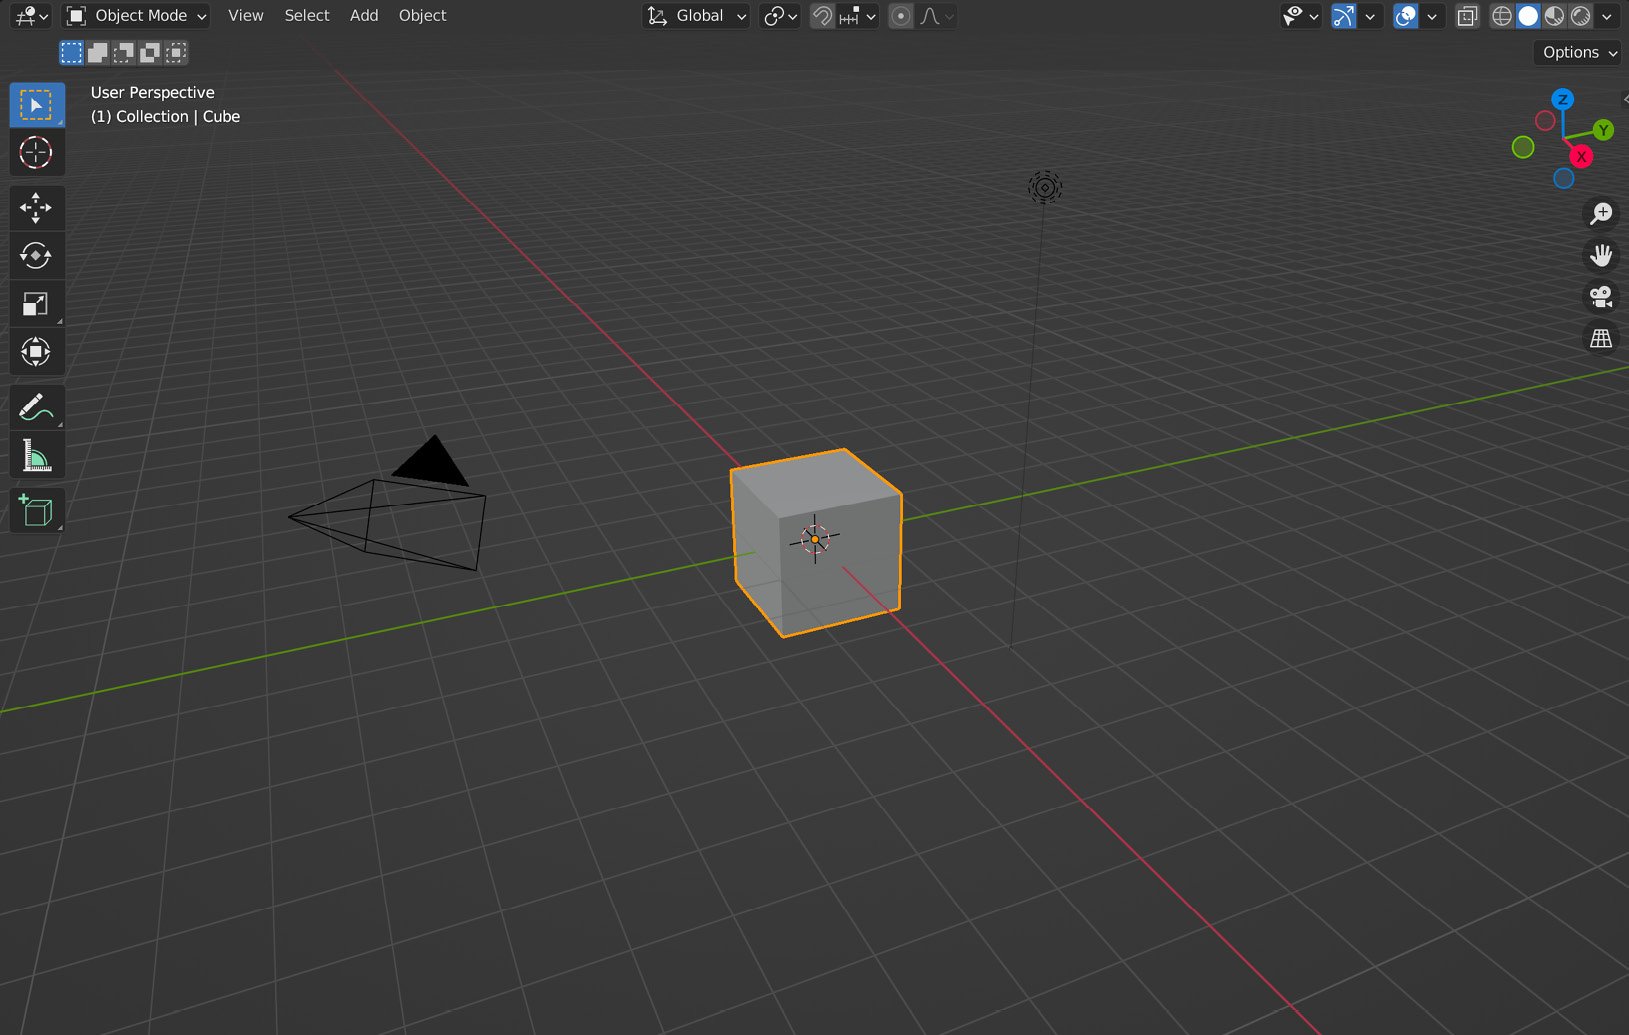
Figure 1.2 – The 3D Viewport
In the next section, let’s learn about the top bar.
The top bar
At the top of the window is the top bar.

Figure 1.3 – The top bar
The top bar allows you to switch between different configurations of views (called Workspaces) with a single click.
The Outliner
In the top right is the Outliner. This is a bit like a computer’s filesystem. It shows you a simple list of all the 3D objects in your Blender file, organized into folders called Collections:
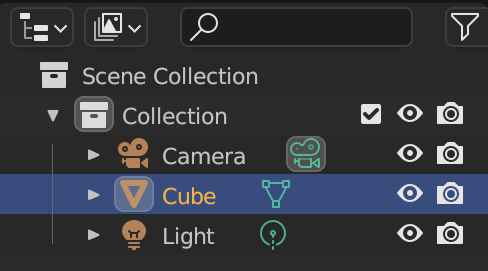
Figure 1.4 – The Outliner
You’ll see Camera, Light, and Cube in the default Collection. These make up the simple default setup that comes in with every new Blender file. (You’ll find yourself having to delete them a lot.)
The Properties panel
Below the Outliner is the Properties panel. Many of the most important settings you’ll use, such as render settings, modifiers, and output options, are located in the Properties panel. The Properties panel is divided into its own set of tabs, as shown in Figure 1.5:
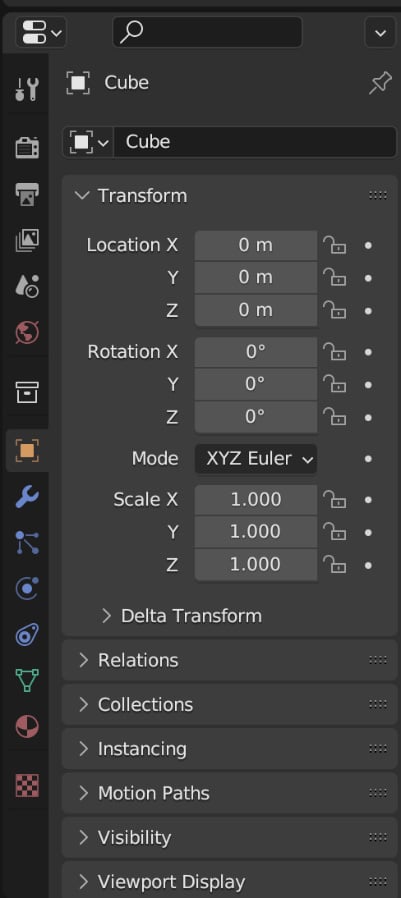
Figure 1.5 – The Properties panel
Next, let’s see what the timeline is.
The Timeline
At the bottom of the window is the Timeline. This gives you play/pause controls that you would use if you were creating an animation. We won’t be covering that in this book, though.
Below the Timeline is the Status bar. This is where you’ll see information on processes (such as how close a render is to completion) and tools (such as extra keyboard shortcuts):

Figure 1.6 – The Timeline
Finally, let’s see what customizing areas means.
Customizing areas
All the different panels we’ve just covered are called areas. Areas are extremely customizable, and it’s not hard to do. It’s super-useful to be able to reconfigure the view (for example, if you wanted two viewports side-by-side, or if you wanted to get rid of the Outliner).
All of your changes are file-specific: they’ll be saved when you save your file, but you won’t see them in other Blender files. In the corner of every area is the Editor Type menu. It looks slightly different depending on the area type, as shown in the following figure:

Figure 1.7 – The Editor Type menu
You can open this menu to change any type of area into any other type of area. For example, you could easily switch the 3D Viewport into a big Outliner by switching Editor Type to Outliner.
You can also adjust each area’s size. Simply hover your mouse over the border between two areas until the cursor turns into an arrow, then left-click and drag to resize the area. Adding new areas is even easier. Hover your cursor over the corner of an area until it becomes a cross, then click and drag inward toward the center of the area. This will create a new area.
To get rid of areas, you can join two areas together. Hover over the corner of an area until it turns into a cross again, but this time, drag outward toward another area (and don’t let go). Your cursor will turn into a little arrow, pointing outward. The areas will darken to show you how they will be joined.
Knowing how to manage areas is very important—so practice! Join and create some areas right now. It’s fine if you mess up your Blender window—it’ll all be fixed when you restart it.
In the next section, you’ll learn how to look around in the 3D Viewport.
Navigating the 3D Viewport
The 3D Viewport is where you interact with 3D. You’ll need to see your 3D models from all sides as you work, so it’s important to learn how to navigate in 3D. You’ll learn how to pan, orbit, and zoom your way around.
This basic navigation is easy to master, and won’t take you very long. You’ll become very good at this the more you use Blender, since you have to navigate in 3D to accomplish anything in 3D.
Moving around
Navigating in the 3D Viewport is extremely intuitive. It’s a bit different depending on whether you’re using a mouse or a trackpad.
With a trackpad, you simply scroll with two fingers (in any direction) to orbit in the 3D Viewport, and to pan, move two fingers around while holding down the Shift key.
That’s orbiting and panning. To zoom in and out, you have two options: spread two fingers closer together or further apart on your trackpad (like zooming in and out on a smartphone), or hold down the Ctrl key and scroll up and down with two fingers.
Simple, right?
Now, if you’re using a real mouse (fun fact: I’m not), you can click and drag with the middle mouse button to orbit, scroll to zoom, and press Shift + middle mouse button to pan.
These controls will seem difficult at first, but as you do more Blender work, they’ll become natural.
Numpad controls
Sometimes, you’ll want to view a 3D model exactly from the side, the top, or the front. In Blender, there are two ways to do this.
Do you see the little 3D cross in the upper-right corner of the viewport, as shown in Figure 1.8? That’s called the Gizmo, which is like a little 3D compass:
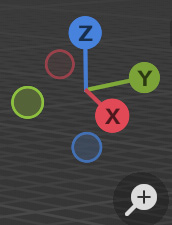
Figure 1.8 – The Gizmo
It’s labeled with letters: X (red), Y (green), and Z (blue). In 3D, just like in reality, there are three spatial dimensions (think about the width, depth, and height of a cube). In Blender, these are called X, Y, and Z:
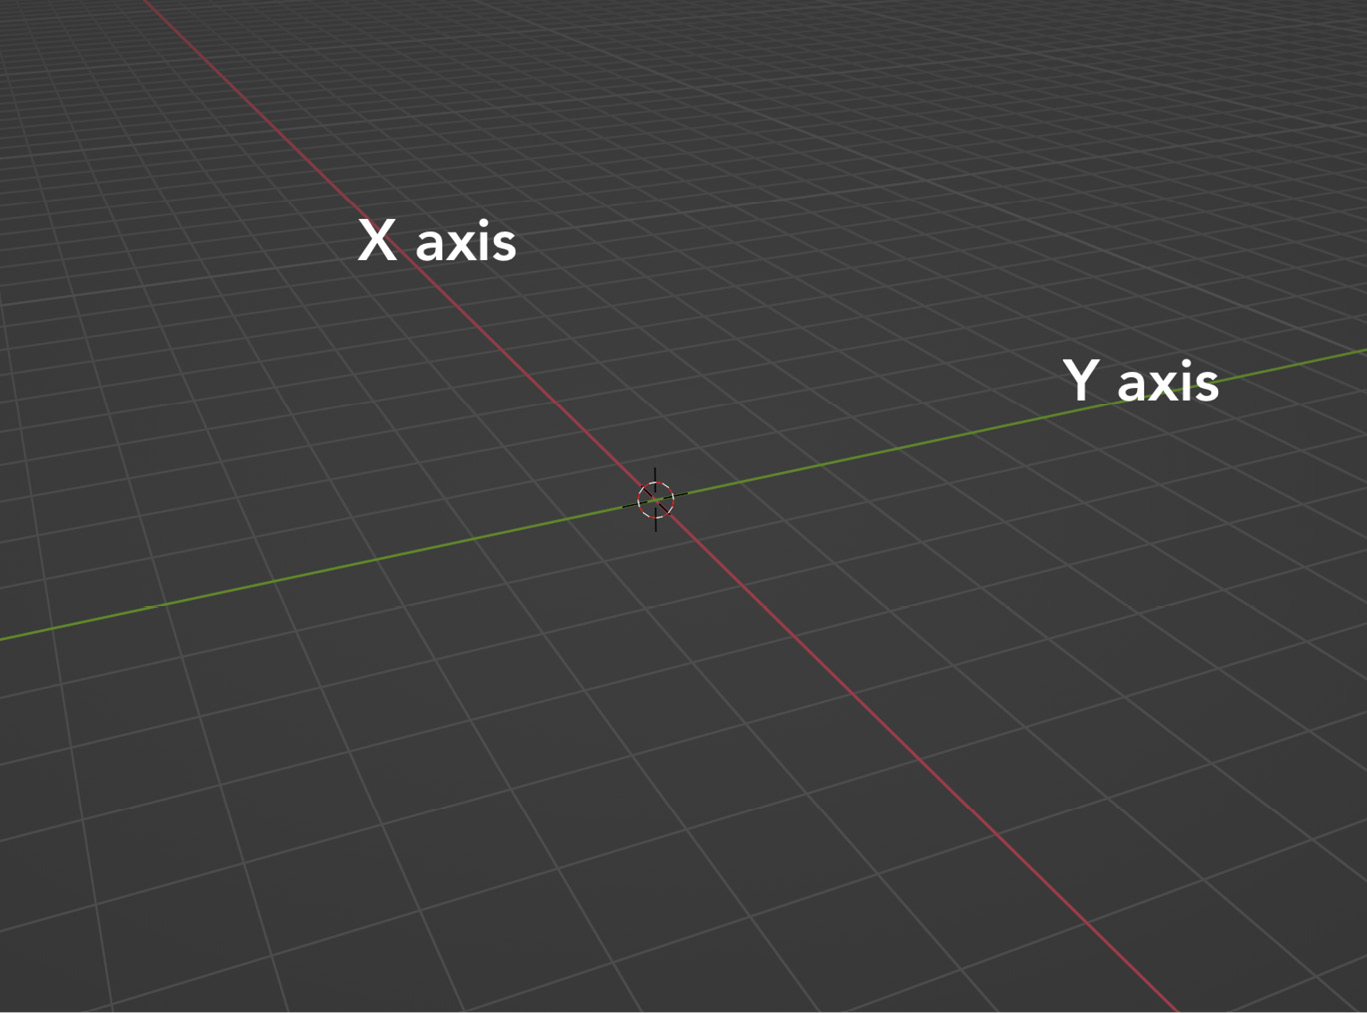
Figure 1.9 – The X and Y axes
As shown in Figure 1.9, X axis is displayed as red. The green line represents Y axis. The color blue is used to represent the Z axis, which runs in the vertical, up-and-down direction. You’ll notice there’s no blue line representing the Z axis . That’s to avoid cluttering the viewport more than is needed.
If you ever need a reminder of any of this, simply look at the little Gizmo in the corner.
Now it’s time to learn your first keyboard shortcuts. But before that, you’ll need to turn on something called Emulate Numpad (if you have an actual numpad on your keyboard, you won’t need to do this):
- Go to Edit | Preferences:
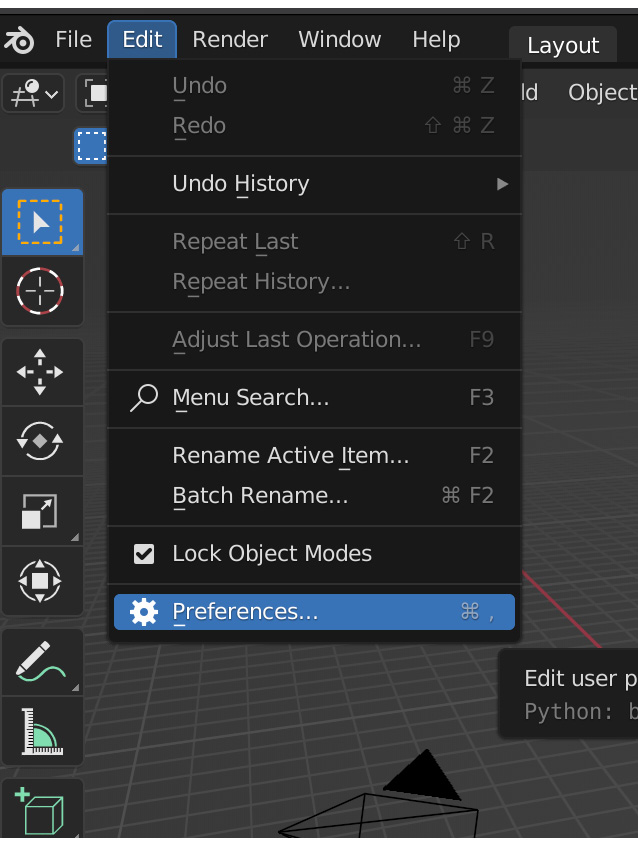
Figure 1.10 – The Preferences menu
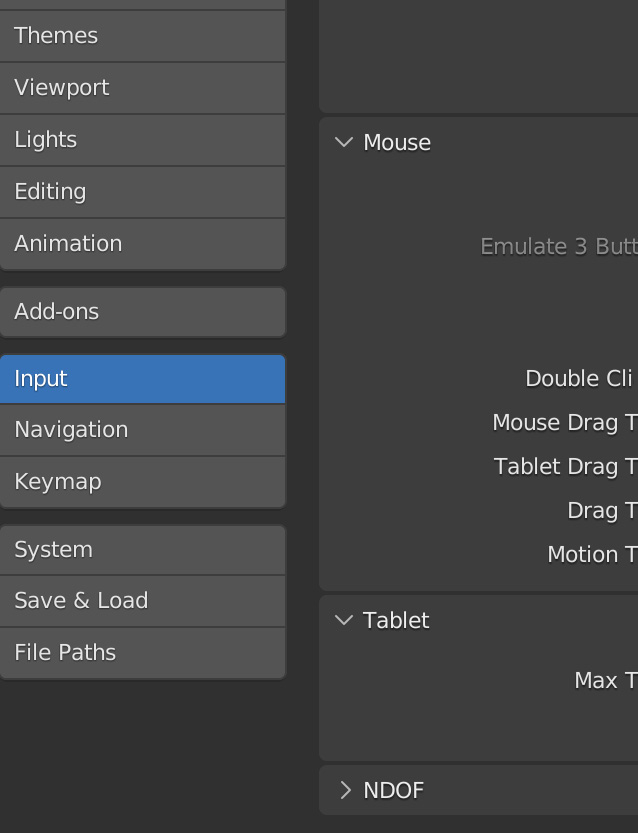
Figure 1.11 – The Input tab
- Turn on Emulate Numpad:

Figure 1.12 – Emulate Numpad
This makes Blender treat your regular number keys as if they were a numpad, which lets you use the viewport shortcuts.
- Close Preferences.
In the viewport, press 1 to get a perfect front view, press 3 to get a perfect right view, and press 7 to get a top view. To see the reverse of these views (back, left, and bottom) press Ctrl + 1, Ctrl + 3, and Ctrl + 7.
There’s another way to do this, too: you can click the little red, green, and blue circles on the Gizmo.
Next, you’ll learn about the Orthographic view mode.
Viewing in Orthographic mode
There are two ways to look at things in 3D. The way you’re looking at your 3D Viewport right now is called Perspective. Perspective is how we view the real world. The farther away something is, the smaller it appears. It’s a very realistic way of viewing things in 3D.
A railroad track is a good example; the further away the rails are, the closer together they appear to be. Take a look at Figure 1.13:
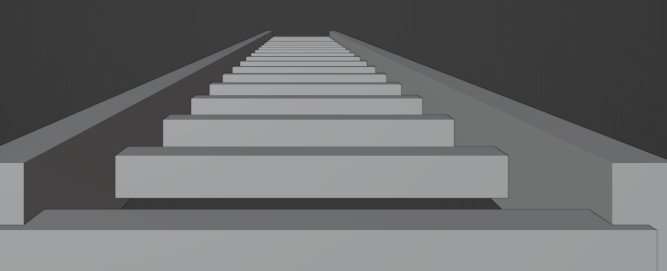
Figure 1.13 – A railroad, viewed in Perspective mode (same as real life)
There’s another, different way to view the world in 3D, called Orthographic. When you view your Scene in Orthographic mode, everything is consistent in size, no matter how far away it is.
To enable Orthographic mode, press 5 on your numpad. Here’s the same railroad track in Orthographic mode:
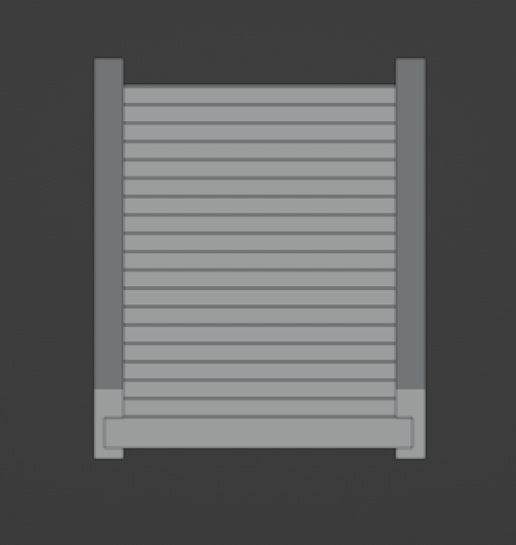
Figure 1.14 – The same railroad in Orthographic mode
This can sometimes be useful when you need to get a better look at something (for example, to get a good look at the overall shape of a model). You probably won’t use it much—but it’s an option.
Now you know the most important keyboard shortcuts for navigating the 3D Viewport. You’ll find these extremely helpful for working quickly and efficiently as we progress.
In the next section, you’ll learn some more helpful shortcuts.
Getting to know the UI shortcuts
There are a few more helpful things to know about for getting around in the viewport. You can use keyboard shortcuts to hide and show the toolbar or to control navigation in the 3D Viewport.
The N panel
The N panel is the panel that appears when you press N. It’s sometimes called the sidebar or the side panel—in this book, I’ll be calling it the N panel:
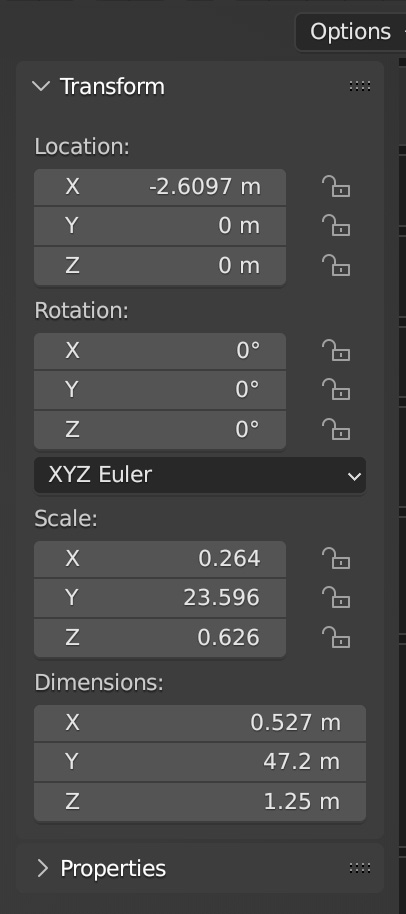
Figure 1.15 – The N panel
This panel gives you quick access to the selected object’s position, rotation, and scale values. In Chapter 3, Creating a Low Poly Tree, you’ll learn how to edit these. The N panel also exists in many of the other editor types (the Shader Editor, for example).
To hide the N panel, just press N again.
The toolbar
The toolbar is a bank of tools down the left-hand side of the viewport. These tools are, for the most part, simple conveniences. They’re useful while you’re learning Blender, but you’ll eventually end up using keyboard shortcuts to work faster.
To show and hide the toolbar, you just press T.
There’s also a secret way to see the names of all the tools in the toolbar—hover your cursor over the right edge of the toolbar until your cursor turns into a double arrow:
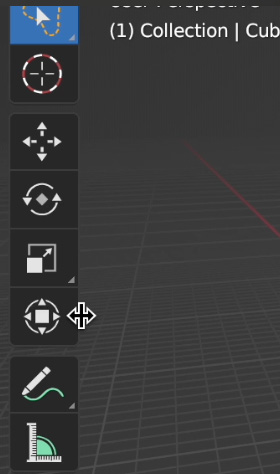
Figure 1.16 – Expanding the toolbar
Now click and drag toward the viewport. Once the toolbar is wide enough, you’ll see the tool names, as shown in Figure 1.17:
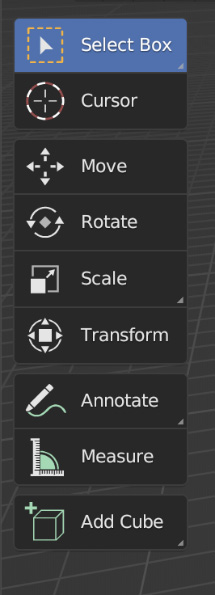
Figure 1.17 – The toolbar
You’ll notice the top tool is selected by default. This is the Select tool. By default, it’s in Select Box mode, but you can press W to toggle through all the different Select tools:
- Tweak, which lets you click and drag objects
- Box, which is the default (leave it on this mode for this book)
- Circle, which gives you a circle “brush” to select with
- Lasso, which gives you a Photoshop-like lasso tool
If, during the course of this book, you find that you’re not able to select objects as you expect, it’s likely that you ended up with the wrong Select tool by accident. Just press W to cycle through each tool and get back to the default Select Box.
Walk Navigation
There’s another, less common way to navigate the viewport in Blender. You can walk around in it using the arrow keys, similar to how you would navigate a video game.
To activate it, go to View | Navigation and click Walk Navigation to enter walk mode. Use the arrow keys to move around and the mouse to steer. There are a lot of other options—look in the Status bar at the bottom of the window to see them all.
It’s a little annoying to go through all those menus every time you want to use Walk Navigation, though.
Here’s how you can set your own shortcu:
- Go to View | Navigation and right-click on Walk Navigation.
- Click Assign Shortcut.
- Press Shift + F on your keyboard to set it as the shortcut. I picked Shift + F because it doesn’t already do anything.
Now you can turn on Walk Navigation simply with the push of a button!
If you get lost
When you’re working in the 3D Viewport, you might pan or zoom too far in one direction—and get lost.
If you ever do get lost in the viewport, here’s how to un-lose yourself:
- Select any object in Outliner by clicking on it.
- Press the ~ key to open the View menu. The View menu is a pie menu—these menus are super-easy to operate. Just move your mouse toward the option you want and then click! In this case, choose the View Selected option:
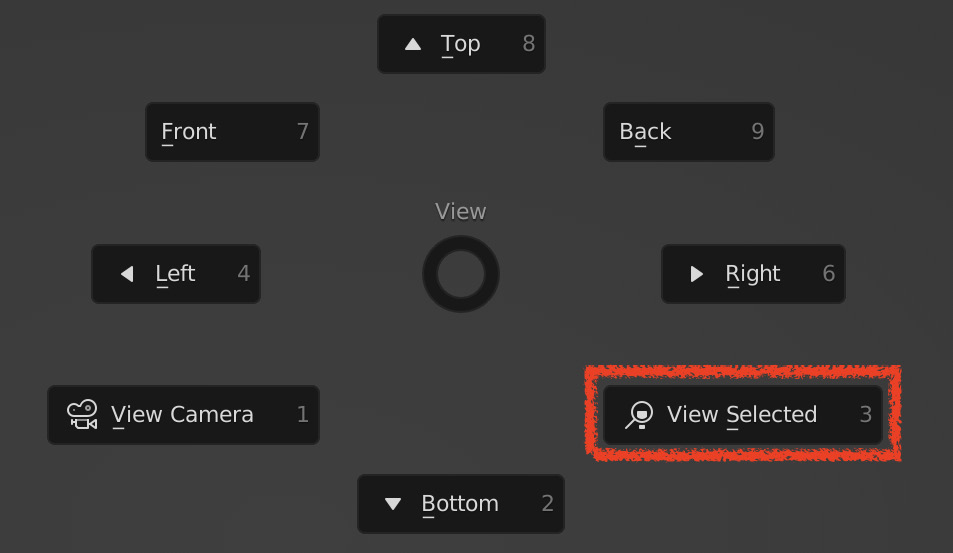
Figure 1.18 – The View pie menu
This will center the view around the object you have selected. This is a really good way to navigate the viewport—and it also works well for finding something you’ve misplaced!
You don’t have to use the mouse to select options in the menu—you can also use the number keys. You’ll notice that each option in the View pie menu has a small number next to it—pressing that number will select that option.
So, to select the View Selected option, you can press ~ then 3—no mouse needed!
Now you have the ability to re-center the view on any selected object, no matter where you currently are in the 3D Viewport. This is an incredibly helpful technique, especially in larger Scenes.
In the next section, we’ll explain those mysterious tabs across the top of the window.
Understanding Workspaces
The tabs across the top of the Blender window (Layout, Modeling, Sculpting, and so on) are called Workspaces:

Figure 1.19 – Some Workspace tabs
Workspaces are just different sets of areas, configured for different tasks. For example, the Layout Workspace (the one we’re in currently) is set up for general Blender work.
Click through the different kinds of Workspaces and have a look!
Any Workspace can do anything
It’s important to understand that the Workspaces are only a convenience—and that any Workspace can quickly be configured to perform any task.
For example, switch to the Shading Workspace. You’ll see a bunch of stuff that you won’t recognize. But, just like the Layout Workspace, it’s all made up of areas. You can easily change the Editor Type of any of them, join them, and add new ones.
You could reconfigure this Workspace to look exactly like the Layout Workspace if you wanted. Workspaces are very useful, though. They save a lot of time by having things set up and ready to go.
But what if you want a different Workspace? Here’s how you can add your own Workspace.
Making your own Workspace
You can make your own Workspace if you want. There are two ways to do it: you can either change an existing one or add a new one. Changing an existing one is easy—just click a Workspace to switch to it, then double-click the name to edit it and name it whatever you want. Now rearrange all of the areas however you like—and you have your own Workspace!
To add a new Workspace, just click the + button at the end of the top bar (you may have to scroll to the side a bit before you can see it) and choose the Workspace you’d like to add (you can also choose to duplicate the current one). Once you have a new Workspace, you can rename and edit it just like any other.
Making your own Workspace is a great way to save yourself the trouble of continuously rearranging areas. However, any changes you make to the workspaces are file-specific. This means that if you open a new file, you won’t have any of the Workspaces that you renamed or created.
The next section will explain how to set up your own default Startup file.
Saving your own Startup file
This is something you won’t need to do for a while, but when you do need it, here it is. One day, you’ll get fearfully tired of setting up Blender just how you like it every single time you open a new file.
When that happens, you need to set up your own Startup file. A Startup file is like a new set of default settings, so when you open Blender, your new file will be a copy of the Startup file you’ve made.
Here’s how to set up your Startup file:
- Open a new Blender file.
- Press Ctrl + S and save it somewhere.
- Now, change stuff. Set it up exactly the way you want.
- Press Ctrl + S again to make sure your file is saved.
- Go to File | Defaults | Save Startup File:
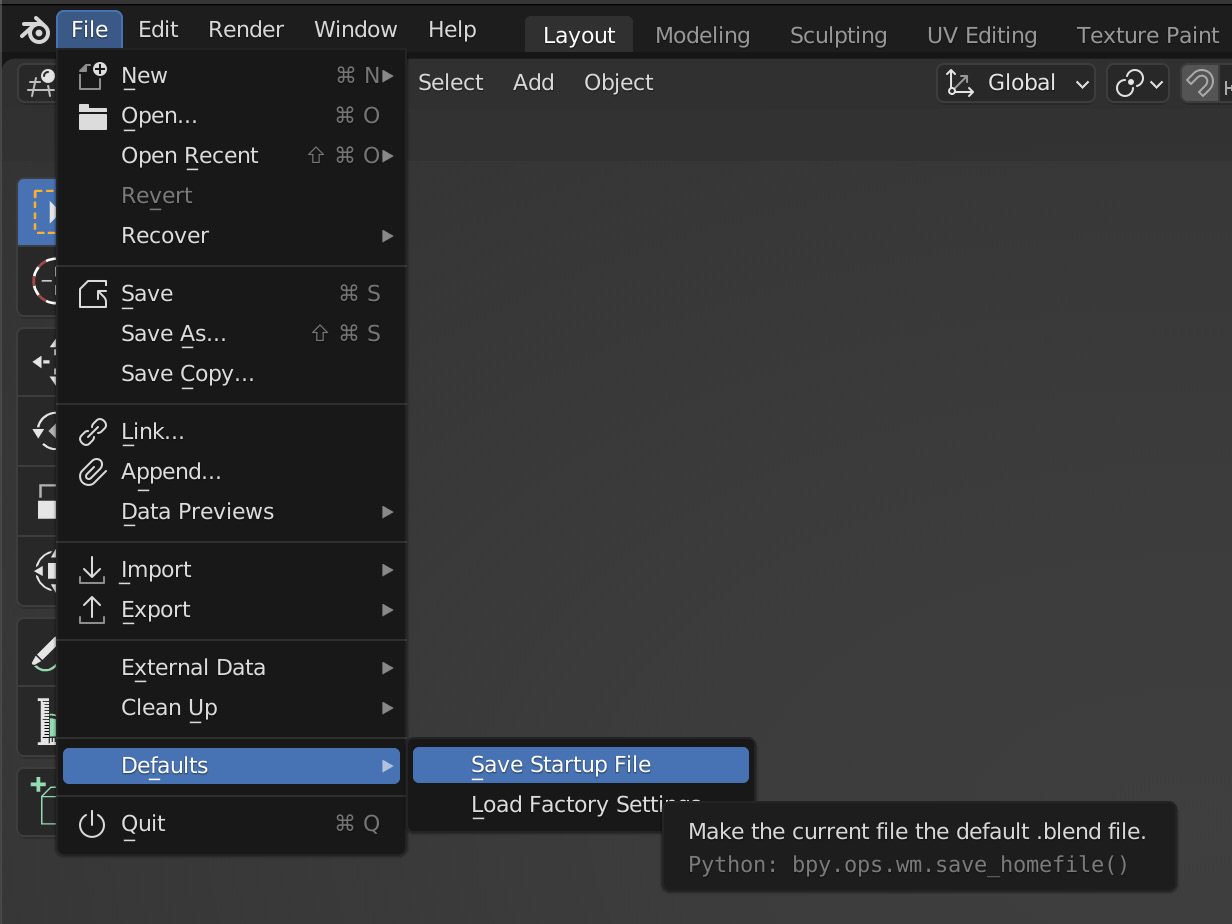
Figure 1.20 – The Save Startup File menu
You’ve got your own default settings now! If you ever want to change them, simply open your Startup file, change the settings, and press Save Startup File again.
If you ever want the default settings back, go to File | Defaults | Load Factory Settings to see the original setup again (and you can save that as the Startup file if you want).
Summary
In this chapter, you made it through all the boring stuff. You learned what the different parts of the UI are called and how to add, remove, and switch areas. You learned how to navigate in 3D and what to do if you get lost in the infinity of the viewport.
You learned what Workspaces are and how to make your own. You even learned how to make your own default settings with a Startup file! That’s a lot of stuff! If you only remember one thing from this chapter, remember how to navigate in 3D.
Great job making it through this chapter! In the next chapter, you’ll learn exactly what low-poly modeling is.
