This book is all about Audacity, an open source audio editing software. This means that the software is free to download, and you can use it to create items that are freely distributable. You'll learn all of the basics about creating audiocasts—or podcasts—that can be uploaded to the Web and shared with the world.
To start with, this chapter will discuss what audio editing software is, who typically uses it, how you can use it, and what computer operating systems it will work on. We'll also talk a bit about how Audacity is an open source project and what that means to you and your projects, as well as the differences between Audacity 1.2 and the latest version, in case there are a few readers who want to work with the upgrade.
Note
Don't worry if you're not familiar with audio terms, editing, or even recording your voice on anything other than a tape recorder. We'll go over some common audio editing terms that will get you in the know.
Also covered will be an overview of the Audacity software main screen, the main menu, main window, all of the toolbars, buttons and settings, as well as what a 'project' is in Audacity. We'll also get into some of the basic fundamentals to remember when setting up a project in Audacity. All of this will lay the foundation for your very first Audacity project of recording a podcast!
With the evolution of the Internet there has been a huge boom in personal websites, blogs, photo and music sharing sites, and things called podcasts. Podcasts are simple recordings of interviews, personal recollections, or entire skits, including entire entertainment "acts" that include background music and sound effects. What this change in the Internet culture has offered to the everyday person is the ability to jump into the world of audio recording. Audacity was created with this very basic need in mind.
Audacity is a simple audio editor and recorder. It can record live audio, help to convert tapes and records into digital recordings, and edit and mix a number of sound files together. What this means for you, is that you can use it to:
Create audiocasts or podcasts that can be uploaded to the Web and shared with others. Podcasts can be interviews with interesting people, simple narrations, or cute snippets of your children talking.
Record live events such as lectures and presentations. Of course, you need to have a laptop to bring along with you.
Move your old records and cassettes into the digital age and convert them to an MP3 digital audio file. With additional equipment (a cassette or record player with a line-out plug and cable), you can connect this equipment to your computer and use Audacity to make versions of your music that you can play on a digital music player like an iPod.
Edit most digital audio files, such as podcasts, to add in music, delete segments, remove unwanted noise, add in some audio effects. Audacity lets you work with audio files to make them better.
Record audio from YouTube. Have you ever wanted only the audio portion of a YouTube video? Well, now you can play the video directly from YouTube, but "strip" only the audio portion out for your own use.
Create a ringtone for your cell phone. Audacity lets you convert between audio formats. It supports Ogg Vorbis, MP3, WAV, and AIFF formats, and can convert between them.
It's also a great tool if you want to e-mail someone a simple audio message. Just plug in your headset, hit record, and start talking. You can have a personalized voice message that can be sent through e-mail!
Throughout this book we'll focus on one key project- creating a podcast. During this discussion there will definitely be pointers for recording events, editing audio files, and even exporting in different audio formats.
Audacity was developed by a group of volunteers under the GNU General Public License (GPL), and is open source, or free software. This not only means that it does not cost anything to download, but also that you can use the program, create items with it, and freely distribute these items, modify the program itself, and share your work with others.
You can download Audacity for:
Mac OS X
Microsoft Windows
GNU/Linux
Other operating systems
Let's briefly go over how to download and install Audacity.
The installation process for both of these operating systems is similar:
Go to the official Audacity website at http://audacity.sourceforge.net/ and download the appropriate version of the software for your computer.
Once the installation package has been downloaded to your computer, double-click on it to start the installation.
Find the Audacity icon (shown in the next image) in the Application or Programs folder, to open the program.

You can use Audacity with GNU/Linux operating systems (and other similar operating systems), but you should download the correct installation package for it. Currently, there are a number of distributions available for the following types of systems:
Alt Linux
Debian
Fedora Core
Fedora Project
Mandriva i586
OpenSUSE
Red Hat
SuSe and packman (suse)
Ubuntu (http://packages.ubuntu.com/ and http://www.rpmseek.com/)
You can download the installation packages for these and others from the Audacity Linux or Unix web page, at http://audacity.sourceforge.net/download/.
Note
In this book, the screenshots are specific to the Mac OS X software. However, don't be concerned if this is not your computer operating system of choice. The software itself is very similar between operating systems, and any notable differences between the Audacity software screens for different operating systems, are noted, so you know what to look for.
In the interest of saving you some time, there are some things that Audacity can't do in comparison to more specialized audio editing software. Audacity:
Can't play or record files in the MIDI audio file format.
Doesn't natively play or export audio in propriety or restricted file audio formats, such as WMA or AAC. Additional plug-ins must be installed to do this.
Has less plug-ins and effects than a specialized Digital Audio Workstation (DAW).
Can't apply sound effects in realtime. This means that you have to record the track and then apply sound effects to the track.
Isn't a specialized audio editing software package, so there are some limitations on multi-track editing and mixing features.
Audacity 1.3 offers a lot more than its predecessor, 1.2. It has some new features, which include faster equalization and noise removal tools, a new "mixer board" view with per-track volume meters, and a fullscreen view, and in addition, some basic audio information (mute, solo, gain, and track height) is now saved when you save a project.
We'll focus on Audacity version 1.3.10 in this book, including detailed keyboard shortcuts in Appendix A, Toolbar, Menu, and Keyboard Shortcut Reference, and the additional features afforded by the latest release.
As with any new tool, there is often some terminology that comes along with understanding how it works. For Audacity, there are audio recording and editing terms that will come in handy when learning how to use the software. Some basic terms are:
Project— when you open Audacity, you will open or create a new project. This includes all of the files, timing, and information on how you combined and edited different pieces of audio into your file or project. This term isn't specific to audio editing, but to software that combines pieces of different files into a single file in order to create a final output.
Clip—is a short segment of audio. It can be combined with others to make an audio track.
Library— a collection of audio files or tracks. These can be grouped according to the content of the audio files (like a music library) or just by the location of where they are stored.
Effect— there are two types of effects: generator and processing. Generator effects artificially create sounds using your audio track (or add it in). Processing effects work with the existing audio and edit or change it for a desired result.
Noise— is sound of any kind, especially unintelligible or dissonant sound, that interferes with the main audio that you want heard in a track. Or simply put, it is any sound that you don't want in the audio track.
Bit or Sample Rates— the number of computer bits that are conveyed or processed per unit of time. This is normally expressed in kilobits per second (kbps). A higher bit or sample rate means that your track was recorded in better quality.
Export— the process of saving the audio in another format other than the format of the program that you created it in, usually so that you can play it or use it on another device or computer program. Typically, for audio, you will export files in a WAV or MP3 format.
WAV, AIFF, MP3— these are all audio file types. This means that when you export an audio track from Audacity, it can be any of these formats, or you can simply do a Save As, to save it in the Audacity format of AUP. However, then only Audacity will be able to open the AUP file to listen to its contents.
As we start using Audacity and create a project, more terms will be added and explained as we move through each step. We'll be sure to call out any new terms so you can add them to your memory banks; we also collect them all in Appendix B, Glossary of Terms for easy reference.
No matter what operating system you use on your computer, all you need to do is find the Audacity program and open it, just as you would with any other software on your computer. The Audacity main window opens with an empty project window. This will look something like the next screenshot:
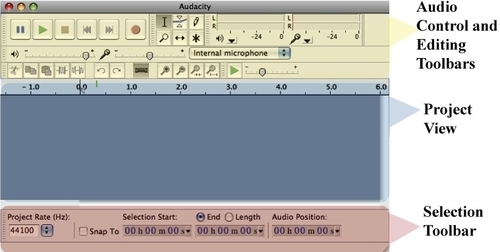
Don't be overwhelmed by this screen. Sure, there are a lot of icons and terms that might not be familiar, but we're going to review each element and how it is used. And as we begin our own sample recording session, we'll again review the icons and their use.
There are three main areas on this screen, as discussed in the following sections.
The top portion, which includes audio controls and the many editing toolbars. These are the buttons and tools that you will use to edit and manipulate your recorded audio tracks.
The middle portion of the screen is the project view. This area will look very different when a project is open, as the timeline won't be empty. In this case it will show a digital representation of the audio that you recorded, along with some more settings that you can adjust.
Just below the project view is the settings tool bar, which displays the frequency and bit rate information, and more timeline information, which we will cover as we start working on our sample project. But let's first discuss the main menu, and each of the toolbars on the screen.
The main menu bar contains basic functionality for Audacity. You can open and save projects, add or hide toolbars in the main window, set preferences, as well as open the program Help file. This menu bar gives access to the entire program, even if you don't have all of the toolbars viewable.

Note
The main menu appears a bit differently when using different operating systems. When using Audacity on the Windows or Linux operating systems, the main menu is seen on top of the program window. With the Macintosh operating system, it is along the top bar of the computer screen.
When we begin our sample project, you'll see the most common uses of this main menu—for opening and saving Audacity project files.
You'll notice that on the main screen there are a number of toolbars, each with their unique icons and uses. Each of the described toolbars are displayed automatically when you first open Audacity, but the screen can also be customized for your own use by hiding some of these toolbars from the main screen. But first, let's just review each toolbar and it's constituent items at a high level, so that you can become familiar with Audacity and it's simple interface.
Most prominent on the screen is the Control Toolbar. This should look very familiar, in that it contains common icons that are used for any audio device: Play, Pause, Record, Skip to Start, Skip to End, and Stop. These are the basic controls for recording and playing back the sound that you record using Audacity.

In fact, if you are anxious to try the software out, let's learn a bit about the Mixer Toolbar, in order to perform a simple set up and sample recording.
The Mixer Toolbar is all about setting the volume and choosing the recording device. On the left-hand side (the speaker icon), you can adjust the input volume levels. In the middle, to the right of the microphone icon, you can adjust the volume of the output that you'd like your audio track to have.
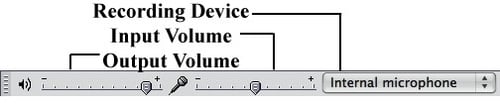
On the right-hand side, you can choose the device that you'd like to use to make the recording. As you can see in the previous screenshot, we use an internal microphone (the one that is pre-installed on the computer that we are using), but you could also choose to use an external microphone or other recording device as the input.
Changing any of these settings is as simple as using your mouse to adjust the volumes, or clicking on the drop-down box to change the recording device. If you want a specific value for your volumes, you can also double-click on the volume scale to open a window where you can enter a specific audio level value.
Ready to try out the software? Then go back to the Control Toolbar and click on the Record button. Start speaking into your computer's internal microphone (that is, if you computer or laptop has one! If not, connect a microphone to the USB or input port). Click on the Stop button when you are finished. You've just completed your first test recording session! It's as simple as that to record voice tracks. Click on the Play button to review your first composition!
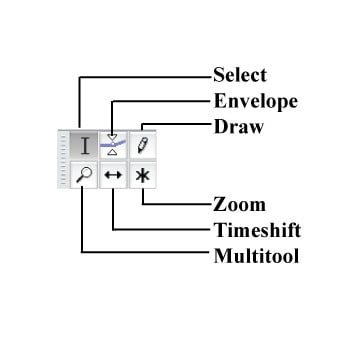
The Tools Toolbar gives you some control options in the recorded audio's timeline. It is not as complicated as it sounds. When you record some audio, the digital translation of that appears in the project view portion of the Audacity screen. Then select one of these tools and you are able to manipulate the recorded audio track. You can select specific sections of the audio track, zoom into the details to delete any unwanted noise, fade in and out at the beginning or end of tracks, shift audio clips on the timeline (which is particularly important if you are adding an introduction or exit), and work to select and replicate certain sounds.
Let's give it a try. Use the Selection Tool  to "highlight" a portion of the test track that you
sampled when you first opened the program, as seen in the next screenshot:
to "highlight" a portion of the test track that you
sampled when you first opened the program, as seen in the next screenshot:
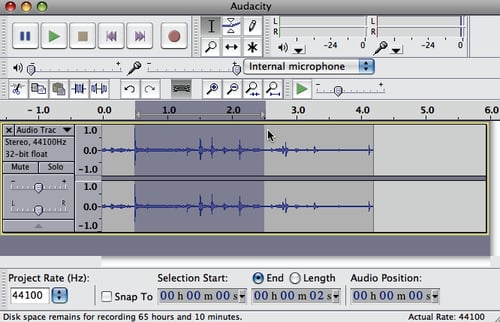
All you need to do is use your mouse to activate the Selection Tool, and then click-and-drag the mouse across the timeline, releasing the mouse button when you want to stop selecting. The "selected" portion of the audio track will appear in a darker shade of gray, as seen in the previous screenshot. Try it a few times to get a feel of how you make selections.
You use selections to make changes to only a specific portion of the audio track. For example, if you wanted what you selected here to be louder than the rest of the track, keep this portion selected, and then go to the main menu and select Effect and then Amplify. You'll see the audio waves in that area increase, indicating that the volume of this portion is now much higher.
Let's also give one of the other edit tools a try. Select the Zoom Tool, and drag your mouse over the area and click on it. The timeline intervals decrease to show you even more detail of the audio waves that were recorded.
You can also select any of the other tools and perform the same action (clicking on the audio track).
Simply put, the Meter Toolbar displays the mono or stereo channels of your audio track. As an example, when recording a song, different instruments are placed in different channels. So in this example, there are mono (1) or stereo (2) channels in which we can record audio for our tracks.
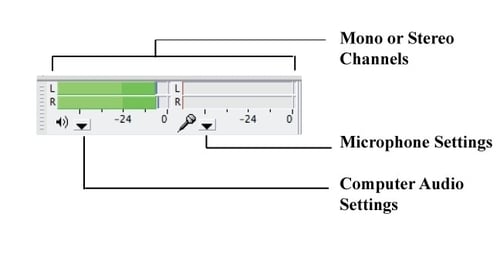
You can select preferences, and even disable certain inputs, by clicking on the down arrow icons near the microphone or speaker settings. However, the inputs (and outputs) listed in these fields are dependent on what hardware or peripheral items you have connected and installed on your computer. Feel free to take a look at what settings are available here.
This toolbar also displays input levels. The green bars move during recording or playback, to show the volume levels. So they move higher (to the right) when the recording or playback is louder. Peaks in the volume, or the highest volume reached when recording are also indicated here, by a small line. This can be useful when editing later, if you see a peak point, but if most of the volume levels are below that point throughout the rest of the track, then you might need to normalize the entire audio track.
Probably the most useful toolbar is the Edit Toolbar. This will be one of the most used toolbars when we work through our sample project.
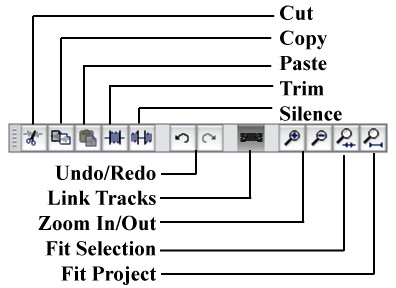
Once a track has been recorded and is displayed in the project window, the items on this toolbar become active. You can cut pieces out of the audio tracks, paste new items in, trim, link, and silence any unwanted noise. This toolbar also lets you undo your last editing option, zoom into a certain area of the recorded track, and adjust the viewing window so that it works with your preferences. You can even fit the audio tracks to your window size.
For example, with your test recording, use the Selection Tool from the Tools Toolbar to select a small portion of the audio track. Then select Cut from the Edit menu. Did that portion of the track disappear? If so, select Undo, and you should see the selection re-appear in your audio timeline. You will see details on each of these items as we work through our sample project in this book.
A toolbar for more advanced editing features is the Transcription Toolbar. This toolbar helps you to speed up or slow down playback for the the selected audio in your timeline.
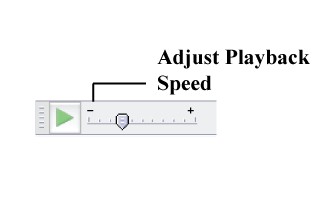
Using this toolbar is as easy as using the Selection Tool to highlight a portion of an audio track, and then using the scale to slow down (move the marker to the left) or speed up (move the marker to the right) the audio. Conveniently, you can also use the green Play button to play back the selected portion, to check if you have the correct playback speed.
Again, if you'd rather set a specific value for the playback speed, double-click the scale and a window is displayed that lets you you enter a number for the playback speed.
The Selection Toolbar is at the bottom of the Audacity main window—just below the project window. Its most common use is to set the Project Rate (commonly measured in Hertz). Technically, it measures the number of computer bits that are conveyed or processed per unit of time. The higher the sample rate, the better the quality of the recording. The sample rate used by audio CDs is 44100 Hz, and this is the default in Audacity and is by far the most common sample rate for most audio recordings.
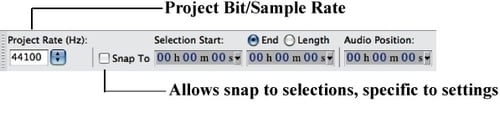
You can also use the Snap To feature, which allows you to have specific settings for when a new clip of audio starts. So, for example, if you wanted this audio track to align with some video content, then you can exactly match the visual frame timing with this audio. This is an advanced feature of the software, and can be adjusted for various time formats and settings.
When the Snap To box is checked, it is considered active, and the remaining fields also become active. You can choose a particular unit of measurement (in the example, the format is in hours : minutes : seconds), and the format is changed for all three display ranges at a time. You can choose between End and Length for the second field. Audio Position is shown in the third field, and shows the current cursor position, and also allows you to manually set it.
As you work more with Audacity and you need to do more precise audio editing, these Snap To fields will be important in creating a clean audio track.
To start working in Audacity, you must open a project. By default, when you open Audacity for the very first time, it is a new project—and the screen looks noticeably blank. But before we start jumping into the details of project creation, it is important to understand what a project is.
A project is not the end-product or output from Audacity. It is actually a working draft of all of the work that you have done on the collection of files that you imported and used in the creation of a final file.
Project files, when saved in Audacity, are AUP files. AUP is the default file format when you choose File and then Save Project from the main menu.
Note
A project encompasses all of the clips and files that you have already imported into Audacity, the timing, silencing, and other editing that you have spent time to create. All of this, is stored in a way that Audacity recognizes. So the next time you open your AUP project file, it's all there, just the way you saved it.
If you were now to save the test sample recording that you made at the very beginning of this chapter, by selecting File and then Save Project from the main menu, then you would be prompted for a file name, and would notice that the file will be saved as an AUP file. You could then reopen this file, edit it some more, fade in the sound, cut or trim the clip, and then save your changes. The next time you open this file, all of those edits would still be applied.
Whenever you work with Audacity, there are some rules that you should remember that will make your projects run a little bit more smoothly. These include:
There is one audio clip per track. Remember that a clip is simply a piece of audio that is imported, recorded, split, or duplicated from another track.
A track, on the other hand, is one continuous piece of audio (as shown in your timeline). This means that it can only carry one piece of audio at a time. You can add to an audio track by pasting audio into it, inserting silence, or cutting a piece away, but it will always be one continuous piece of audio.
Audacity always records to a new track. When you click on Record, this will always be a new audio track to work with. The new track will appear at the bottom of the project view. Sometimes you may need to resize the Audacity window, or scroll to the bottom-most audio track in order to see what was, or is being, recorded.
Audacity references the original audio until you actually perform an edit, cut, silence, or apply some sort of audio effect to it. But note that if you are ever unhappy with an edit, you can always undo (and then, if necessary, redo) all of the edits that you have made, even after you have saved your project.
To get the best sound, you need a good microphone. But let's keep this in perspective. It is your first time using Audacity and creating a podcast, right? So our project doesn't need to be professional in its quality of sound. Any microphone will do the trick, including any internal microphone that your computer may have. However, it is worth recommending some microphone options that will make editing and cleaning up the vocal tracks easier. For any future projects, you may want to upgrade your equipment—because a better microphone, sound card, and audio setup will record your audio with much less degradation up front. When you compress your recording to create an MP3, your recording will sound better, and will also require less of your time for post-production.
Generally, here's what you'll need:
A computer (or laptop) with a sound card
A microphone
A microphone stand, or something to secure the microphone while you are recording, may be useful, so that you can avoid any additional interference
The sound card allows your computer to record audio. There are hundreds of sound card varieties, some with many "lines in" for recording multiple items at once (say, if you're part of a band and want each instrument to have an individual microphone) or just one input. Others have microphones bundled with the product, and there are even a few that include additional useful software packages, including Audacity. Again, for our project, any sound card will do, as long as it has a line-in and is functional. For ongoing projects, you should research the best sound cards for the best recording quality, depending on what will best fit your needs.
For the microphone option, there are several different types to consider in the long run, depending on what you are recording, your other equipment, and the purpose that your audio track will serve. Your range of choices is as follows:
The most inexpensive option is to use your computer's internal microphone (if it has one). This is definitely enough to get you started on our sample project.
The next least-expensive option is a simple headset of the kind that are easily available in most big department stores, and are used commonly by computer gamers. The headphone portion uses your computer's sound card and lets you listen to stereo sound from music, games, movies, and more. The microphone, is usually incorporated into the headset, is often noise-canceling, and generally offers decent quality sound recording. With a headset, no microphone stand or other equipment is required to get started.

The next best choice is a dynamic microphone. They are durable, with few moving parts, and are ideal for someone who wants that little bit of extra quality when recording vocals. No additional power source is needed, but a microphone stand is recommended.

In addition to these basic options, there are several other varieties of microphones that vary in both price and the quality of sound that they record. However, many of these will require even more equipment to work effectively. Hence, sticking to the basics will get you through your project.
You should now be ready to get started! You've learned what audio editing software is, and about Audacity in particular, its capabilities, and what it can (and can't) do for your audio projects. We've also covered how to download the Audacity software, what operating systems it works on, and what version is best for you.
You've just begun the journey into audio editing with Audacity by skimming over some basic audio editing terms that will be useful. We even covered the basics of the Audacity main screen, the main menu, each toolbar, an overview of each button, field, and setting, and have learnt about Audacity projects. You were even able to test some of the buttons and menus, when recording a very simple test audio track. Also, we covered some basic pointers, or things to remember when working with Audacity (all the little details about how we can or can't manipulate an audio track) and a handful of equipment pointers. All this in an effort to give us a foundation for creating a simple podcast, which is coming up next!